Step 1: Log in to your pfSense router.
Step 2: Decide which gateway you would like to connect to, and obtain its hostname. You can find a list of all of our hostnames available on our network page or if you use a Static IP then use this.
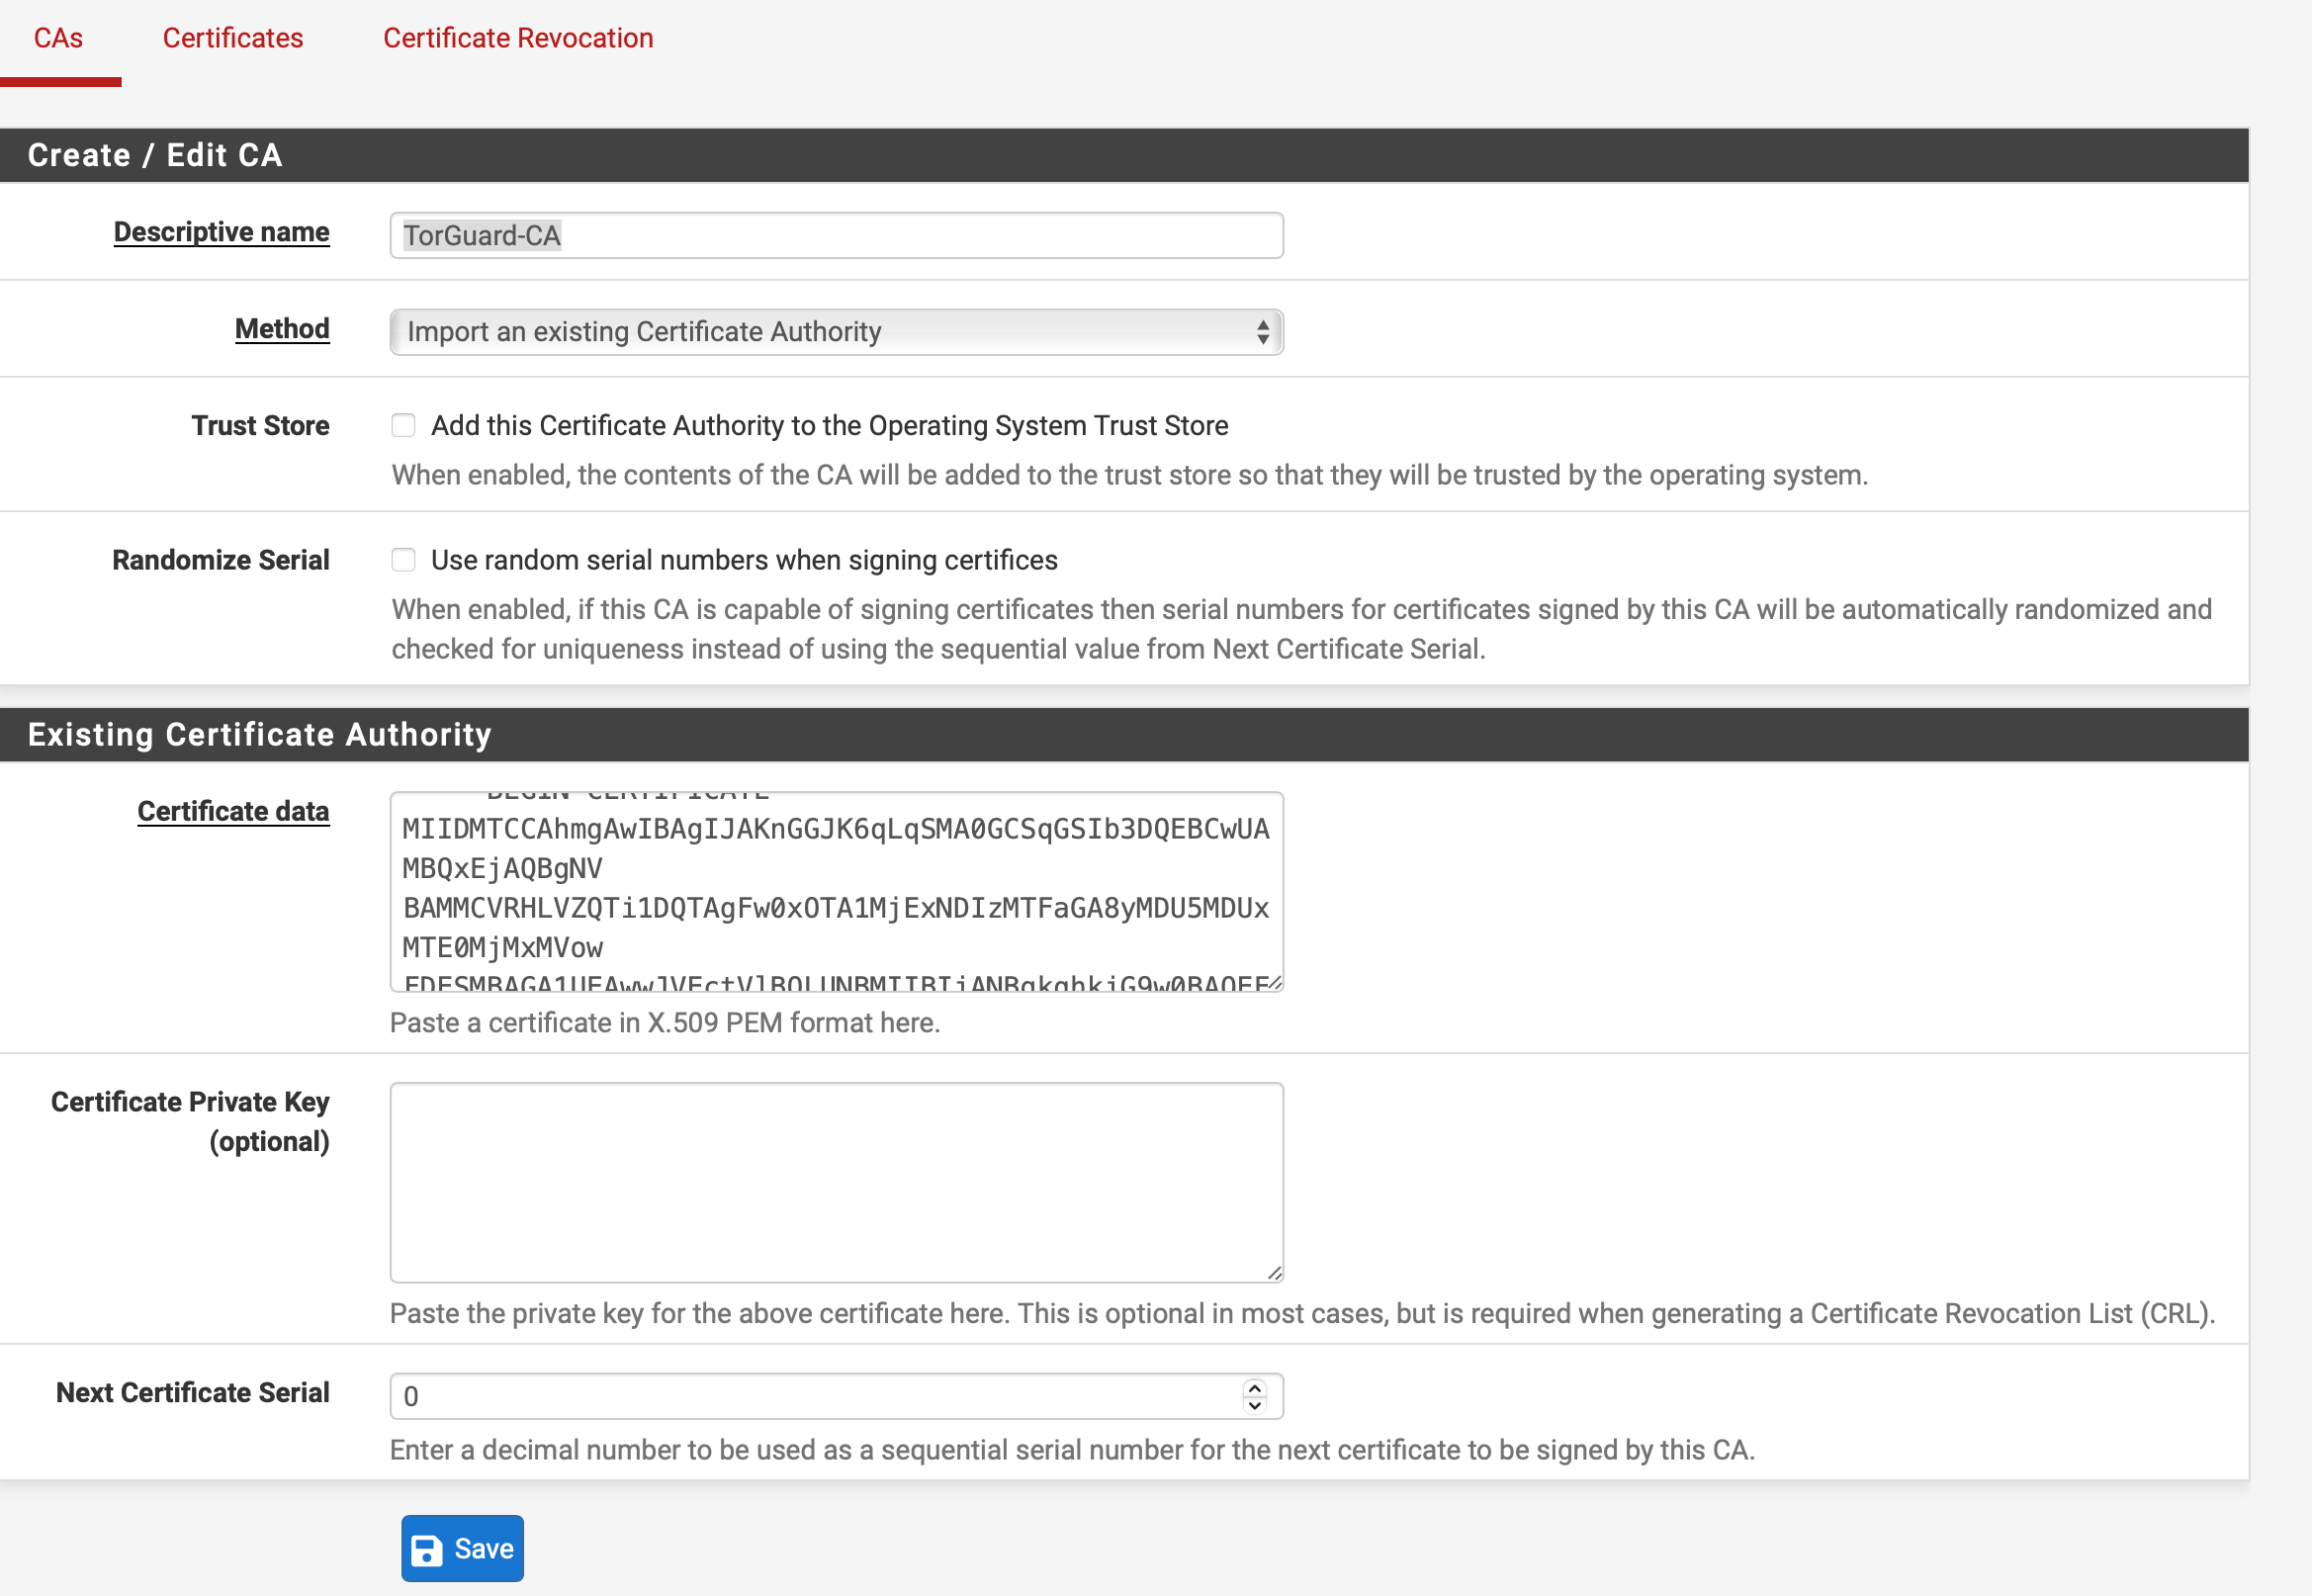
Step 3: Navigate to System>Cert Manager and select Add. Enter a name into the Descriptive name field, such as TorGuard-CA.
Set the Method as "Import an existing Certificate Authority".
Download the OpenVPN CA certificate from our certificate page here and open it in a text editor. Copy the entire contents of the file into the Certificate data field.
Then, press Save.
Step 5: Navigate to VPN>OpenVPN>Clients and select Add.
Enter the following settings under "General Information":
Disable this client: leave unchecked.
Server mode: Peer to Peer (SSL/TLS)
Protocol: TCP or UDP on IPv4 only - whichever works best for you.
Device mode: tun – Layer 3 Tunnel Mode
Interface: WAN
Local port: leave blank
Server host or address: The hostname for the region you picked out on our network page or your static IP.
Server port: 1912 - or any port available under our OpenVPN Ports page
Proxy host or address: Leave blank
Proxy port: Leave blank
Authentication method: None
Description: Whatever you would like to title your connection profile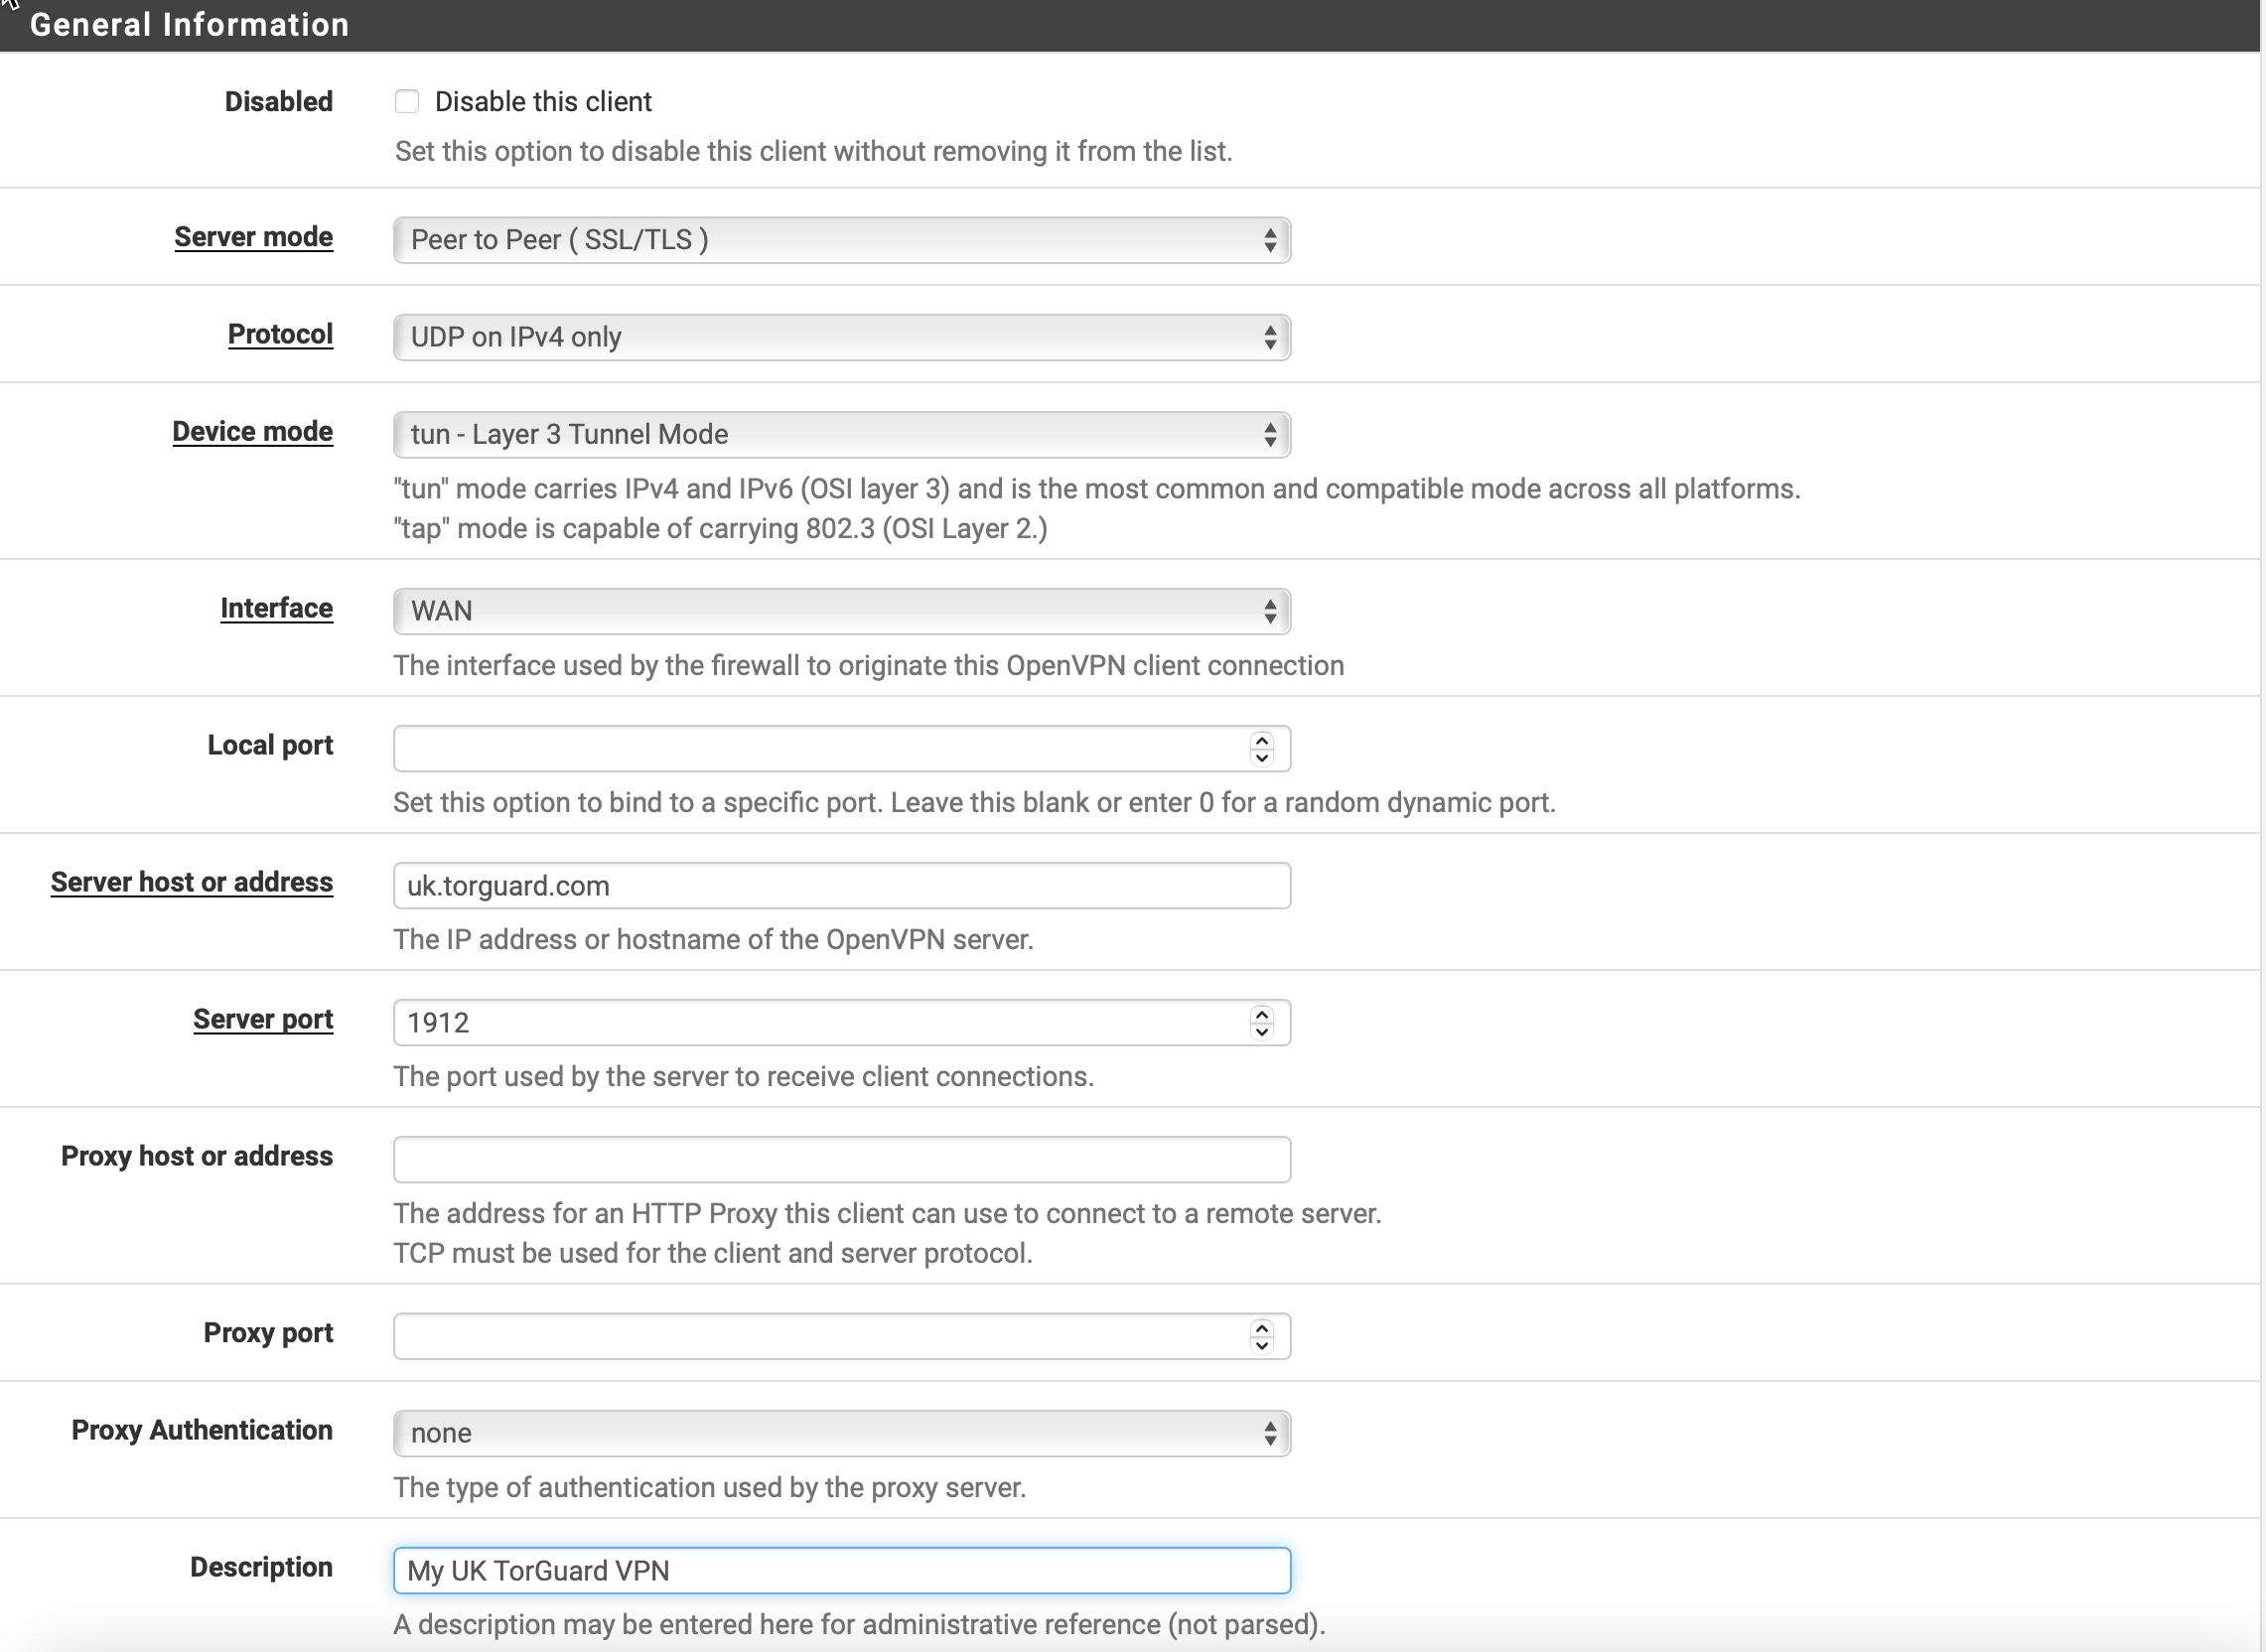
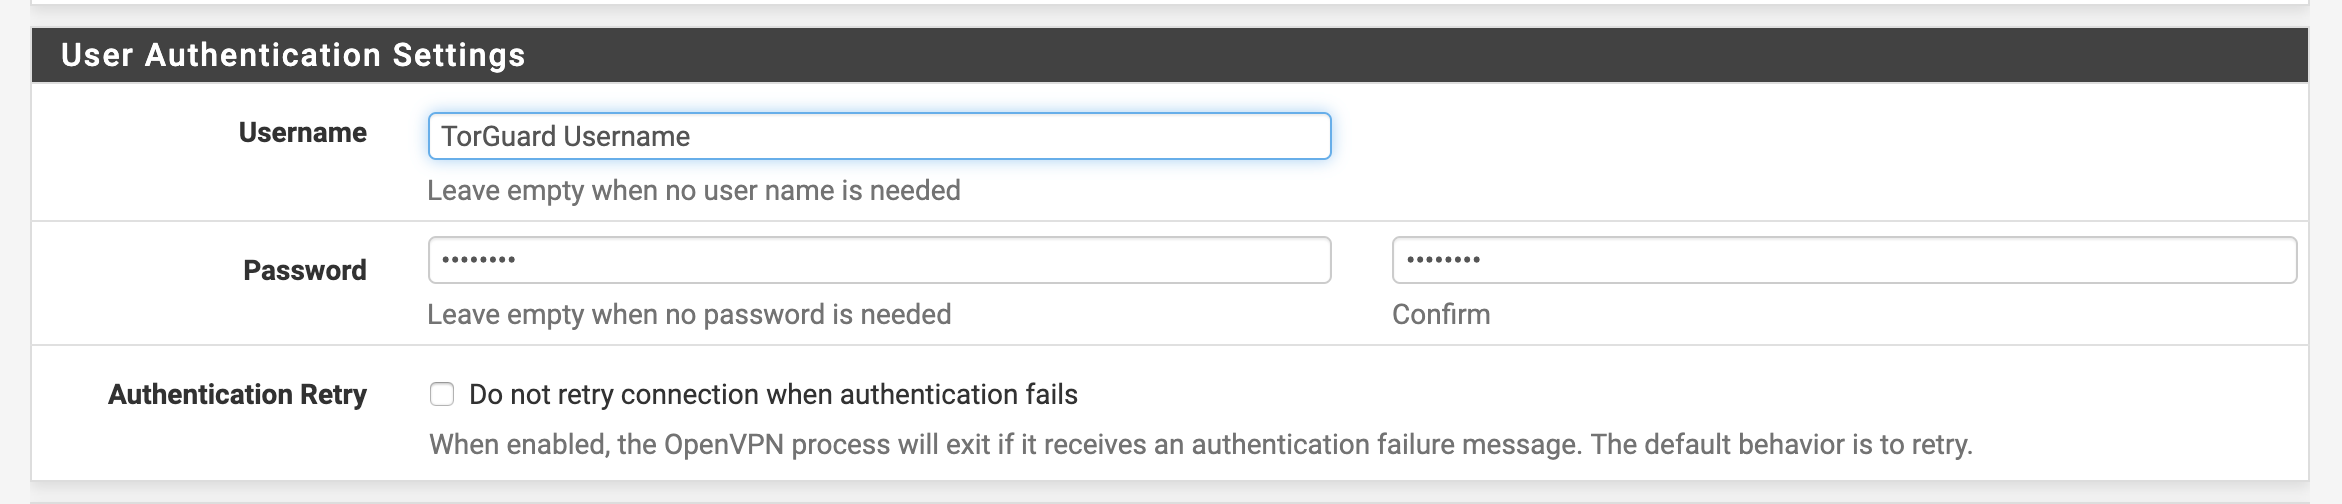
Enter the following settings under "User Authentication Settings":
Username: Enter your TG VPN Username
Password: Enter your TG VPN Password
Authentication Retry: Leave Unchecked.
Enter the following settings under "Cryptographic Settings":
TLS Configuration:: Checked
TLS-Key:: Uncheck to automatically generate one and enter the tls-auth key located here.
TLS Key Usage Mode:: TLS Authentication
TLS keydir direction:: Leave as the default
Data Encryption Negotiation: Checked
Peer Certificate Authority: TorGuard-CA
Peer Certificate Revocation list: Leave undefined
Client Certificate: None - Username/Password Required
Data Encryption Negotiation: Checked
Data Encryption Algorithms: The Allowed Data Encryption Algorithms should be prepopulated, click to remove the CHACHA20 for now.
Fallback Data Encryption Algorithm: Set to AES-128-GCM
Auth digest algorithm: SHA256
Hardware Crypto: No Hardware Crypto Acceleration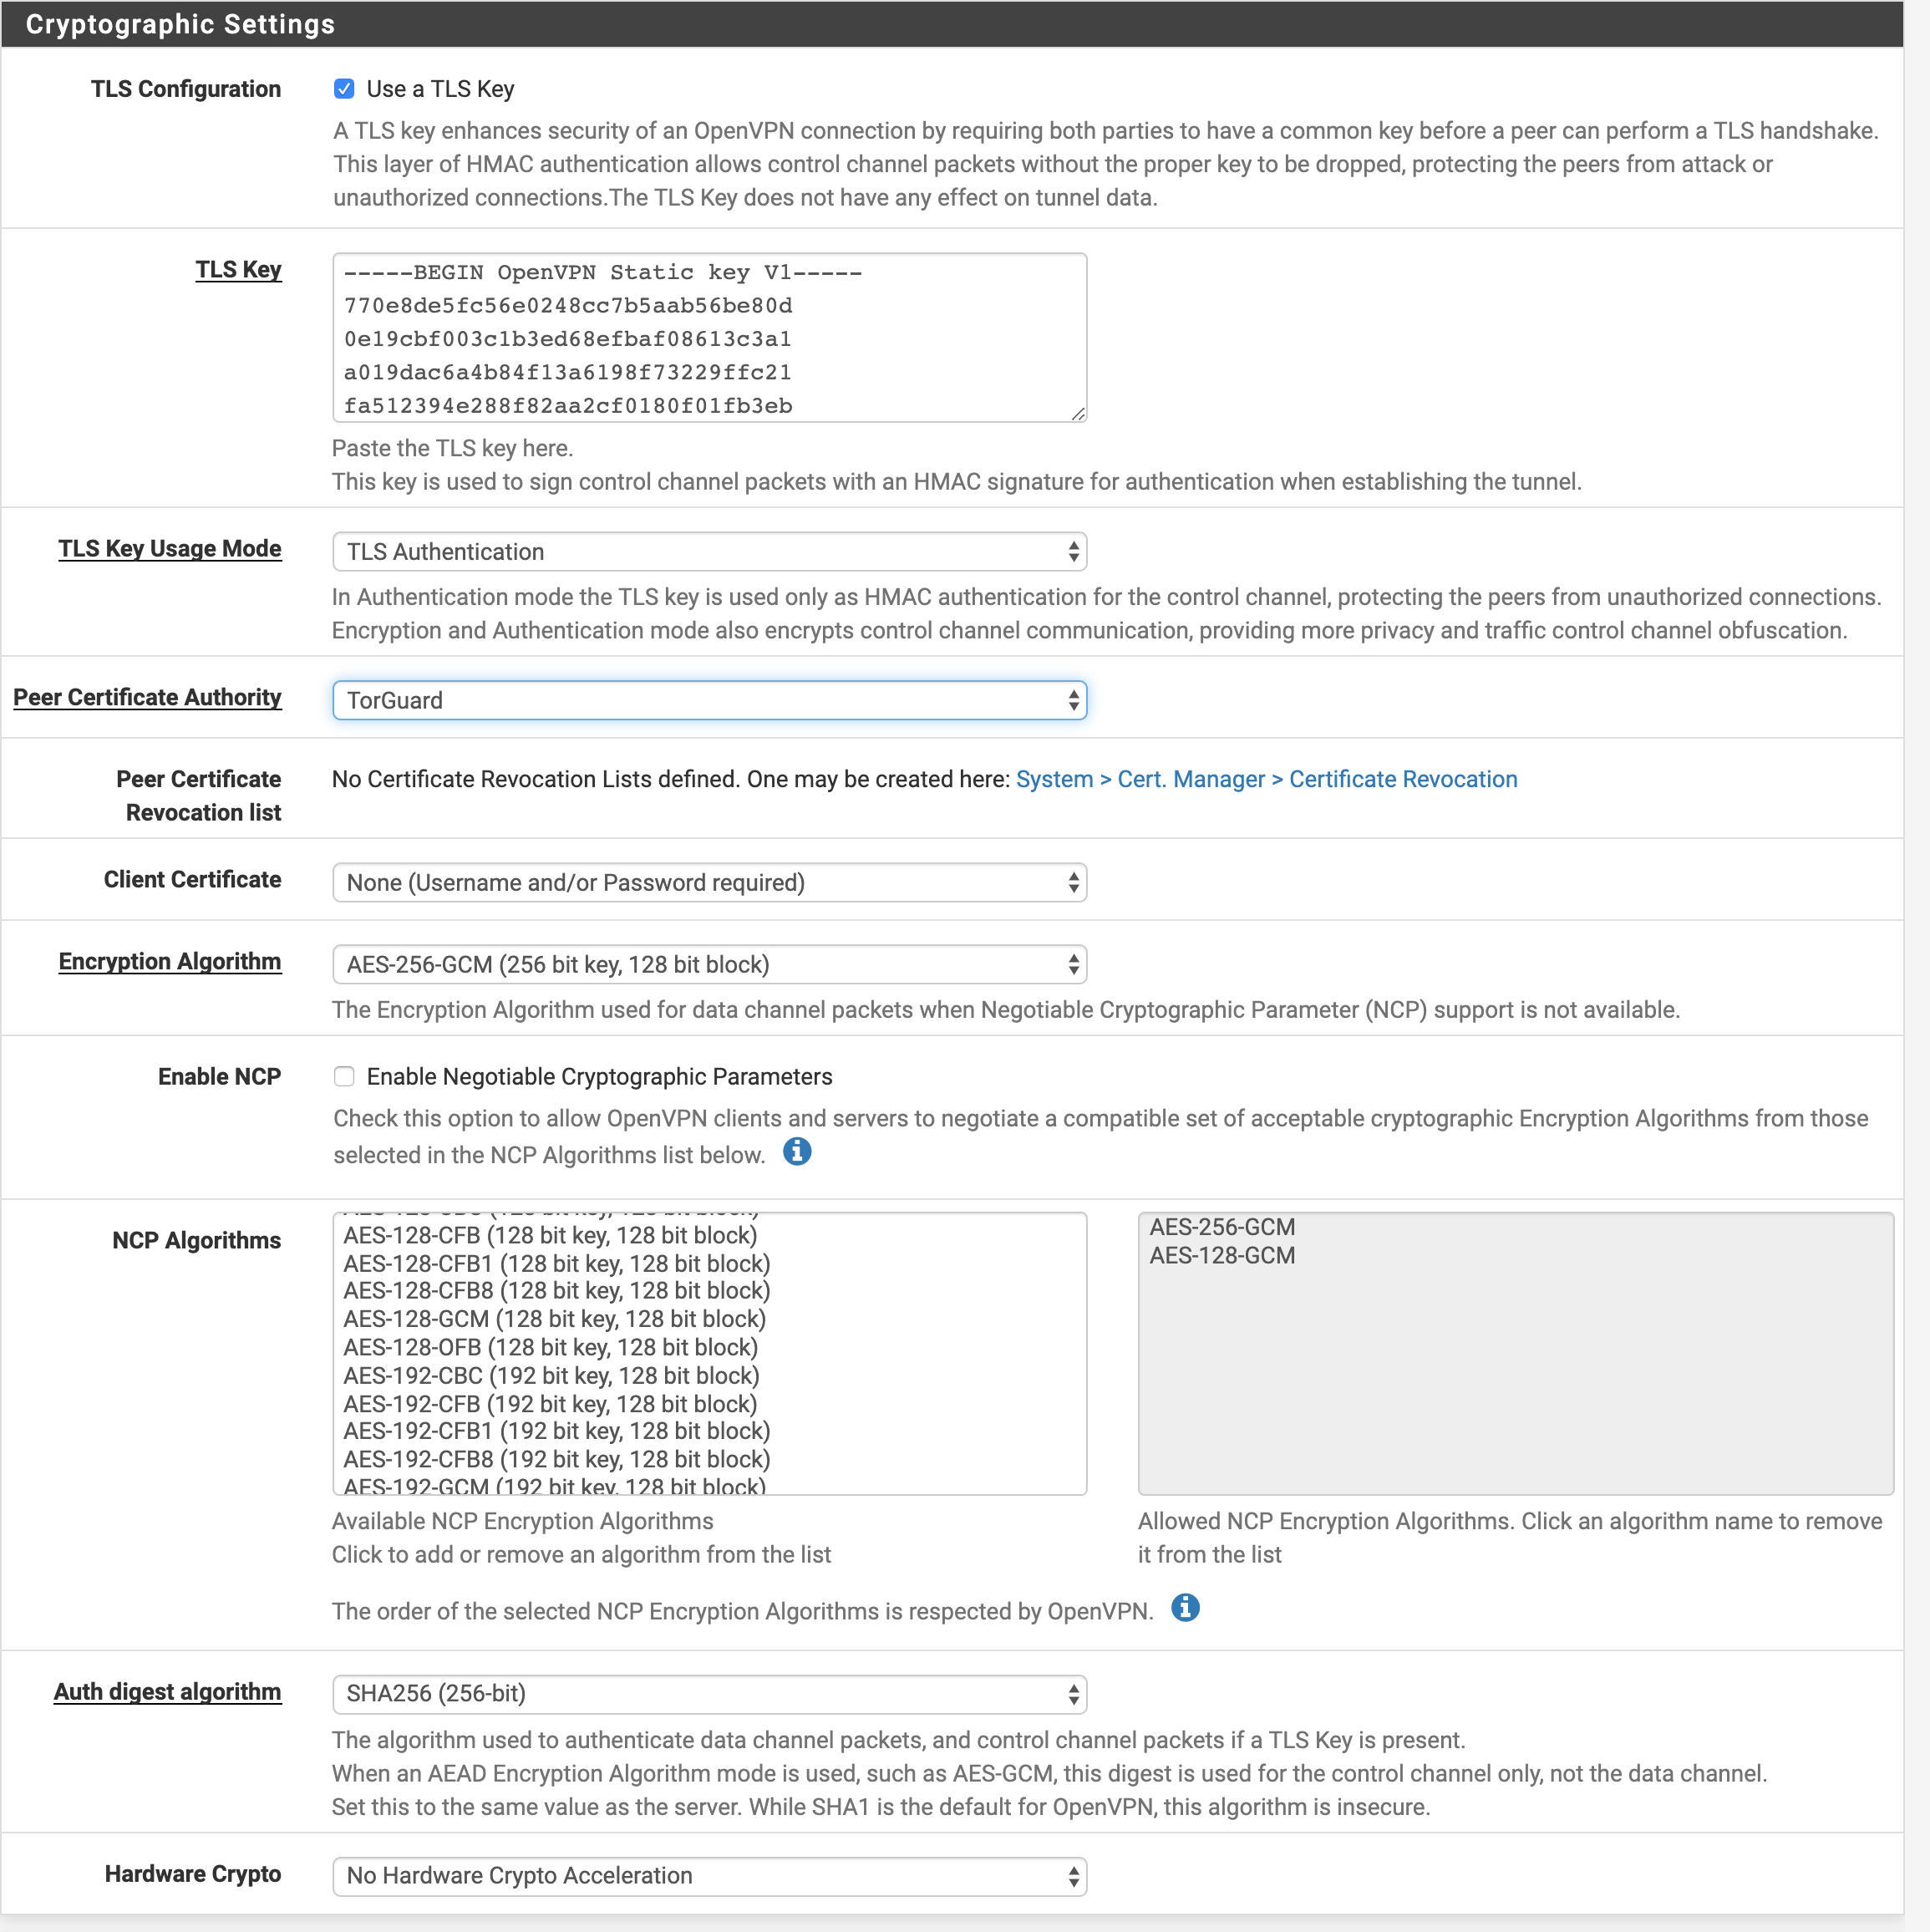
Enter the following settings under "Tunnel Settings":
IPv4 Tunnel Network: Leave blank
IPv6 Tunnel Network: Leave blank
IPv4 Remote network(s): Leave blank
IPv6 Remote network(s): Leave blank
Limit outgoing bandwidth: Leave blank
Allow Compression: Set to "Decompress Incoming, do not compress outgoing (Asymmetric)".
Compression: This menu pops up due to the above option, set this to
- For Pfsense versions below 2.7 -> "Disable Compression, retain compression packet framing (compress)"
- For Pfsense version 2.7+ -> "Disable Compression [Omit Preference]"
Topology: Subnet -- One IP address per client in a common subnet
Type-of-service: Unchecked
Don't pull routes: Unchecked
Don't add/remove routes: Unchecked
Pull DNS: Check to add server provided DNS 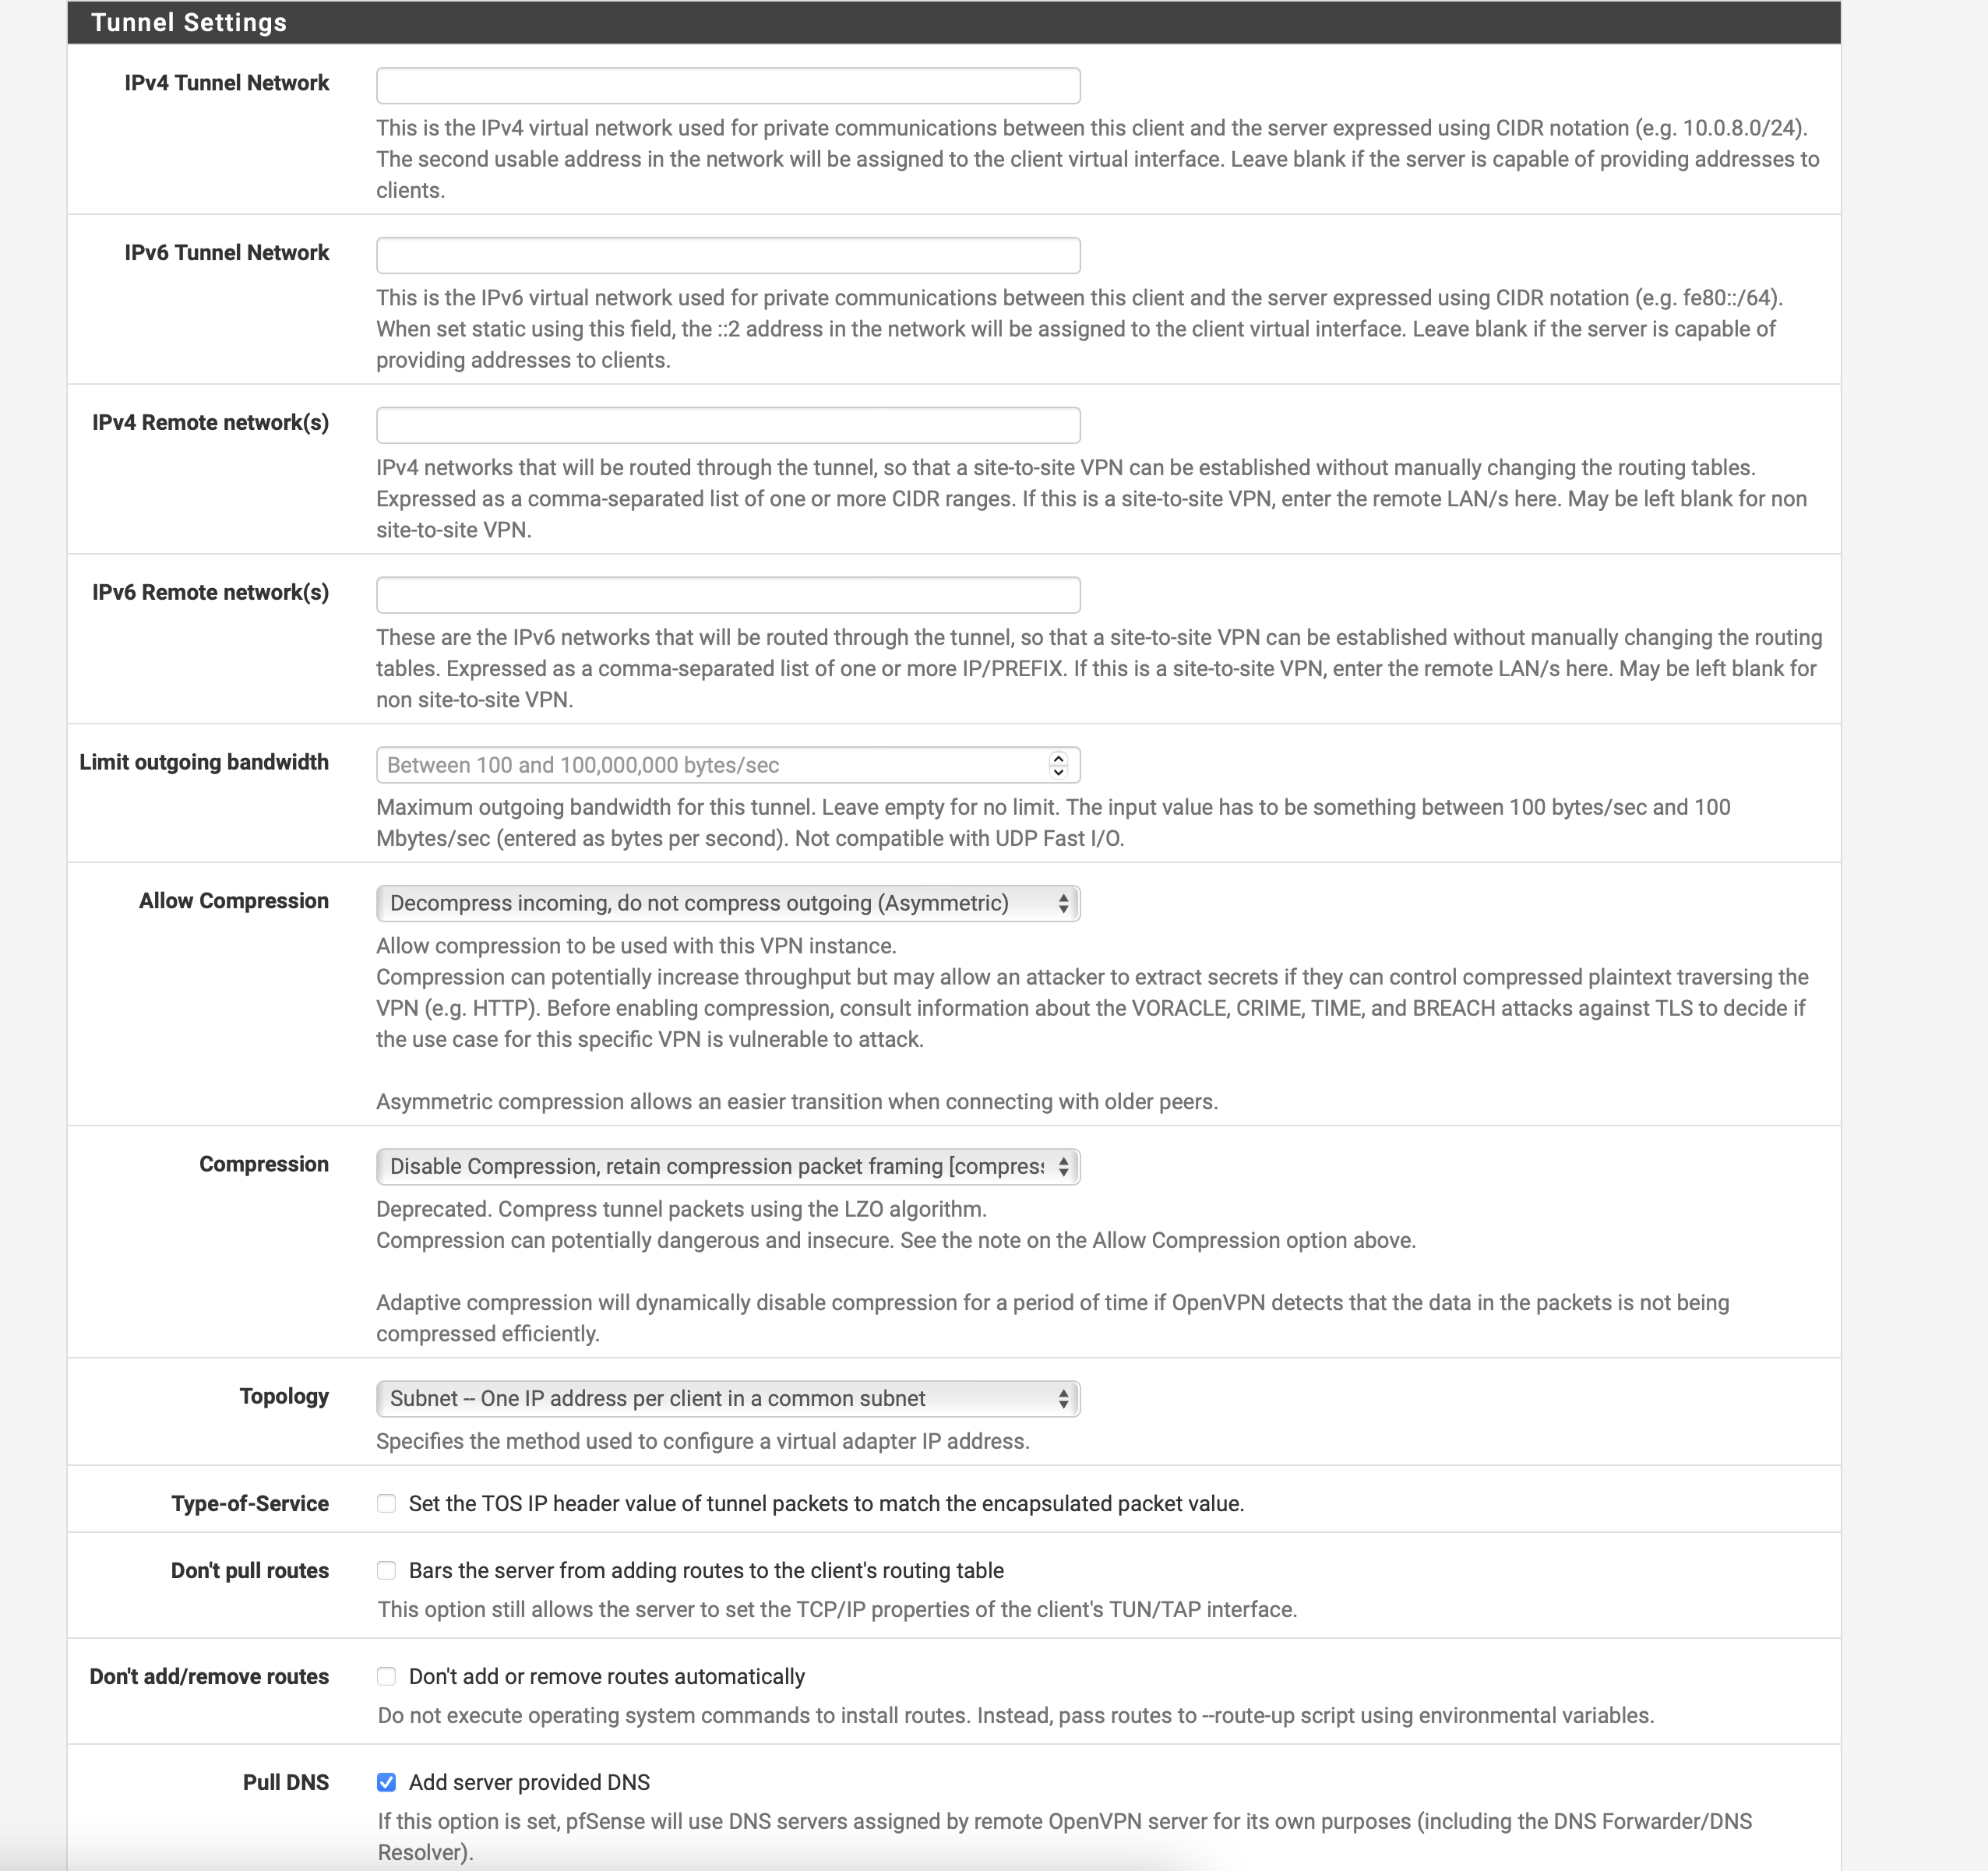
Compression Settings for pfsense 2.7+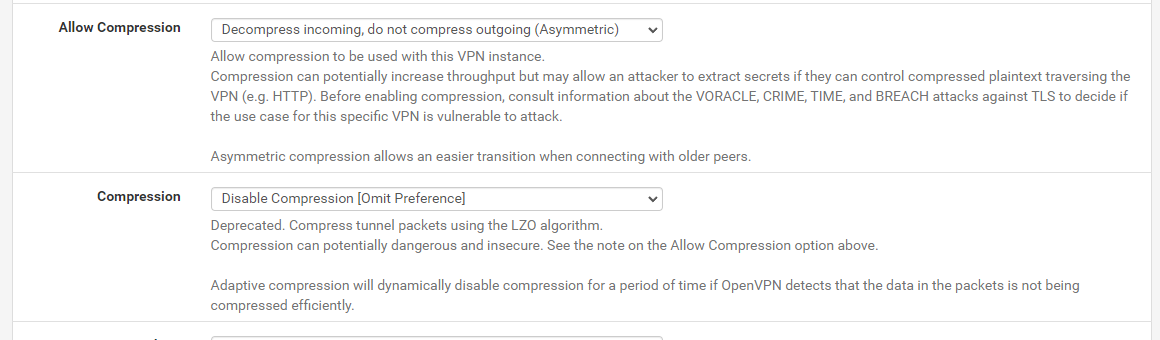
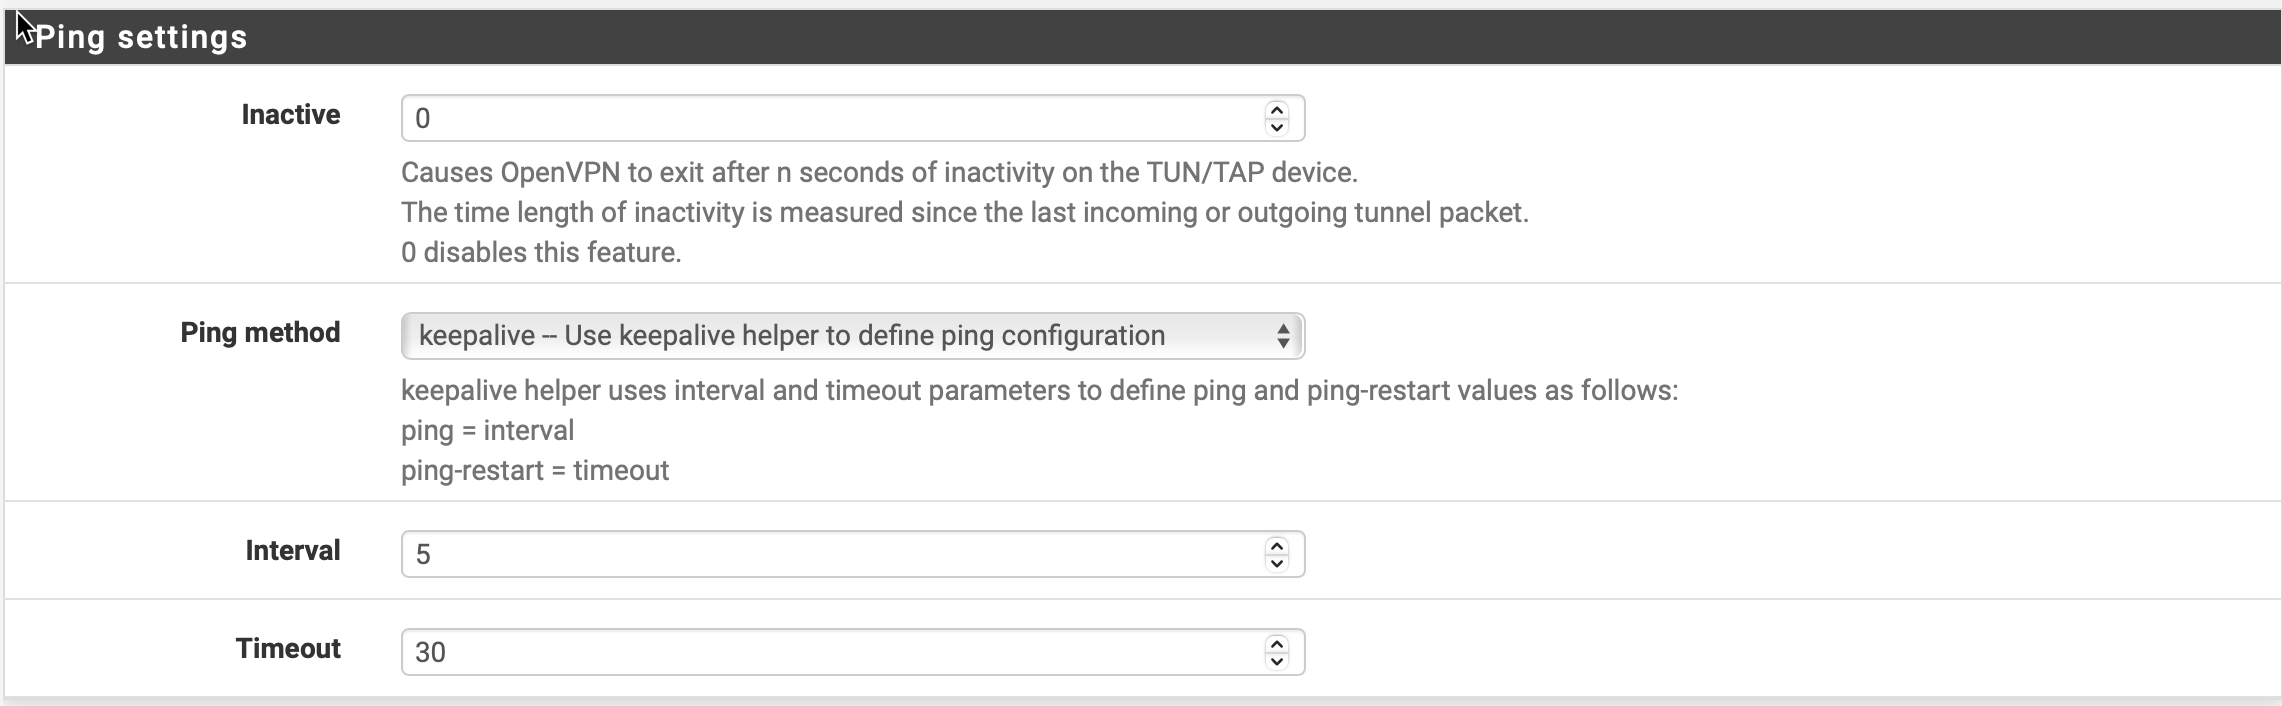
Enter the following settings under "Ping Settings":
Inactive: 0
Ping Method: Keepalive - Use Ping helper to define configuration
Interval: 5
Timeout: 30
Enter the following settings under "Advanced Configuration":
Custom options:
persist-key
persist-tun
remote-cert-tls server
reneg-sec 0
auth-retry interact
Exit Notify: Disabled
UDP Fast I/O: Unchecked
Send/Receive Buffer: Default
Gateway creation: IPv4 only
Verbosity level: Default
Then, click Save.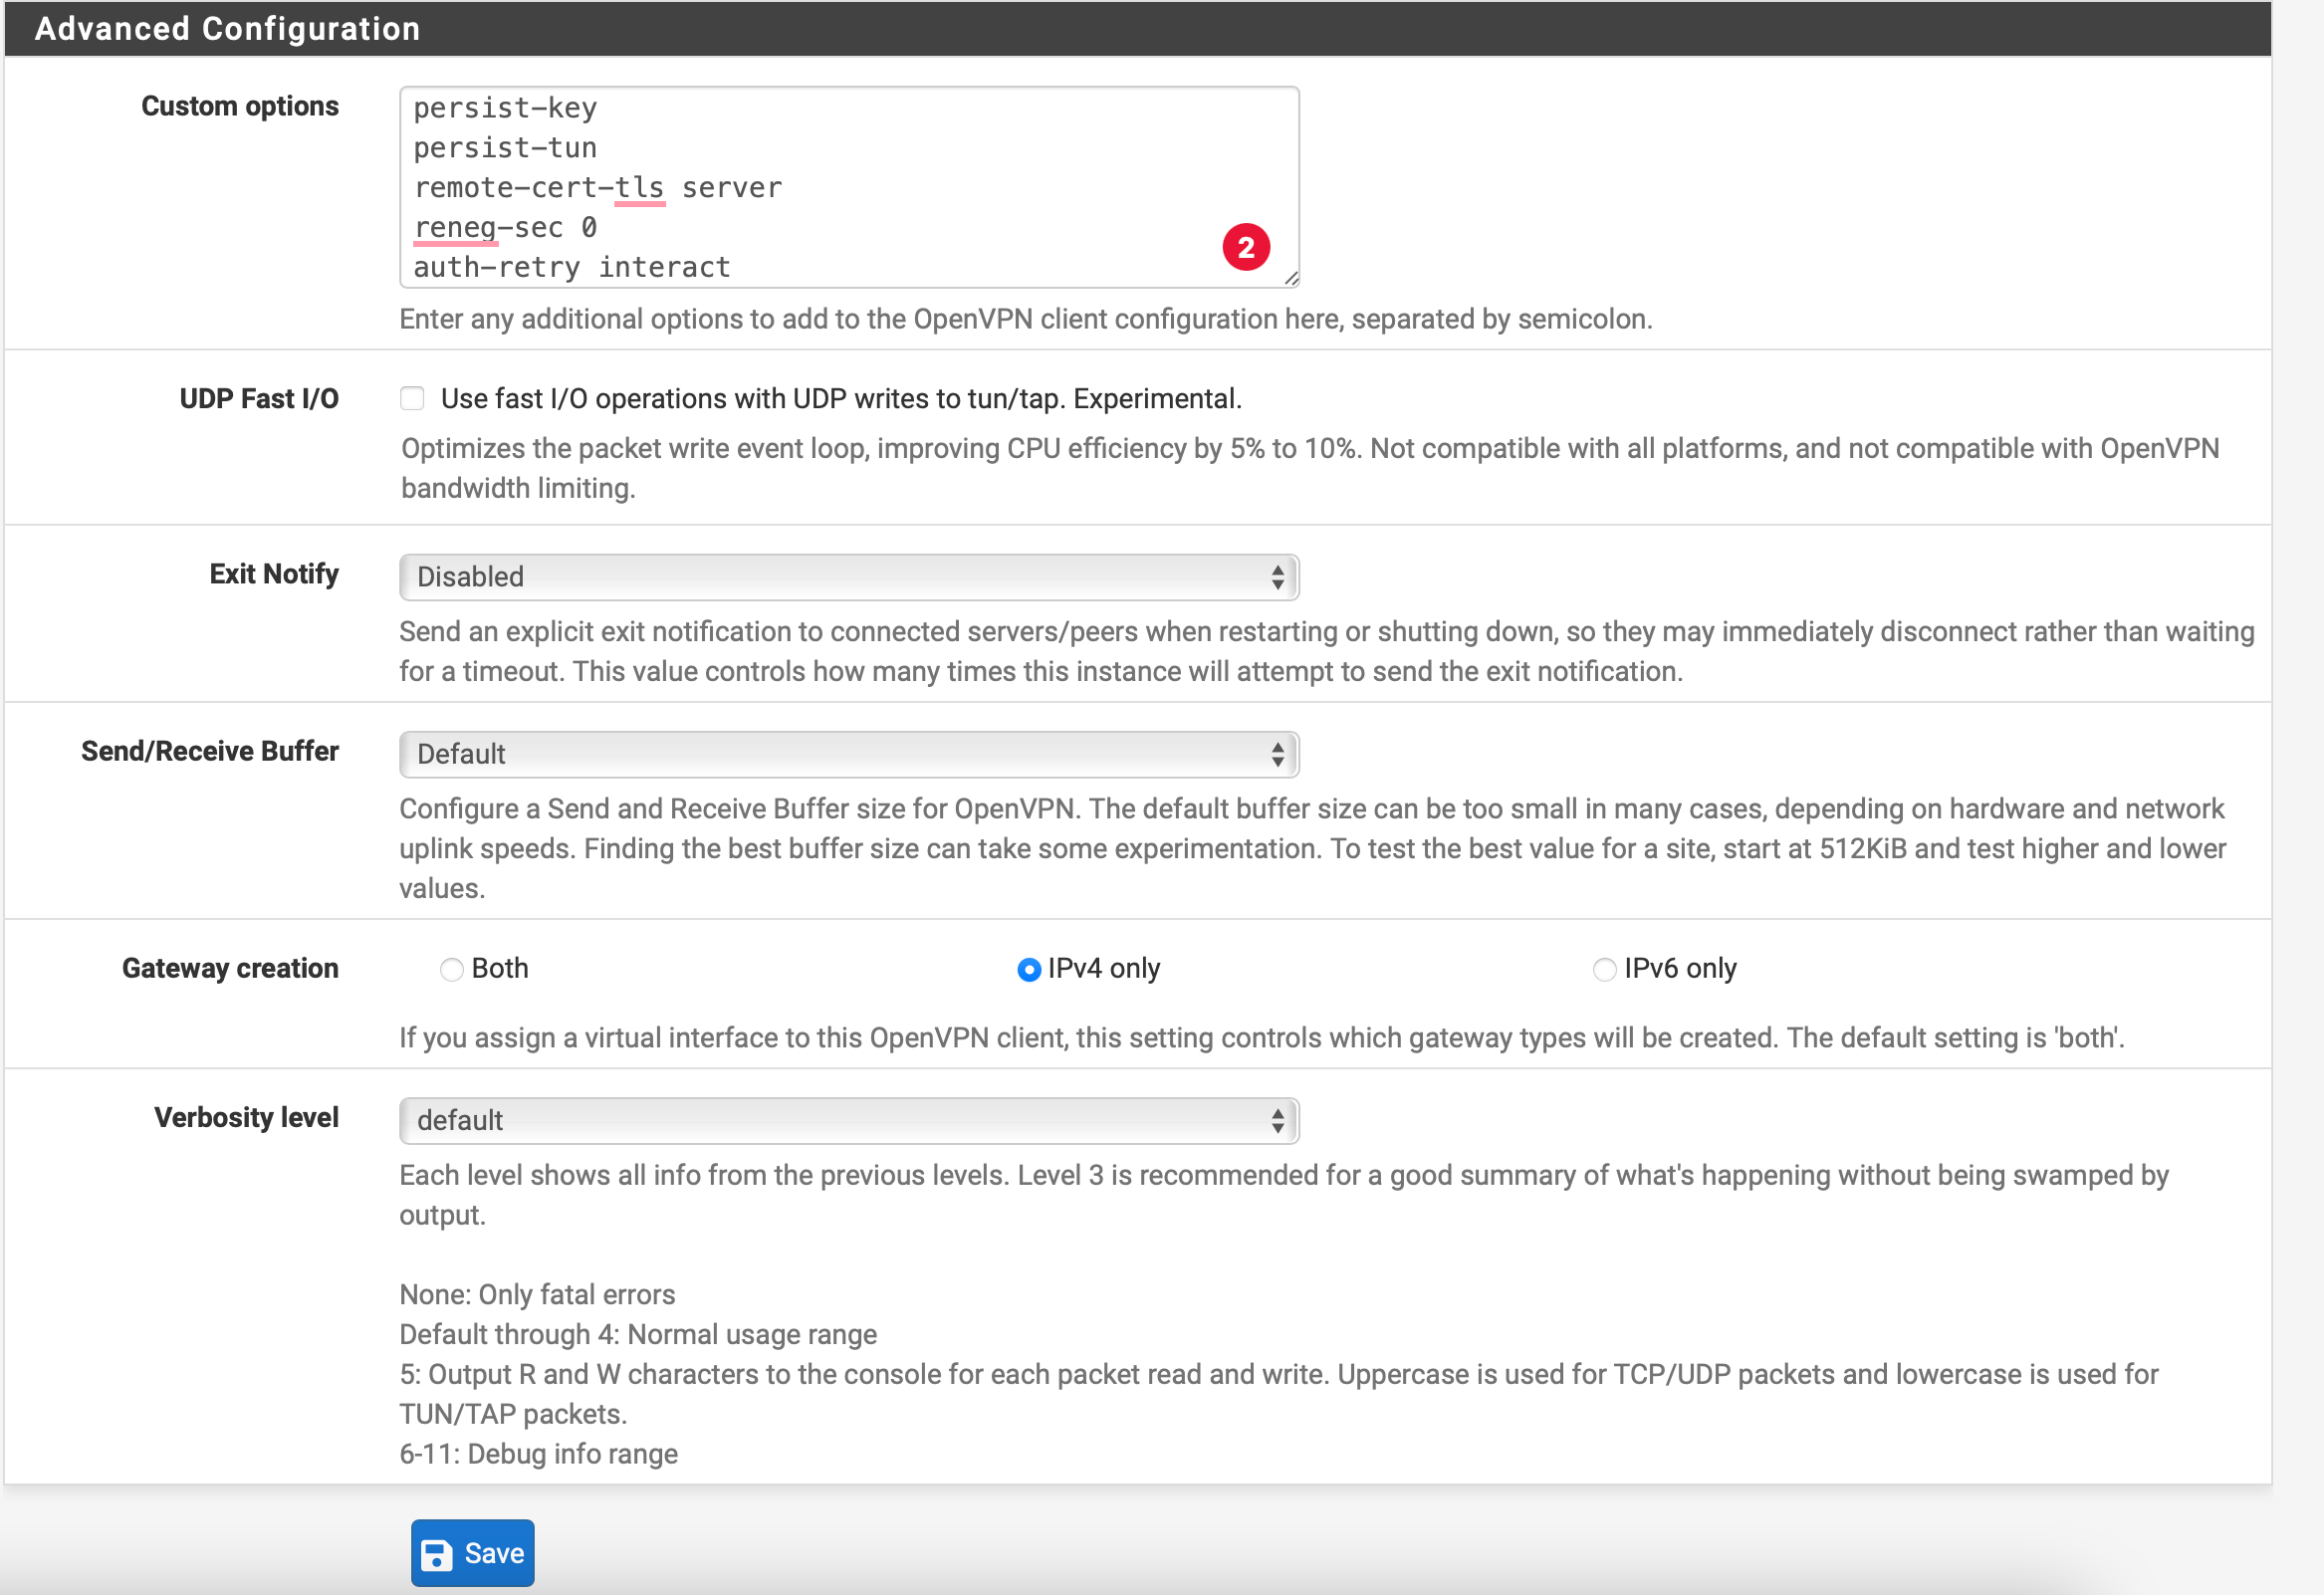
Step 6.
Navigate to Firewall>NAT>Outbound, and select Manual Outbound NAT rule generation and hit save. You should then see 4 rules.
Under the Actions heading, you should see an icon that looks like two pages, called Add a new mapping based on this one. Duplicate each of the 4 rules exactly, but change their interface to OpenVPN, clicking Save after each rule is duplicated. Now click Apply Changes.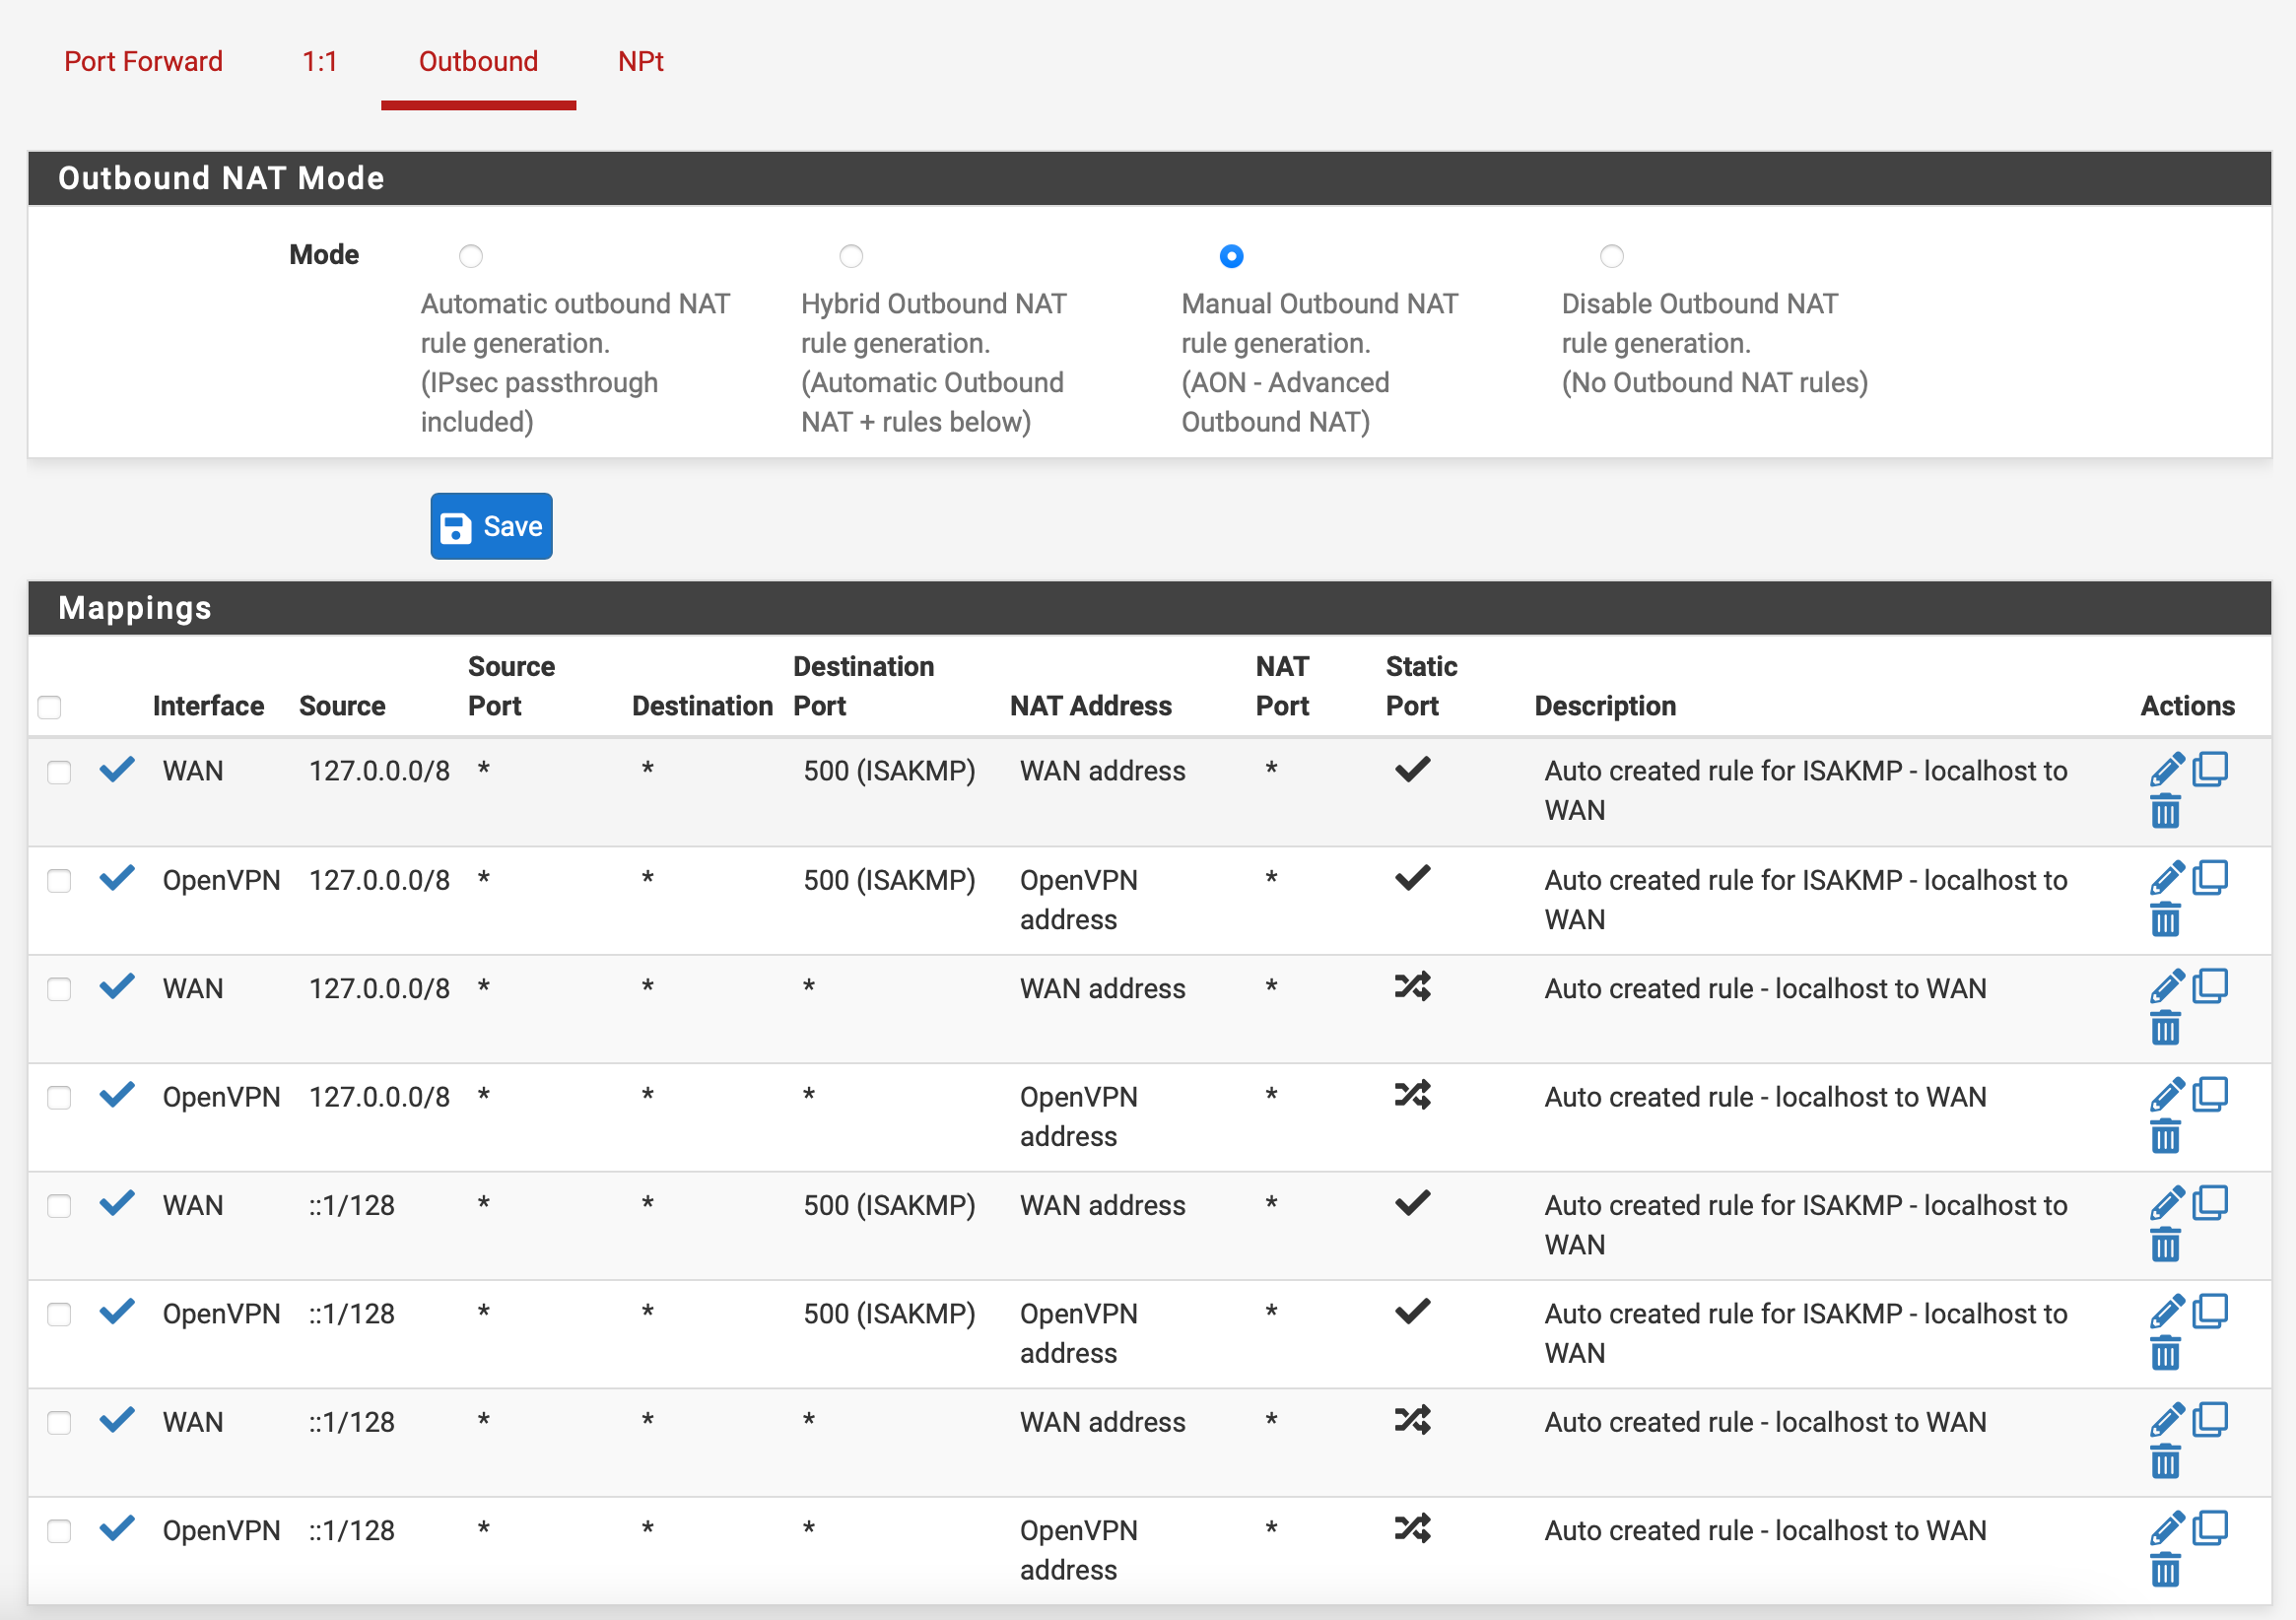
Step 7:
Navigate to System > General Setup and set DNS Servers to:
DNS Servers: 1.1.1.1
Add DNS Server: Click to add a secondary DNS and set to: 10.8.0.1
Step 8:

Verify your connection. Navigate to Status>OpenVPN and check to see whether your OpenVPN client is up.
Finally, visit What's My IP to verify that you are protected.