🎩 Quick Start for Fedora
Get TorGuard VPN running on Fedora with our easy installation guide. Full support for Fedora Workstation and Server editions with GNOME integration and SELinux compatibility.
⚡ 30-Second Quick Setup
- Download: TorGuard for Fedora (64-bit)
- Install: Double-click RPM → Install with Software Center
- Launch: Click notification or find in Activities
- Login: Enter VPN credentials
- Connect: Click connect button
✅ You're protected! Continue for detailed instructions, terminal methods, and Fedora-specific tips.
System Requirements
💻 Minimum Requirements
Fedora Version
- Fedora 39 ✅
- Fedora 38 ✅
- Fedora 37 ✅
- Fedora 36 ⚠️
- RHEL/CentOS compatible
Hardware
- 2 GHz processor
- 2 GB RAM minimum
- 200 MB disk space
- Internet connection
Architecture
- x86_64 (64-bit) ✅
- aarch64 (ARM64) ✅
- 32-bit deprecated ⚠️
Desktop Environment
- GNOME (default) ✅
- KDE Plasma ✅
- Xfce ✅
- Cinnamon ✅
- Server (headless) ✅
Fedora Edition Support
🖥️ Workstation
Desktop Users
- ✅ GNOME integration
- ✅ GUI installation
- ✅ Software Center
- ✅ System tray support
🖥️ Server
Server Deployments
- ✅ CLI management
- ✅ Systemd service
- ✅ Remote control
- ✅ Minimal resources
🎯 Spins
Alternative Desktops
- ✅ KDE Plasma
- ✅ Xfce
- ✅ MATE
- ✅ All supported
Package Manager Info
📦 DNF vs YUM
Fedora uses DNF (Dandified YUM) as its package manager since Fedora 22:
✅ DNF (Current)
- Default in modern Fedora
- Faster performance
- Better dependency resolution
- Compatible with YUM commands
⚠️ YUM (Legacy)
- Symlinked to DNF
- Commands still work
- For compatibility only
- Use DNF for new scripts
Installation Methods
🖱️ GUI Installation
Software Center (GNOME Software)
- ✅ One-click install
- ✅ Automatic updates
- ✅ No terminal needed
- ✅ Best for desktop users
💻 Terminal Installation
DNF Package Manager
- ✅ Faster installation
- ✅ Better for automation
- ✅ Works on Server edition
- ✅ More control
GUI Installation Steps
Download TorGuard RPM
Download the RPM package for your system:
Download TorGuard for Fedora (64-bit)
For ARM64 systems: Download ARM64 RPM
Open with Software Install
When Firefox prompts, select "Software Install (default)" and click OK:
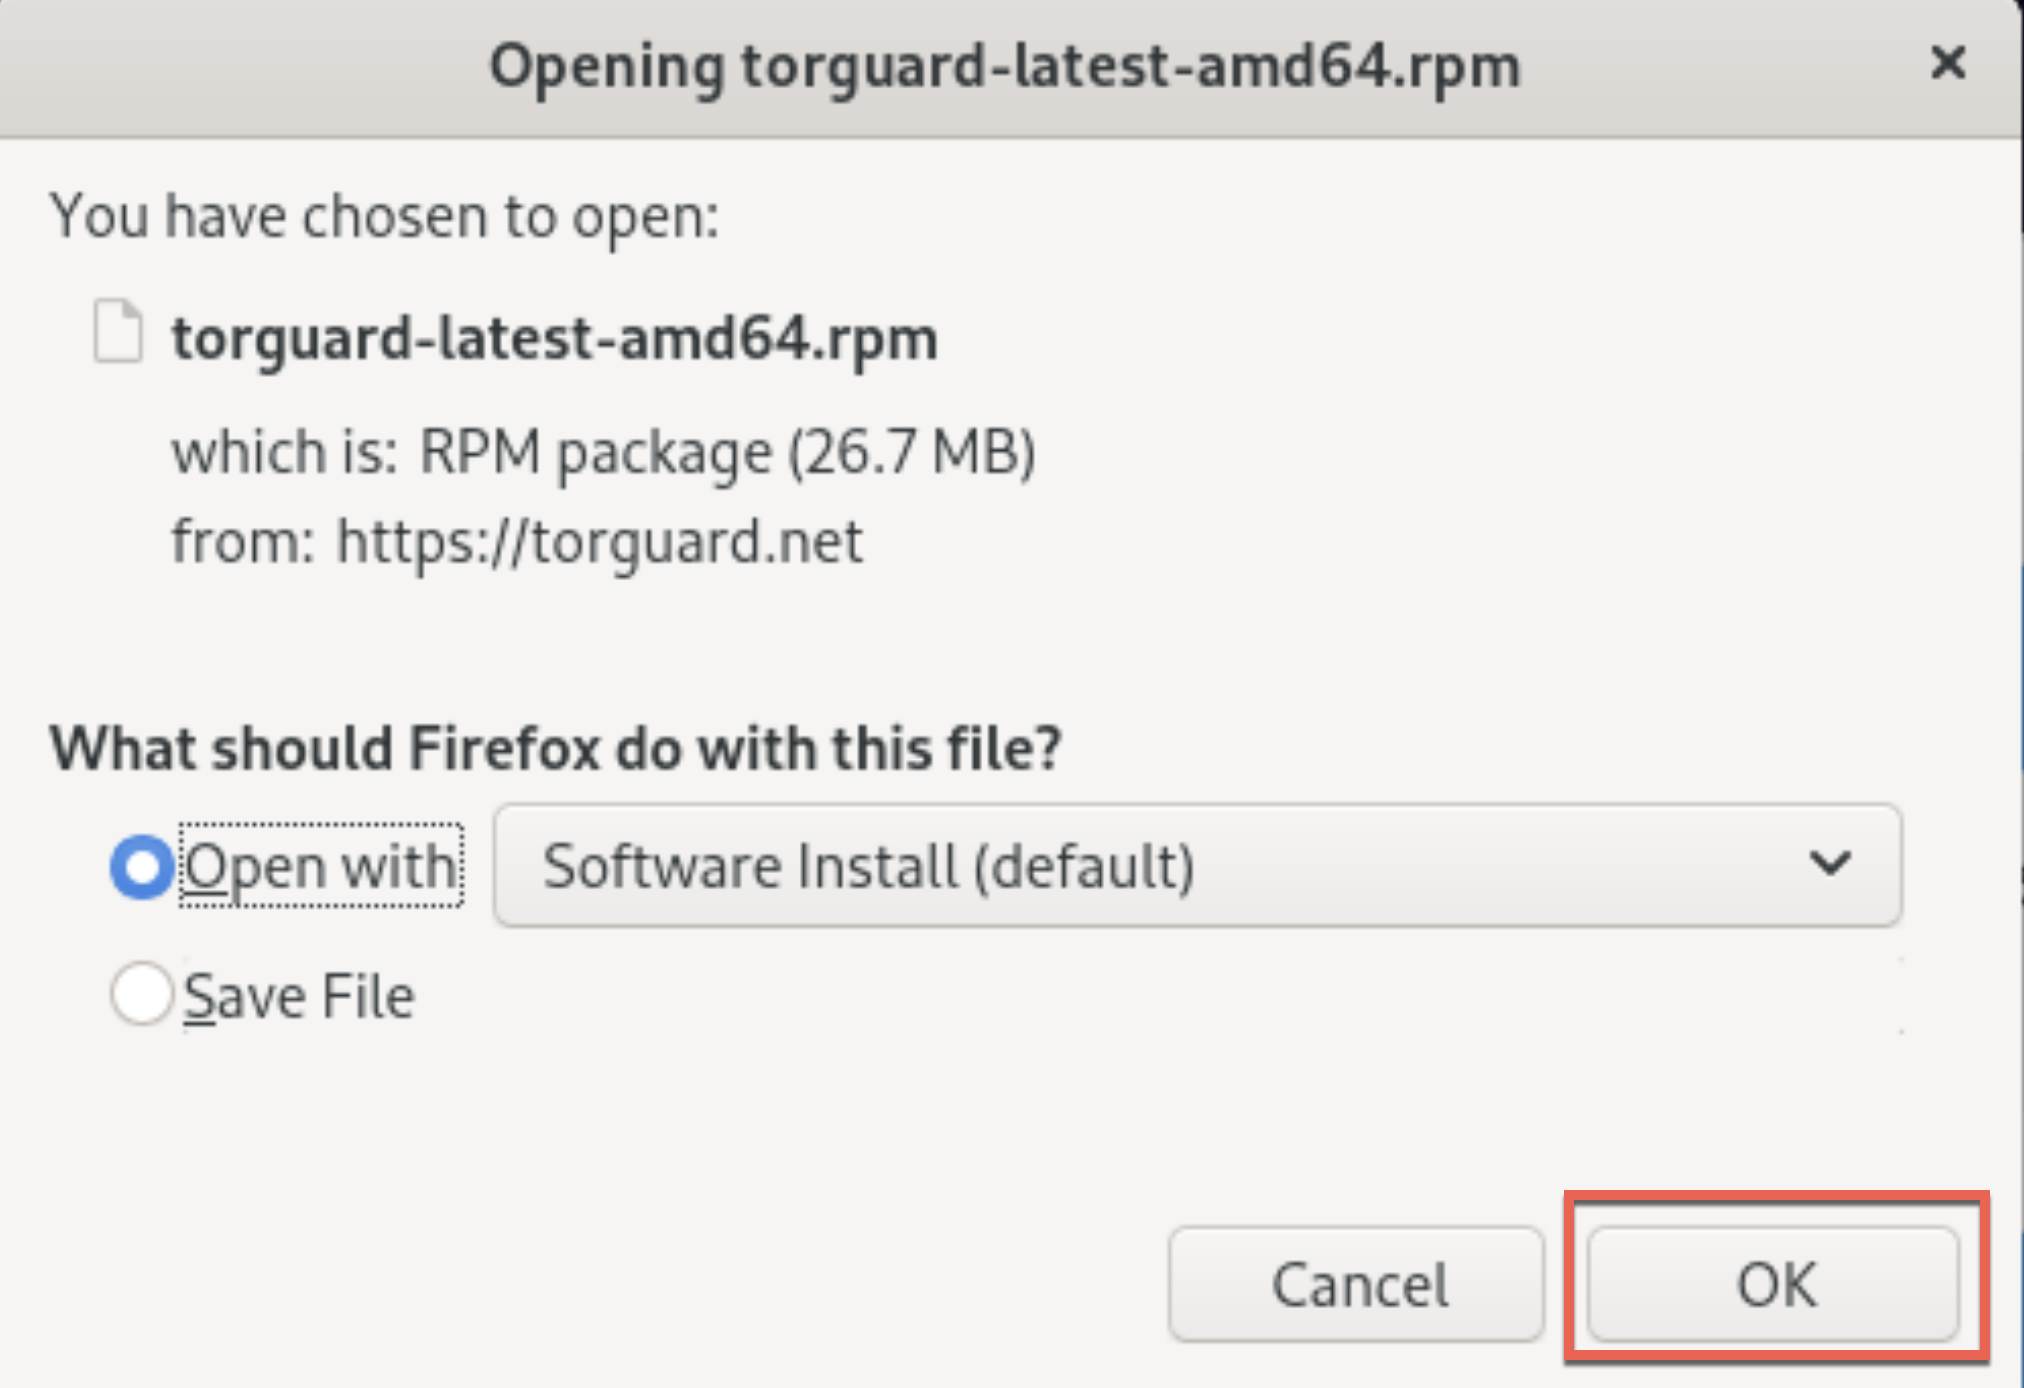
💡 Alternative Method
You can also double-click the downloaded RPM file in Files (Nautilus)
Software Ready Notification
Click the "Software is Ready" notification that appears:

This opens GNOME Software with TorGuard ready to install:
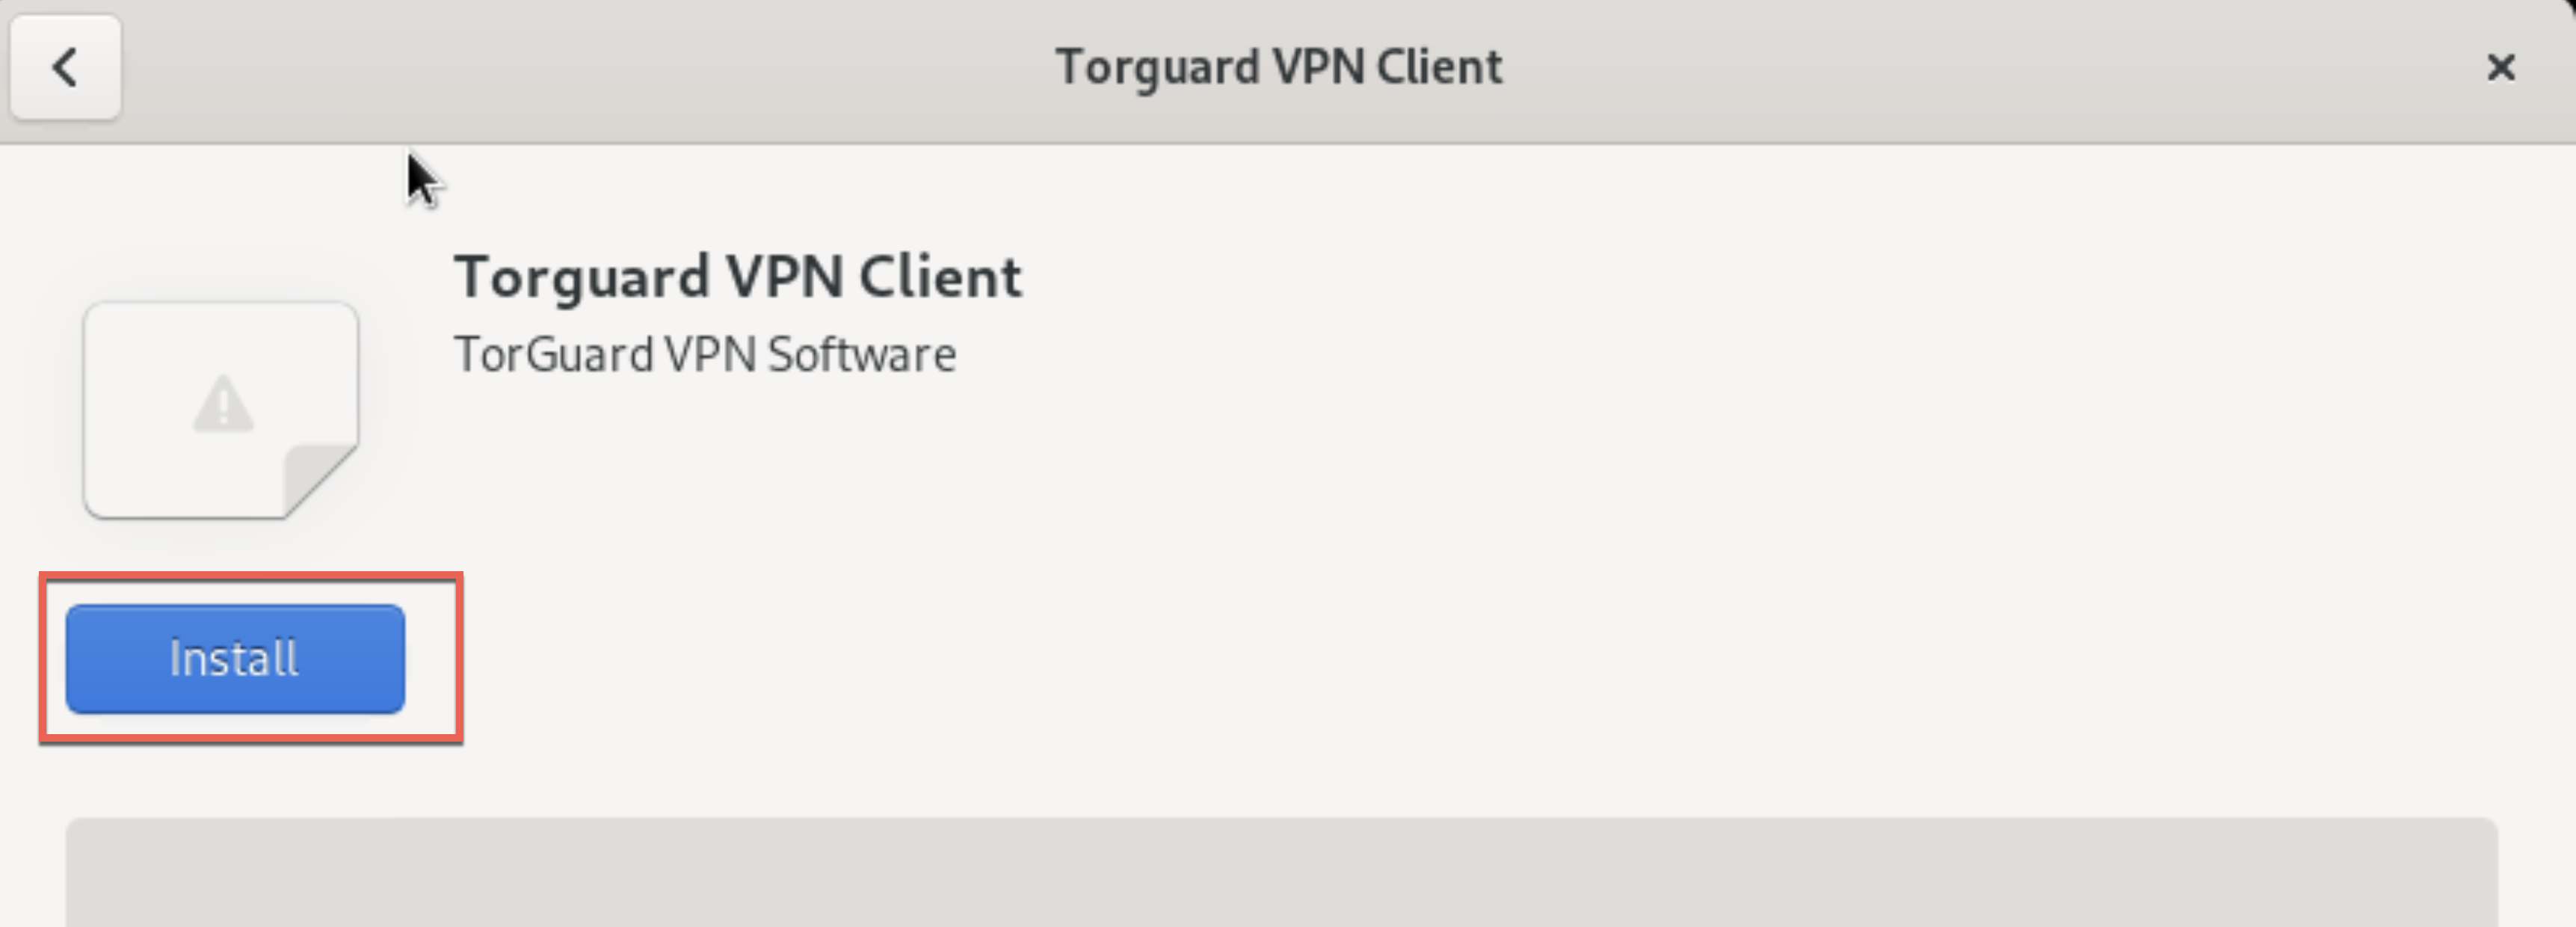
Install and Launch
Click Install, enter your password if prompted, then click Launch:
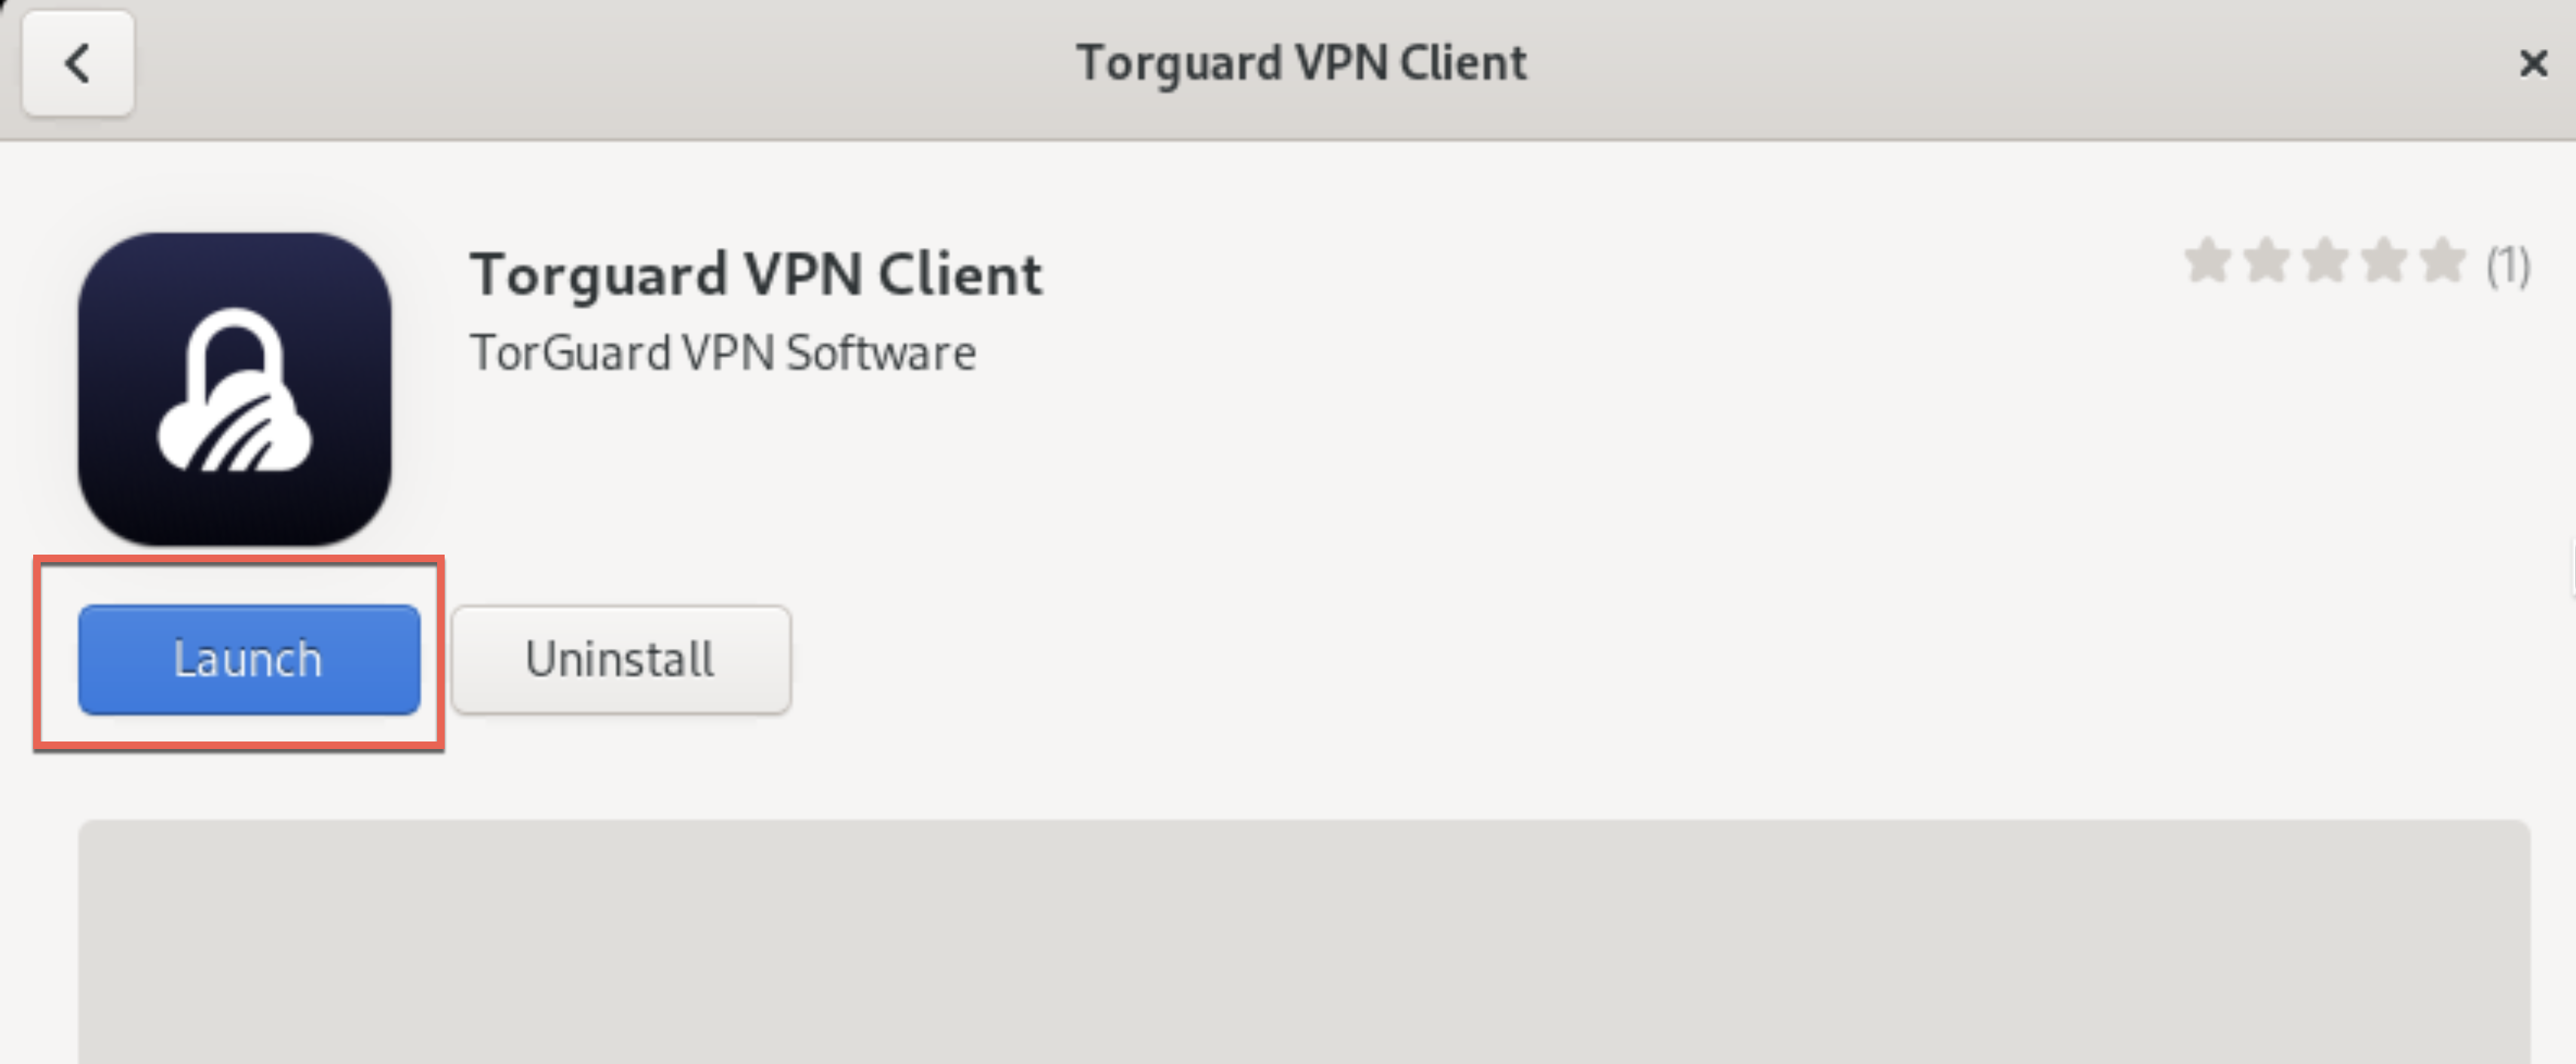
✅ Installation Complete!
TorGuard is now installed and ready to use
Login to TorGuard
Enter your VPN credentials:
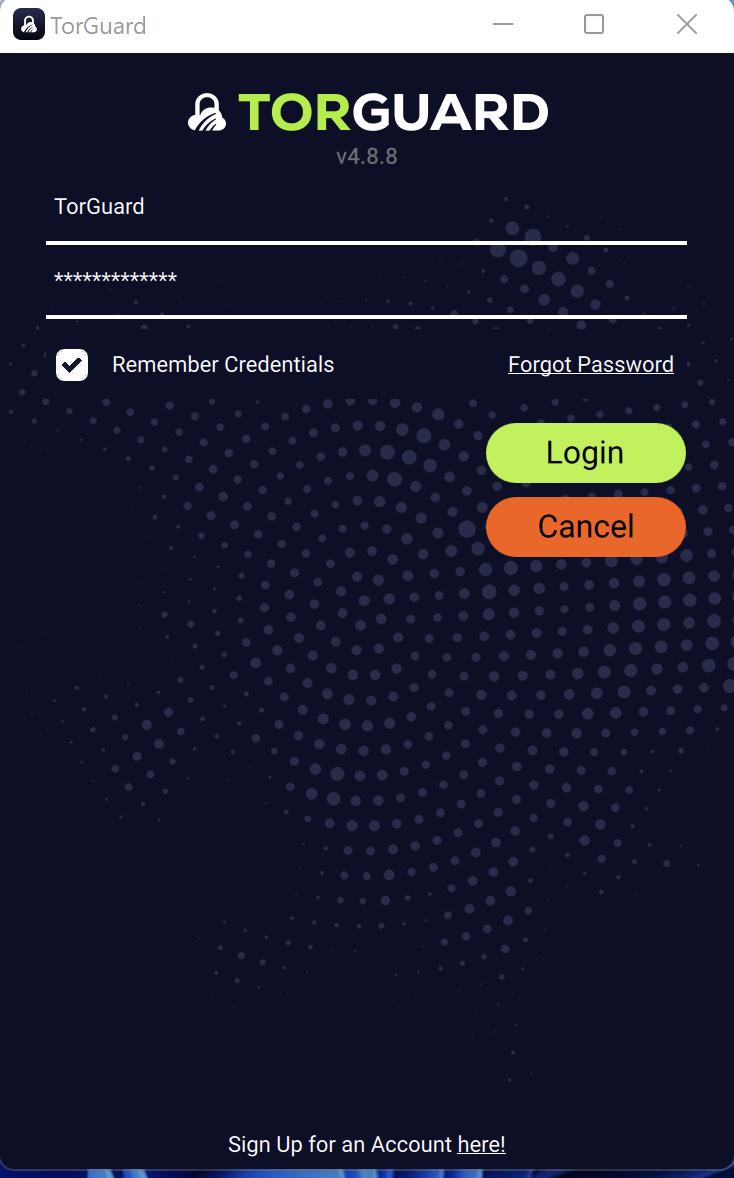
- Username: Your TorGuard VPN username
- Password: Your TorGuard VPN password
- ✅ Check "Remember credentials"
⚠️ VPN Credentials
These are different from website login. Manage VPN credentials here
Connect to VPN
Click connect to establish VPN connection:
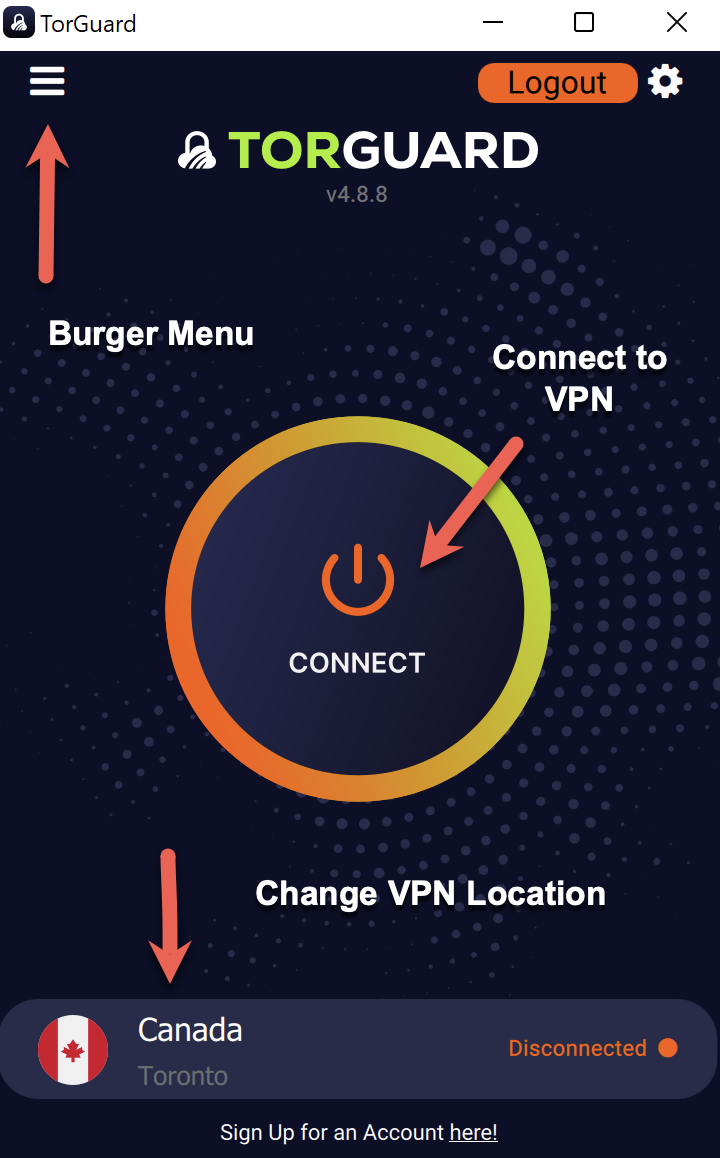
Quick Options:
- Change location: Click country name
- Protocol settings: Menu (☰) → Settings
- Server browser: Click location → More
Verify Connection
Confirm VPN is active:
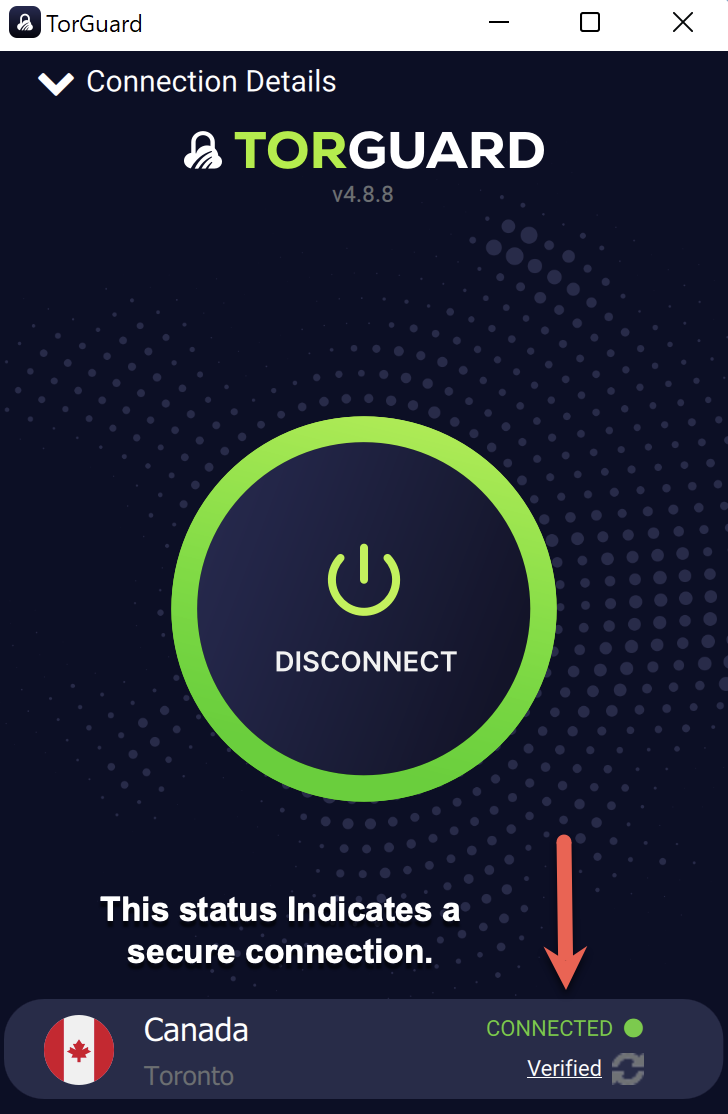
- Status: "CONNECTED"
- Shows: "Verified"
- New IP address displayed
- GNOME top bar shows VPN icon
Terminal Installation
💻 Command Line Installation
For Server edition, automation, or advanced users:
Download Package
Download using wget:
sudo wget https://torguard.net/downloads/new/torguard-latest-amd64.rpm
Or using curl:
sudo curl -O https://torguard.net/downloads/new/torguard-latest-amd64.rpm
Install with DNF
Install using DNF (recommended):
sudo dnf install ./torguard-latest-amd64.rpm -y
Or using RPM directly:
sudo rpm -i torguard-latest-amd64.rpm
💡 DNF Advantages
DNF automatically handles dependencies, while RPM requires manual dependency resolution
Launch TorGuard
Start TorGuard:
torguard
Or with sudo for first run:
sudo torguard
Dependencies & Prerequisites
📦 Required Dependencies
Install all common dependencies at once:
sudo dnf install -y wireguard-tools kernel-modules-extra NetworkManager-openvpn libappindicator qt5-qtbase
Modern protocol
VPN modules
Network control
GUI framework
System tray
Legacy VPN
SELinux Configuration
🔒 SELinux Considerations
Fedora uses SELinux by default. If you experience connection issues:
- Check SELinux status:
getenforce - Temporarily set to permissive (testing only):
sudo setenforce 0 - Create permanent exception for TorGuard:
sudo setsebool -P openvpn_can_network_connect 1 - Check for SELinux denials:
sudo ausearch -m avc -ts recent | grep torguard
GNOME Integration
🎯 GNOME Desktop Features
- Top Bar Icon: VPN status indicator in system menu
- Quick Settings: Toggle VPN from quick settings panel
- Notifications: Connection status notifications
- Activities: Search "TorGuard" in Activities overview
- Autostart: Add to startup applications:
cp /usr/share/applications/torguard.desktop ~/.config/autostart/
Protocol Options
🔧 Available Protocols
Access via: Menu → Connection → Protocol
⚡ WireGuard
Fastest
Kernel module support
🛡️ OpenVPN
Most Compatible
Works everywhere
🌐 OpenConnect
Cisco Compatible
Enterprise networks
🚀 Shadowsocks
Obfuscation
Bypass restrictions
Troubleshooting
🔍 Common Issues & Solutions
WireGuard Not Found
Install WireGuard tools:
sudo dnf install wireguard-tools kernel-modules-extra -y
Then reboot system
SELinux Blocking
- Check with
getenforce - Set SELinux booleans
- Create custom policy
- Check audit logs
Missing Dependencies
sudo dnf install -y qt5-qtbase libappindicator-gtk3
Then reinstall TorGuard
Firewall Issues
sudo firewall-cmd --add-service=openvpn --permanent
sudo firewall-cmd --reload
GNOME Shell Extension
- Install TopIcons Plus
- Enable in Extensions app
- Restart GNOME Shell
- Alt+F2 → 'r' → Enter
RPM Database Issues
sudo rpm --rebuilddb
sudo dnf clean all
sudo dnf makecache
Fedora-Specific Tips
💡 Pro Tips for Fedora Users
- Kernel Updates: Reboot after kernel updates for WireGuard
- DNF History: View install history with
dnf history - Automatic Updates: Enable with GNOME Software preferences
- Flatpak Alternative: Consider Flatpak version for sandboxing
- Systemd Service: Create service for autostart:
sudo systemctl enable torguard.service - Wayland vs X11: Both supported, X11 may have better tray support
- COPR Repos: Additional packages available via COPR
Performance Optimization
⚡ Fedora Performance Tips
- Use WireGuard: Native kernel module for best speed
- Disable IPv6: If not needed:
sudo sysctl -w net.ipv6.conf.all.disable_ipv6=1 - CPU Governor: Set to performance mode for servers
- Network Buffer: Increase for better throughput
- Firewalld: Optimize rules for VPN traffic
Next Steps
🎉 Installation Complete!
Now explore these Fedora-optimized features:
- NetworkManager Integration: Import configs to NM
- Kill Switch: Enable for security
- Split Tunneling: Configure per-app VPN
- Command Line: Use torguard-cli for automation
Need Help?
If you need assistance with Fedora:
Include your Fedora version and desktop environment