🐧 Quick Start for Linux Mint
Get TorGuard VPN running on Linux Mint with our easy installation guide. Full support for all Mint editions (Cinnamon, MATE, Xfce) with both GUI and terminal installation options.
⚡ 30-Second Quick Setup
- Download: TorGuard for Linux (64-bit)
- Install: Double-click DEB file → Install with GDebi
- Launch: Find in Start Menu → Internet
- Login: Enter VPN credentials
- Connect: Click connect button
✅ You're protected! Continue for detailed instructions, terminal installation, and troubleshooting.
System Requirements
💻 Minimum Requirements
Linux Mint Version
- Linux Mint 21.x (Virginia) ✅
- Linux Mint 20.x (Ulyana) ✅
- Linux Mint 19.x (Tara) ✅
- LMDE 5 (Elsie) ✅
- LMDE 4 (Debbie) ⚠️
Hardware
- 1 GHz processor
- 2 GB RAM minimum
- 200 MB disk space
- Internet connection
Architecture
- 64-bit (amd64) ✅
- 32-bit (i386) ✅
- ARM64 ✅
Desktop Environment
- Cinnamon ✅
- MATE ✅
- Xfce ✅
- All editions supported
Linux Mint Edition Support
🖥️ Cinnamon
Most Popular
- ✅ Full integration
- ✅ System tray support
- ✅ Modern interface
- ✅ Best performance
🎨 MATE
Traditional Desktop
- ✅ Classic interface
- ✅ Lightweight
- ✅ Full compatibility
- ✅ Panel applet support
⚡ Xfce
Lightweight Edition
- ✅ Minimal resources
- ✅ Fast performance
- ✅ Older hardware friendly
- ✅ Full feature support
Installation Methods
🖱️ GUI Installation
GDebi Package Installer
- ✅ One-click install
- ✅ Automatic dependencies
- ✅ No terminal needed
- ✅ Best for beginners
💻 Terminal Installation
Command Line Method
- ✅ Faster installation
- ✅ Script automation
- ✅ Remote installation
- ✅ Better error info
GUI Installation Steps
Download TorGuard
Select your system architecture:
For most modern Linux Mint installations
For older 32-bit systems
For ARM-based devices
Install with GDebi
When download completes:
- A dialog will appear asking to open with "GDebi Package Installer"
- Click OK
- GDebi will open and analyze the package
- Click "Install Package"
- Enter your password when prompted
- Wait for installation to complete
💡 Alternative: Software Manager
You can also right-click the DEB file → Open With → Software Install
Launch TorGuard
Find TorGuard in your menu:
- Cinnamon: Menu → Internet → TorGuard VPN Client
- MATE: Applications → Internet → TorGuard VPN Client
- Xfce: Applications → Network → TorGuard VPN Client
Or search for "TorGuard" in your menu search
Login to TorGuard
Enter your VPN credentials:
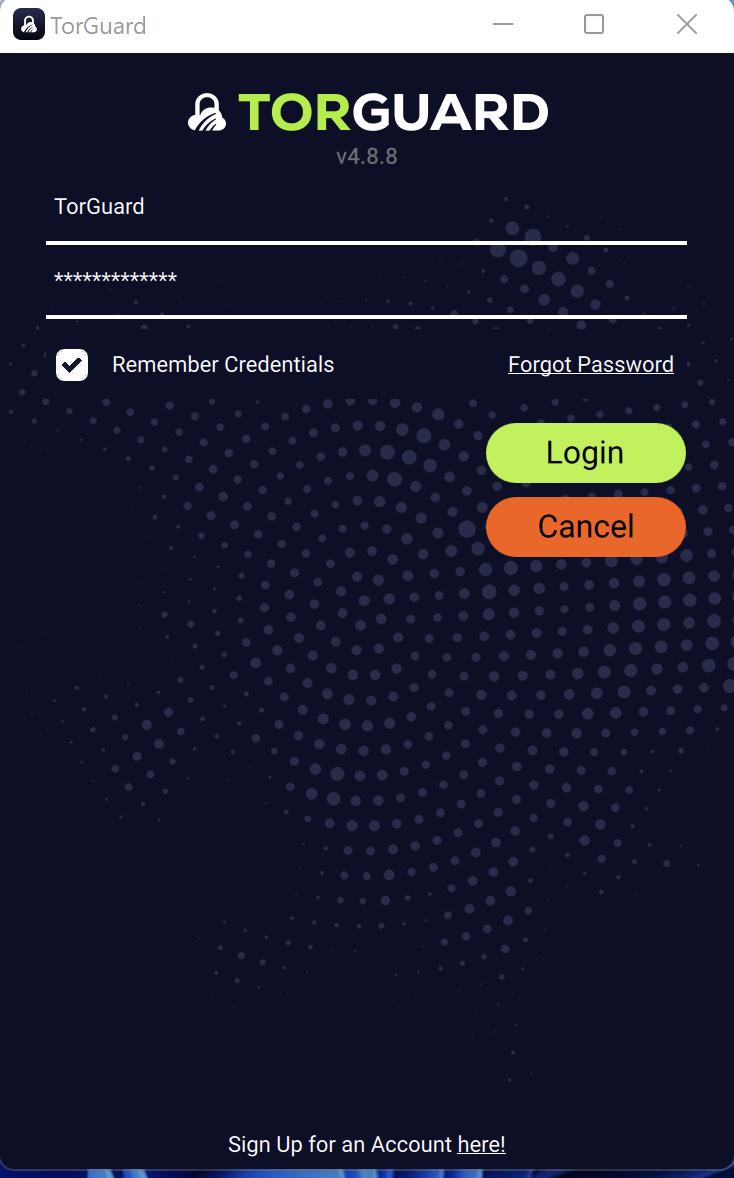
- Username: Your TorGuard VPN username
- Password: Your TorGuard VPN password
- ✅ Check "Remember credentials"
⚠️ VPN Credentials
These are different from website login. Manage VPN credentials here
Connect to VPN
Click connect to establish VPN connection:
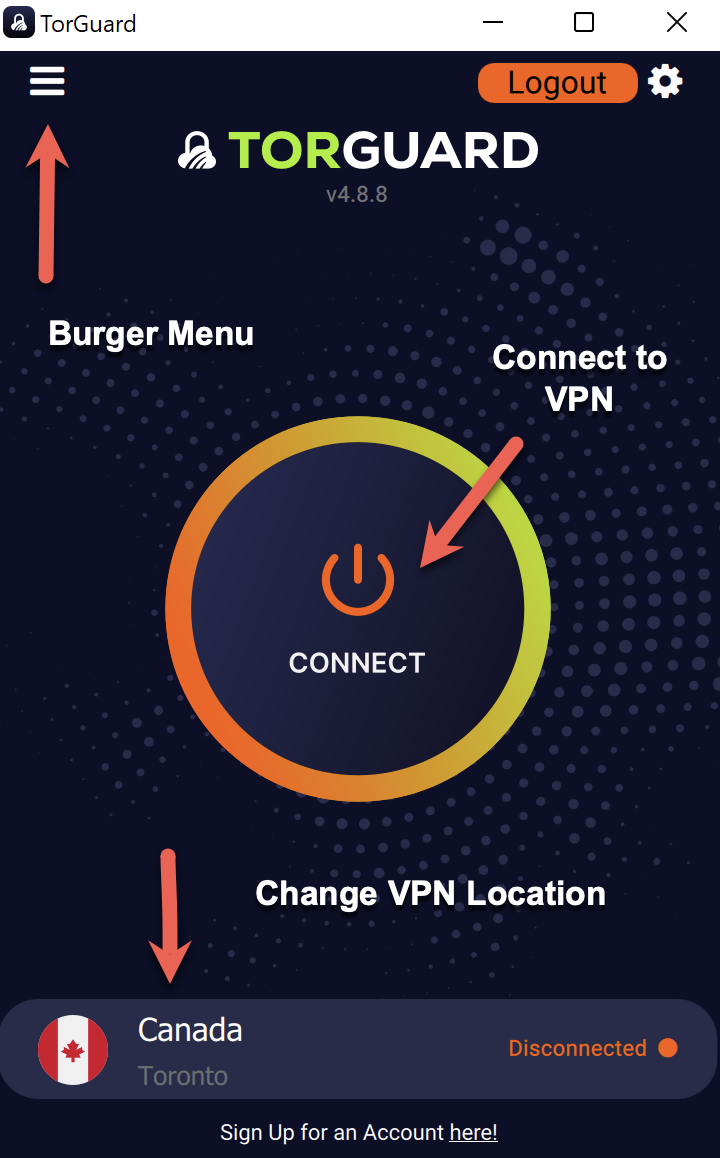
Quick Options:
- Change location: Click country name
- Protocol settings: Menu (☰) → Settings
- Server browser: Click location → More
Verify Connection
Confirm VPN is active:
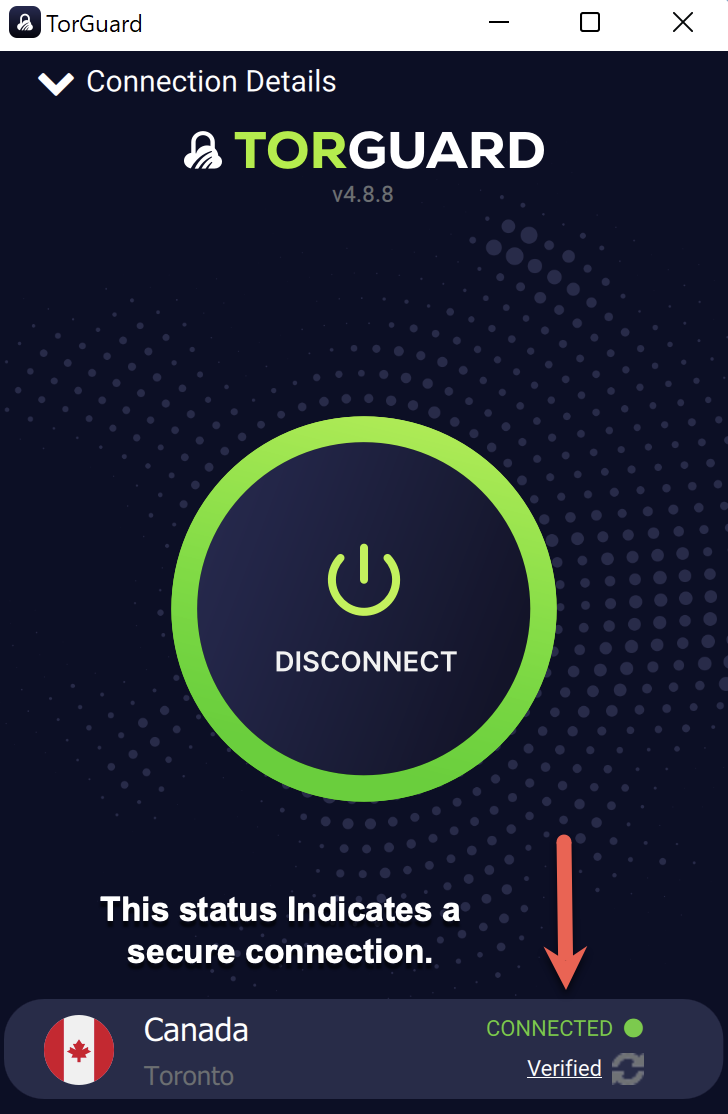
- Status: "CONNECTED"
- Shows: "Verified"
- New IP address displayed
- System tray icon active
Terminal Installation
💻 Command Line Installation
For advanced users or remote installation:
Download Package
Open terminal and download:
sudo wget https://torguard.net/downloads/new/torguard-latest-amd64.deb
For 32-bit systems:
sudo wget https://torguard.net/downloads/new/torguard-latest-i386.deb
Install Package
Install the downloaded package:
sudo dpkg -i torguard-latest-amd64.deb
If you get dependency errors, run:
sudo apt-get install -f
Launch TorGuard
Start TorGuard from terminal:
torguard
Or with sudo for first run:
sudo torguard
Dependencies & Prerequisites
📦 Required Dependencies
TorGuard installer handles most dependencies, but you may need:
Modern protocol
Legacy support
Network control
GUI framework
Firewall rules
DNS management
Install all common dependencies:
sudo apt-get update && sudo apt-get install -y wireguard wireguard-tools openvpn network-manager iptables resolvconf
Protocol Options
🔧 Available Protocols
Access via: Menu → Connection → Protocol
⚡ WireGuard
Fastest
Best for most users
🛡️ OpenVPN
Most Compatible
Works everywhere
🌐 OpenConnect
Cisco Compatible
Corporate networks
🚀 Shadowsocks
Obfuscation
Bypass censorship
Linux Mint Features
System Tray
Quick access icon
Right-click for menu
Kill Switch
Block traffic on disconnect
Settings → General
Auto-Start
Launch with system
Settings → General
DNS Leak Protection
Force TorGuard DNS
Automatic on connect
Network Lock
IPv6 leak prevention
Enabled by default
Split Tunneling
Exclude applications
Settings → Network
Troubleshooting
🔍 Common Issues & Solutions
WireGuard Not Found
Install WireGuard modules:
sudo apt-get install wireguard wireguard-tools
Then restart TorGuard
Permission Denied
- Run with sudo first time
- Add user to netdev group
- Check /etc/sudoers
- Reinstall with --force
Tray Icon Missing
- Install indicator-application
- Enable system tray
- Restart desktop session
- Check panel settings
DNS Not Working
- Install resolvconf
- Disable systemd-resolved
- Check /etc/resolv.conf
- Use Network Manager
Slow Connection
- Switch to WireGuard
- Try UDP protocol
- Change MTU size
- Disable IPv6
Dependencies Error
sudo apt-get update
sudo apt-get install -f
sudo dpkg --configure -a
Linux Mint Specific Tips
💡 Pro Tips for Mint Users
- Timeshift: Create system snapshot before major changes
- Update Manager: Keep system updated for best compatibility
- Driver Manager: Ensure network drivers are current
- Firewall: Configure ufw to allow VPN:
sudo ufw allow 1194/udp sudo ufw allow 443/tcp sudo ufw allow 1443/udp - Panel Applet: Add network monitor to panel for speed info
- Keyboard Shortcuts: Set custom shortcut for quick connect/disconnect
Advanced Configuration
🔧 Power User Options
- Config Files: Located in ~/.config/torguard/
- Logs: Check ~/.config/torguard/logs/ for debugging
- CLI Control: Use torguard-cli for scripting
- Custom Scripts: Pre/post connection scripts supported
- Network Manager: Can import .ovpn configs directly
Next Steps
🎉 Installation Complete!
Now explore these features:
- Server Browser: Find optimal server location
- Kill Switch: Enable for security
- Port Forwarding: Set up for P2P
- Dedicated IP: Get static IP address
Need Help?
If you need assistance with Linux Mint:
Include your Mint version and desktop environment