🍎 Quick Start for macOS
Get TorGuard VPN running on your Mac with our simple installation guide. Native support for both Apple Silicon (M1/M2/M3) and Intel Macs with full macOS integration.
⚡ 30-Second Quick Setup
- Download: TorGuard for macOS
- Install: Open DMG, drag to Applications
- Launch: Open from Applications (bypass Gatekeeper if needed)
- Login: Enter VPN credentials
- Connect: Click the connect button
✅ You're now protected! Continue reading for detailed instructions and Mac-specific features.
System Requirements
💻 Minimum Requirements
macOS Version
- macOS 14 Sonoma ✅
- macOS 13 Ventura ✅
- macOS 12 Monterey ✅
- macOS 11 Big Sur ✅
- macOS 10.15 Catalina ✅
- macOS 10.14 Mojave ⚠️
Hardware
- Any Mac from 2015+
- 4 GB RAM minimum
- 200 MB free disk space
- Internet connection
Processor Support
- Apple Silicon (M1/M2/M3) ✅
- Intel x86_64 ✅
- Universal Binary
- Native performance
Permissions
- Admin for installation
- Network Extensions
- System Preferences access
- Keychain access
Processor Compatibility
🚀 Apple Silicon
M1, M2, M3 Series
- ✅ Native ARM64 support
- ✅ Optimized performance
- ✅ Better battery life
- ✅ No Rosetta needed
💻 Intel Macs
x86_64 Processors
- ✅ Full compatibility
- ✅ Native performance
- ✅ All features supported
- ✅ Legacy OS support
Download Options
Step-by-Step Installation
Download TorGuard
Download the TorGuard DMG installer:
The file will be saved to your Downloads folder
Open the DMG File
- Open Finder
- Go to Downloads
- Double-click TorGuard-latest.dmg
- Wait for the disk image to mount
Install TorGuard
In the mounted DMG window:
- Drag the TorGuard app icon
- Drop it onto the Applications folder
- Wait for the copy to complete
- Eject the DMG (drag to trash or right-click → Eject)
✅ Installation Complete!
TorGuard is now in your Applications folder
First Launch (Gatekeeper)
macOS may block the first launch for security:
🔒 macOS Security Alert
If you see "TorGuard can't be opened because it was not downloaded from the App Store":
- Right-click (or Control-click) the TorGuard app
- Select "Open" from the menu
- Click "Open" in the dialog
This only needs to be done once. TorGuard is code-signed and safe.
System Permissions
On first launch, TorGuard needs permissions:
🔐 macOS 12+ Permissions
- Click "Open System Preferences" when prompted
- Go to Privacy & Security
- Scroll down to find TorGuard
- Click "Allow"
- Enter your Mac password if prompted
For older macOS: System Preferences → Security & Privacy → General → Allow
Login to TorGuard
Enter your VPN credentials:
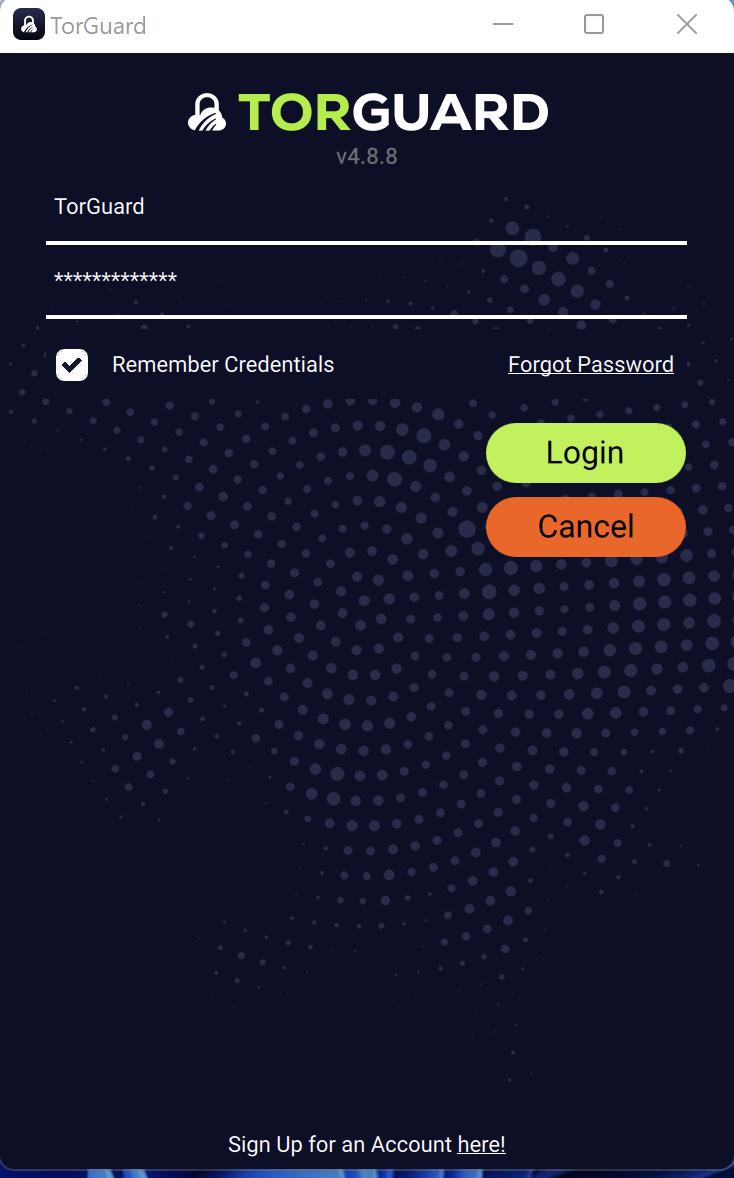
- Username: Your TorGuard VPN username
- Password: Your TorGuard VPN password
- ✅ Check "Remember credentials"
- 🔐 Credentials saved to macOS Keychain
⚠️ VPN Credentials
These are different from your website login. Manage VPN credentials here
Connect to VPN
The main interface allows quick connection:
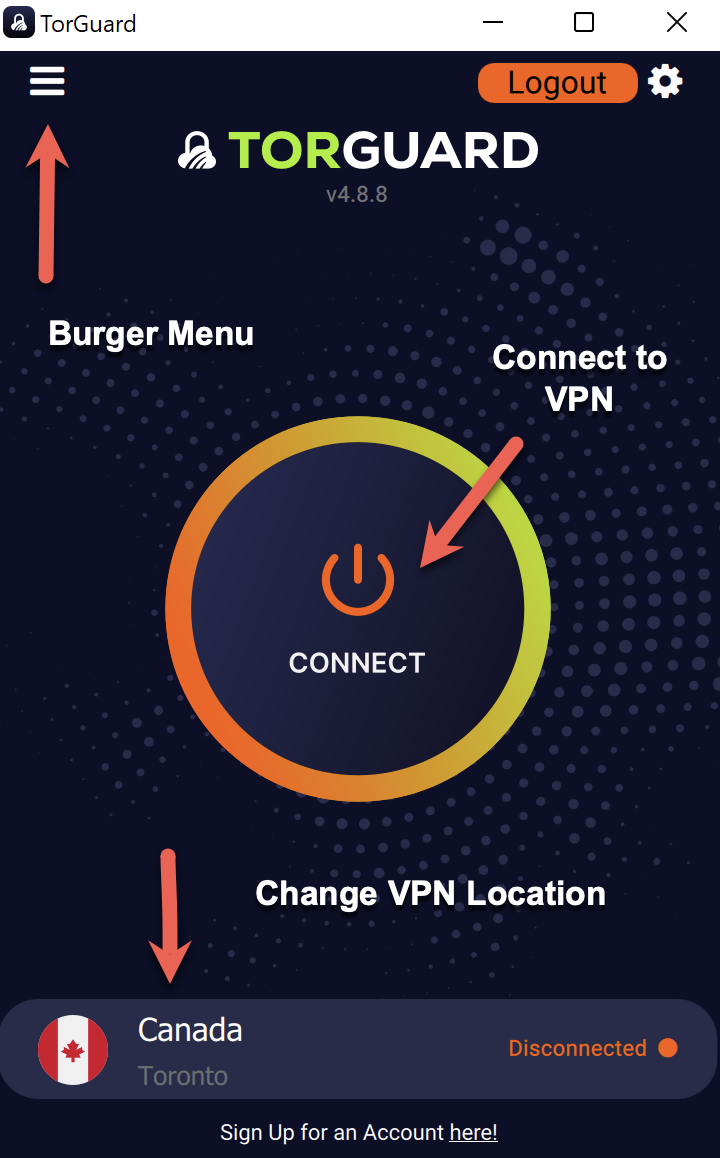
Quick Actions:
Click the large Connect button to establish VPN connection
Verify Connection
Confirm your VPN is active:
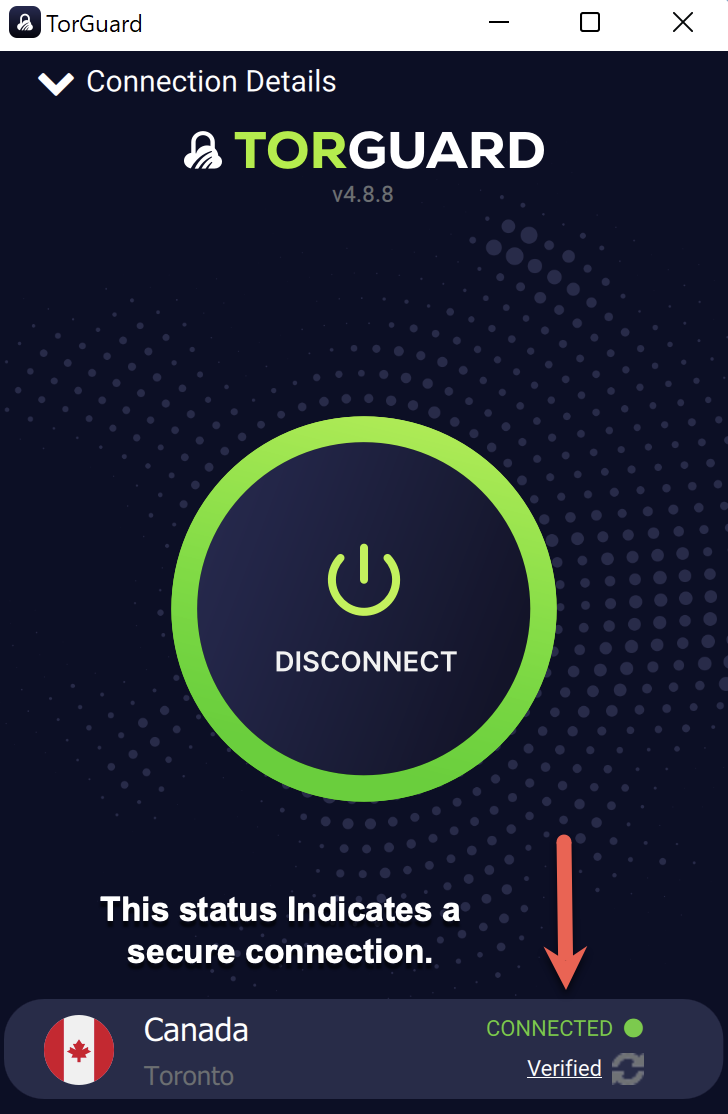
- Status shows "CONNECTED"
- Shows "Verified" below
- New IP address displayed
- Menu bar icon turns green
✅ You're Protected!
All internet traffic from your Mac is now encrypted and secure.
macOS Integration
Menu Bar App
Quick access from menu bar
Connect/disconnect with one click
Keychain Integration
Secure credential storage
No plain text passwords
Login Items
Start with macOS
Settings → General → Launch at startup
Network Extension
Modern VPN framework
Better than legacy kexts
Continuity
Works with all Apple devices
Consistent experience
Battery Optimized
Efficient on MacBooks
Minimal battery impact
Protocol Selection
🔧 Choose Your Protocol
Access via: TorGuard → Preferences → Connection
⚡ WireGuard
Fastest
Best for most users
🛡️ OpenVPN
Most Flexible
Works everywhere
🌐 IKEv2
Native macOS
Good for mobile
🚀 OpenConnect
Firewall Bypass
Corporate networks
macOS-Specific Tips
💡 Pro Tips for Mac Users
- Menu Bar: Option-click the menu bar icon for quick server switch
- Shortcuts: Set custom keyboard shortcuts in System Settings
- Split Tunnel: Exclude apps via Preferences → Network → App Exclude
- DNS: Use TorGuard DNS to prevent leaks (automatic)
- Kill Switch: Enable in Preferences → General for maximum security
- Terminal Access: Control via command line:
# Connect
/Applications/TorGuard.app/Contents/MacOS/TorGuard --connect

# Disconnect
/Applications/TorGuard.app/Contents/MacOS/TorGuard --disconnect

# Status
/Applications/TorGuard.app/Contents/MacOS/TorGuard --status
Troubleshooting
🔍 Common Issues & Solutions
App Won't Open
- Right-click → Open (Gatekeeper)
- Check Security & Privacy
- Verify app isn't damaged
- Re-download if needed
Connection Failed
- Allow Network Extension
- Check System Preferences
- Try different protocol
- Restart Mac
Slow Speeds
- Use WireGuard protocol
- Try closer server
- Check Activity Monitor
- Disable battery saver
DNS Issues
- Flush DNS cache
- Use TorGuard DNS
- Check Network settings
- Restart mDNSResponder
Keychain Errors
- Reset in Keychain Access
- Delete old entries
- Re-enter credentials
- Repair keychain
Auto-Update Failed
- Download manually
- Check permissions
- Clear app cache
- Reinstall if needed
Universal App Benefits
🎯 One App, All Macs
TorGuard for macOS is a Universal Binary, meaning:
- Apple Silicon: Runs natively on M1/M2/M3 for best performance
- Intel Macs: Full compatibility with x86_64 processors
- Automatic: macOS chooses the best version for your Mac
- Future-Proof: Ready for upcoming Mac processors
Next Steps
🎉 Setup Complete!
Explore these advanced features:
- Streaming Bundle: Access geo-restricted content
- Ad Blocker: Enable DNS-level ad blocking
- Port Forwarding: Configure for P2P applications
- Dedicated IP: Get your own static IP address
Need Help?
If you need assistance with your Mac setup:
24/7 support for all macOS versions