Critical: Windows 7 Security Warning
Windows 7 reached end-of-life on January 14, 2020. Microsoft no longer provides security updates, leaving your system vulnerable to malware and exploits. We strongly recommend upgrading to Windows 10 or 11.
If you must use Windows 7, understand that even with VPN, your system remains at significant risk.
Upgrade to Windows 11About L2TP/IPSec
Protocol Characteristics:
- Security: Good encryption with IPSec
- Compatibility: Built into Windows
- Speed: Moderate performance
- Stability: Generally reliable
- Port: UDP 500, 4500, and ESP
L2TP/IPSec is more secure than PPTP but less secure than OpenVPN or WireGuard.
Prerequisites
Before You Begin:
- Windows 7 with latest updates (if available)
- Administrator access to create VPN connections
- TorGuard VPN account with active subscription
- Pre-shared key:
torguard
Update Windows 7
Run Windows Update to install any remaining patches:
- Click Start → Control Panel
- Click System and Security → Windows Update
- Install any available updates
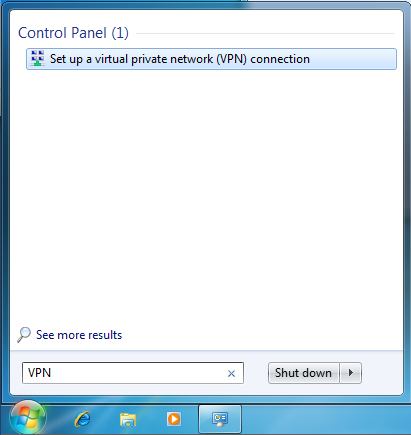
Step 1: Open VPN Setup
Start VPN Configuration
- Click the Start Menu
- Type
VPNin the search box - Click "Set up a virtual private network (VPN) connection"
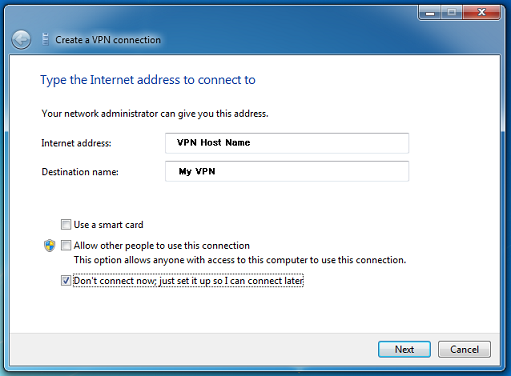
Step 2: Enter Server Information
Configure Connection Details
| Internet address: | VPN server hostname (e.g., uk.torguard.com) See server list |
| Destination name: | TorGuard VPN (or custom name) |
Important: Check "Don't connect now; just set it up so I can connect later"
Click Next to continue.
Step 3: Enter Credentials
Authentication Details
| User name: | Your TorGuard VPN username |
| Password: | Your TorGuard VPN password |
Optional: Check "Remember this password" for convenience
Click Create to save the connection.
Use VPN credentials, not website login!

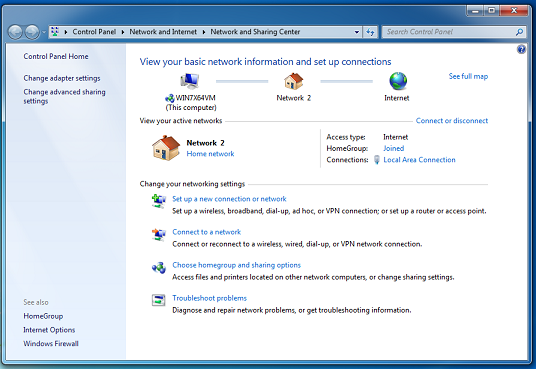
Step 4: Access Connection Properties
Navigate to Network Settings
- Click Start Menu
- Type
Networkin search box - Click "Network and Sharing Center"

Find Your VPN Connection
- Click "Connect to a network"
- Right-click your TorGuard VPN connection
- Select "Properties"
Step 5: Configure L2TP/IPSec
Set VPN Type
- In the Security tab, set Type of VPN to L2TP/IPSec
- Click Advanced settings
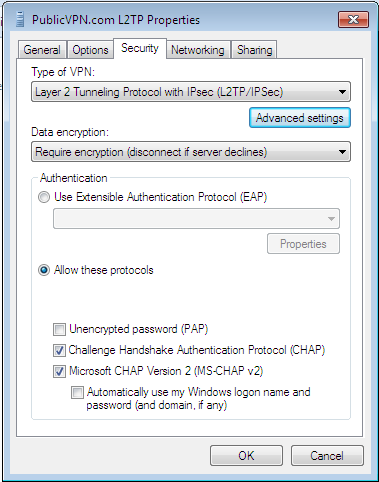
Step 6: Set Pre-shared Key
Configure IPSec Authentication
- Select "Use preshared key for authentication"
- Enter key:
torguard - Click OK
The pre-shared key is always "torguard" (lowercase) for all servers.

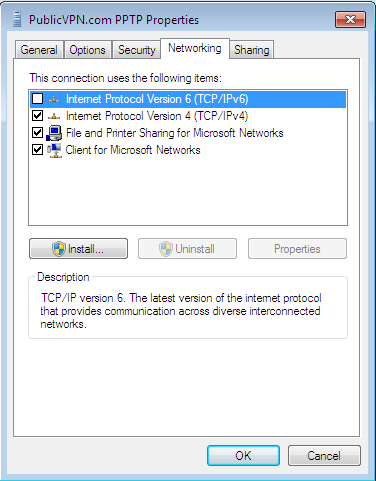
Step 7: Configure Networking
Network Protocol Settings
In the Networking tab, ensure only these items are checked:
- ✓ Internet Protocol Version 4 (TCP/IPv4)
- ✓ Client for Microsoft Networks
Uncheck all other protocols.
TorGuard only routes IPv4 traffic through L2TP.
Step 8: Connect to VPN
Establish Connection
- Click OK to save all settings
- Click on network icon in system tray
- Click your TorGuard VPN connection
- Click Connect
Verify connection at TorGuard IP Check
Troubleshooting
Error 789: Connection Failed
- L2TP is blocked by firewall/router
- Enable UDP ports 500, 4500
- Enable IPSec passthrough on router
- Try OpenVPN instead if blocked
Error 691: Authentication Failed
- Verify username/password
- Check pre-shared key is "torguard"
- Ensure using VPN credentials
- Try different server
Connection Timeout
- Server may be down - try another
- Windows Firewall blocking - add exception
- Router blocking VPN - check settings
- ISP blocking - use OpenVPN TCP 443
Security Recommendations
Protect Your Windows 7 System
Critical Security Measures:
- Upgrade to Windows 10/11 as soon as possible
- Use antivirus with real-time protection
- Enable Windows Firewall
- Avoid downloading software
- Use secure browsers (not Internet Explorer)
- Enable automatic VPN connection
- Regular malware scans
Migration Options:
- Windows 10: Still receiving updates
- Windows 11: Latest security features
- Linux: Free, secure alternative