OpenVPN via Ubuntu Network Manager
This guide covers OpenVPN setup using Ubuntu's built-in Network Manager GUI. Compatible with Ubuntu 20.04 LTS, 22.04 LTS, 24.04 LTS, and other Ubuntu-based distributions like Linux Mint and Pop!_OS.
Prerequisites
Before You Begin:
- Ubuntu 20.04 or newer (or compatible distribution)
- TorGuard VPN account with active subscription
- OpenVPN plugin for Network Manager (installation covered below)
- Config file from TorGuard Config Generator
Install Required Packages
Install OpenVPN Plugin
First, ensure the OpenVPN plugin for Network Manager is installed:
sudo apt update && sudo apt install network-manager-openvpn network-manager-openvpn-gnome
Note: You may need to restart Network Manager or reboot after installation.
Generate Configuration File
Download OpenVPN Config
- Visit TorGuard's Config Generator
- Select your preferred:
- Server location
- Port (443 TCP recommended)
- Encryption (AES-256-GCM recommended)
- Click Generate Config
- Download the .ovpn file to your Downloads folder
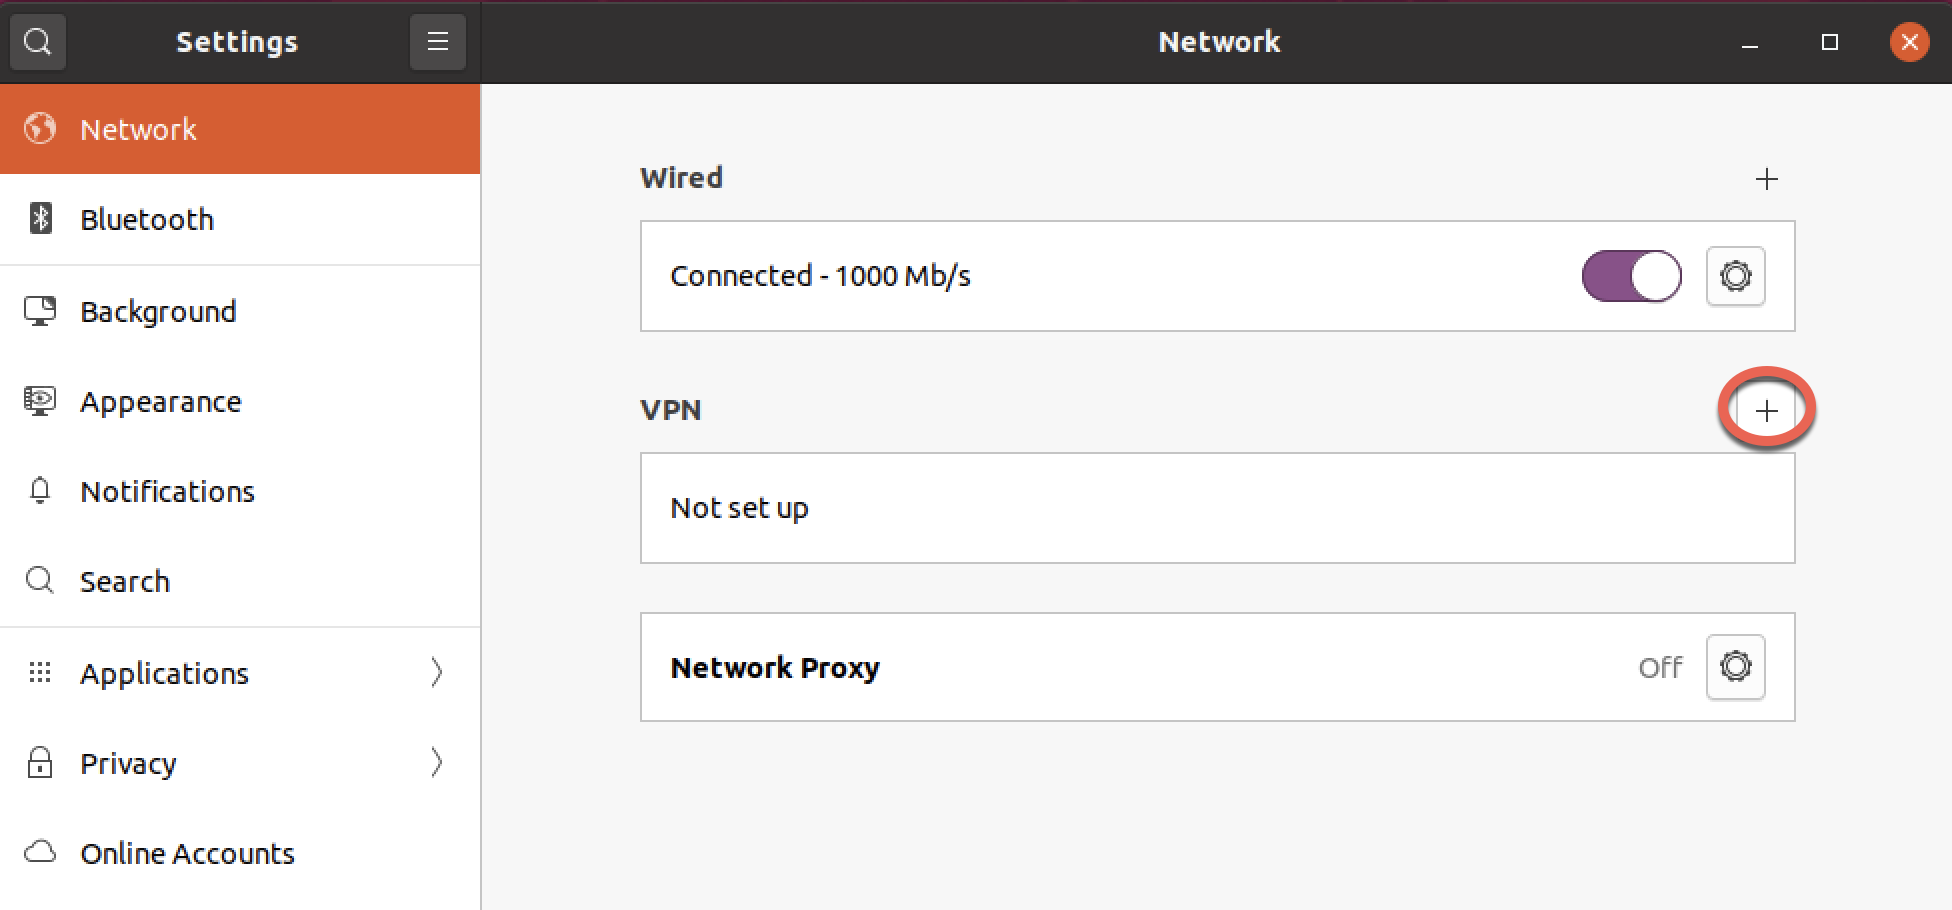
Step 1: Open Network Settings
Access VPN Configuration
Click the network icon in your system tray and select Settings.
Version-Specific Notes:
- Ubuntu 20.04/22.04: Network icon in top-right corner
- Ubuntu 24.04: Quick settings → Network icon
- GNOME 40+: Top-right system menu → Settings

Step 2: Add VPN Connection
Create New VPN Profile
In the Network settings window, locate the VPN section and click the + button to add a new connection.
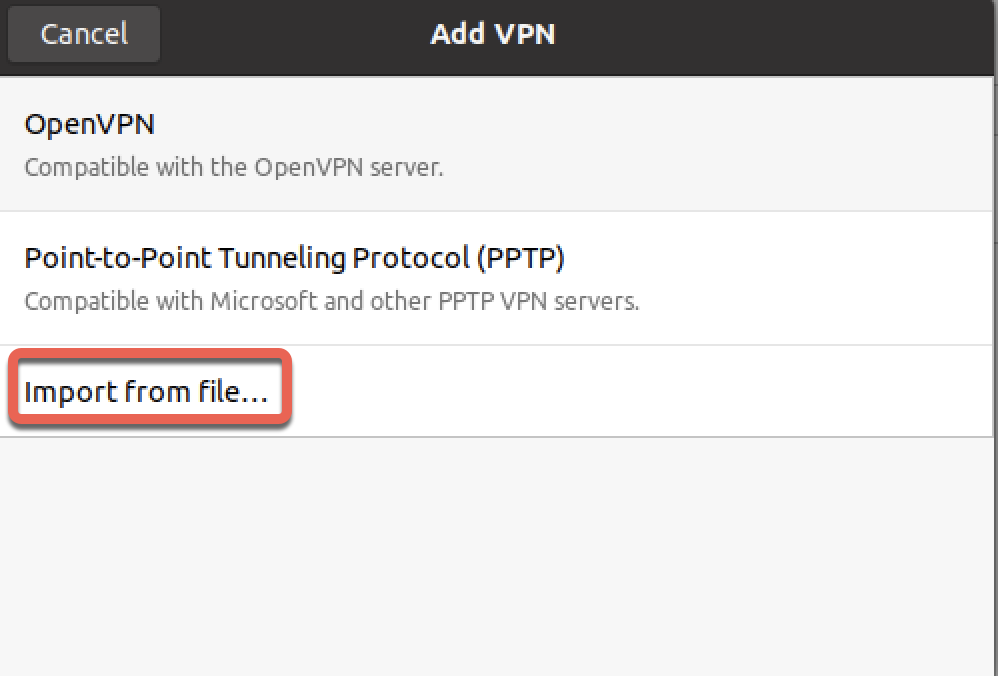
Step 3: Import Configuration
Import OpenVPN Config
- Select Import from file...
- Navigate to your Downloads folder
- Select the .ovpn file you downloaded
- Click Open
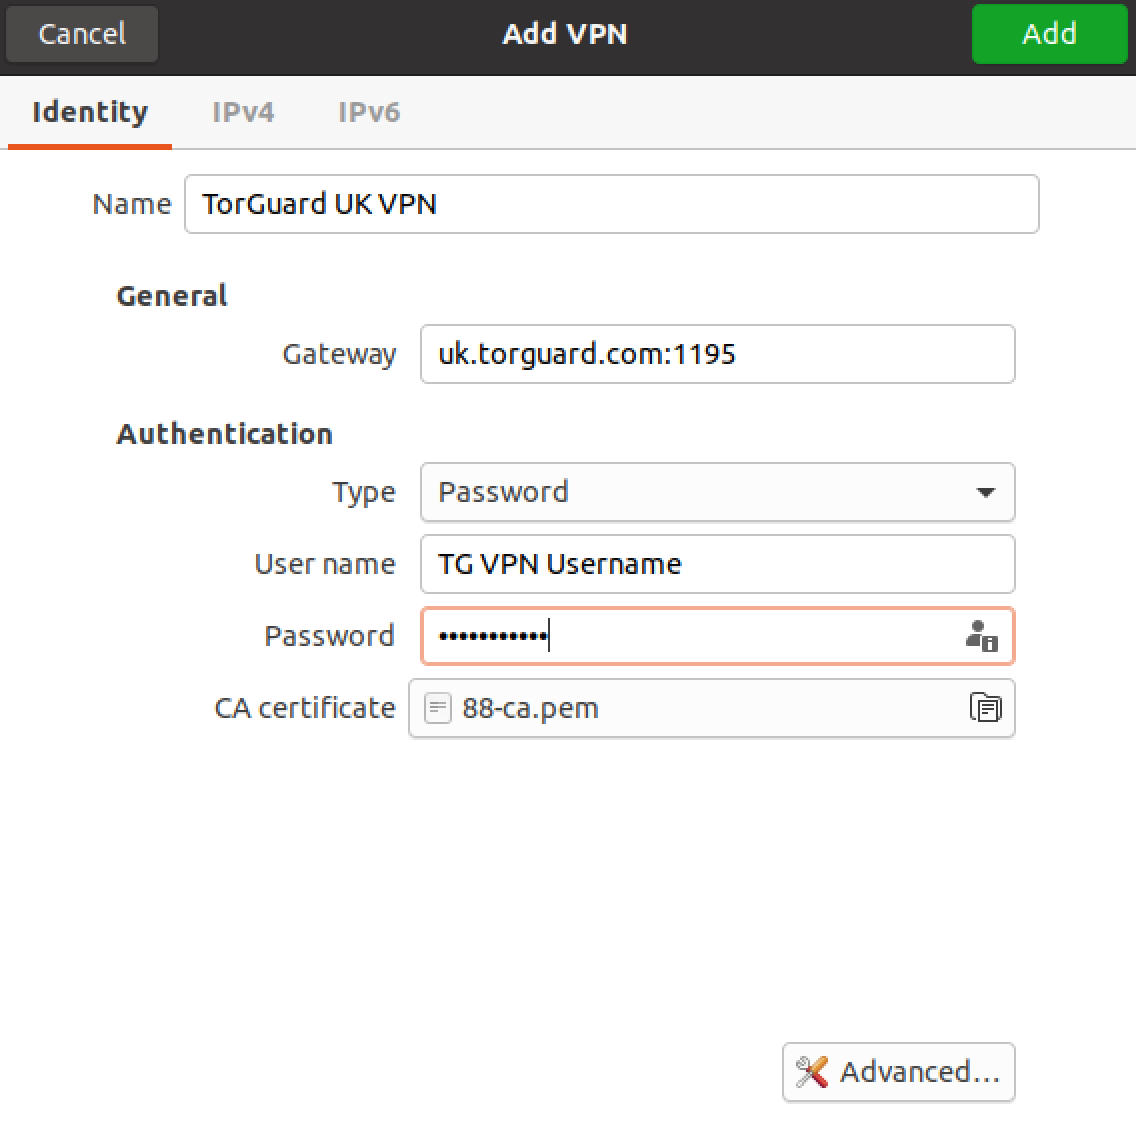
Step 4: Configure Authentication
Enter Credentials
After importing, configure the following:
| Name: | TorGuard VPN (or custom name) |
| Username: | Your VPN username |
| Password: | Your VPN password |
Click Add in the top-right corner to save.
Tip: Leave password field empty to be prompted each time (more secure).
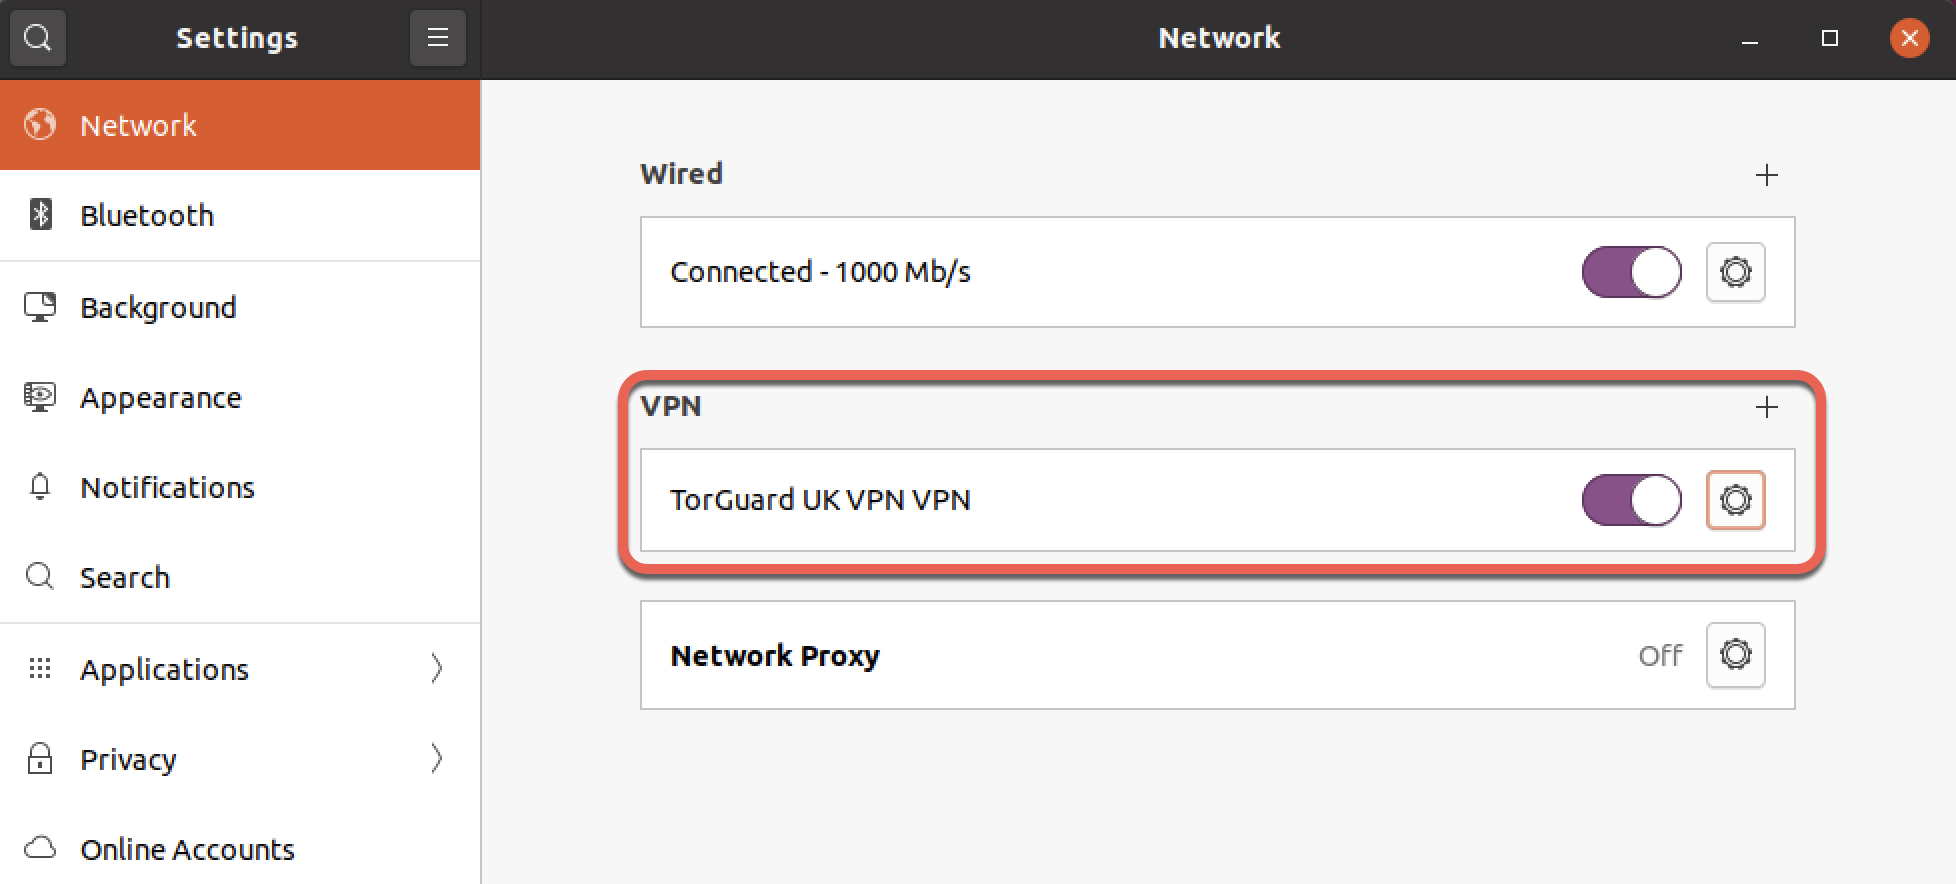
Step 5: Connect to VPN
Establish Connection
Toggle the switch next to your VPN profile to connect.
Alternative Connection Methods:
- System tray: Click network icon → VPN → Select connection
- Settings: Network → VPN → Toggle switch
- Terminal:
nmcli con up "TorGuard VPN"
Step 6: Verify Connection
Connection Indicators
When successfully connected:
- VPN icon appears in system tray
- Lock icon shows on network indicator
- Connection status shows "Connected"
Verify your IP has changed at TorGuard IP Check

Advanced Configuration
Optional Settings
1. Auto-connect on Startup
- Go to Network settings → VPN
- Click gear icon next to your VPN
- Enable "Connect automatically"
2. IPv6 Leak Protection
Edit connection → IPv6 Settings → Method: "Ignore"
3. DNS Configuration
Edit connection → IPv4 Settings → Additional DNS servers:
- 8.8.8.8, 8.8.4.4 (Google DNS)
- 1.1.1.1, 1.0.0.1 (Cloudflare DNS)
4. Kill Switch (Network Lock)
To prevent leaks if VPN disconnects:
sudo ufw enable && sudo ufw default deny outgoing && sudo ufw allow out on tun0
Troubleshooting
Import Failed
- Ensure network-manager-openvpn is installed
- Check config file isn't corrupted
- Try different server location config
- Manually create connection instead of import
Connection Failed
- Verify credentials (use VPN username, not email)
- Try TCP port 443 if UDP blocked
- Check system logs:
journalctl -u NetworkManager - Disable IPv6 if causing issues
No Internet After Connecting
- Check DNS settings
- Flush DNS cache:
sudo systemd-resolve --flush-caches - Restart Network Manager:
sudo systemctl restart NetworkManager - Try different VPN server
VPN Option Missing
If VPN section doesn't appear:
sudo apt install --reinstall network-manager-openvpn-gnome
Then restart or run:
sudo systemctl restart NetworkManager
Command Line Management
Useful nmcli Commands
List connections:
nmcli connection show
Connect to VPN:
nmcli connection up "TorGuard VPN"
Disconnect VPN:
nmcli connection down "TorGuard VPN"
Check VPN status:
nmcli connection show --active | grep vpn
Alternative Methods
Other Setup Options
- TorGuard Linux App: GUI application with WireGuard support
- OpenVPN CLI: For servers and advanced users
- WireGuard: Modern, faster protocol
- systemd-networkd: For minimal installations