Important Warning
This method will delete and replace any existing OpenVPN configuration on pfSense. If you have existing configurations you want to keep, please use the manual configuration guide instead.
XML Import Method Benefits
This method uses TorGuard's config generator to create a complete OpenVPN configuration that can be imported into pfSense with just a few clicks. Perfect for setting up multiple servers quickly or deploying standardized configurations.
Method Overview
Why Use XML Import?
XML Import Method
- Quick multi-server setup
- Automated configuration
- Less prone to manual errors
- Easy to redeploy
- Replaces existing configs
Manual Method
- Preserves existing configs
- More granular control
- One server at a time
- Takes more time
- Good for existing setups
Prerequisites
Before You Begin
- pfSense firewall with admin access
- Active TorGuard VPN account
- TorGuard VPN username and password
- Backup of existing OpenVPN configs (if any)
Step 1: Login to pfSense
Access your pfSense web interface (typically https://192.168.1.1)
Step 2: Choose VPN Servers
Select Server Locations
Decide which VPN gateway(s) you want to connect to. You can find all available servers on our network page.
If you have a dedicated/static IP, use that server hostname instead of the shared servers.
Step 3: Import Certificate Authority
Add TorGuard CA Certificate
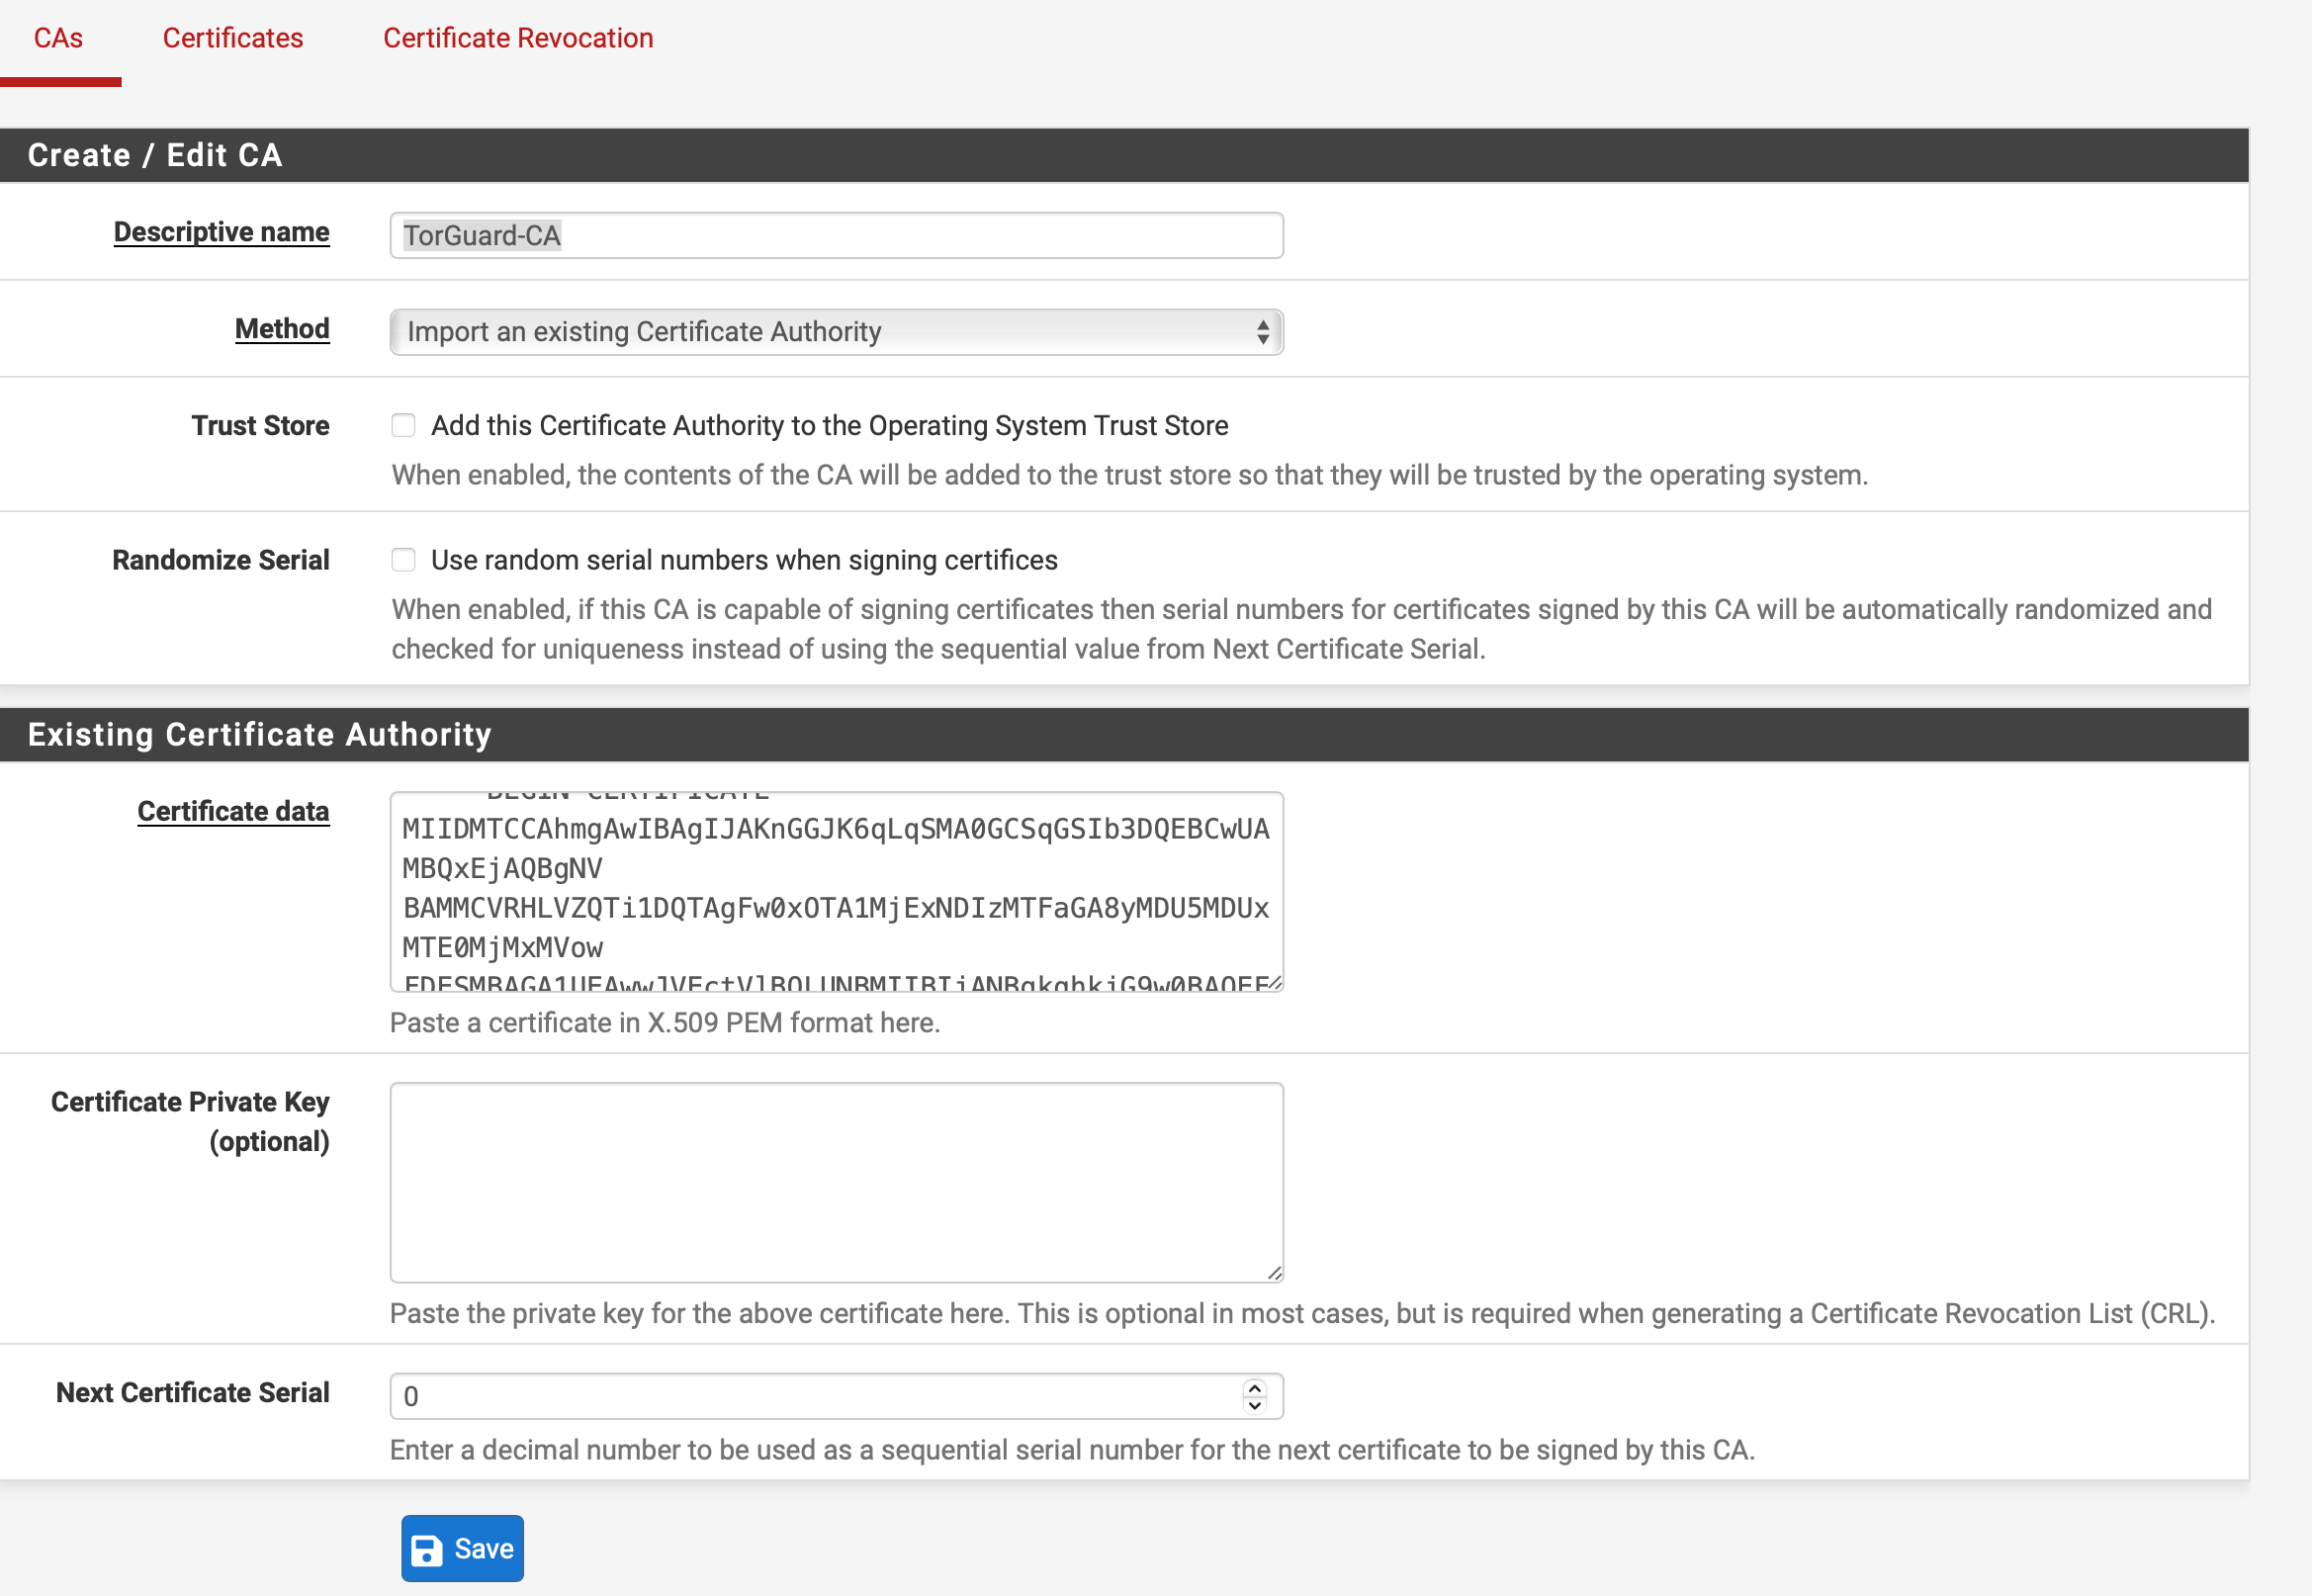
- Navigate to System → Cert Manager
- Click Add
- Configure the certificate:
- Descriptive name: TorGuard-CA
- Method: Import an existing Certificate Authority
- Download the OpenVPN CA certificate from our certificate page
- Open the certificate in a text editor
- Copy the entire contents into the Certificate data field
- Click Save
Step 4: Generate XML Configuration
Use TorGuard Config Generator
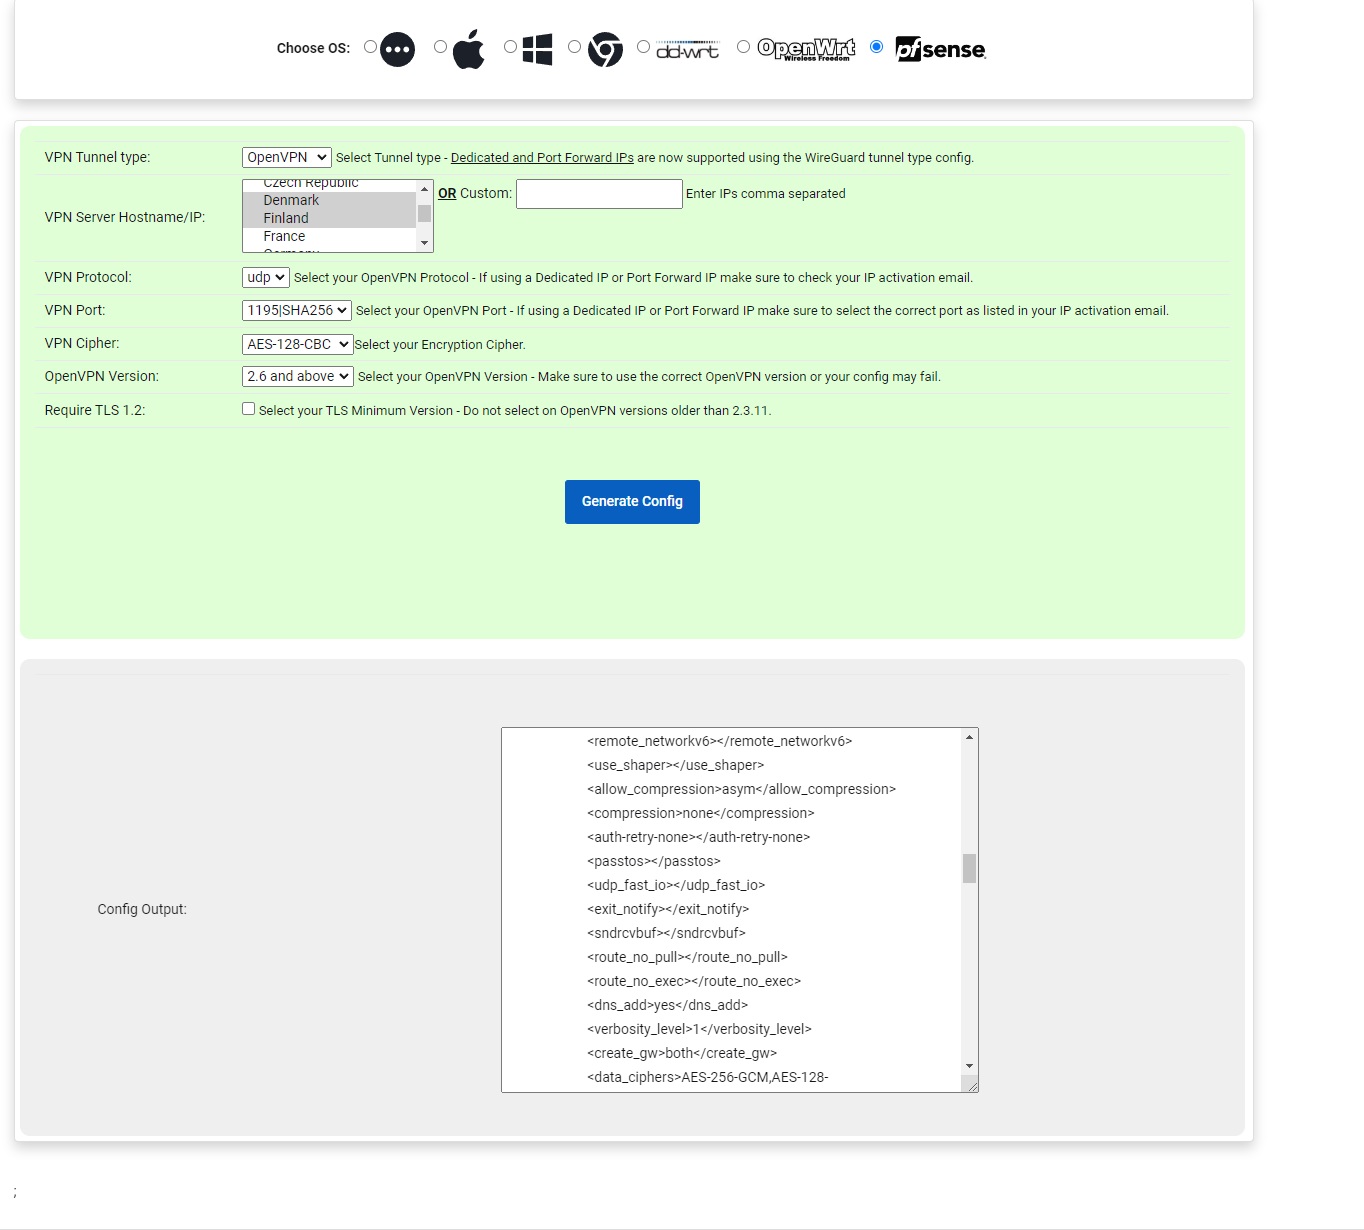
- Go to TorGuard website → Tools → Config Generator
- Select pfSense as the platform
- Choose your desired VPN server(s)
Pro Tip: Hold CTRL (or CMD on Mac) while clicking to select multiple servers!
- Select OpenVPN configuration options
- Click Generate
- An XML file will be downloaded to your computer
Step 5: Import XML Configuration
Restore OpenVPN Configuration
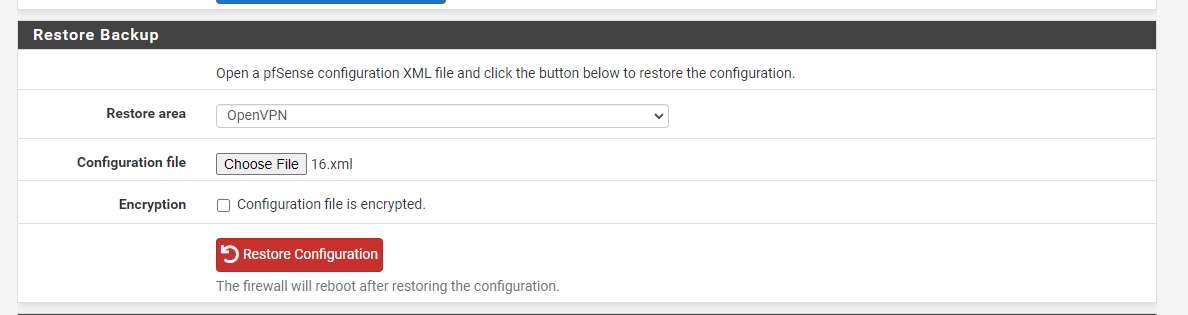
- In pfSense, navigate to Diagnostics → Backup & Restore
- Configure the restore:
- Restore Area: OpenVPN
- Configuration File: Choose the downloaded XML file
- Click Restore Configuration
This will replace ALL existing OpenVPN configurations!
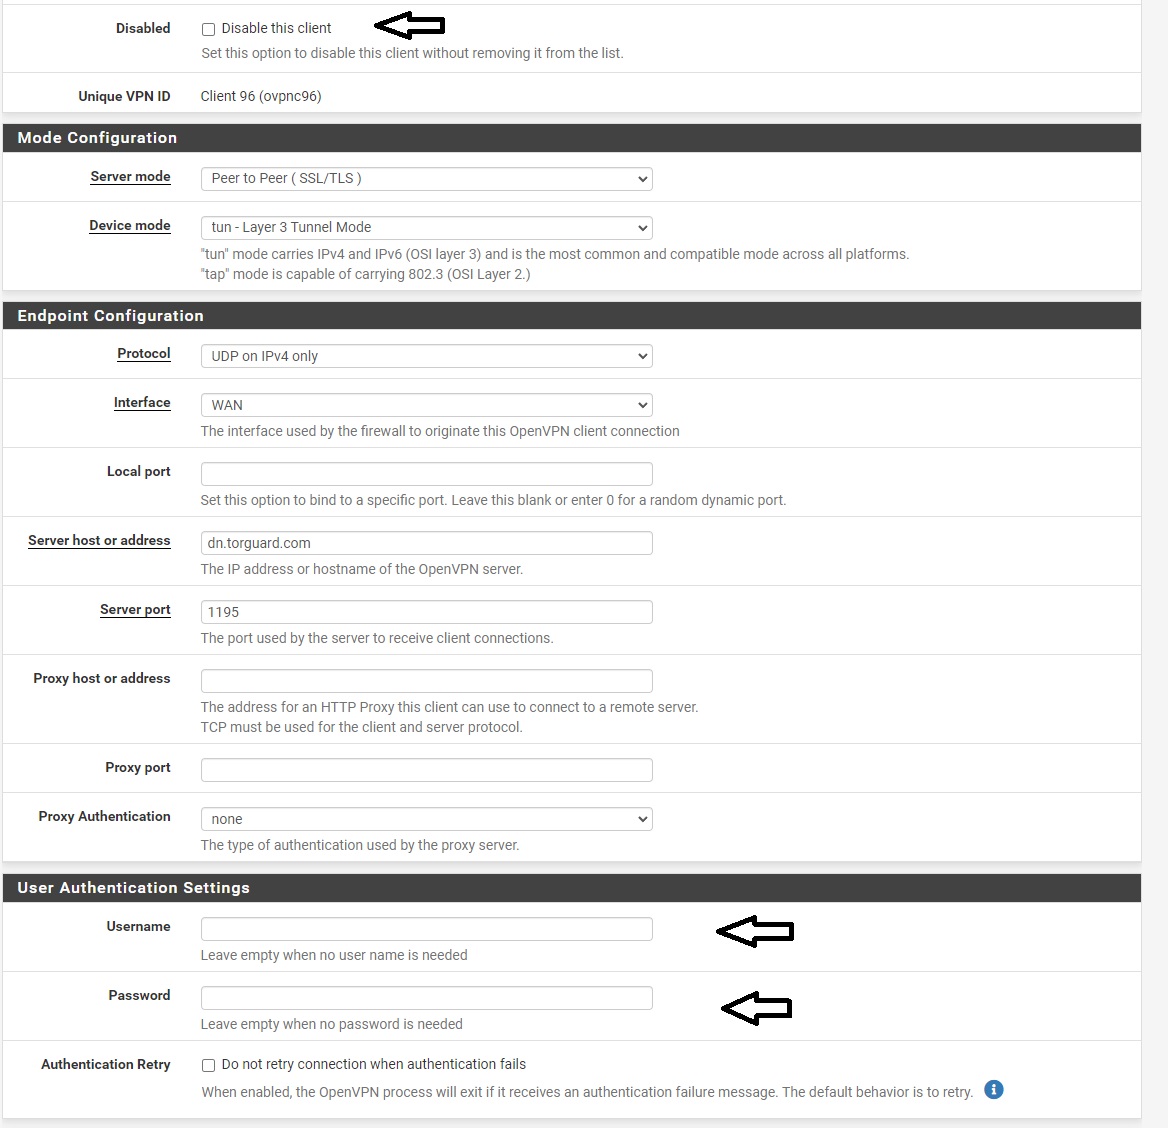
Step 6: Enable and Configure Credentials
Activate OpenVPN Clients
Imported configurations are disabled by default and need your VPN credentials.
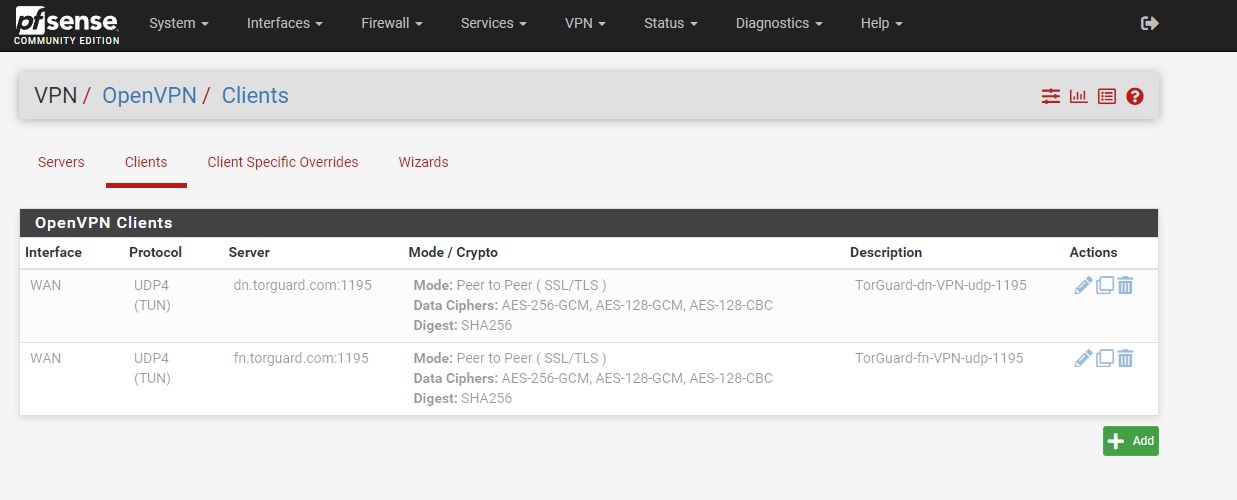
- Navigate to VPN → OpenVPN → Clients
- Click the edit icon (✏️) next to the configuration you want to activate
Step 7: Configure Client Settings
Enable and Add Credentials
- Uncheck "Disabled" to enable the client
- Under User Authentication Settings:
- Username: Your TorGuard VPN username
- Password: Your TorGuard VPN password
- Authentication Retry: Leave unchecked
- Click Save
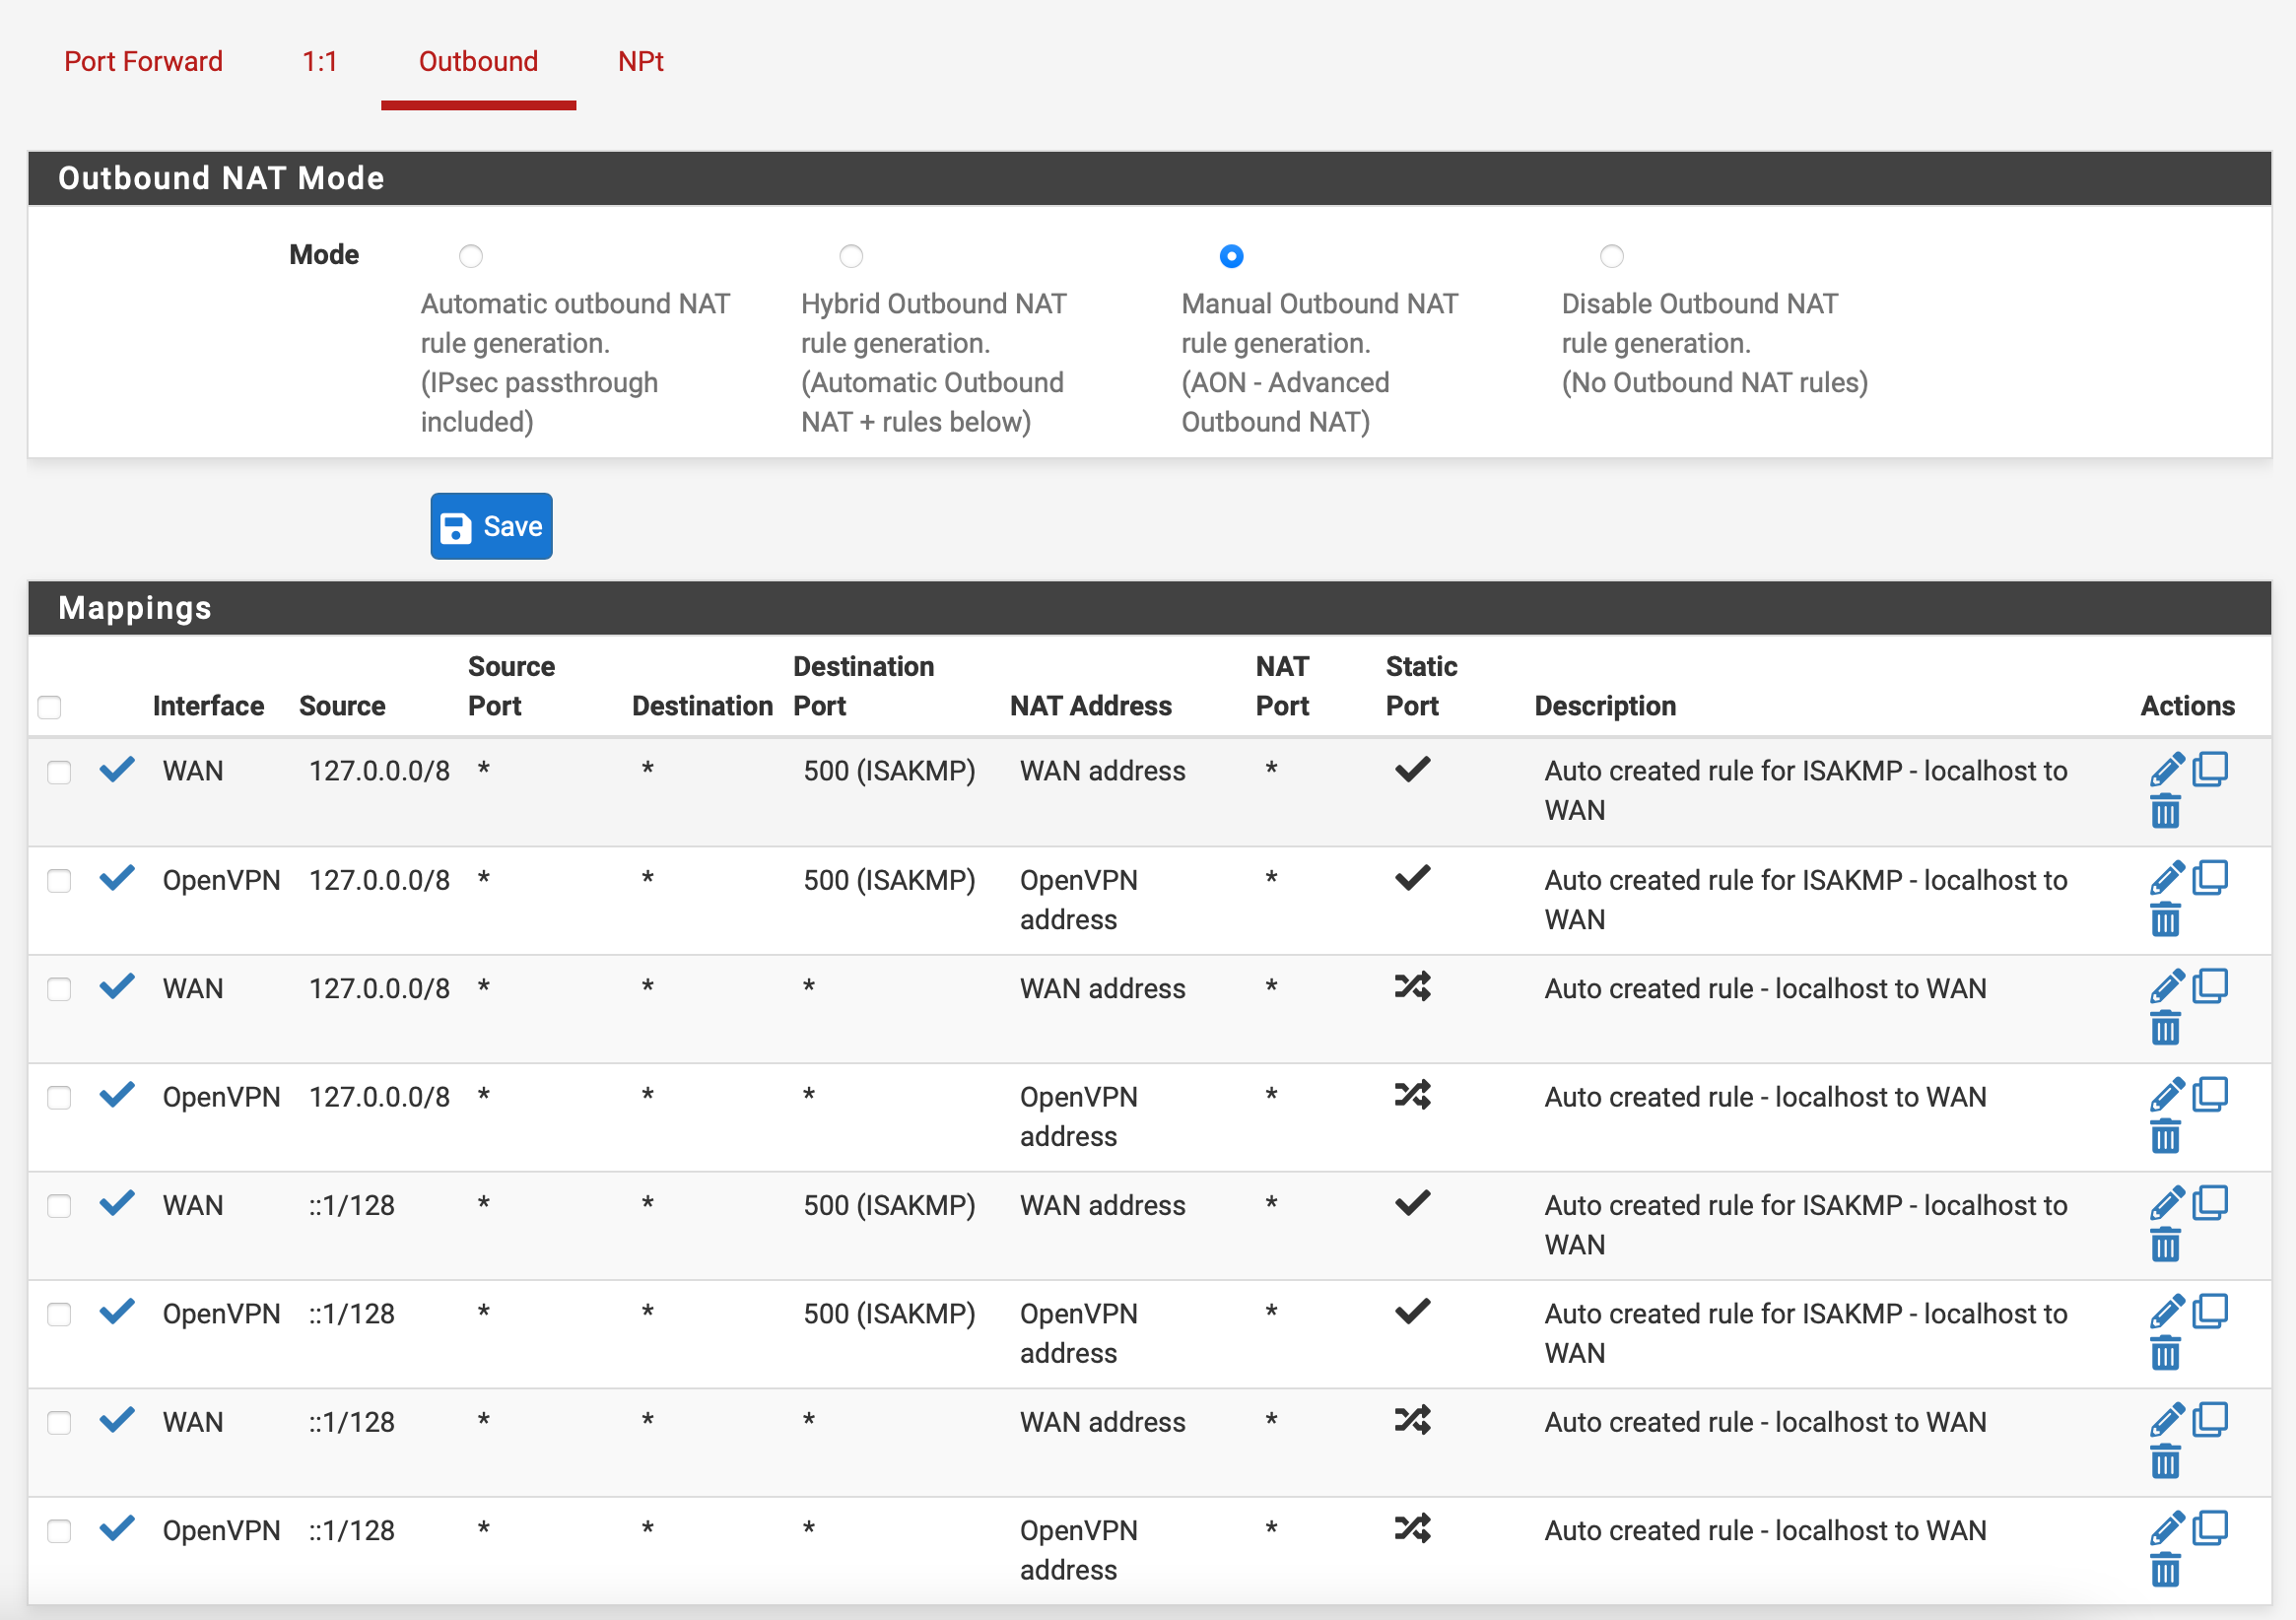
Step 8: Configure NAT Rules
Setup Outbound NAT
- Navigate to Firewall → NAT → Outbound
- Select Manual Outbound NAT rule generation
- Click Save
- You should see 4 default rules
- For each rule:
- Click the "copy" icon (📄) to duplicate the rule
- Change the Interface to OpenVPN
- Click Save
- After duplicating all 4 rules, click Apply Changes
Step 9: Configure DNS
Set DNS Servers
- Navigate to System → General Setup
- Configure DNS servers:
- DNS Server 1: 1.1.1.1
- DNS Server 2: 10.8.0.1
- Click Save
DNS Server Explanation:
- 1.1.1.1: Cloudflare's public DNS for reliability
- 10.8.0.1: TorGuard's internal DNS for VPN queries
Step 10: Verify Connection
Check VPN Status
- Navigate to Status → OpenVPN
- Verify your OpenVPN client shows as "up" with a green status

Verify IP Change
Visit TorGuard's What's My IP tool to confirm:
- Your IP address has changed to the VPN server location
- DNS leak test shows no leaks
- Your real IP is hidden
Managing Multiple Servers
Working with Multiple Configurations
If you imported multiple servers:
- Each server appears as a separate client in the list
- Enable only one at a time for standard use
- Configure failover using gateway groups for redundancy
- Each needs credentials configured individually
Tip: Name your clients descriptively (e.g., "TorGuard-USA-NY") for easy identification.
Troubleshooting
Import Failed
- Ensure you selected "OpenVPN" as restore area
- Verify the XML file isn't corrupted
- Try generating a fresh configuration
- Check pfSense version compatibility
Connection Won't Establish
- Double-check username and password
- Verify the client is enabled (not disabled)
- Check firewall rules aren't blocking
- Try a different server location
No Internet Access
- Verify NAT rules are configured correctly
- Check DNS servers are set
- Ensure default gateway is set to VPN
- Test with a single client device first