Remote LAN Access via Private VPN Cloud
This advanced configuration allows you to securely access your entire home or office network from anywhere in the world. By using PrivateRouter OpenWRT as a WireGuard gateway, all devices on your local network become accessible through TorGuard's Private VPN Cloud.
Understanding the Architecture
Network Topology Overview
Remote Devices
(Android, Windows, etc.)
Private VPN Cloud
(WireGuard Server)
PrivateRouter Gateway
(192.168.8.1/24)
Local Network
(All LAN devices)
Key Components:
- PrivateRouter OpenWRT: Acts as WireGuard gateway for your LAN
- Private VPN Cloud: TorGuard's WireGuard server infrastructure
- WireGuard Peers: Remote devices connecting to access LAN
- Local Subnet: Your home/office network (e.g., 192.168.8.1/24)
Use Cases
Why Set Up Remote LAN Access?
Home Server Access
Access NAS, media servers, or home automation from anywhere
Remote Work
Connect to office resources as if you were on-site
Network Devices
Use printers, cameras, and IoT devices remotely
Secure Access
Encrypted tunnel prevents exposure to public internet
Prerequisites
Before You Begin
- Active TorGuard Private VPN Cloud subscription
- PrivateRouter OpenWRT device (or compatible OpenWRT router)
- Access to router admin panel (default: 192.168.8.1)
- Basic understanding of IP subnets and networking
- Devices you want to connect remotely (mobile, laptop, etc.)
Step 1: Configure Gateway Device in Private VPN Cloud
Add PrivateRouter as Gateway
- Login to your TorGuard account
- Click Manage Service under your Private Cloud
- Click the "Add device" button
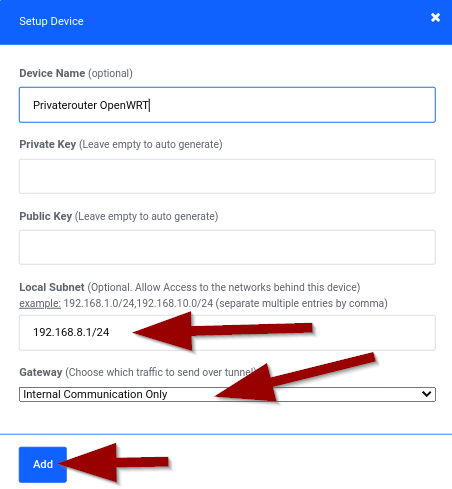
- Configure the gateway device:
- Device Name: "PrivateRouter OpenWRT" (or descriptive name)
- Local Subnet:
192.168.8.1/24(your router's subnet) - Gateway: Select "Internal Communication Only"
- Click Add button
Important: The Local Subnet must match your router's LAN subnet exactly. Common subnets include 192.168.1.1/24, 192.168.0.1/24, or 10.0.0.1/24.
Step 2: Set Default Gateway
Define Gateway for Other Peers
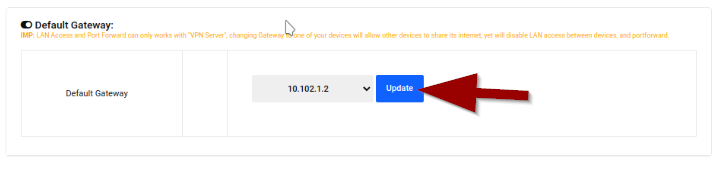
- Scroll down to "Default Gateway" section
- Select the WireGuard peer IP that was assigned (e.g., 10.102.1.2)
- Click Update button
This step tells all other WireGuard peers to route their traffic through your PrivateRouter, giving them access to your LAN.
Step 3: Add Remote Access Devices
Create WireGuard Peers
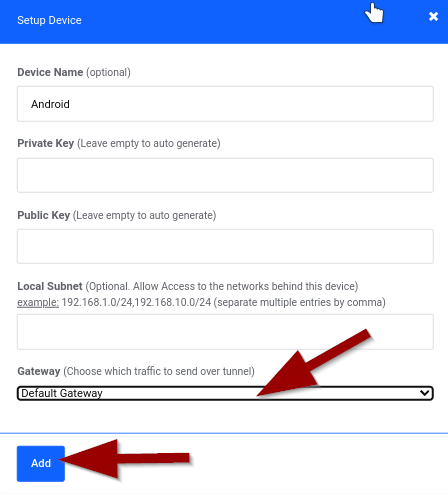
- Click "Add device" button again
- Configure each remote device:
- Device Name: Descriptive name (e.g., "Android", "Work Laptop")
- Gateway: Select "Default Gateway"
- Leave Local Subnet empty for client devices
- Click Add
- Repeat for each device that needs remote access
Step 4: Download Gateway Configuration
Get WireGuard Config
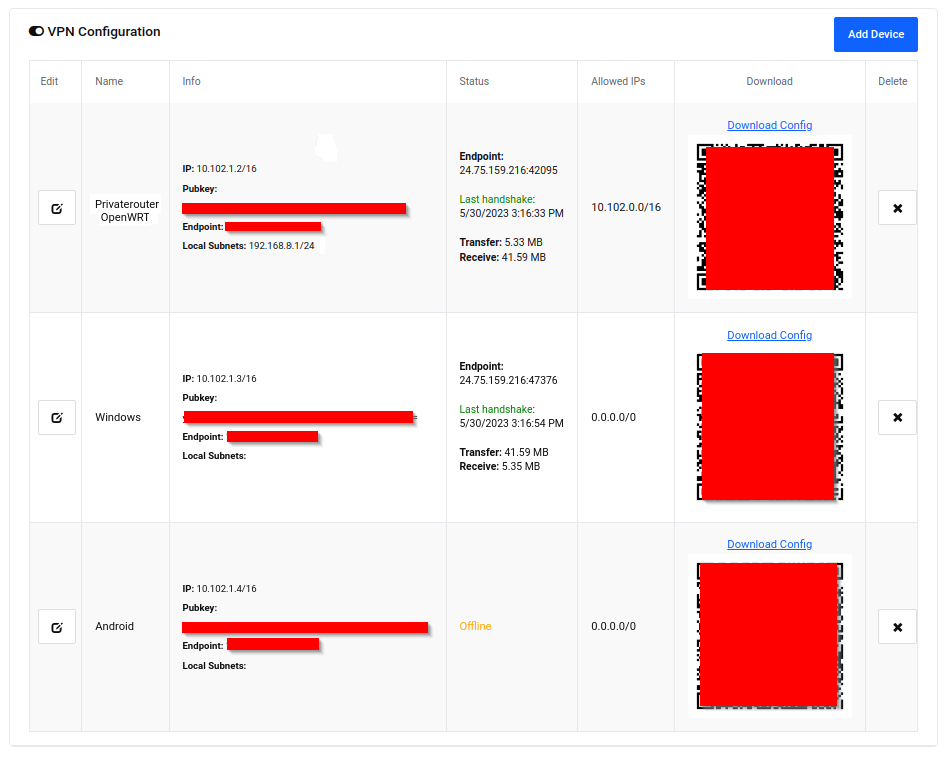
- Locate your gateway device (PrivateRouter OpenWRT) in the device list
- Click "Download config" link
- Save the WireGuard configuration file
- Open the file to view its contents (you'll need to copy this)
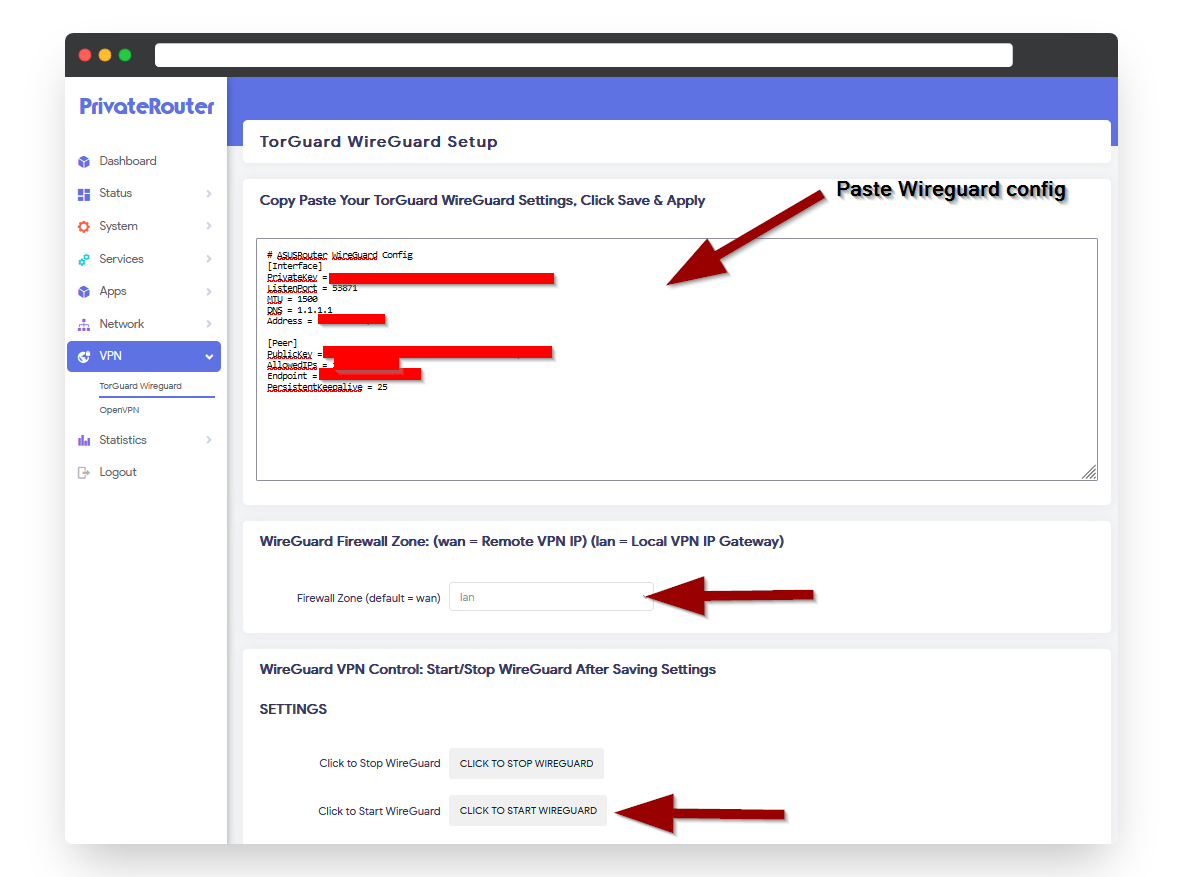
Step 5: Configure PrivateRouter OpenWRT
Setup WireGuard on Router
- Connect to PrivateRouter via WiFi or Ethernet
- Open browser and navigate to
192.168.8.1 - Login with admin credentials
- Navigate to: VPN tab → TorGuard WireGuard
- Open the gateway config file downloaded in Step 4
- Copy and paste entire contents into the text area
- Important: In the dropdown menu, select "lan" (not wan)
- Click "Click to Start WireGuard" button
Selecting "lan" instead of "wan" is crucial - this allows WireGuard peers to access your local network.
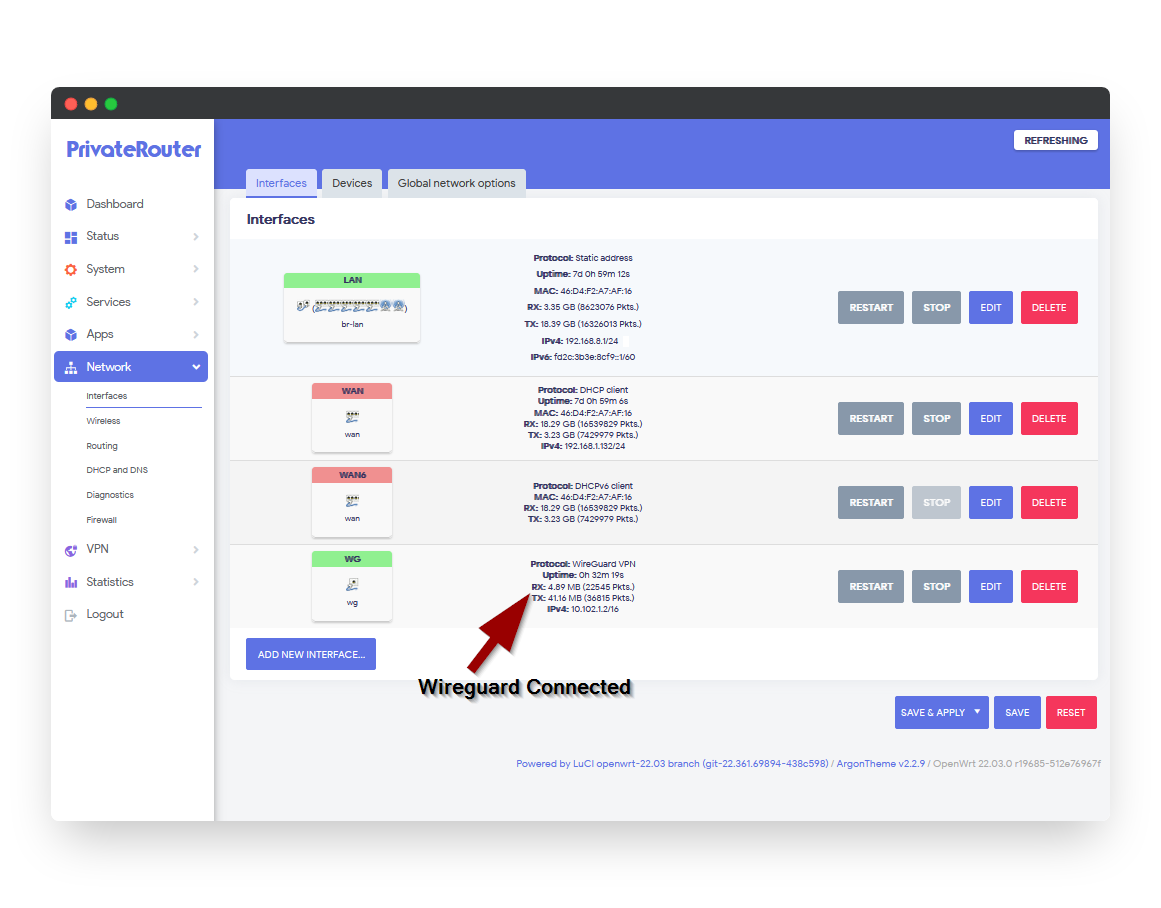
Step 6: Verify Gateway Connection
Confirm WireGuard is Active
- In PrivateRouter, go to Network tab → Interfaces
- Look for the "WG" interface
- Verify you see packet flow under RX and TX counters
- If packets are flowing, WireGuard is connected successfully!
Step 7: Connect Remote Devices
Setup Client Connections
- Download WireGuard configs for each remote device from Private VPN Cloud
- Install WireGuard app on each device
- Import the configuration file
- Connect to WireGuard
- Test LAN access by pinging router:
ping 192.168.8.1
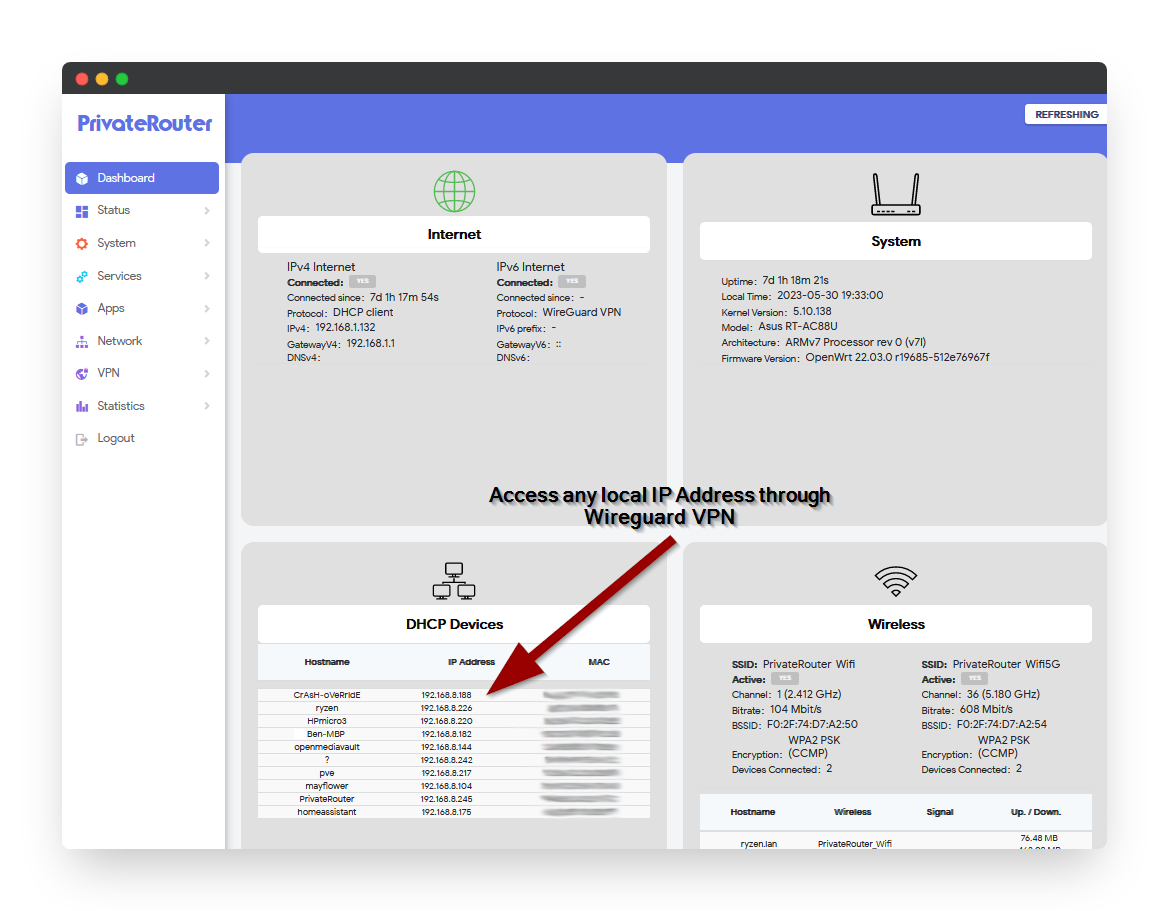
Testing Remote Access
Verify LAN Access
From Remote Device:
- Test Router Access:
ping 192.168.8.1 - Access Router Admin:
Open browser and navigate to
http://192.168.8.1 - Test Other LAN Devices:
- Ping other devices:
ping 192.168.8.100 - Access network shares:
\\192.168.8.100\share - Connect to services:
http://192.168.8.50:8080
- Ping other devices:
Security Considerations
Best Practices
- Firewall Rules: Configure router firewall to limit access to necessary services only
- Strong Passwords: Use complex passwords for all network devices
- Regular Updates: Keep PrivateRouter firmware updated
- Access Control: Only create WireGuard peers for trusted devices
- Monitoring: Regularly check connected peers in Private VPN Cloud dashboard
- Subnet Isolation: Consider using VLANs for sensitive devices
Advanced Configuration
Additional Options
Multiple Subnets:
To access multiple subnets, add them to the Local Subnet field separated by commas:
192.168.8.0/24,10.0.0.0/24,172.16.0.0/24
Port Forwarding:
Configure specific port forwards in PrivateRouter for enhanced security instead of full LAN access
DNS Configuration:
Set up local DNS server (Pi-hole, etc.) for remote devices to use
Troubleshooting
Cannot Access LAN Devices
- Verify "lan" is selected in PrivateRouter WireGuard settings
- Check subnet matches exactly (including CIDR notation)
- Ensure Windows Firewall isn't blocking connections
- Verify LAN devices allow connections from VPN subnet
WireGuard Won't Connect
- Check PrivateRouter has internet connectivity
- Verify configuration was pasted correctly
- Ensure no other VPN is running on router
- Try regenerating configs in Private VPN Cloud
Slow Performance
- Check router CPU usage during transfers
- Verify internet upload speed at gateway location
- Consider upgrading router for better WireGuard performance
- Test with MTU adjustments in WireGuard config