Pi-hole DNS on TorGuard Cloud
Transform your internet experience with Pi-hole - a network-wide ad blocker that works at the DNS level. By hosting it on TorGuard's Private VPN Cloud, you get a secure, private DNS server accessible from anywhere while blocking ads, trackers, and malicious domains for your entire network.
What is Pi-hole?
Understanding Pi-hole DNS Filtering
Network-Wide Ad Blocking
Blocks ads before they reach any device on your network
Privacy Protection
Prevents tracking domains from collecting your data
DNS Analytics
Monitor and analyze DNS queries across your network
Performance Boost
Faster browsing by blocking ads at DNS level
Benefits of Cloud-Hosted Pi-hole
Why Use TorGuard's Pi-hole Cloud App?
- Always Available: Access your Pi-hole DNS from anywhere in the world
- No Hardware Required: No need for Raspberry Pi or home server
- High Reliability: Enterprise-grade infrastructure with 99.9% uptime
- Easy Management: Web-based admin panel accessible from anywhere
- VPN Integration: Works seamlessly with TorGuard VPN services
- Multiple Device Support: Use on routers, computers, and mobile devices
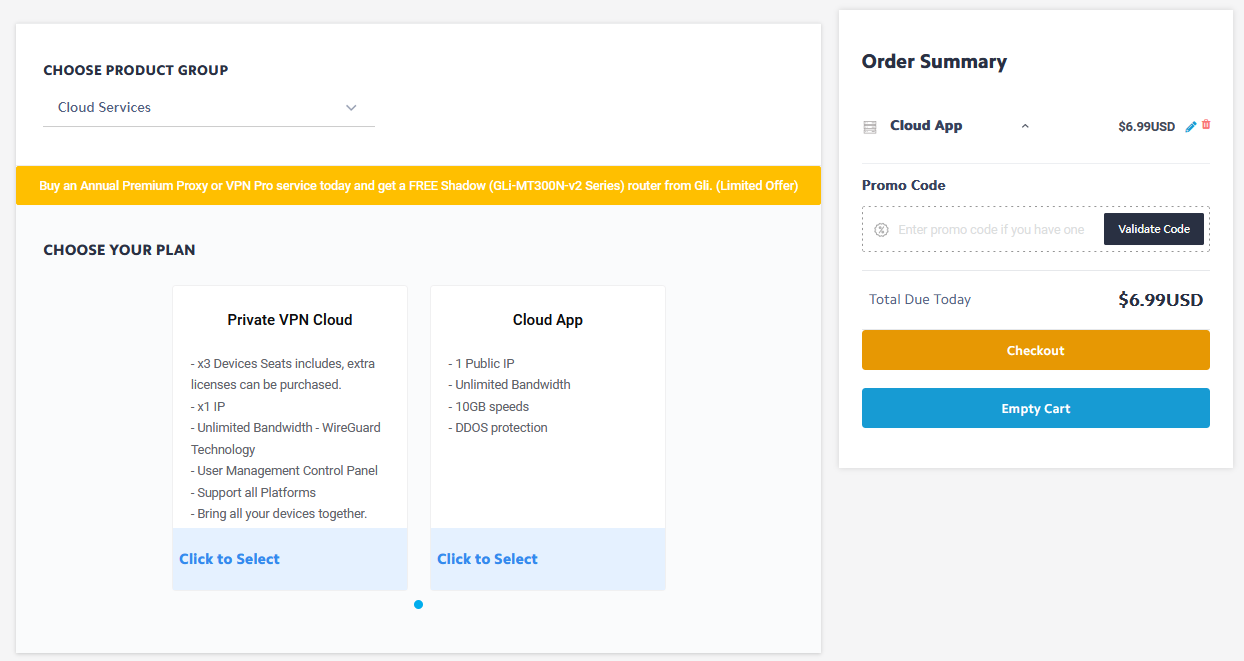
Step 1: Purchase TorGuard Pi-hole Cloud App
Get Your Pi-hole Instance
- Visit TorGuard's Pi-hole Cloud App page
- Select your billing cycle (monthly/yearly)
- Complete the purchase
- Your Pi-hole server will be instantly provisioned and ready to use
Pi-hole Cloud Apps can run standalone or integrate with your Private VPN Cloud WireGuard server for enhanced security.
Step 2: Access Your Pi-hole Service
Manage Your Pi-hole
- Go to My Services in your TorGuard account
- Find your Pi-hole service
- Click Manage button
- Select Manage App

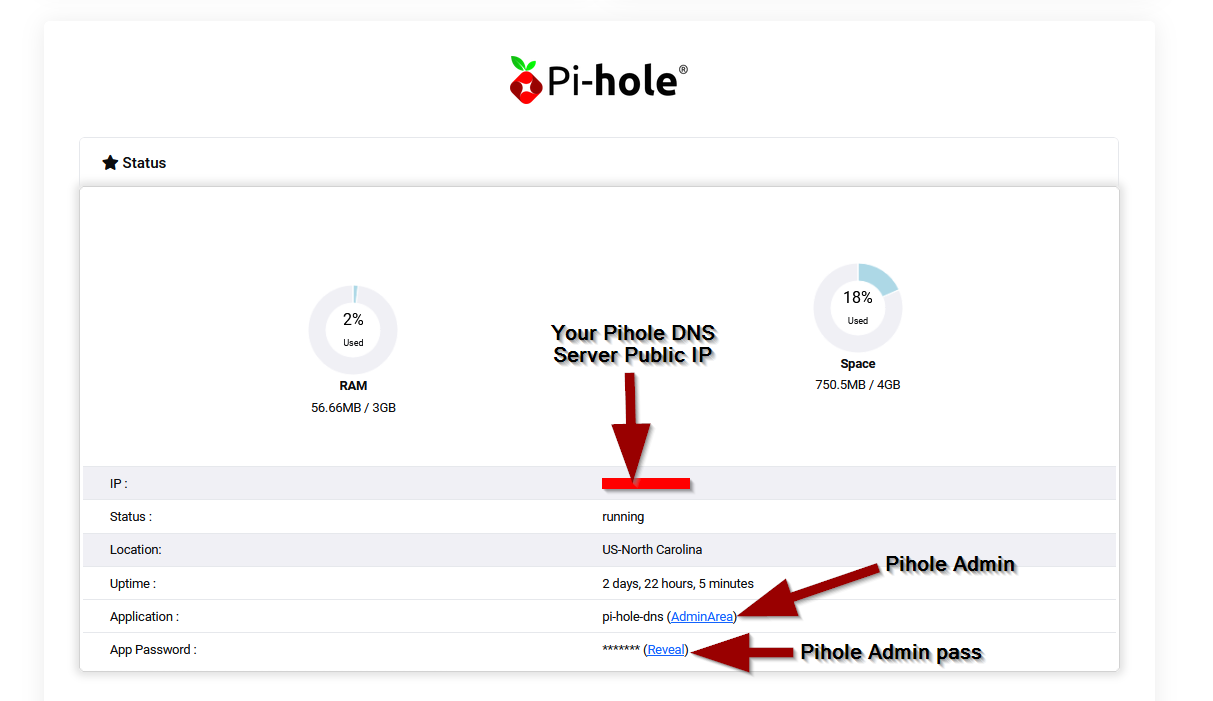
Step 3: Get Your Pi-hole Details
Pi-hole Information
On the Pi-hole admin screen, you'll find:
- Public Pi-hole IP Address: Your DNS server IP to use on devices
- Admin Password: For accessing Pi-hole web interface
- Admin URL: Link to Pi-hole dashboard
Save these credentials securely. The IP address is what you'll configure on your devices and routers.
Step 4: Secure Your Pi-hole with Firewall Rules
Critical Security Configuration
By default, your Pi-hole is publicly accessible. This poses security risks:
- Brute force attacks on admin interface
- Unauthorized DNS usage by others
- Potential DDoS amplification
Important: Always secure your Pi-hole with firewall rules to prevent unauthorized access!
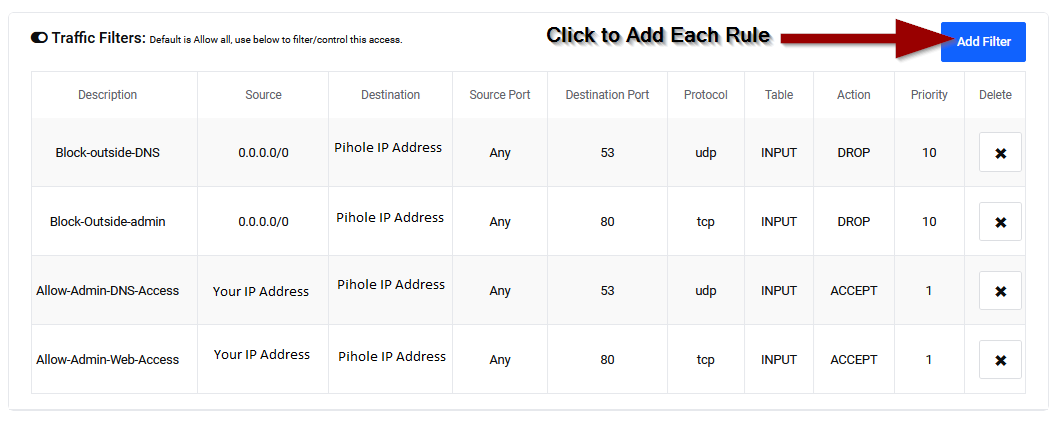
Configure Firewall Rules
- Click Add Filter button in your Pi-hole management panel
- Add the following firewall rules:
Firewall Rules to Add:
Rule 1: Block All Web Admin Access
- Action: Block
- Protocol: TCP
- Source: 0.0.0.0/0 (all IPs)
- Destination: [Your Pi-hole IP]
- Port: 80
Rule 2: Allow Your IP to Web Admin
- Action: Allow
- Protocol: TCP
- Source: [Your Home/VPN IP]
- Destination: [Your Pi-hole IP]
- Port: 80
Rule 3: Block All DNS Access
- Action: Block
- Protocol: UDP
- Source: 0.0.0.0/0
- Destination: [Your Pi-hole IP]
- Port: 53
Rule 4: Allow Your Network DNS Access
- Action: Allow
- Protocol: UDP
- Source: [Your Home/VPN IP]
- Destination: [Your Pi-hole IP]
- Port: 53
Note: Add additional allow rules for each IP address that needs access (office, mobile networks, etc.)
Router Configuration Examples
Configure Your Router to Use Pi-hole
To protect your entire network, configure your router's DNS settings to use your Pi-hole IP address.
Select Your Router Type:
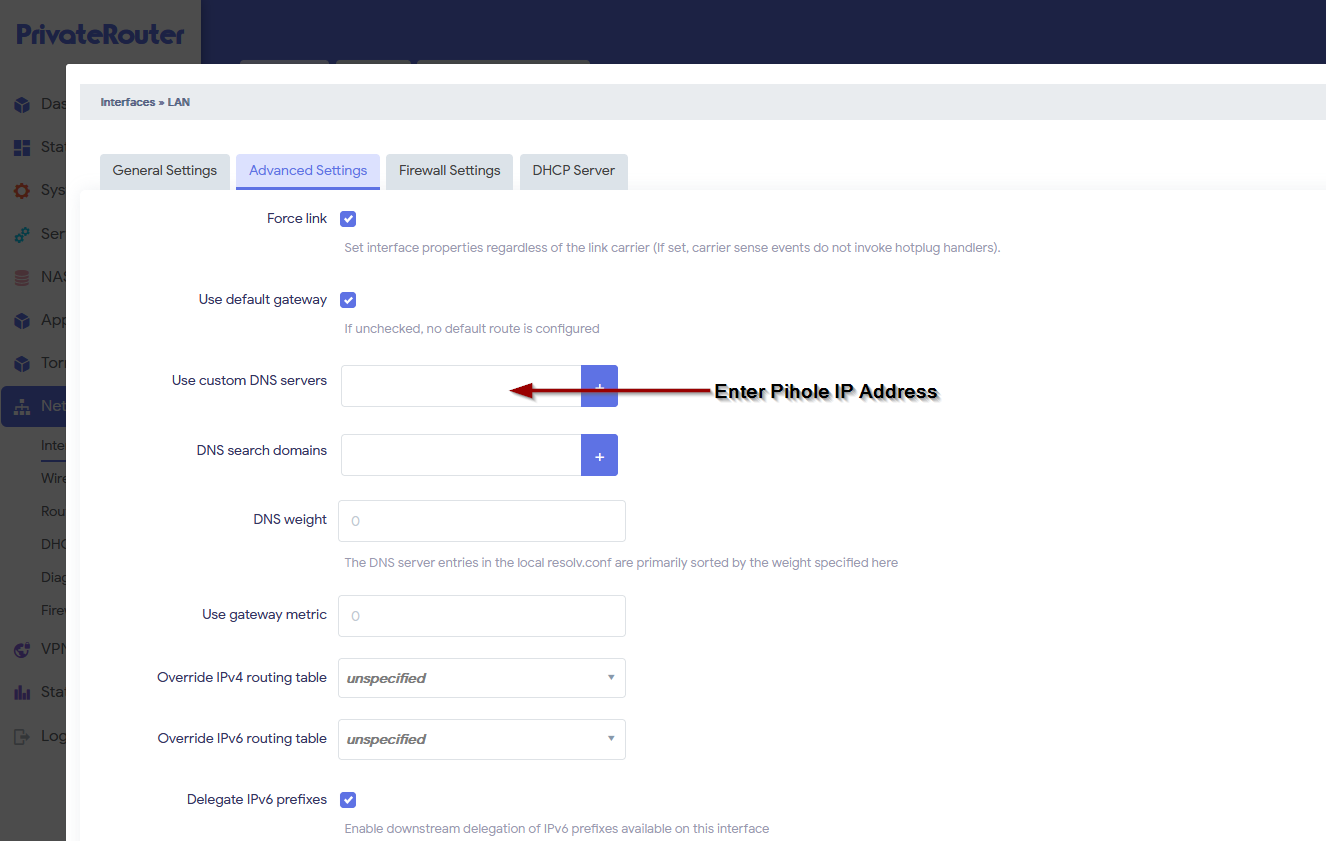
PrivateRouter OpenWRT
- Navigate to Network → Interfaces
- Click Edit on LAN interface
- Go to Advanced Settings tab
- Under "Use Custom DNS Servers", click +
- Enter your Pi-hole IP address
- Save & Apply
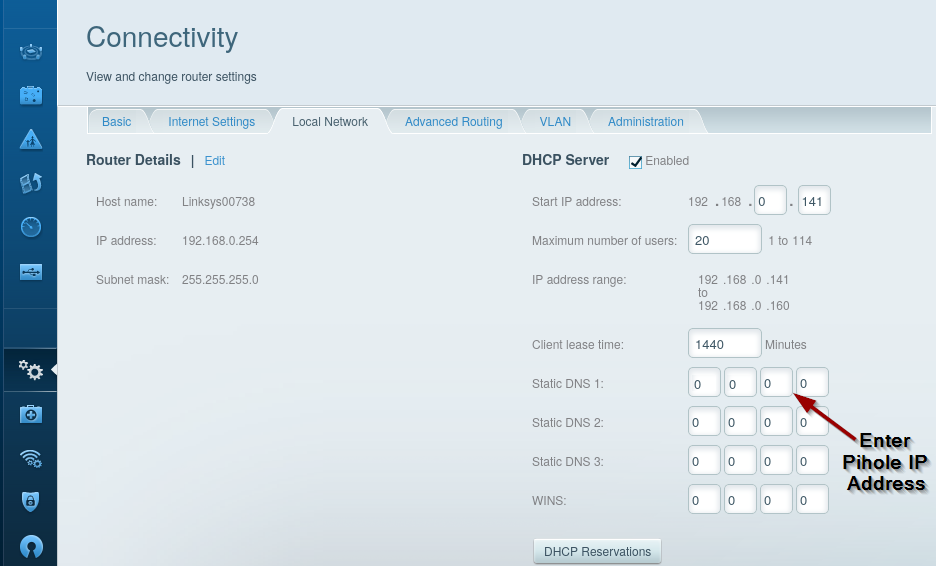
Linksys Routers
- Click Connectivity tab
- Select Local Network tab
- Under DHCP Server settings
- Enter Pi-hole IP in Static DNS 1
- Apply Settings
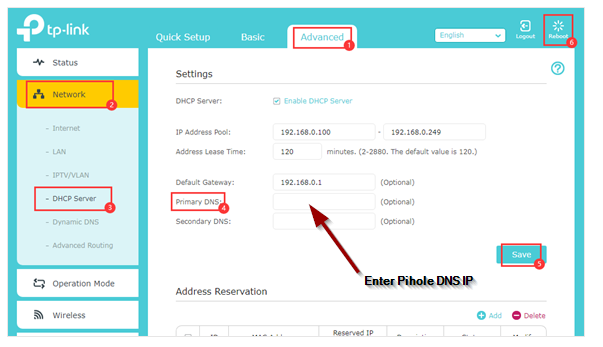
TP-Link Routers
- Go to Advanced tab
- Select Network → DHCP Server
- Enter Pi-hole IP as Primary DNS
- Save settings
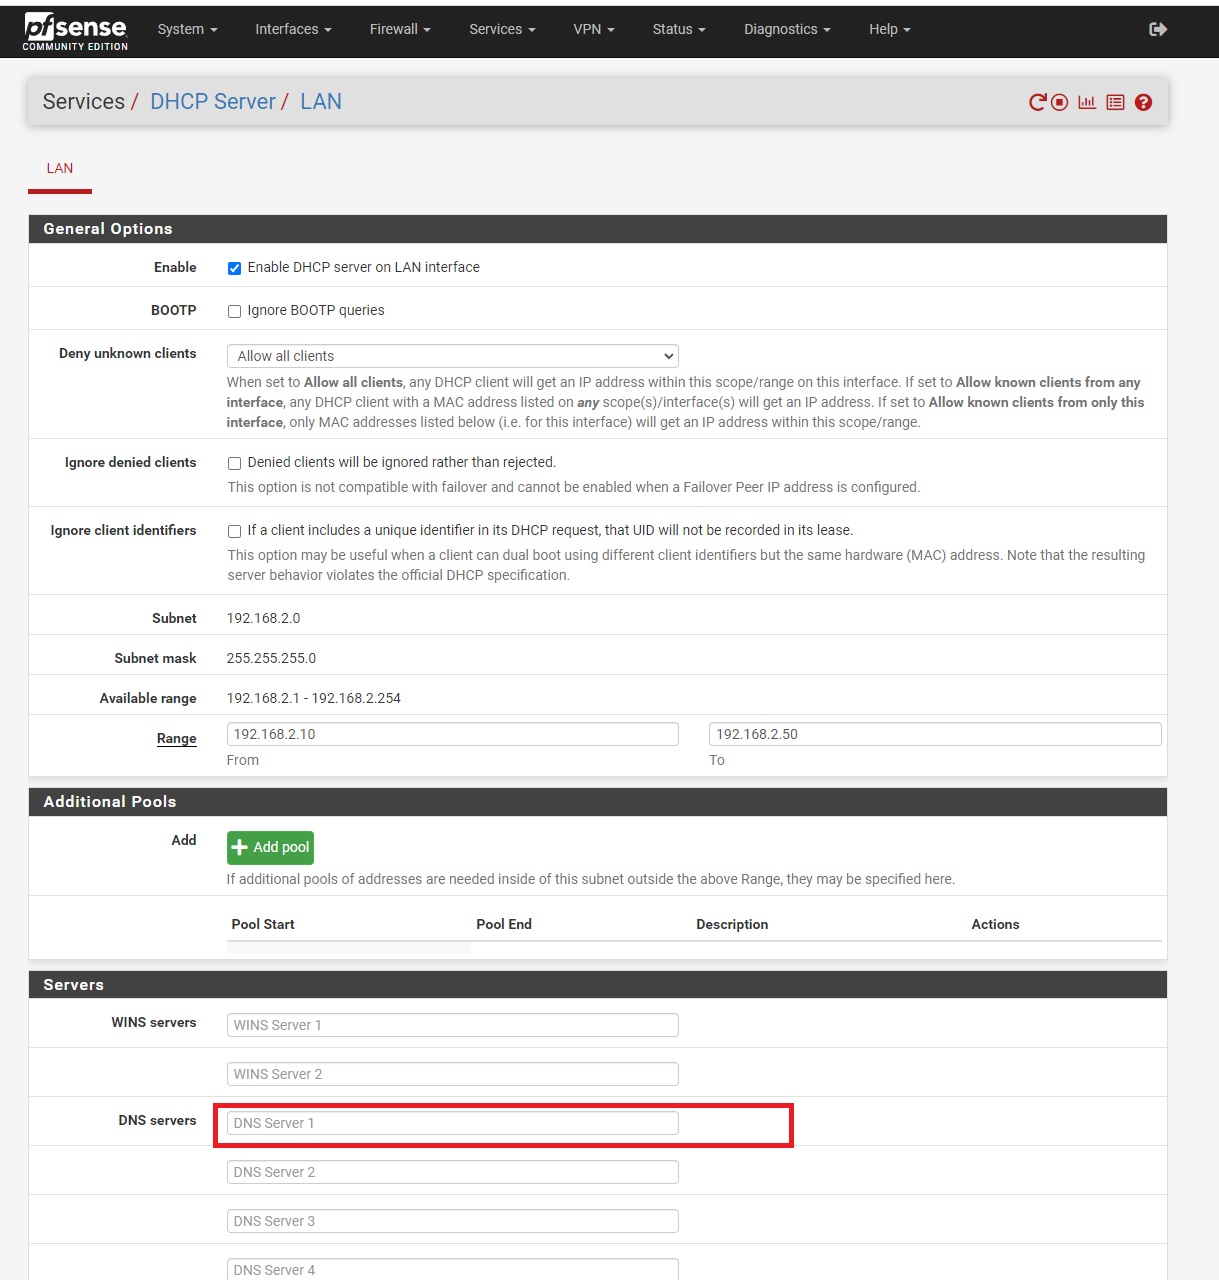
pfSense
- Navigate to Services → DHCP Server → LAN
- In Servers section
- Enter Pi-hole IP in DNS Server 1
- Save configuration
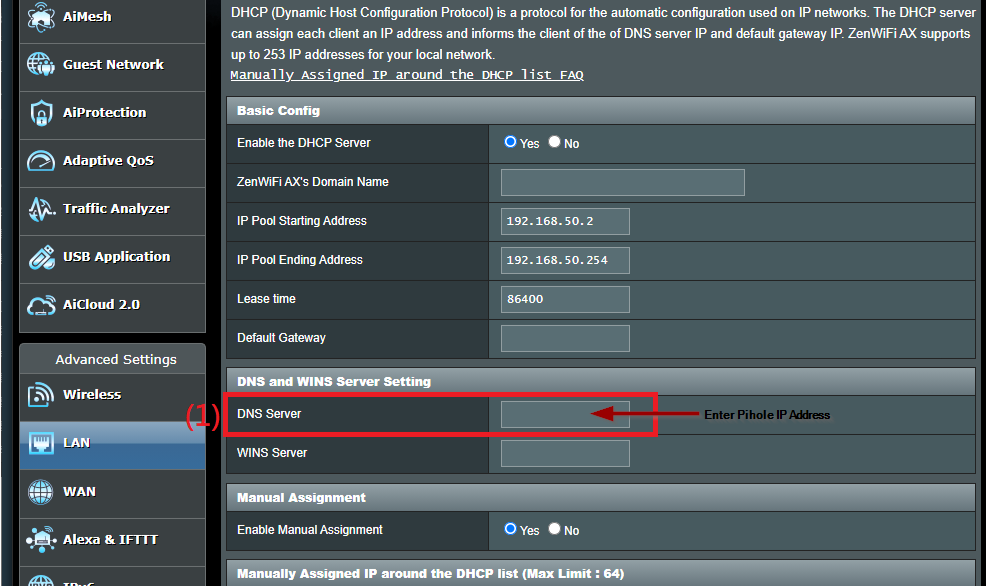
ASUS Routers
- Go to Advanced Settings → LAN
- Click DHCP tab
- Enter Pi-hole IP in DNS Server field
- Apply settings
TorGuard VPN Integration
Use Pi-hole with TorGuard VPN
For maximum privacy, combine Pi-hole with TorGuard VPN:
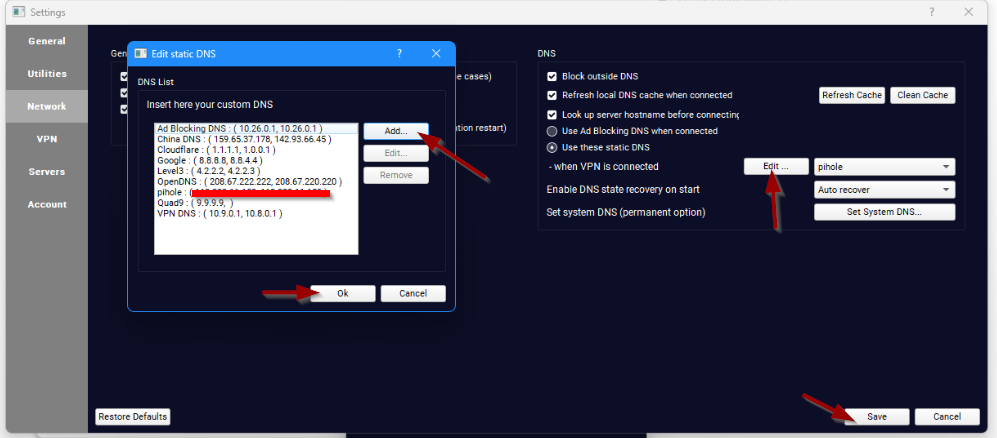
- Open TorGuard VPN app
- Go to Settings → Network
- Click Edit under DNS menu
- Click Add button
- Enter your Pi-hole DNS IP
- Click OK
- Select Pi-hole from DNS dropdown for "When VPN is connected"
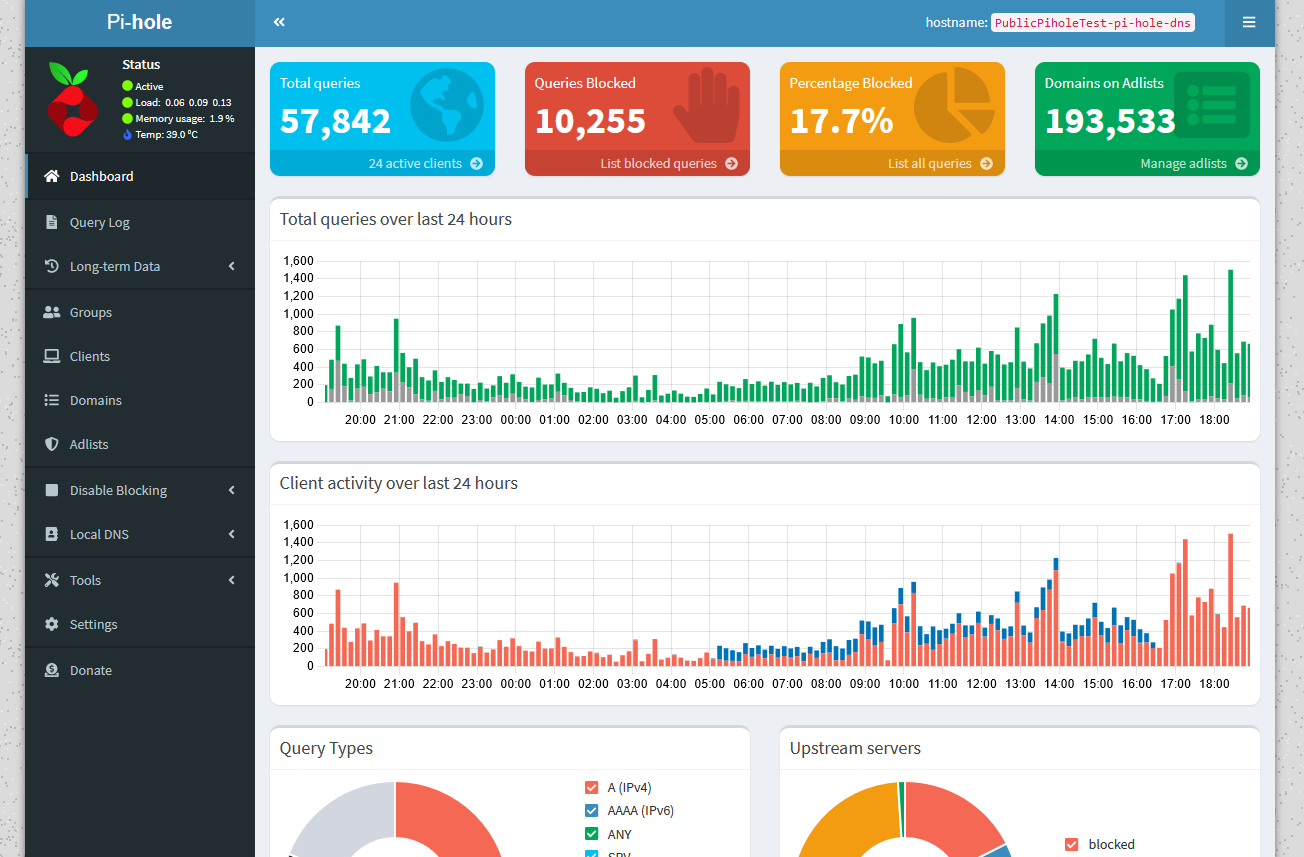
Pi-hole Admin Dashboard
Monitor Your DNS Queries
Access your Pi-hole admin interface to:
- View real-time DNS query statistics
- See top blocked domains
- Whitelist or blacklist specific domains
- Monitor device-specific queries
- Update blocklists
- Configure advanced settings
Best Practices
Recommendations
- Regular Updates: Keep Pi-hole updated through admin interface
- Backup Whitelist: Export your custom whitelist regularly
- Monitor Logs: Check query logs for unusual activity
- Update Blocklists: Refresh blocklists weekly via Gravity update
- Test Thoroughly: Verify important sites work after deployment
- Document IPs: Keep record of all authorized IP addresses
Troubleshooting
Cannot Access Admin Interface
- Verify firewall rules allow your current IP
- Check if using correct admin URL
- Ensure using HTTP (not HTTPS) for initial access
- Try accessing from allowed IP address
Websites Not Loading
- Check if site is incorrectly blocked (whitelist if needed)
- Verify DNS is resolving:
nslookup google.com [pi-hole-ip] - Temporarily disable Pi-hole to test
- Clear device DNS cache
Ads Still Showing
- Ensure device is using Pi-hole DNS (check IP configuration)
- Clear browser cache and cookies
- Some ads use HTTPS and can't be blocked by DNS
- Update gravity (blocklists) in Pi-hole admin