🔧 About DD-WRT Manual Configuration
DD-WRT is powerful open-source router firmware that transforms consumer routers into enterprise-grade networking devices. This guide covers manual OpenVPN setup for 2019/2020+ DD-WRT builds, providing whole-network VPN protection.
Why Use DD-WRT for VPN?
✨ DD-WRT VPN Benefits
Version Requirements
⚠️ Important: DD-WRT Build Requirements
This guide is specifically for 2019/2020+ DD-WRT builds. These newer builds have different configuration options compared to older versions.
- Minimum Build: v3.0-r40000 or newer
- Required: OpenVPN client support
- Router RAM: 64MB minimum, 128MB+ recommended
- Flash Storage: 8MB minimum
Port Limitations
🚫 Unsupported Ports on DD-WRT
Due to DD-WRT limitations, the following TorGuard OpenVPN ports are NOT supported:
- Port 443 - HTTPS port (often used for stealth)
- Port 80 - HTTP port
- Port 995 - POP3S port
- Port 1194 - Standard OpenVPN port
Alternative Ports: Use 1195, 1198, 1912, 9201, or other supported ports from our specs page.
Configuration Options
🔐 TLS Auth (Port 1195)
- Security: Standard authentication
- Cipher: AES-128-GCM
- Protocol: UDP/TCP
- Compatibility: Excellent
- Setup: Simpler
Good for most users
🛡️ TLS Crypt (Port 1198)
- Security: Enhanced encryption
- Cipher: AES-256-GCM
- Protocol: UDP/TCP
- Compatibility: Newer builds only
- Setup: Advanced
Maximum security
Network Setup Overview
🌐 Typical Network Configuration
- ISP Modem/Router: Connected to internet
- Ethernet Cable: From ISP LAN port → DD-WRT WAN port
- DD-WRT Router: Broadcasting VPN-protected Wi-Fi
- Your Devices: Connect to DD-WRT Wi-Fi for VPN protection
Important: Disable Wi-Fi on ISP router to avoid confusion and ensure all devices use VPN.
Step-by-Step Configuration
Access DD-WRT Control Panel
Open your web browser and navigate to your router:
- Primary:
http://192.168.1.1 - Alternative:
http://192.168.18.1
If this is your first setup, you'll be prompted to create a username and password.

Navigate to Services → VPN
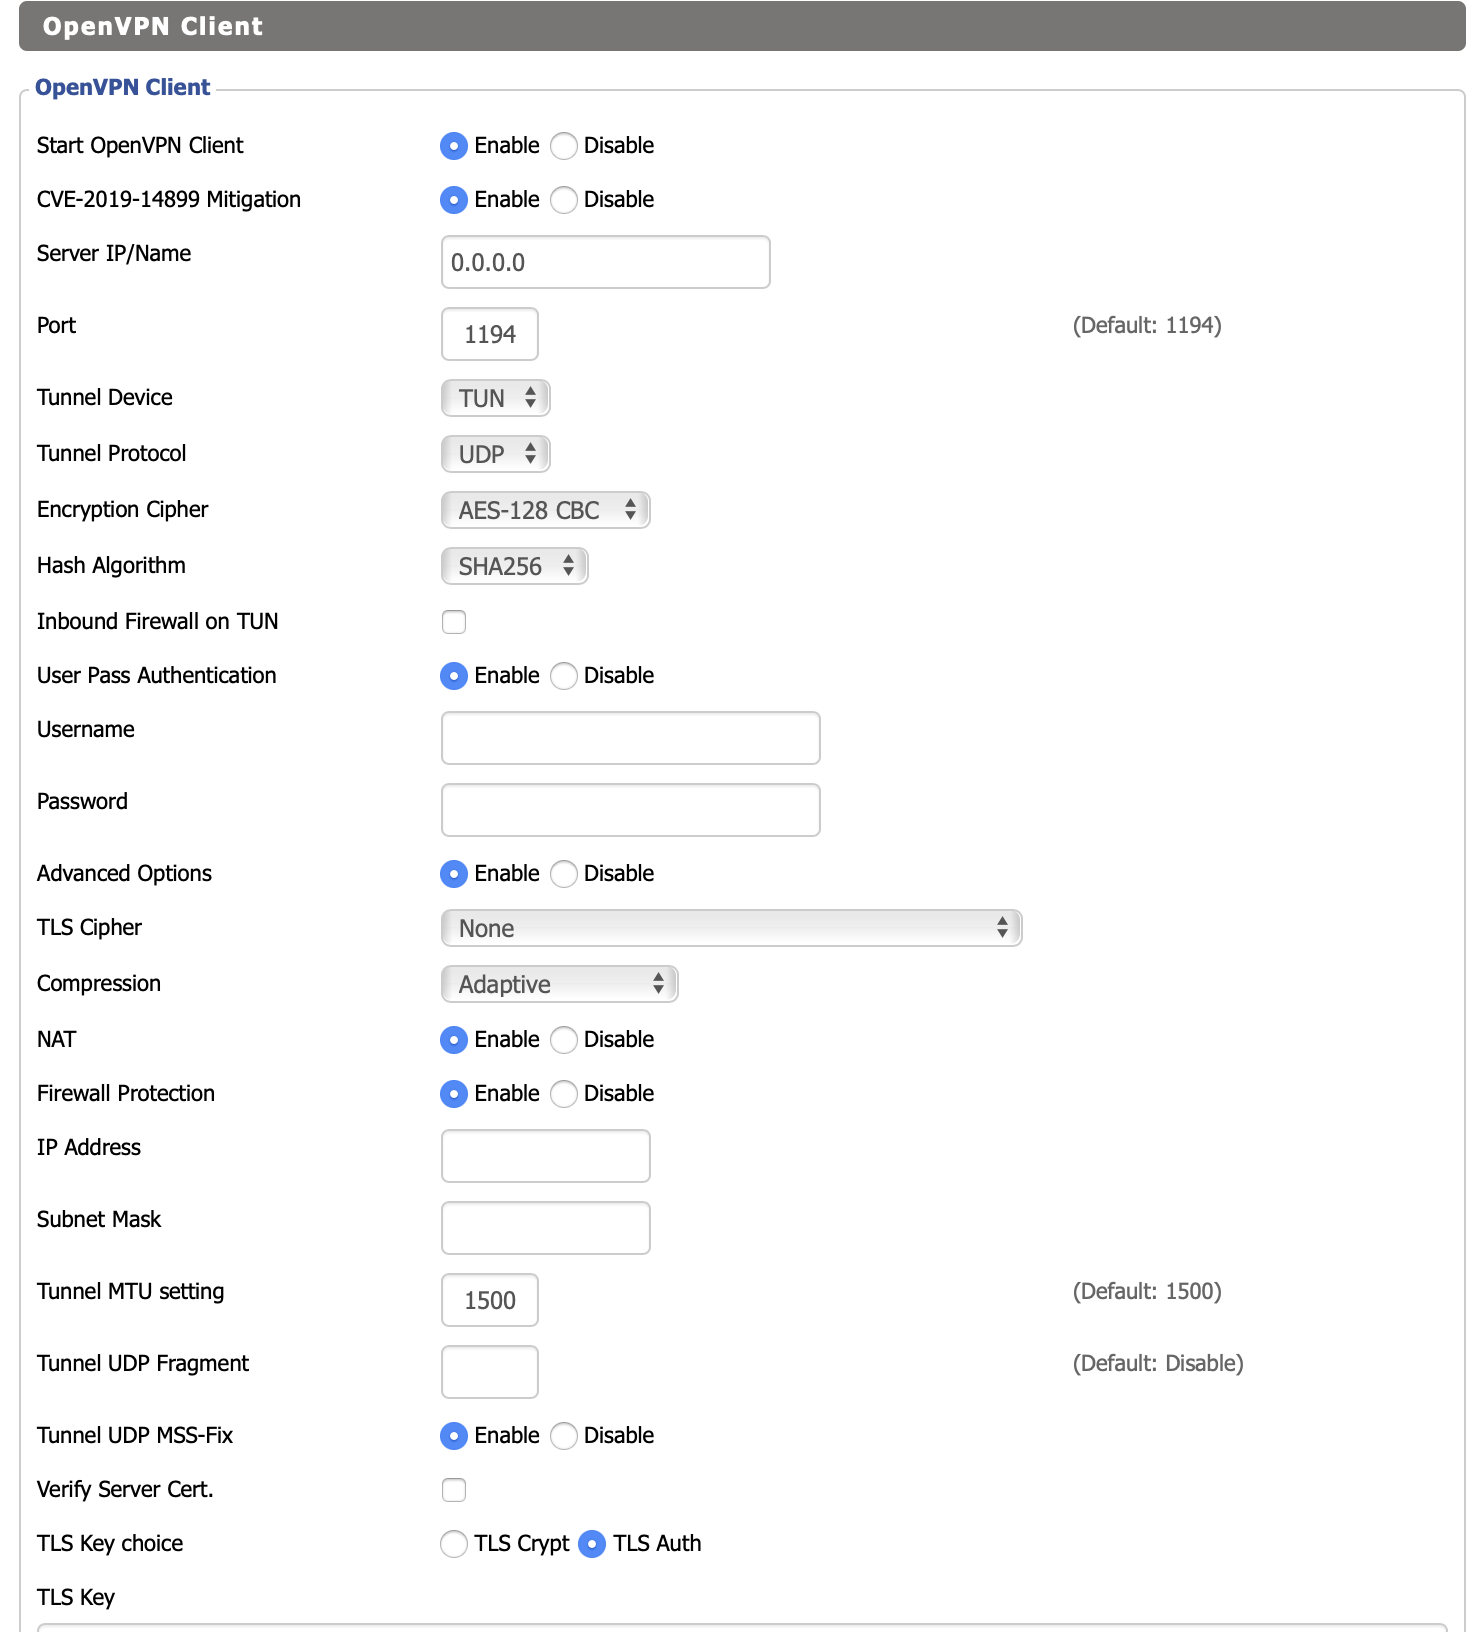
Enable OpenVPN Services
Enable the following options in order:
- OpenVPN Server/Daemon: Enable
- OpenVPN Client: Enable
- User Pass Authentication: Enable
- Advanced Options: Enable
- NAT: Enable (appears after enabling Advanced)
- Tunnel UDP MSS-Fix: Enable
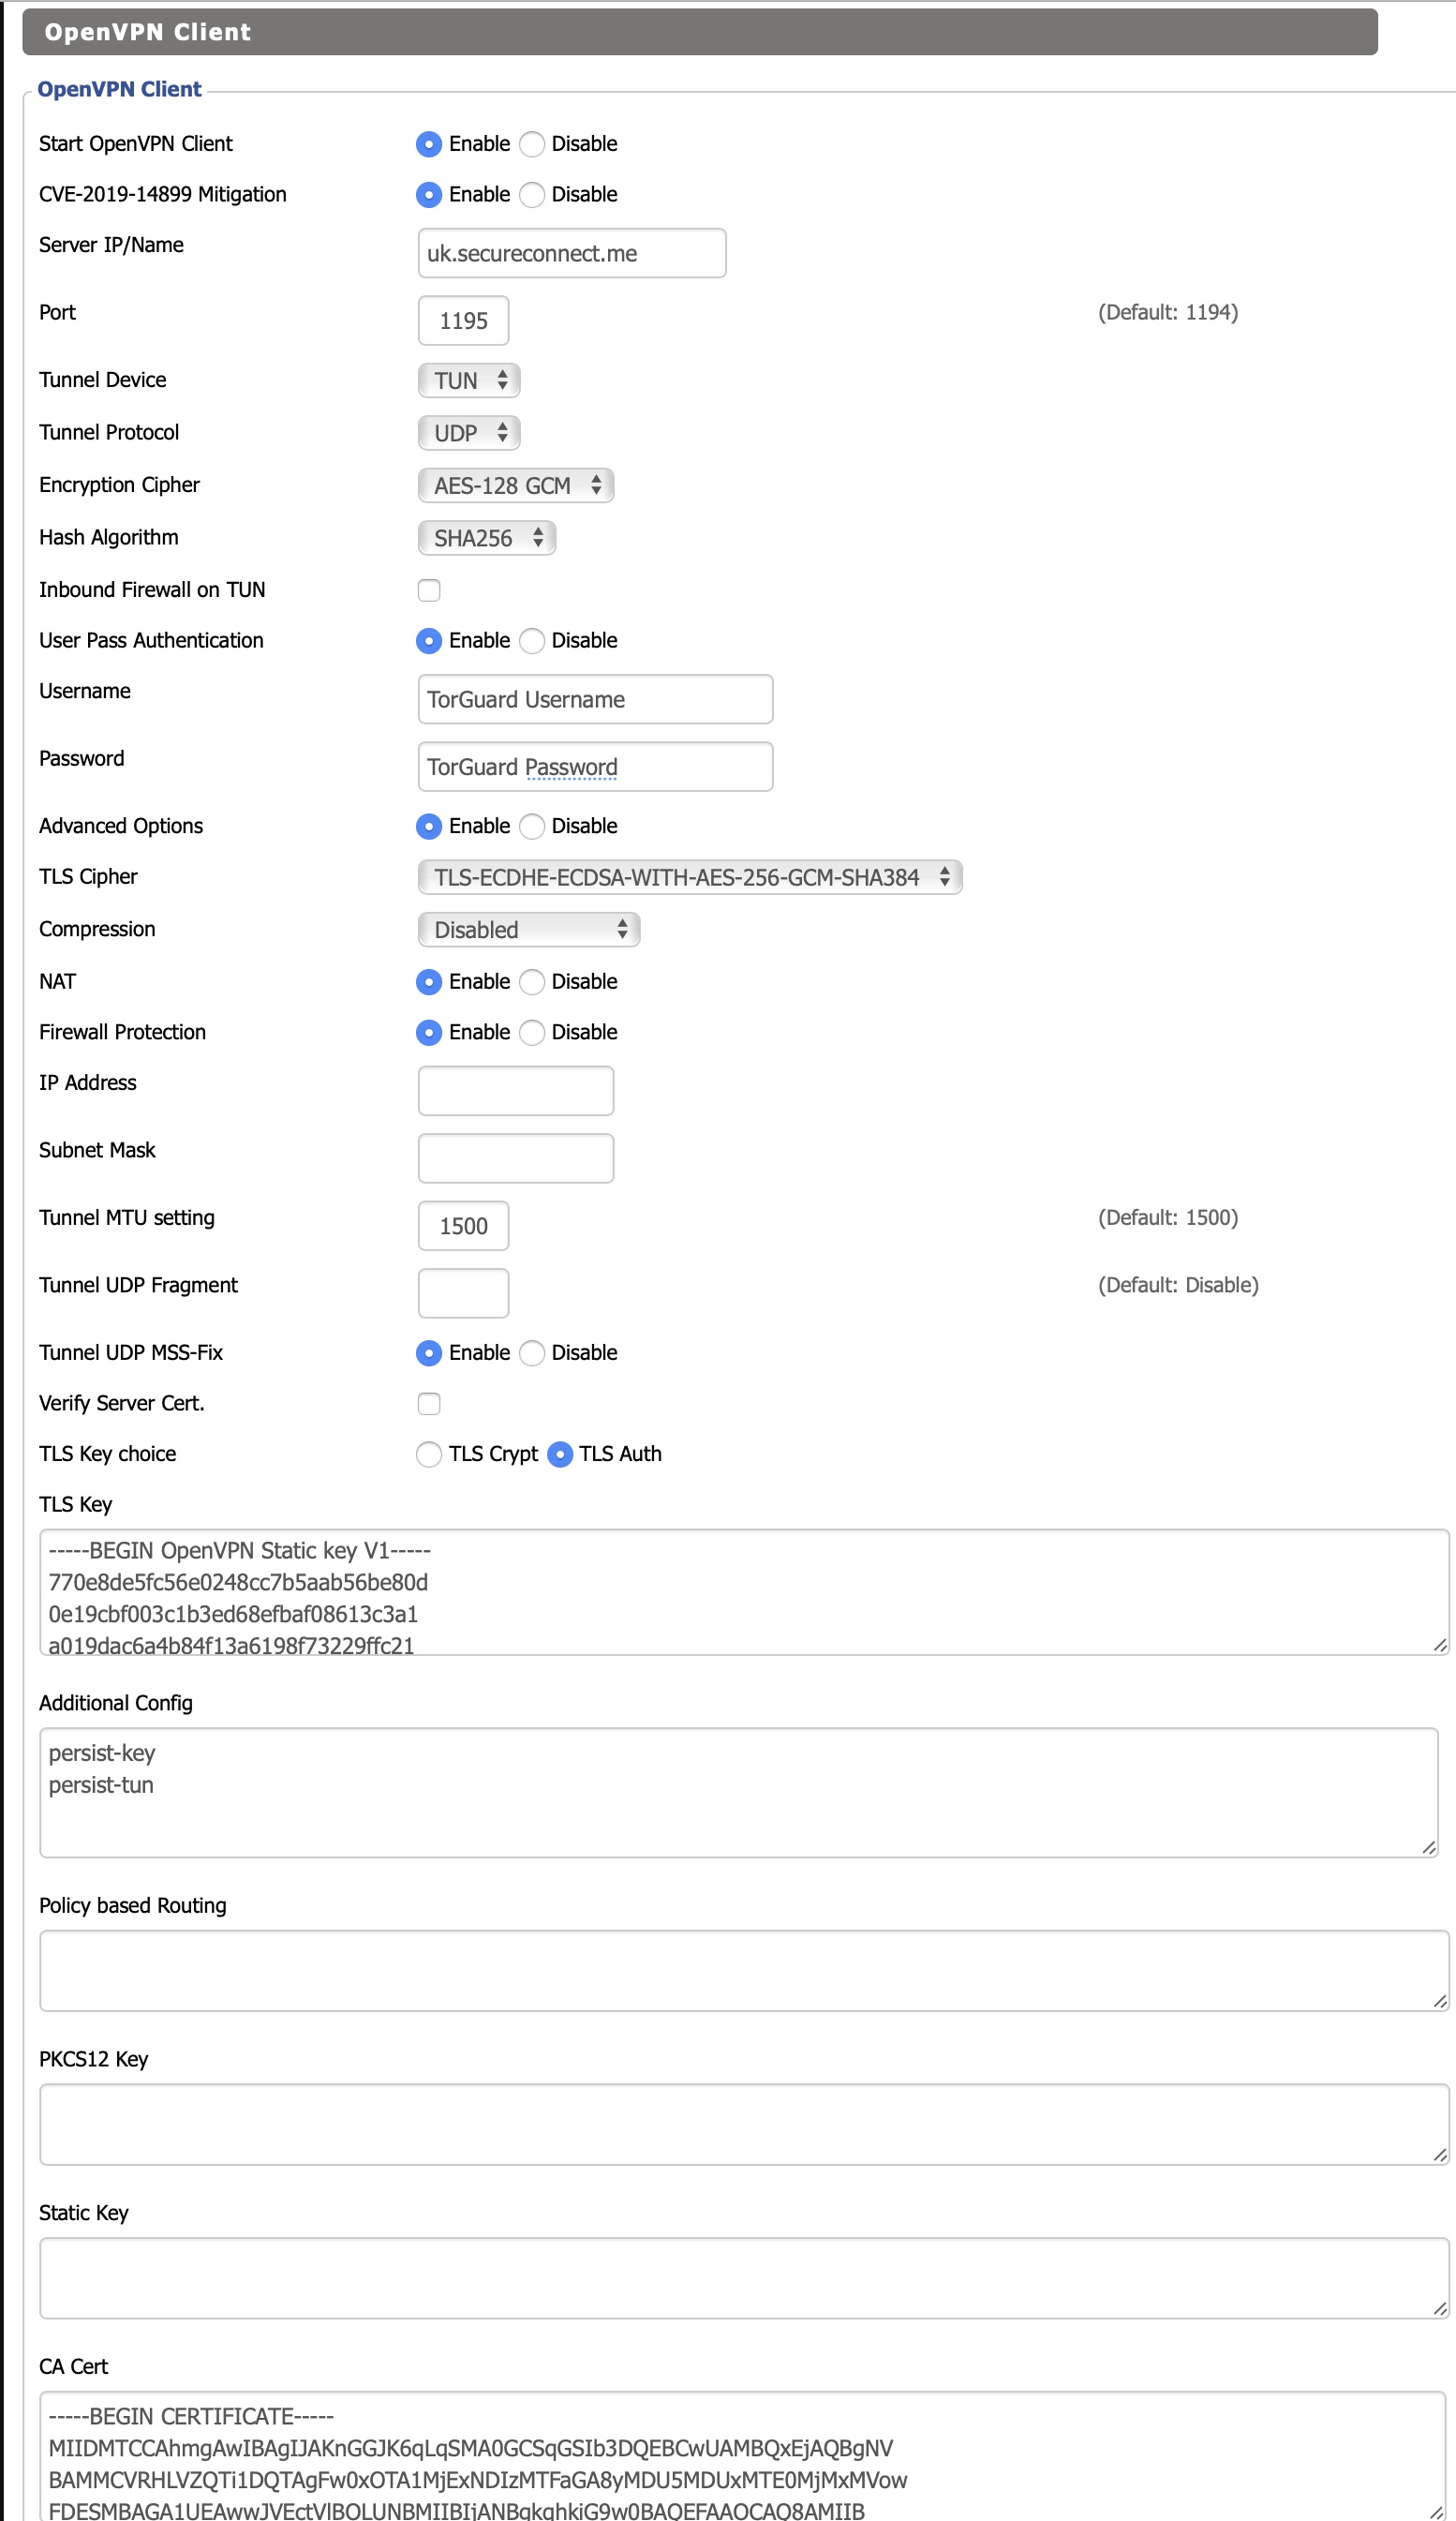
Configure TLS Auth (Standard Setup)
For a standard setup using port 1195:
| Setting | Value |
|---|---|
| Server IP/Name | Choose from TorGuard Network |
| Port | 1195 |
| Tunnel Protocol | UDP (faster) or TCP (more reliable) |
| Encryption Cipher | AES-128-GCM |
| Hash Algorithm | SHA256 |
| Username | Your TorGuard VPN username |
| Password | Your TorGuard VPN password |
| TLS Cipher | TLS-ECDHE-ECDSA-WITH-AES-256-GCM-SHA384 |
| Compression | Disabled |
| TLS Key choice | TLS Auth |
TLS Key:
-----BEGIN OpenVPN Static key V1-----
770e8de5fc56e0248cc7b5aab56be80d
0e19cbf003c1b3ed68efbaf08613c3a1
a019dac6a4b84f13a6198f73229ffc21
fa512394e288f82aa2cf0180f01fb3eb
1a71e00a077a20f6d7a83633f5b4f47f
27e30617eaf8485dd8c722a8606d56b3
c183f65da5d3c9001a8cbdb96c793d93
6251098b24fe52a6dd2472e98cfccbc4
66e63520d63ade7a0eacc36208c3142a
1068236a52142fbb7b3ed83d785e12a2
8261bccfb3bcb62a8d2f6d18f5df5f36
52e59c5627d8d9c8f7877c4d7b08e19a
5c363556ba68d392be78b75152dd55ba
0f74d45089e84f77f4492d886524ea6c
82b9f4dd83d46528d4f5c3b51cfeaf28
38d938bd0597c426b0e440434f2c451f
-----END OpenVPN Static key V1-----
Additional Options:
persist-key
persist-tun
CA Cert:
-----BEGIN CERTIFICATE-----
MIIDMTCCAhmgAwIBAgIJAKnGGJK6qLqSMA0GCSqGSIb3DQEBCwUAMBQxEjAQBgNV
BAMMCVRHLVZQTi1DQTAgFw0xOTA1MjExNDIzMTFaGA8yMDU5MDUxMTE0MjMxMVow
FDESMBAGA1UEAwwJVEctVlBOLUNBMIIBIjANBgkqhkiG9w0BAQEFAAOCAQ8AMIIB
CgKCAQEAlv0UgPD3xVAvhhP6q1HCmeAWbH+9HPkyQ2P6qM5oHY5dntjmq8YT48FZ
GHWv7+s9O47v6Bv7rEc4UwQx15cc2LByivX2JwmE8JACvNfwEnZXYAPq9WU3ZgRr
AGvA09ItuLqK2fQ4A7h8bFhmyxCbSzP1sSIT/zJY6ebuh5rDQSMJRMaoI0t1zorE
Z7PlEmh+o0w5GPs0D0vY50UcnEzB4GOdWC9pJREwEqppWYLN7RRdG8JyIqmA59mh
ARCnQFUo38HWic4trxFe71jtD7YInNV7ShQtg0S0sXo36Rqfz72Jo08qqI70dNs5
DN1aGNkQ/tRK9DhL5DLmTkaCw7mEFQIDAQABo4GDMIGAMB0GA1UdDgQWBBR7Dcym
XBp6u/jAaZOPUjUhEyhXfjBEBgNVHSMEPTA7gBR7DcymXBp6u/jAaZOPUjUhEyhX
fqEYpBYwFDESMBAGA1UEAwwJVEctVlBOLUNBggkAqcYYkrqoupIwDAYDVR0TBAUw
AwEB/zALBgNVHQ8EBAMCAQYwDQYJKoZIhvcNAQELBQADggEBAE79ngbdSlP7IBbf
nJ+2Ju7vqt9/GyhcsYtjibp6gsMUxKlD8HuvlSGj5kNO5wiwN7XXqsjYtJfdhmzz
VbXksi8Fnbnfa8GhFl4IAjLJ5cxaWOxjr6wx2AhIs+BVVARjaU7iTK91RXJnl6u7
UDHTkQylBTl7wgpMeG6GjhaHfcOL1t7D2w8x23cTO+p+n53P3cBq+9TiAUORdzXJ
vbCxlPMDSDArsgBjC57W7dtdnZo7gTfQG77JTDFBeSwPwLF7PjBB4S6rzU/4fcYw
y83XKP6zDn9tgUJDnpFb/7jJ/PbNkK4BWYJp3XytOtt66v9SEKw+v/fJ+VkjU16v
E/9Q3h4=
-----END CERTIFICATE-----
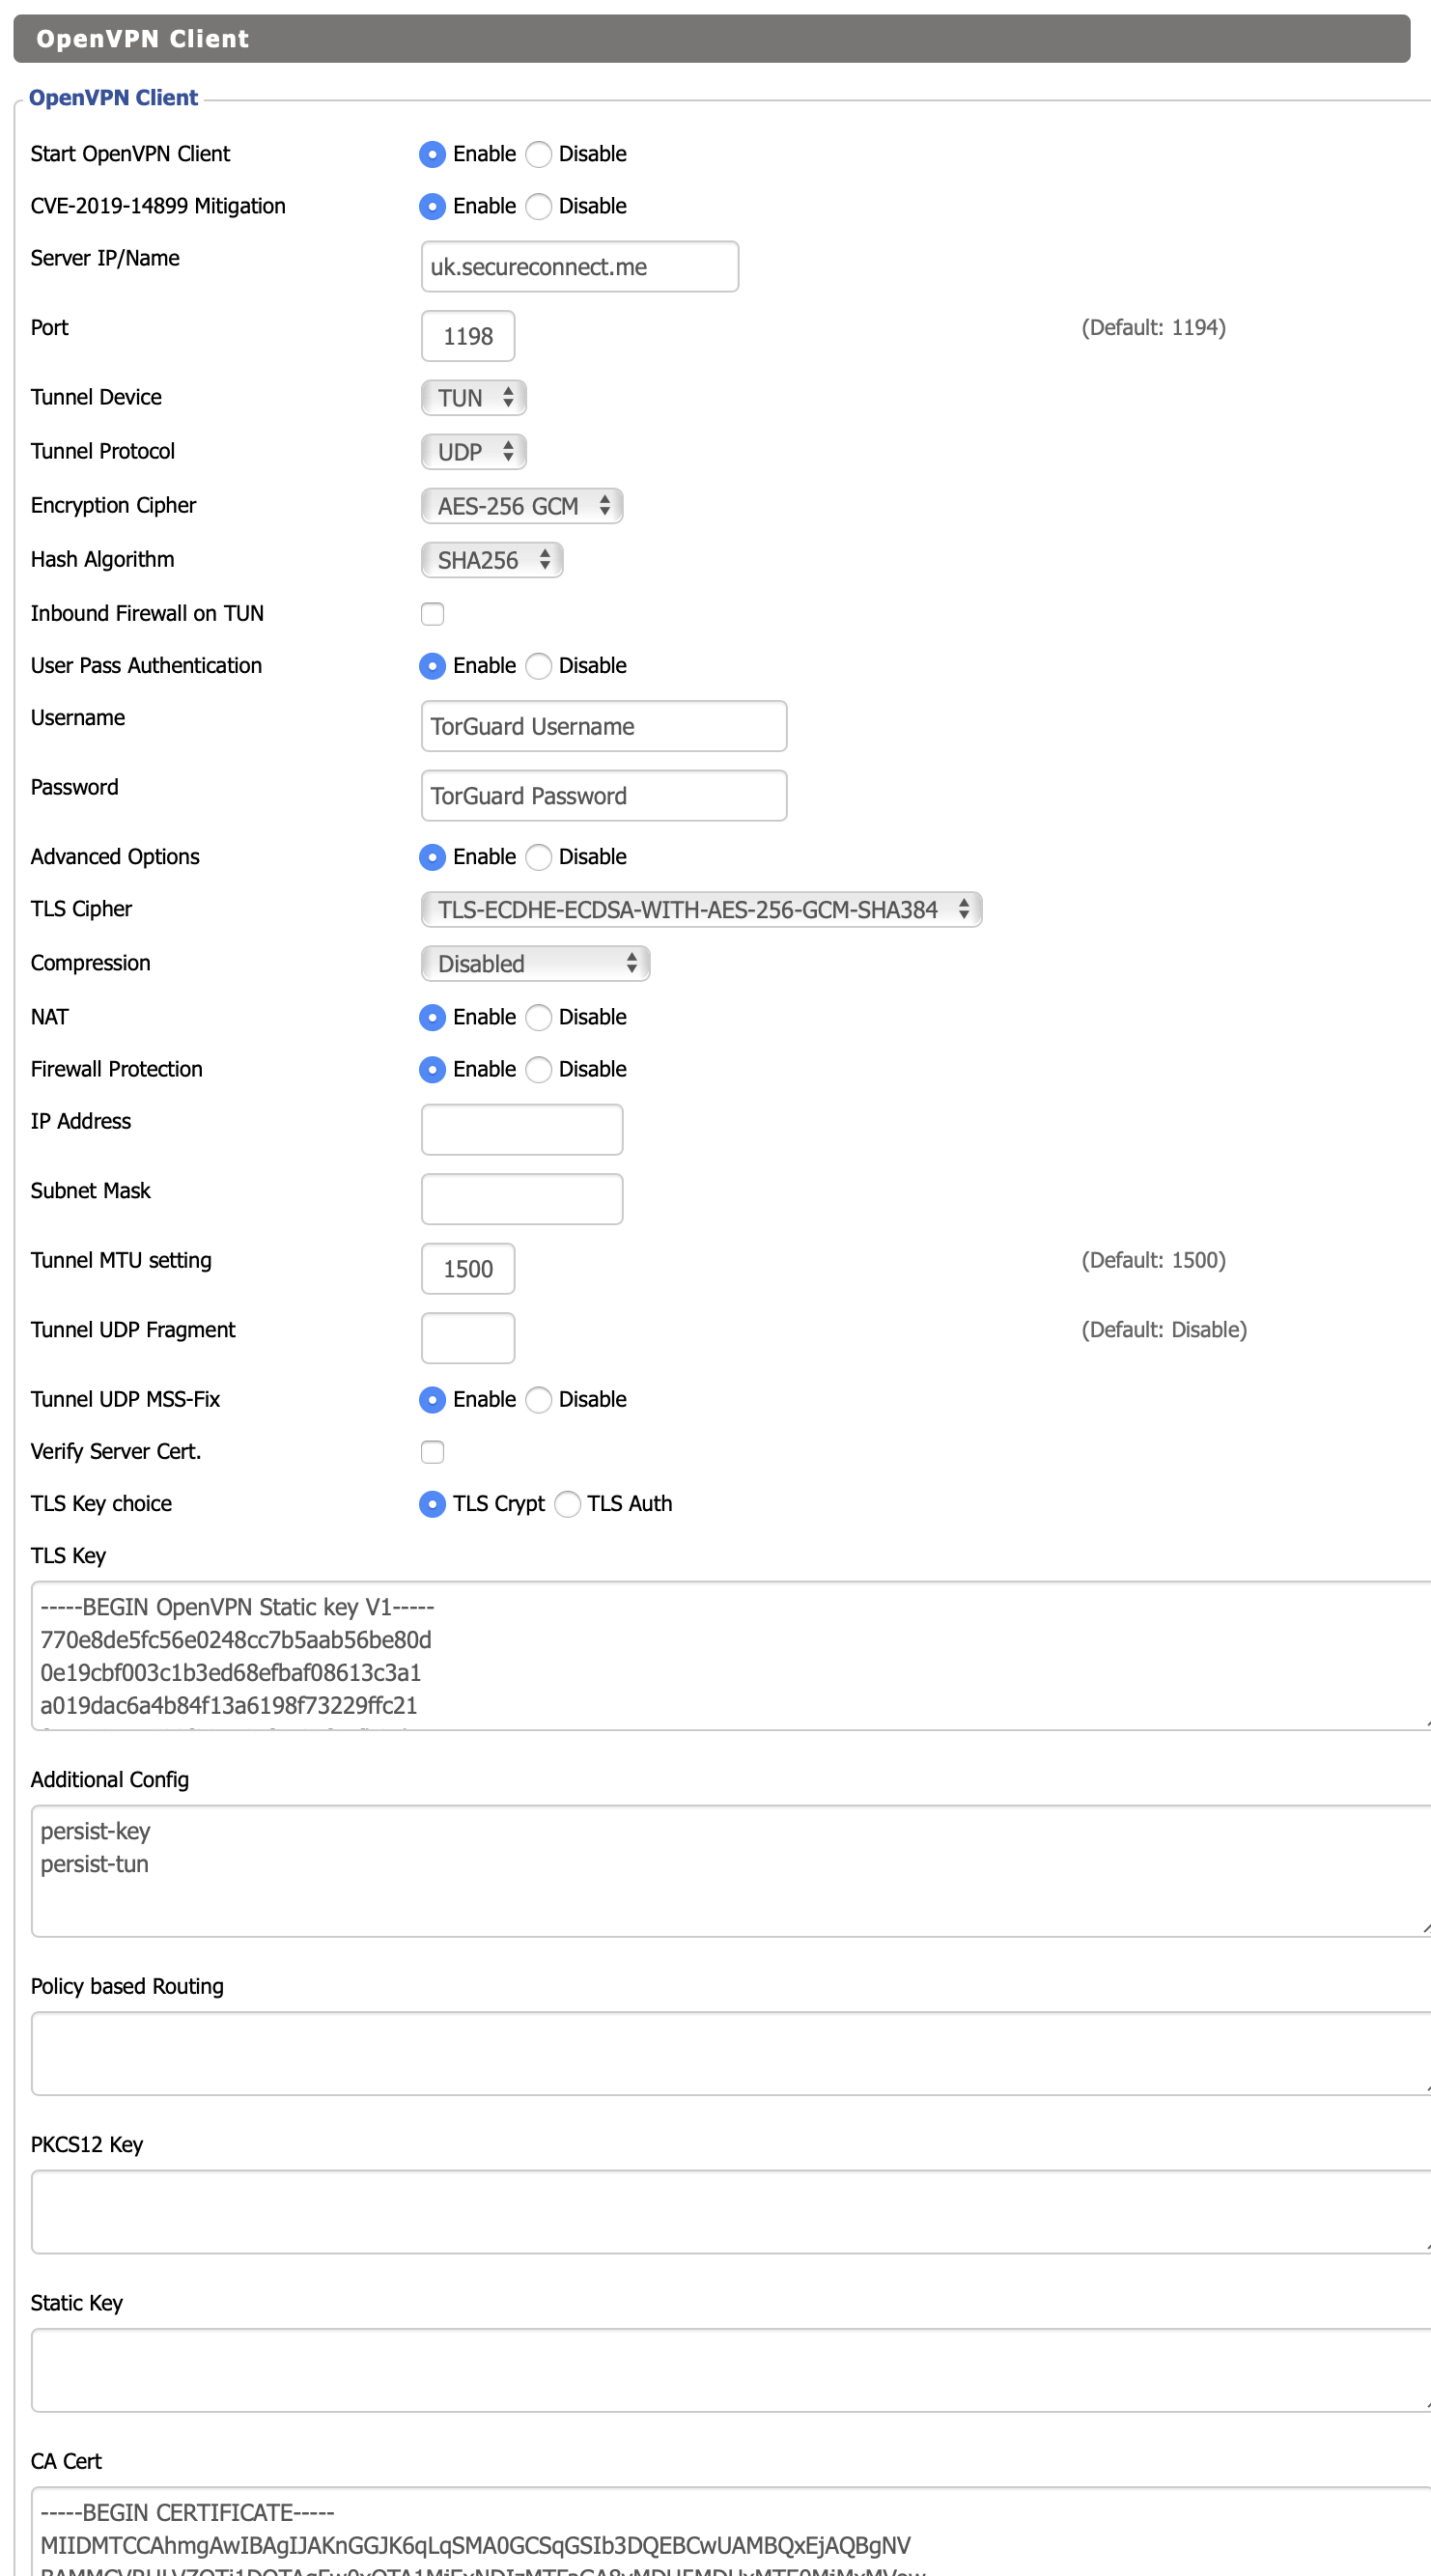
Configure TLS Crypt (Enhanced Security)
For enhanced security using port 1198:
| Setting | Value |
|---|---|
| Server IP/Name | Choose from TorGuard Network |
| Port | 1198 |
| Tunnel Protocol | UDP (faster) or TCP (more reliable) |
| Encryption Cipher | AES-256-GCM |
| Hash Algorithm | SHA256 |
| Username | Your TorGuard VPN username |
| Password | Your TorGuard VPN password |
| TLS Cipher | TLS-ECDHE-ECDSA-WITH-AES-256-GCM-SHA384 |
| Compression | Disabled |
| TLS Key choice | TLS Crypt |
The TLS Key and CA Certificate remain the same as the TLS Auth configuration.
Save and Apply Settings
After entering all configuration details:
- Click Save at the bottom of the page
- Wait for the page to reload
- Click Apply Settings
- Wait 30-60 seconds for the connection to establish
💜 Dedicated IP Configuration
If using a Dedicated IP or Port Forward IP:
- Check your activation email for the correct port and protocol
- Find settings under Services → My Fixed IPs in your TorGuard account
- Use your dedicated IP instead of a server hostname
- Ensure port and protocol match your dedicated IP settings exactly
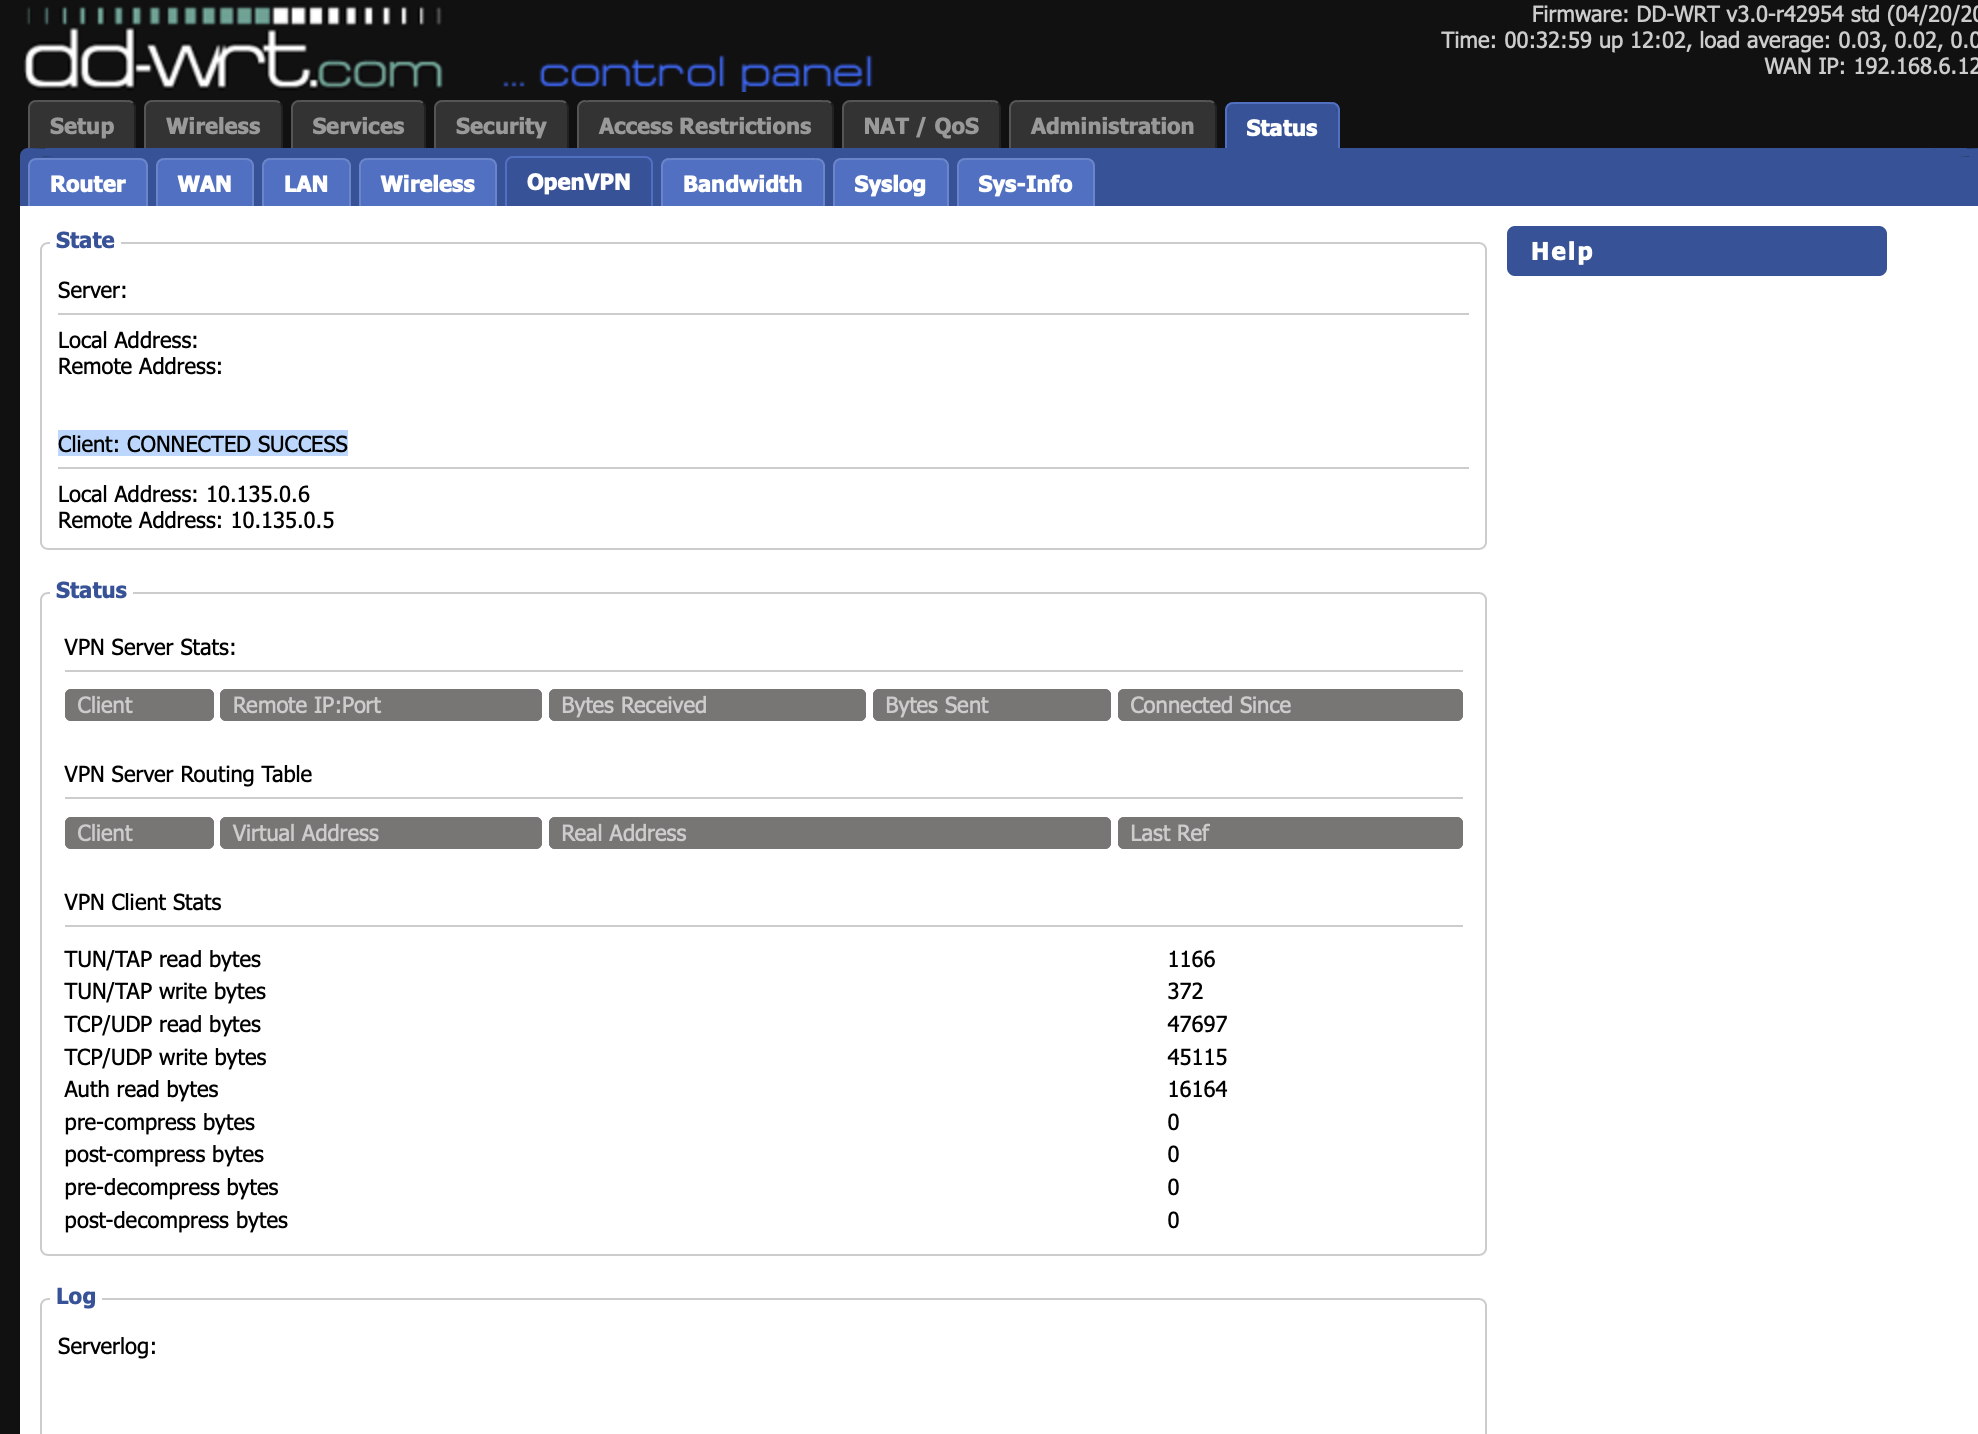
Verify Connection Status
Navigate to Status → OpenVPN
You should see: Client: CONNECTED SUCCESS
⚠️ No Status Data?
If you don't see any data, enable Syslogd service:
- Go to Services → Services
- Enable Syslogd
- Save and Apply Settings
Test Your VPN Connection
Connect a device to your DD-WRT router's Wi-Fi and:
- Visit TorGuard IP Check
- Verify the IP shows a TorGuard server location
- Confirm status shows "Protected"
Compatible Router Models
🔧 Popular DD-WRT Compatible Routers
Check the DD-WRT Router Database for full compatibility list.
Security Comparison
| Feature | TLS Auth | TLS Crypt |
| Encryption | AES-128-GCM | AES-256-GCM |
| Control Channel | Authenticated | Encrypted + Authenticated |
| DDoS Protection | Good | Excellent |
| CPU Usage | Lower | Higher |
| Compatibility | All DD-WRT builds | Newer builds only |
Performance Optimization
⚡ Speed Optimization Tips
- Use UDP Protocol: Generally 10-20% faster than TCP
- Choose Nearby Servers: Lower latency = better performance
- AES-128 vs AES-256: AES-128-GCM offers better speed with sufficient security
- Disable Compression: Already disabled in our configs for best performance
- Router CPU: Ensure your router has adequate processing power
- MTU Size: Leave at default unless experiencing issues
Troubleshooting
Connection Fails
- Double-check username and password
- Verify you're not using unsupported ports (443, 80, 995, 1194)
- Try a different server location
- Switch between UDP and TCP
- Ensure certificates are copied completely
No Internet After Connecting
- Verify NAT is enabled in Advanced Options
- Check DNS settings under Setup → Basic Setup
- Try rebooting the router
- Ensure ISP modem is in bridge mode if applicable
Slow Speeds
- Test with a wired connection first
- Try servers closer to your location
- Use AES-128-GCM instead of AES-256-GCM
- Check router CPU usage under Status → Router
- Consider upgrading to a more powerful router
DNS Leaks
- Set Static DNS to 10.8.0.1 under Setup → Basic Setup
- Enable "Force DNS Redirection" if available
- Test at dnsleaktest.com
Advanced Features
🚀 DD-WRT Advanced Options
- Policy-Based Routing: Route specific devices through VPN
- Kill Switch: Block internet if VPN disconnects
- Multiple VPN Clients: Run different VPNs simultaneously
- Custom Scripts: Automate tasks with startup scripts
- VLAN Support: Separate networks with different VPN policies
Need Help?
If you're experiencing issues with DD-WRT setup:
Include your DD-WRT build number and router model for fastest assistance