🛡️ About pfSense
pfSense is a powerful open-source firewall and router platform. This guide covers configuring TorGuard OpenVPN on the latest pfSense versions, including special settings for version 2.7+.
pfSense Use Cases with TorGuard VPN
🏠 Home Network Protection
Protect all devices on your network automatically. Perfect for smart homes with IoT devices that can't run VPN software directly.
🏢 Small Business Security
Secure your entire office network with enterprise-grade encryption. All employee devices protected without individual setup.
🌐 Multi-Site Connectivity
Connect multiple locations securely. Use pfSense with TorGuard for site-to-site VPN or secure remote access.
Version Compatibility
✅ pfSense 2.7+
- Latest features supported
- Special compression settings
- Enhanced security options
- This guide optimized for 2.7+
⚠️ pfSense 2.6.x
- Fully compatible
- Different compression settings
- See notes in guide
- Consider upgrading
🚫 pfSense 2.5.x and older
- May work with modifications
- Security updates ended
- Strongly recommend upgrade
- Limited support
Prerequisites
📋 Before You Begin
- TorGuard VPN Account: Active subscription required
- VPN Credentials: Your TorGuard username and password
- pfSense Access: Admin login to your pfSense router
- Server Selection: Choose your preferred VPN server location
- Backup: Save your current pfSense config before changes
Configuration Progress
Step 1: Login and Server Selection
First, log into your pfSense router's web interface. Then choose your TorGuard server:
🌍 Server Selection
Visit TorGuard's Network Page to choose a server location. Select based on:
- Proximity: Closer servers = lower latency
- Purpose: Streaming servers for media, standard for privacy
- Load: Check server status for best performance
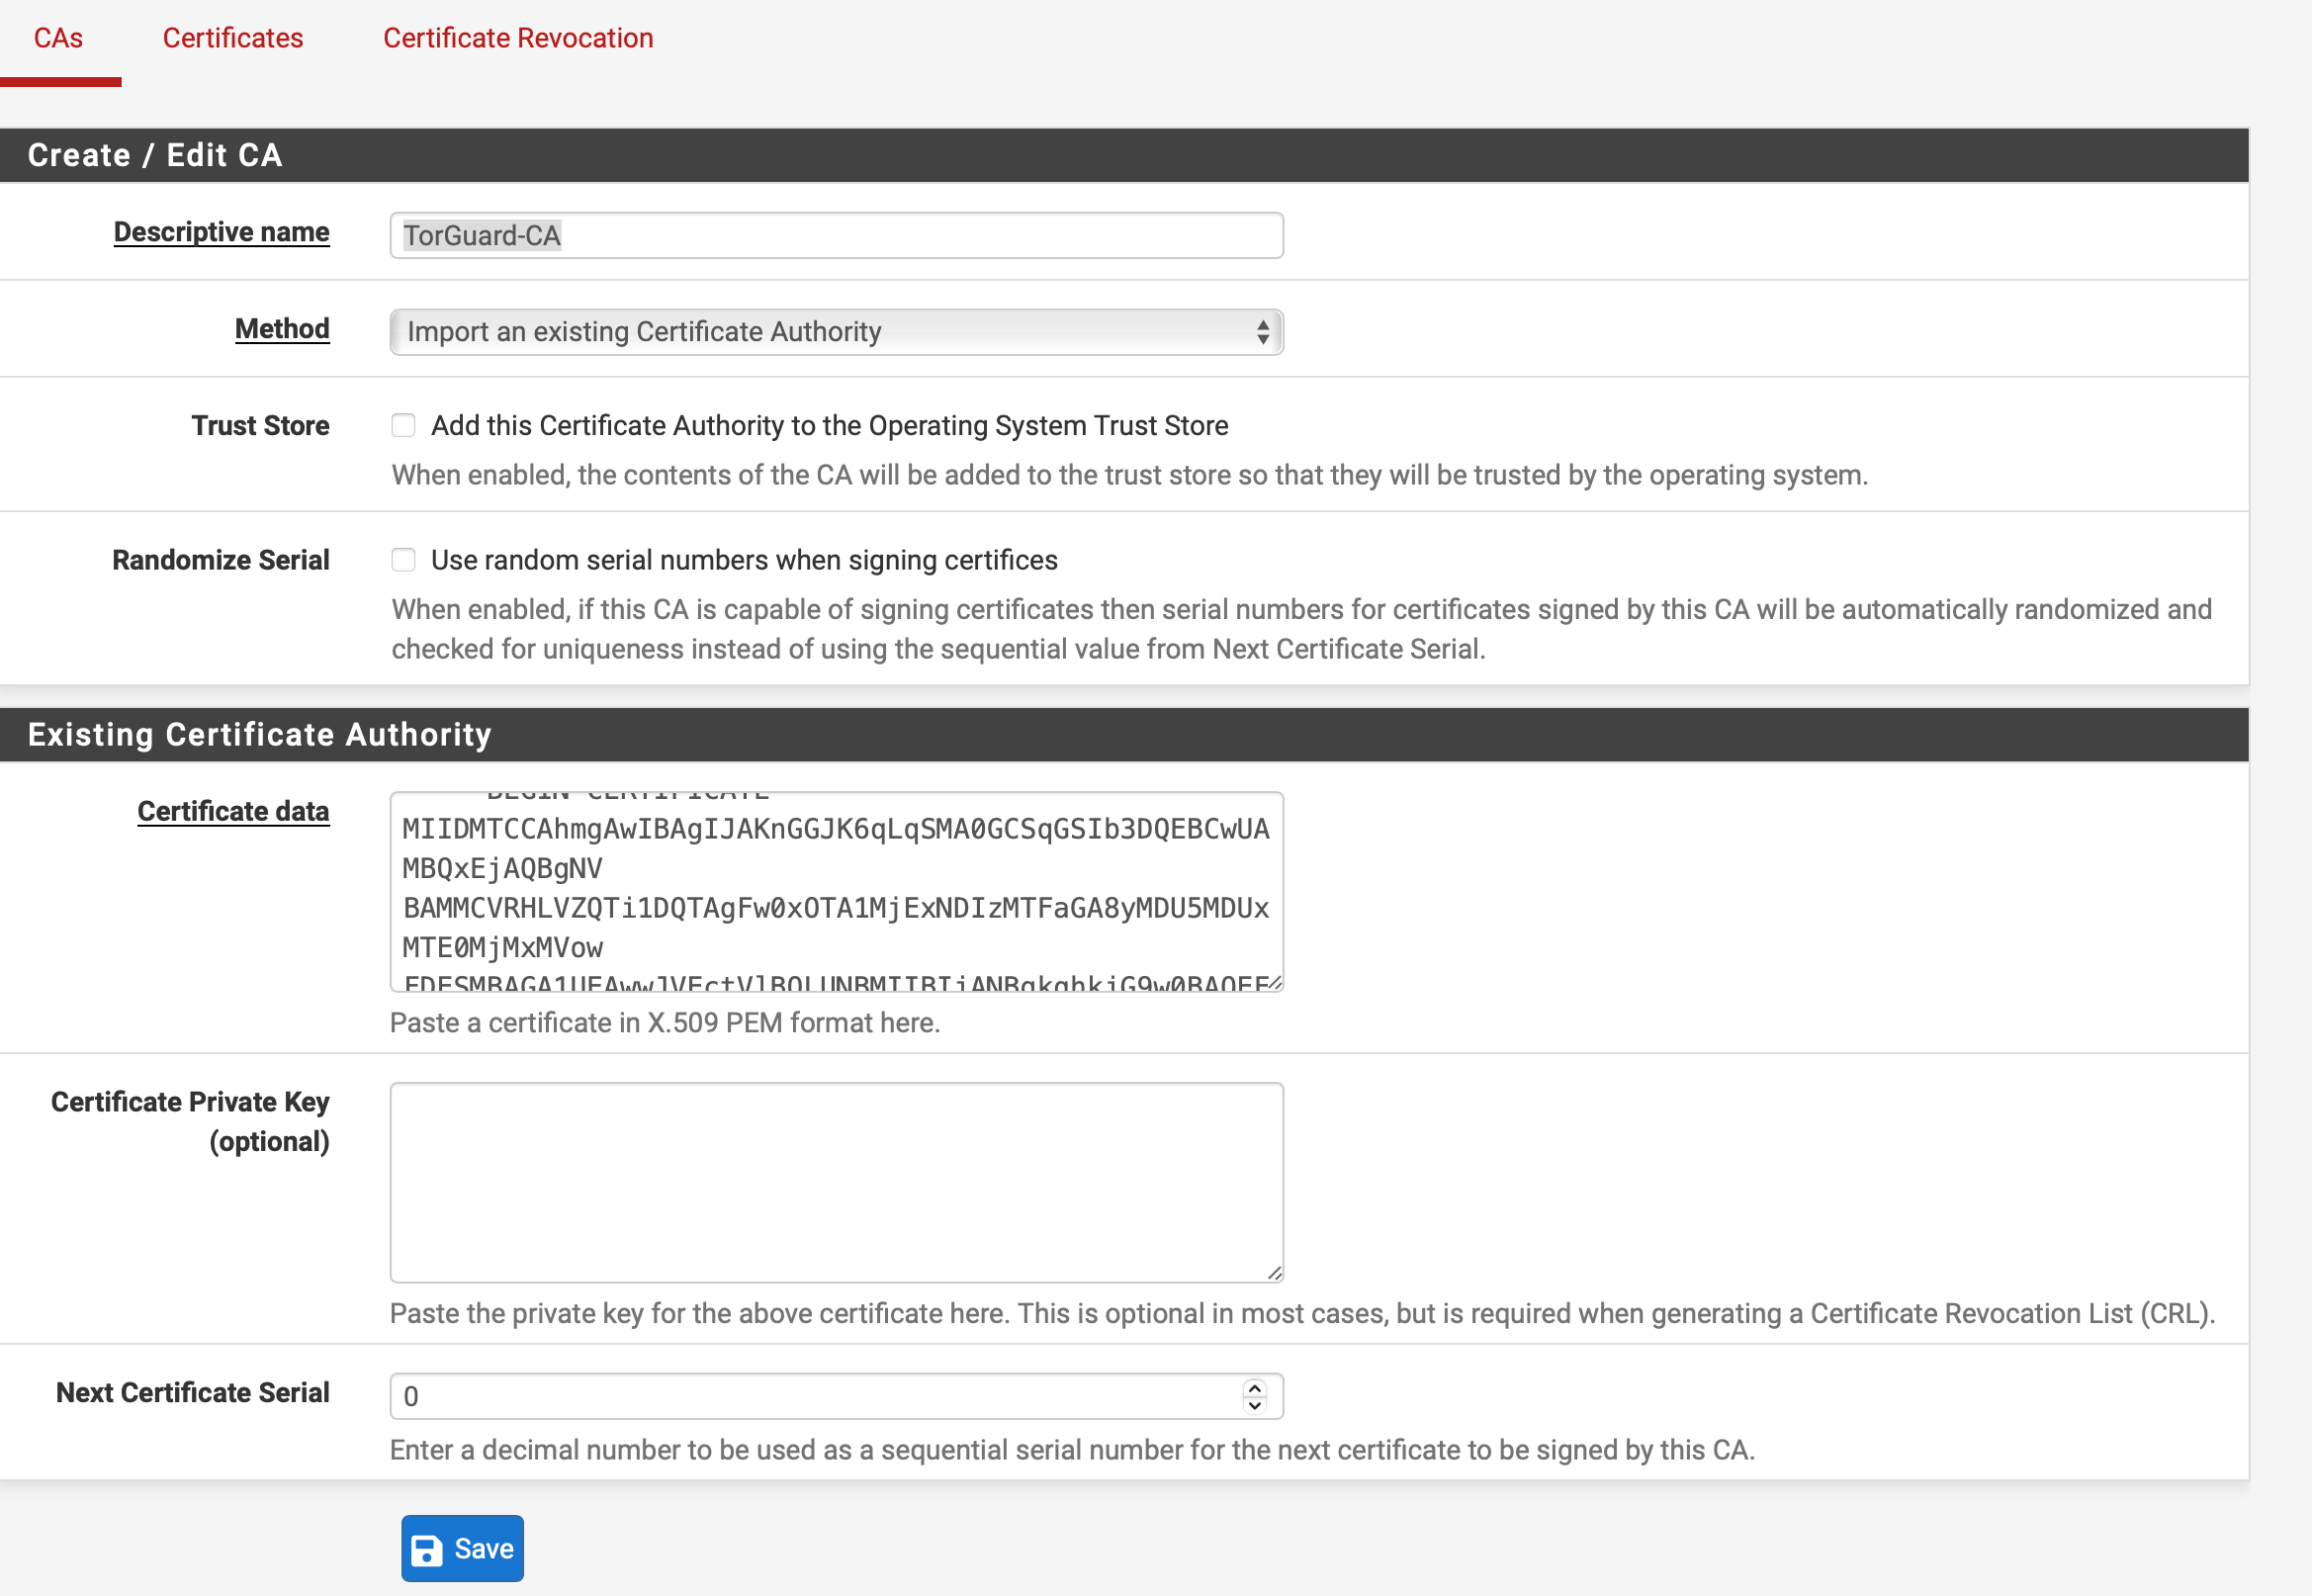
Step 2: Import TorGuard Certificate
Navigate to System → Cert Manager and click Add:
Certificate Import Settings
| Descriptive name | TorGuard-CA |
| Method | Import an existing Certificate Authority |
| Certificate data | Paste the CA certificate from TorGuard Certs Page |
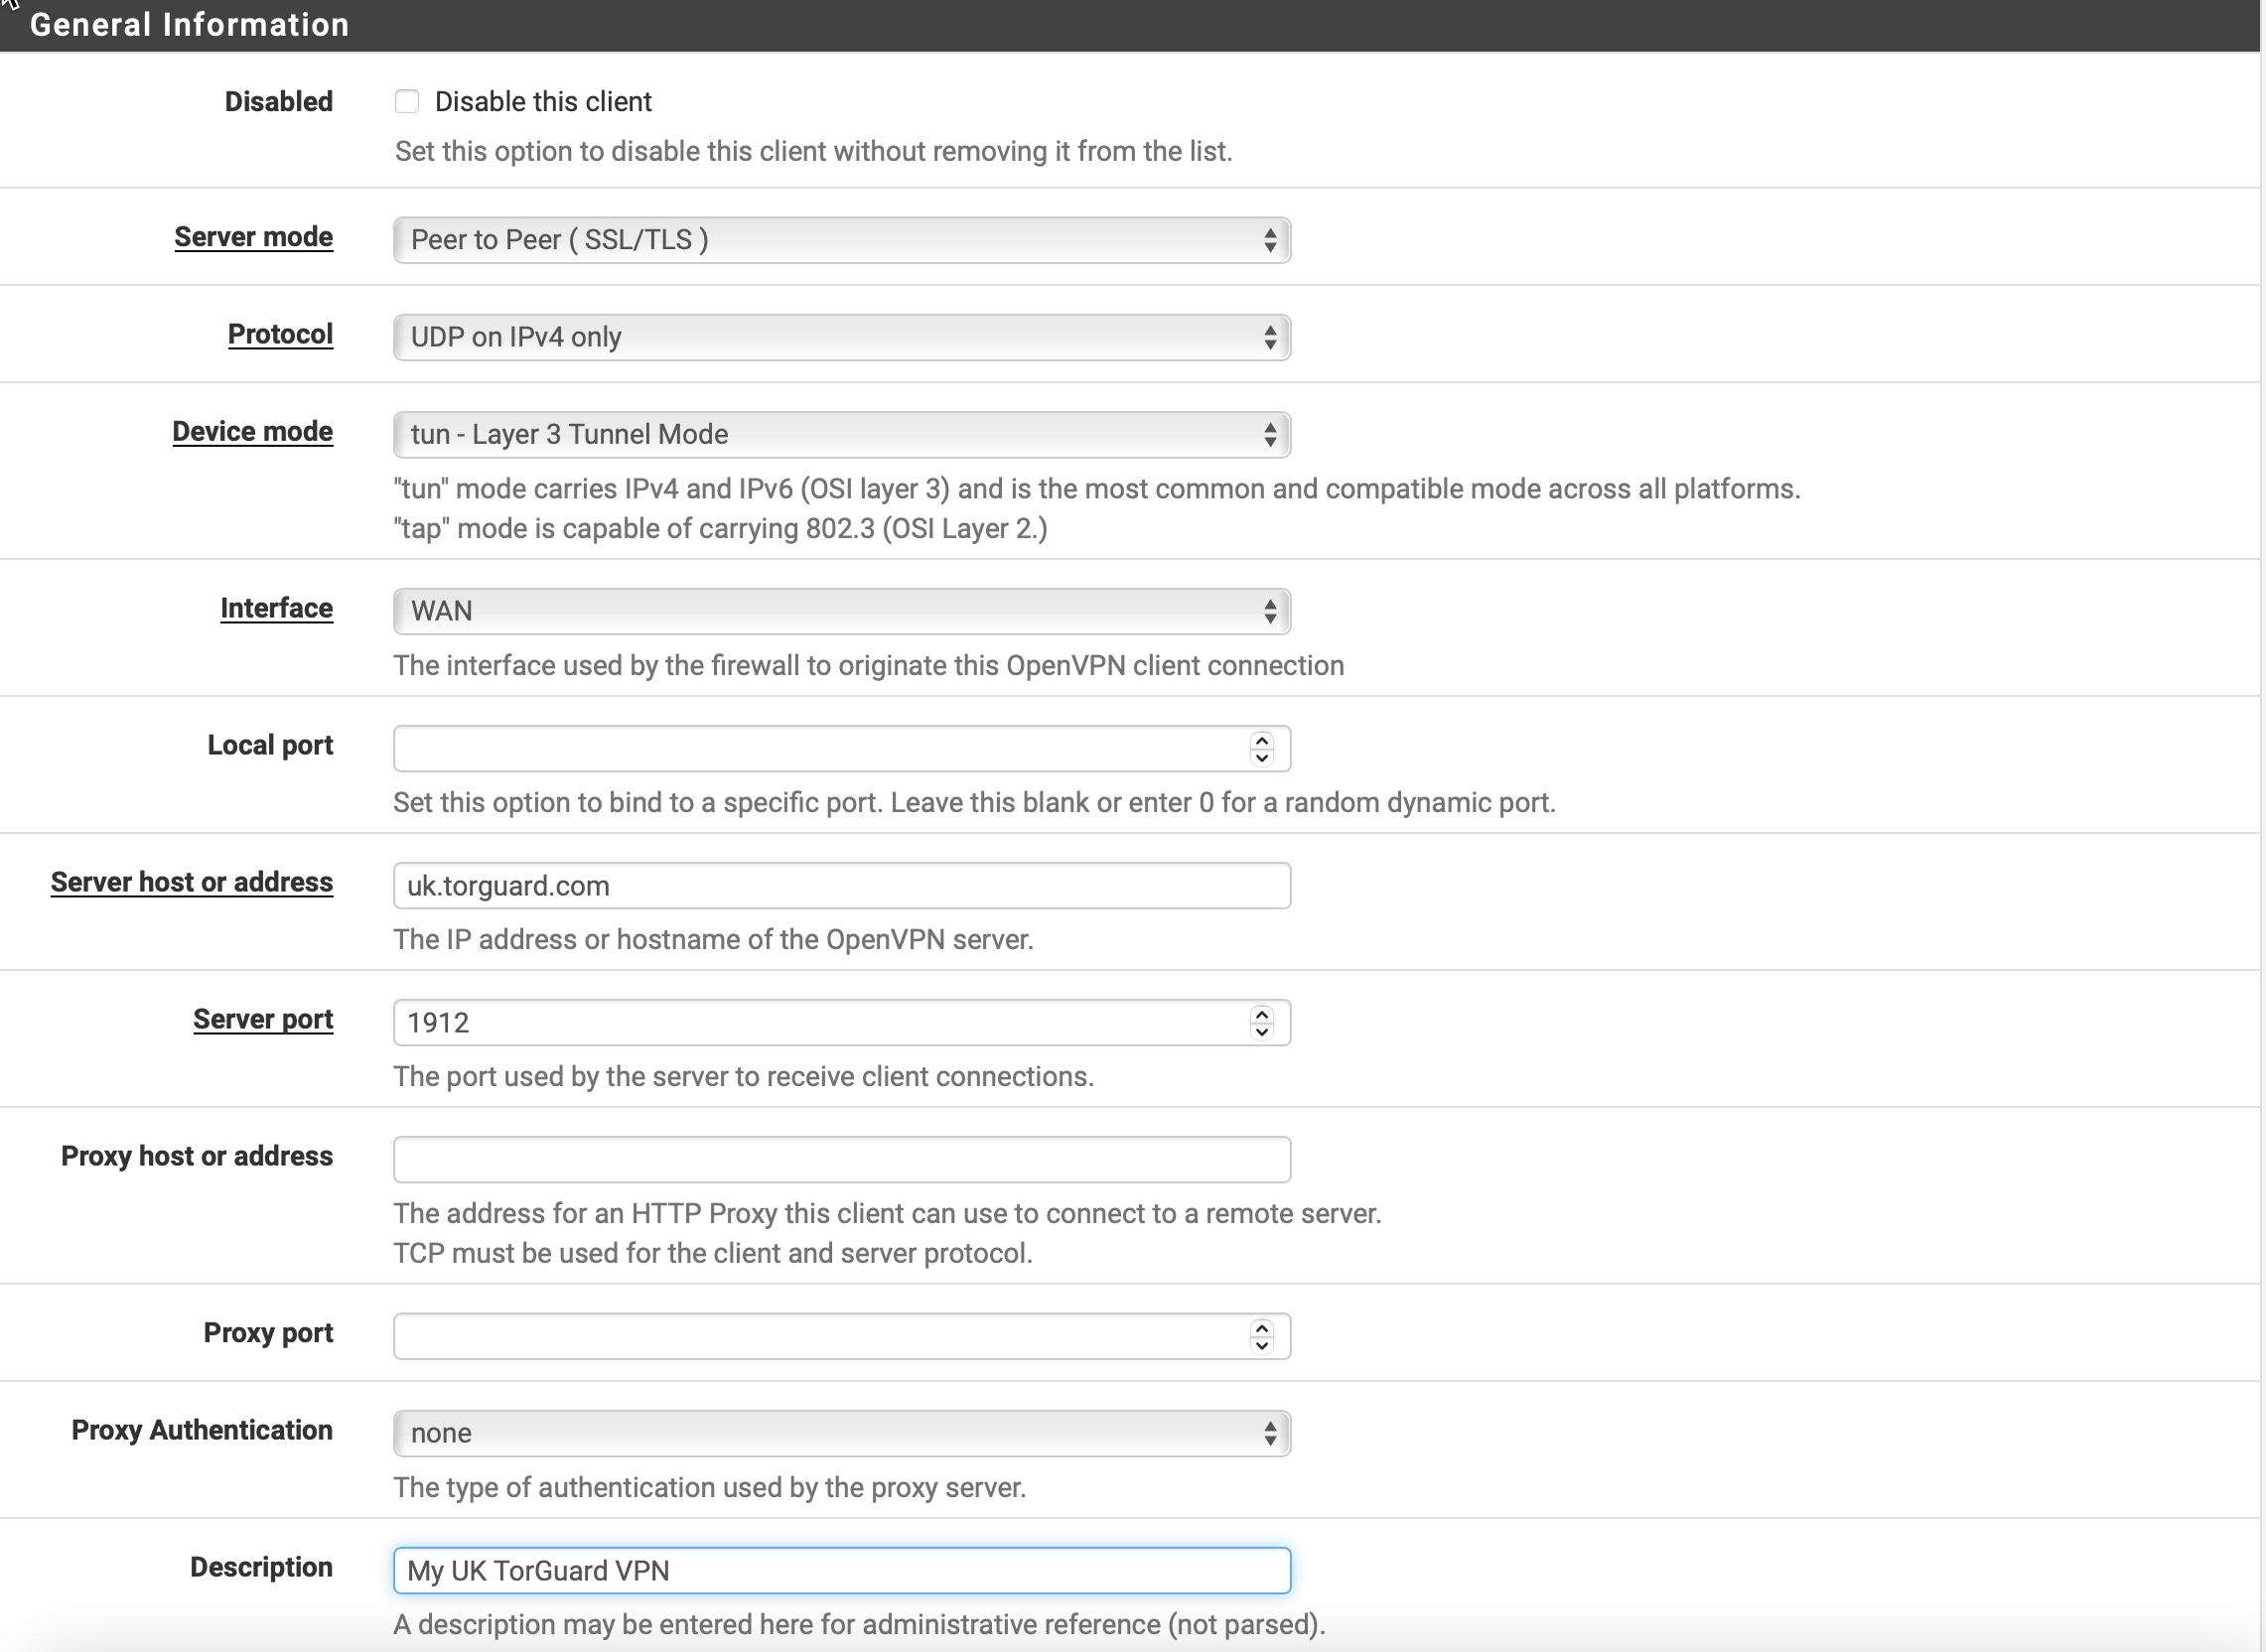
Step 3: Configure OpenVPN Client
Navigate to VPN → OpenVPN → Clients and click Add:
General Information
| Disable this client | Unchecked (leave enabled) |
| Server mode | Peer to Peer (SSL/TLS) |
| Protocol | UDP on IPv4 only (recommended) or TCP |
| Device mode | tun - Layer 3 Tunnel Mode |
| Interface | WAN |
| Server host or address | Your chosen server hostname or Static IP |
| Server port | 1912 (or see available ports below) |
| Description | TorGuard VPN (or custom name) |
📡 Available OpenVPN Ports
TorGuard supports multiple ports for bypassing restrictions:
View all available ports at TorGuard Ports Page
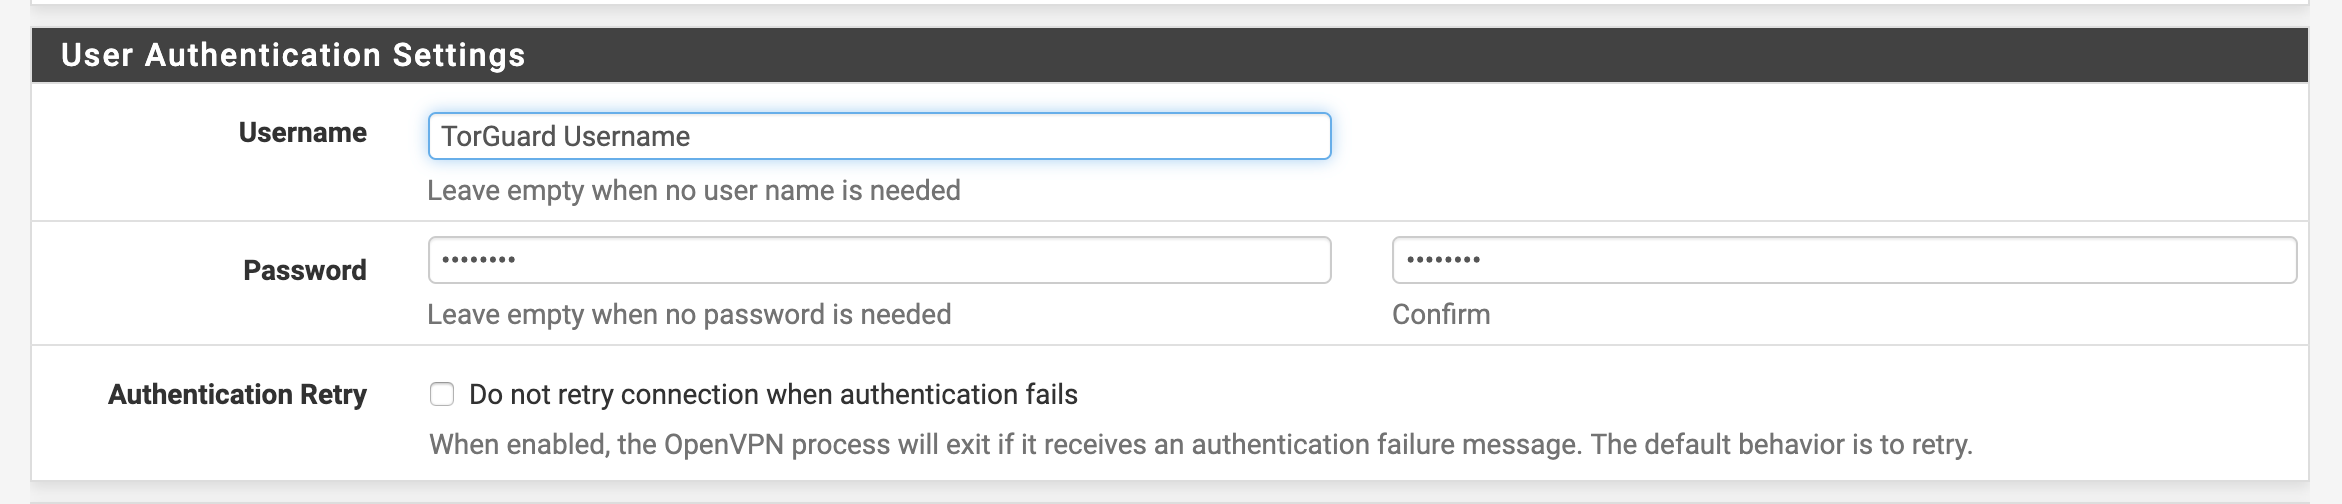
User Authentication Settings
| Username | Your TorGuard VPN username |
| Password | Your TorGuard VPN password |
| Authentication Retry | Leave unchecked |
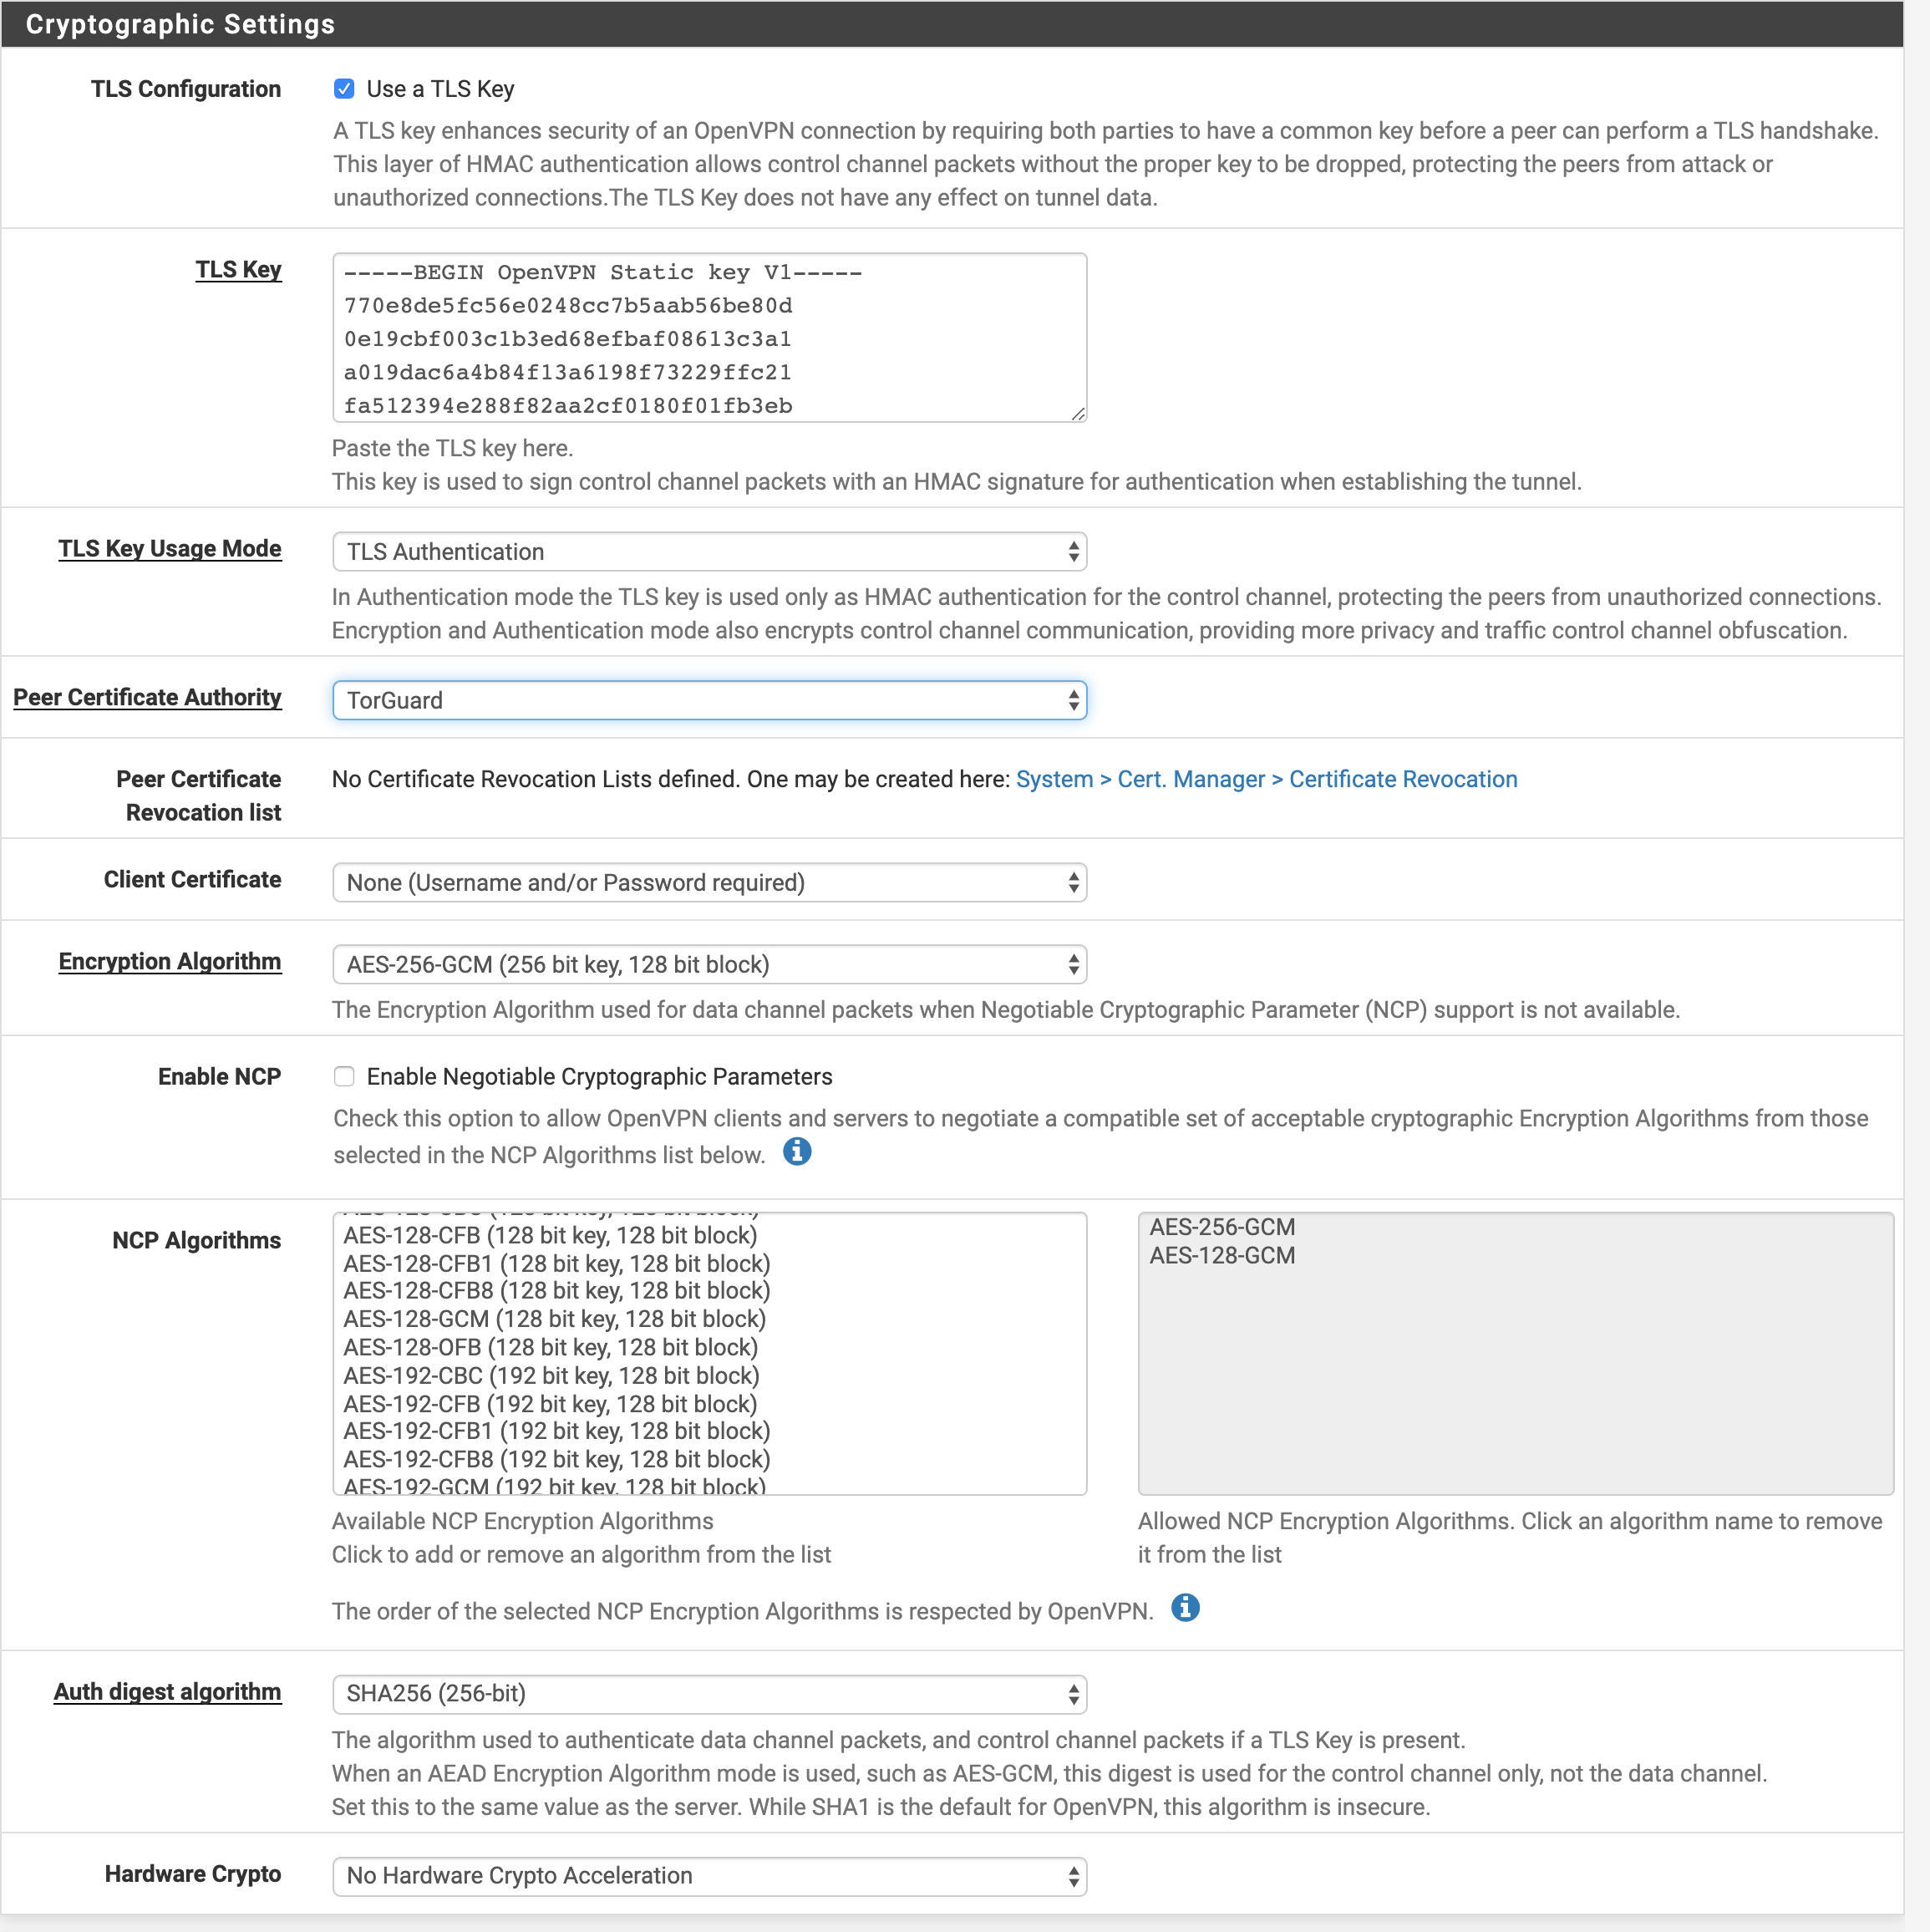
Cryptographic Settings
| TLS Configuration | Checked ✓ |
| TLS Key | Uncheck and paste key from certs page |
| TLS Key Usage Mode | TLS Authentication |
| TLS keydir direction | Leave as default |
| Peer Certificate Authority | TorGuard-CA (from Step 2) |
| Client Certificate | None - Username/Password Required |
| Data Encryption Negotiation | Checked ✓ |
| Data Encryption Algorithms | Remove CHACHA20 from list |
| Fallback Algorithm | AES-128-GCM |
| Auth digest algorithm | SHA256 |
| Hardware Crypto | No Hardware Crypto Acceleration |
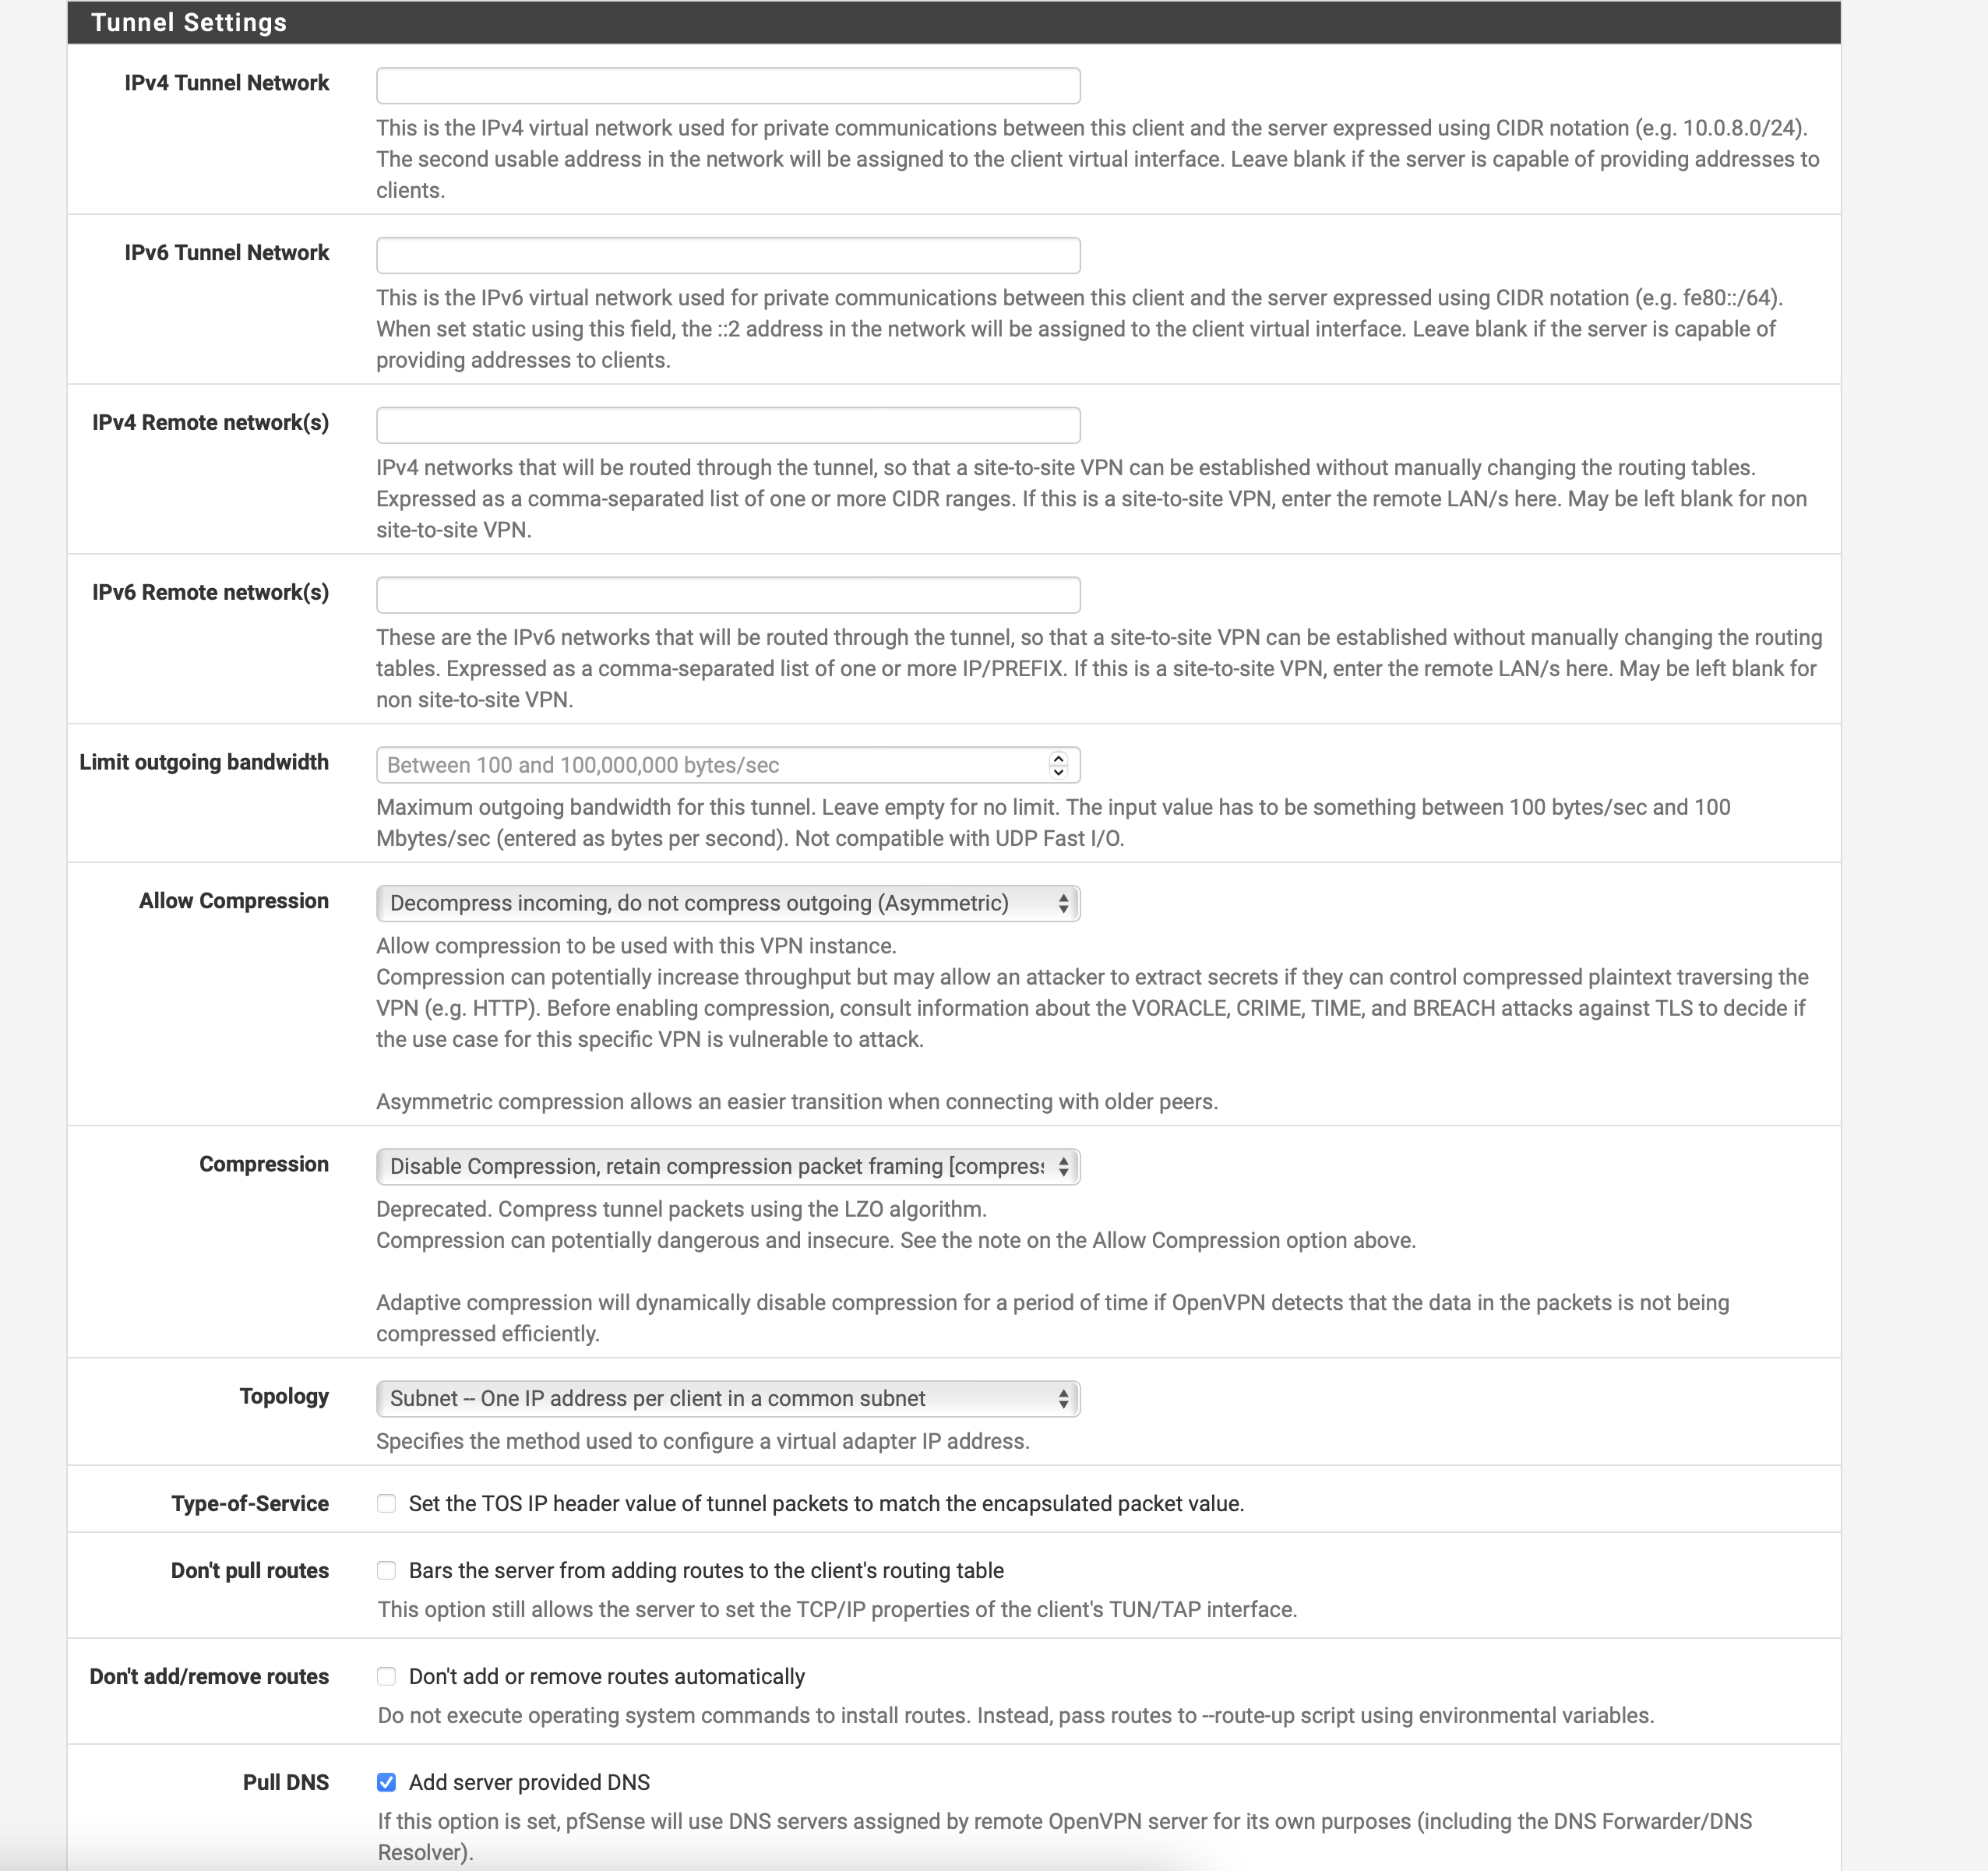
Tunnel Settings
⚠️ Version-Specific Settings
Compression settings differ between pfSense versions. Use the correct setting for your version!
| IPv4 Tunnel Network | Leave blank |
| IPv6 Tunnel Network | Leave blank |
| Allow Compression | Decompress Incoming, do not compress outgoing (Asymmetric) |
| Compression (pfSense < 2.7) | Disable Compression, retain compression packet framing |
| Compression (pfSense 2.7+) | Disable Compression [Omit Preference] |
| Topology | Subnet - One IP address per client in common subnet |
| Pull DNS | Checked ✓ (to use TorGuard DNS) |
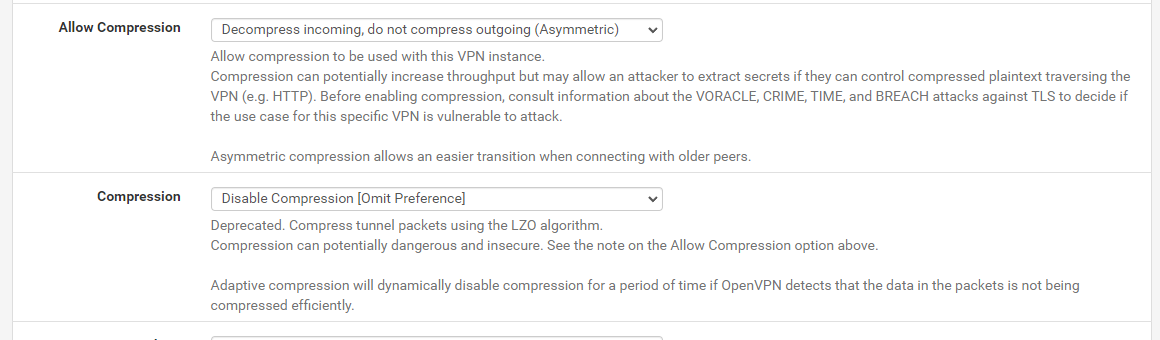
Compression settings for pfSense 2.7+
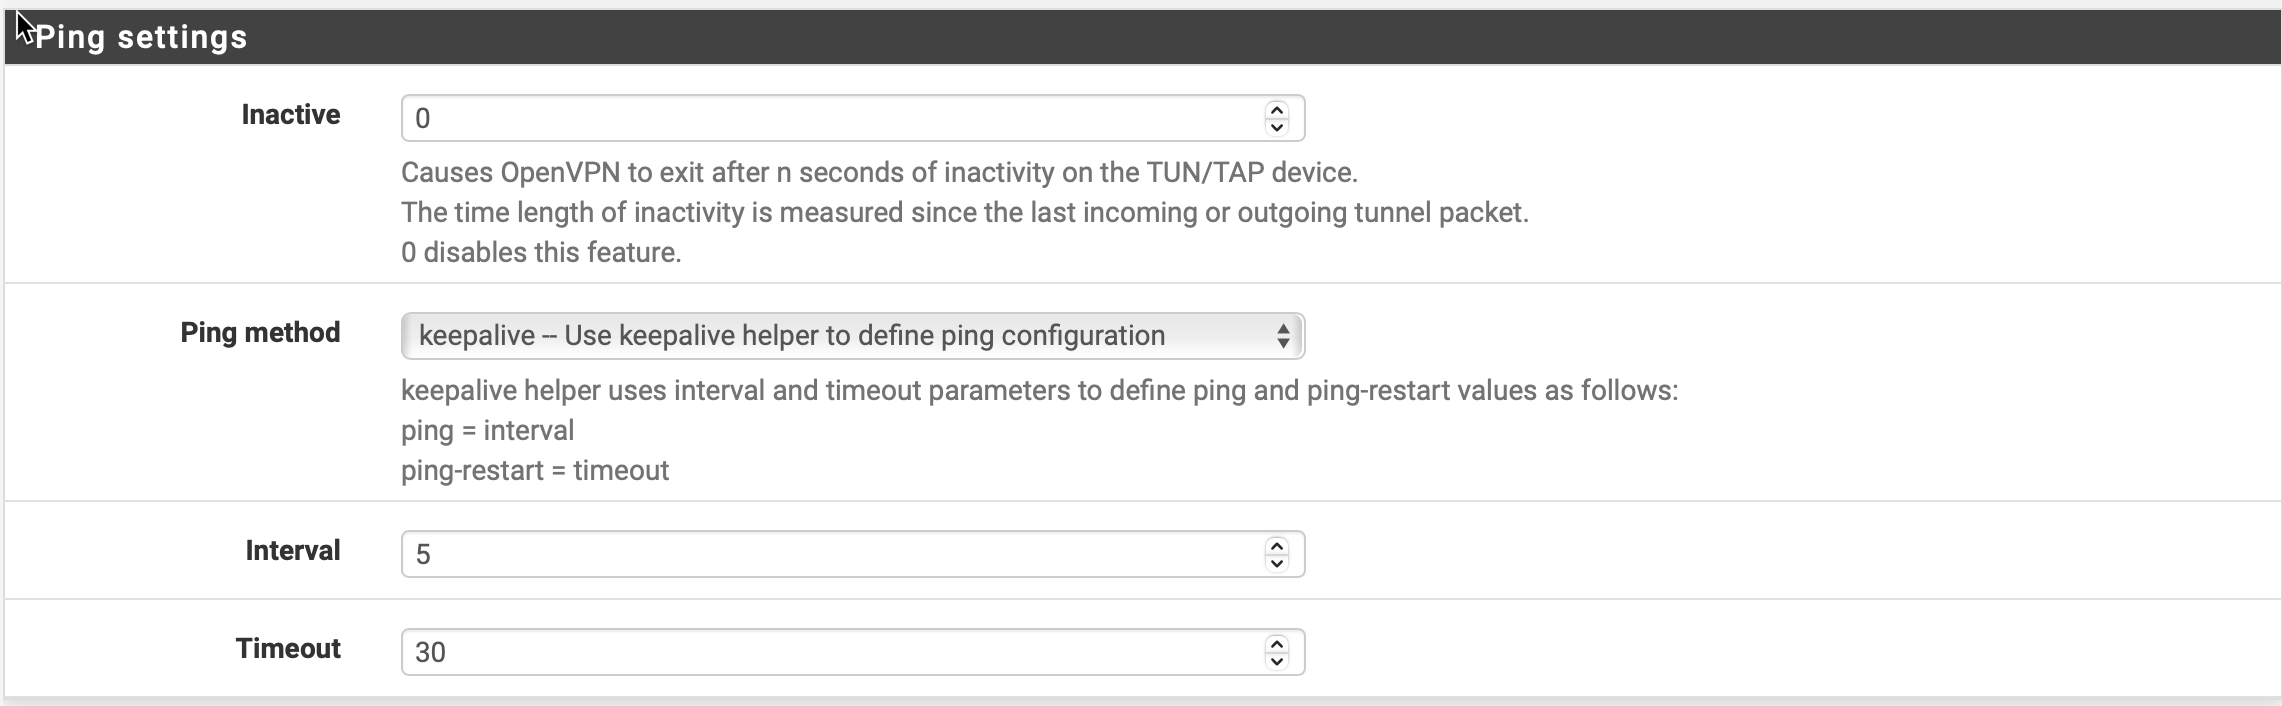
Ping Settings
| Inactive | 0 |
| Ping Method | Keepalive - Use Ping helper |
| Interval | 5 |
| Timeout | 30 |
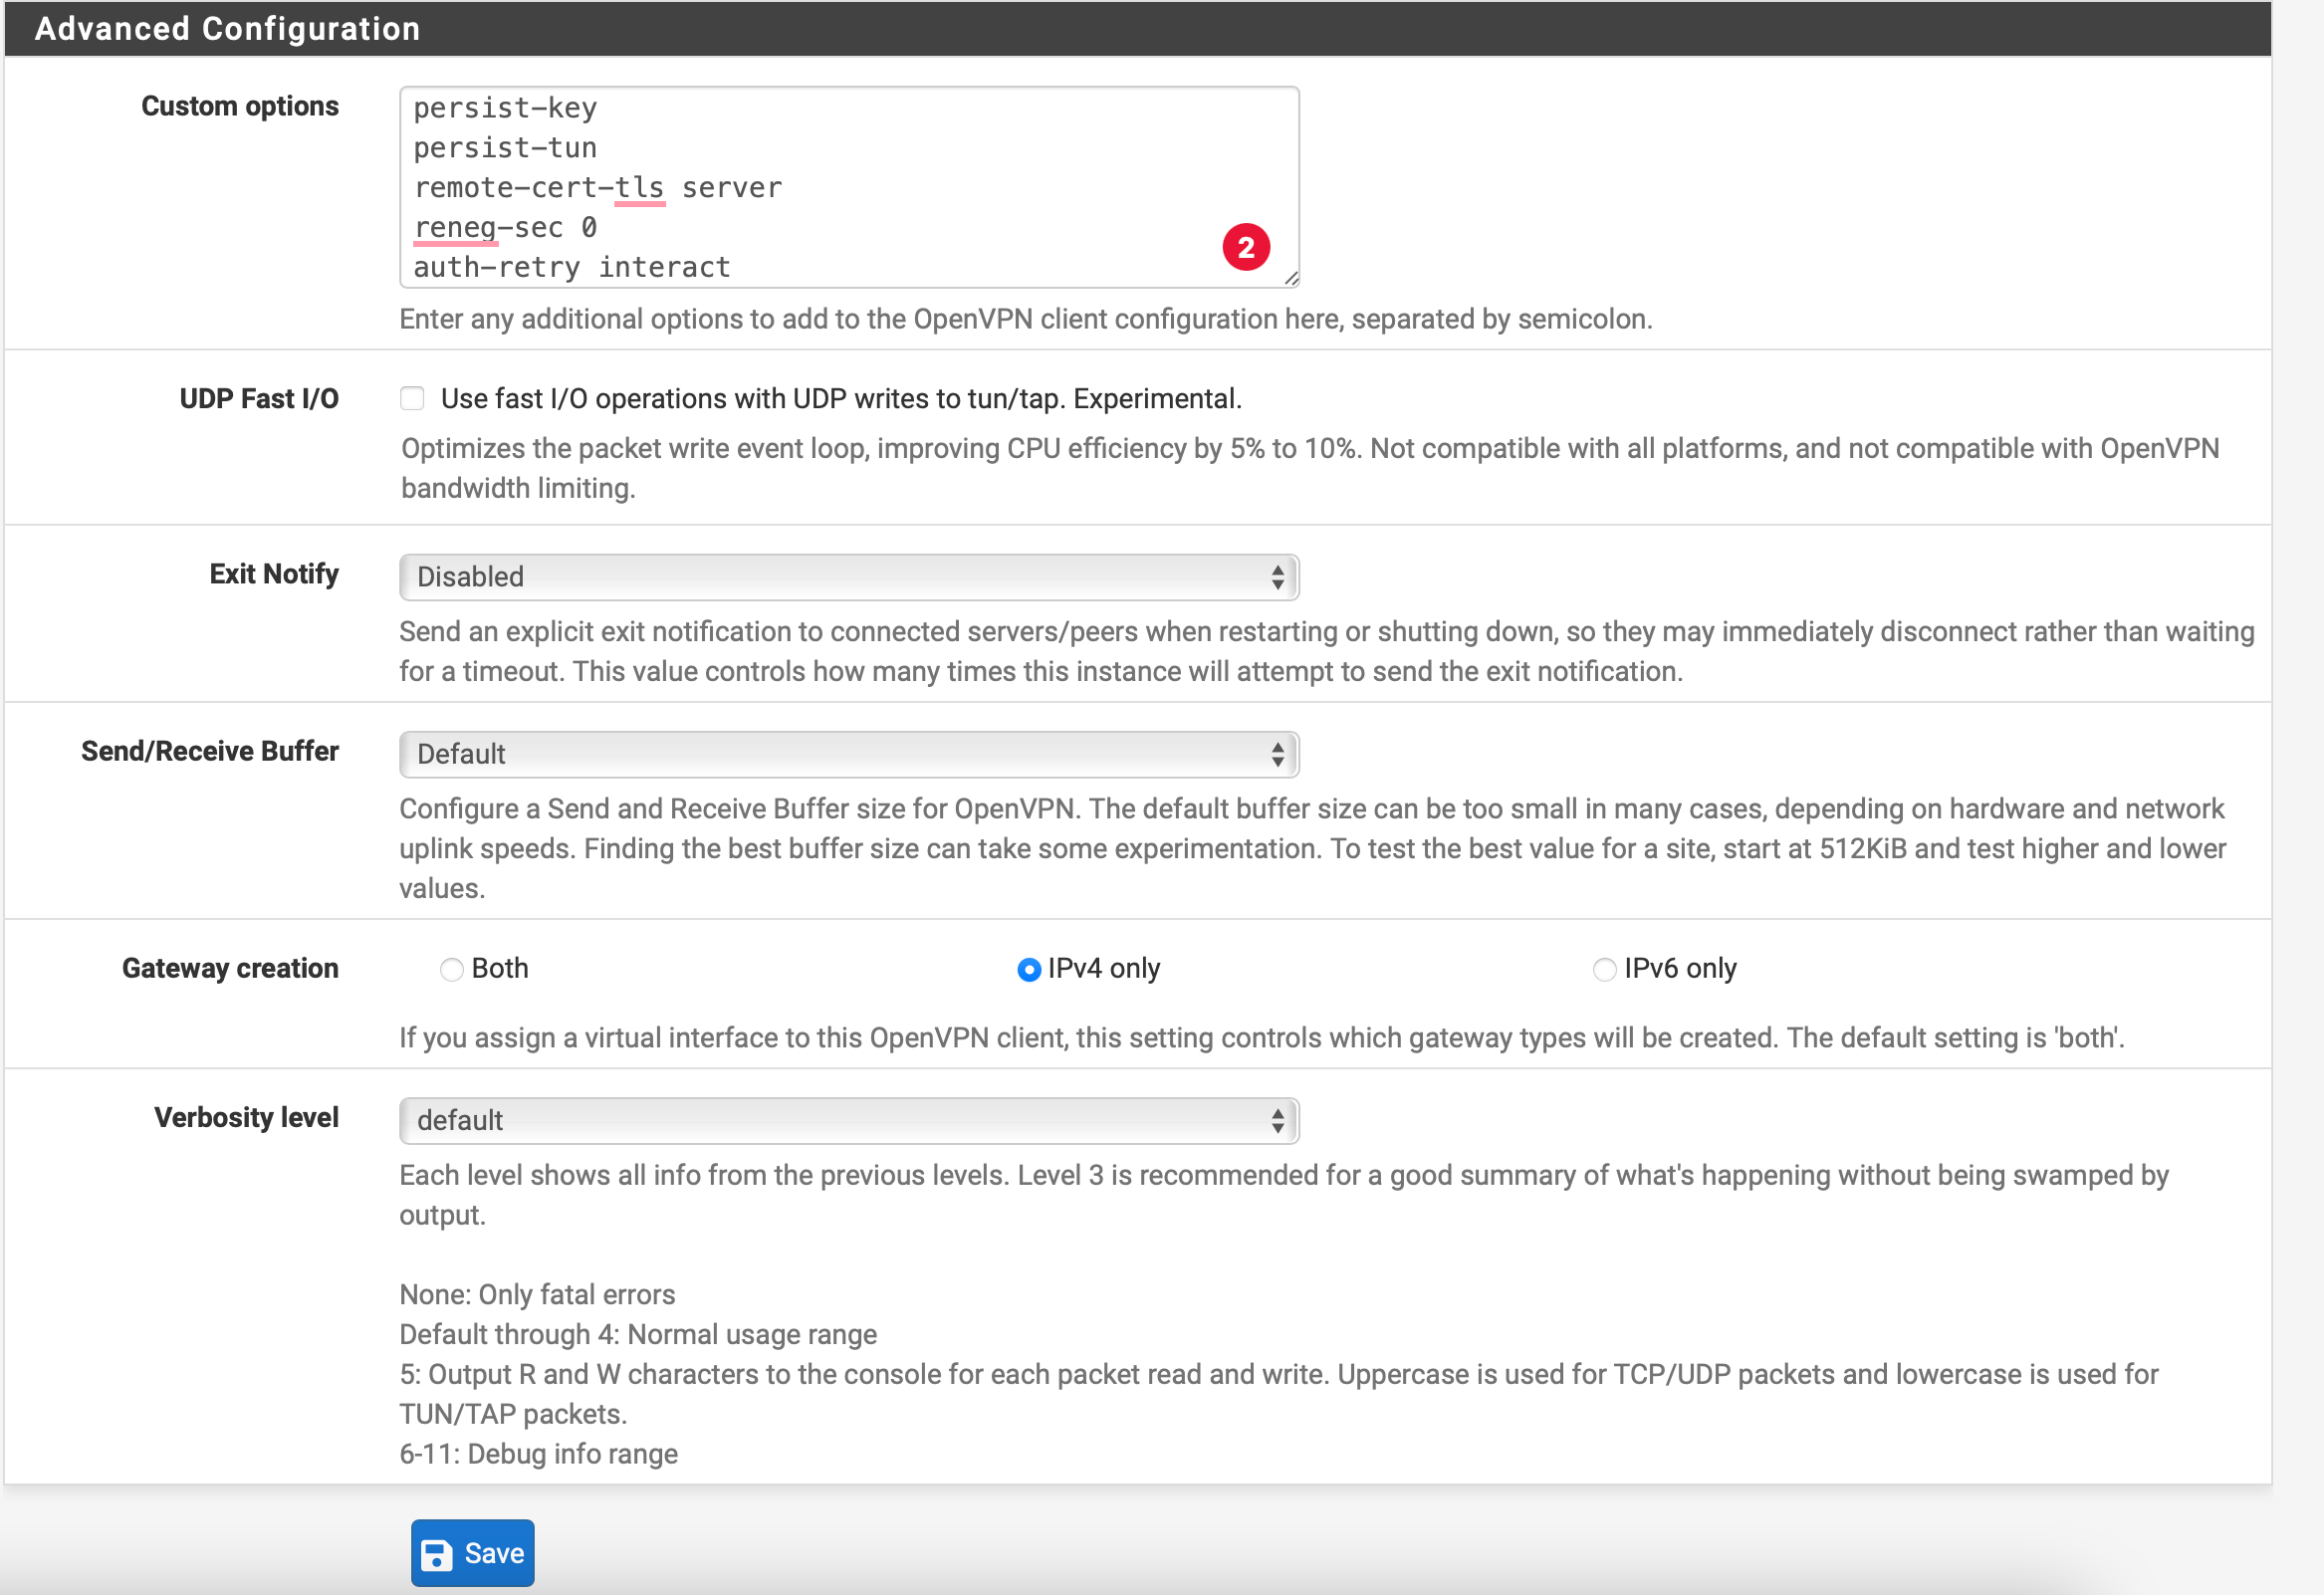
Advanced Configuration
Custom Options
| Exit Notify | Disabled |
| UDP Fast I/O | Unchecked |
| Send/Receive Buffer | Default |
| Gateway creation | IPv4 only |
| Verbosity level | Default (3) |
Click Save to save the OpenVPN client configuration.
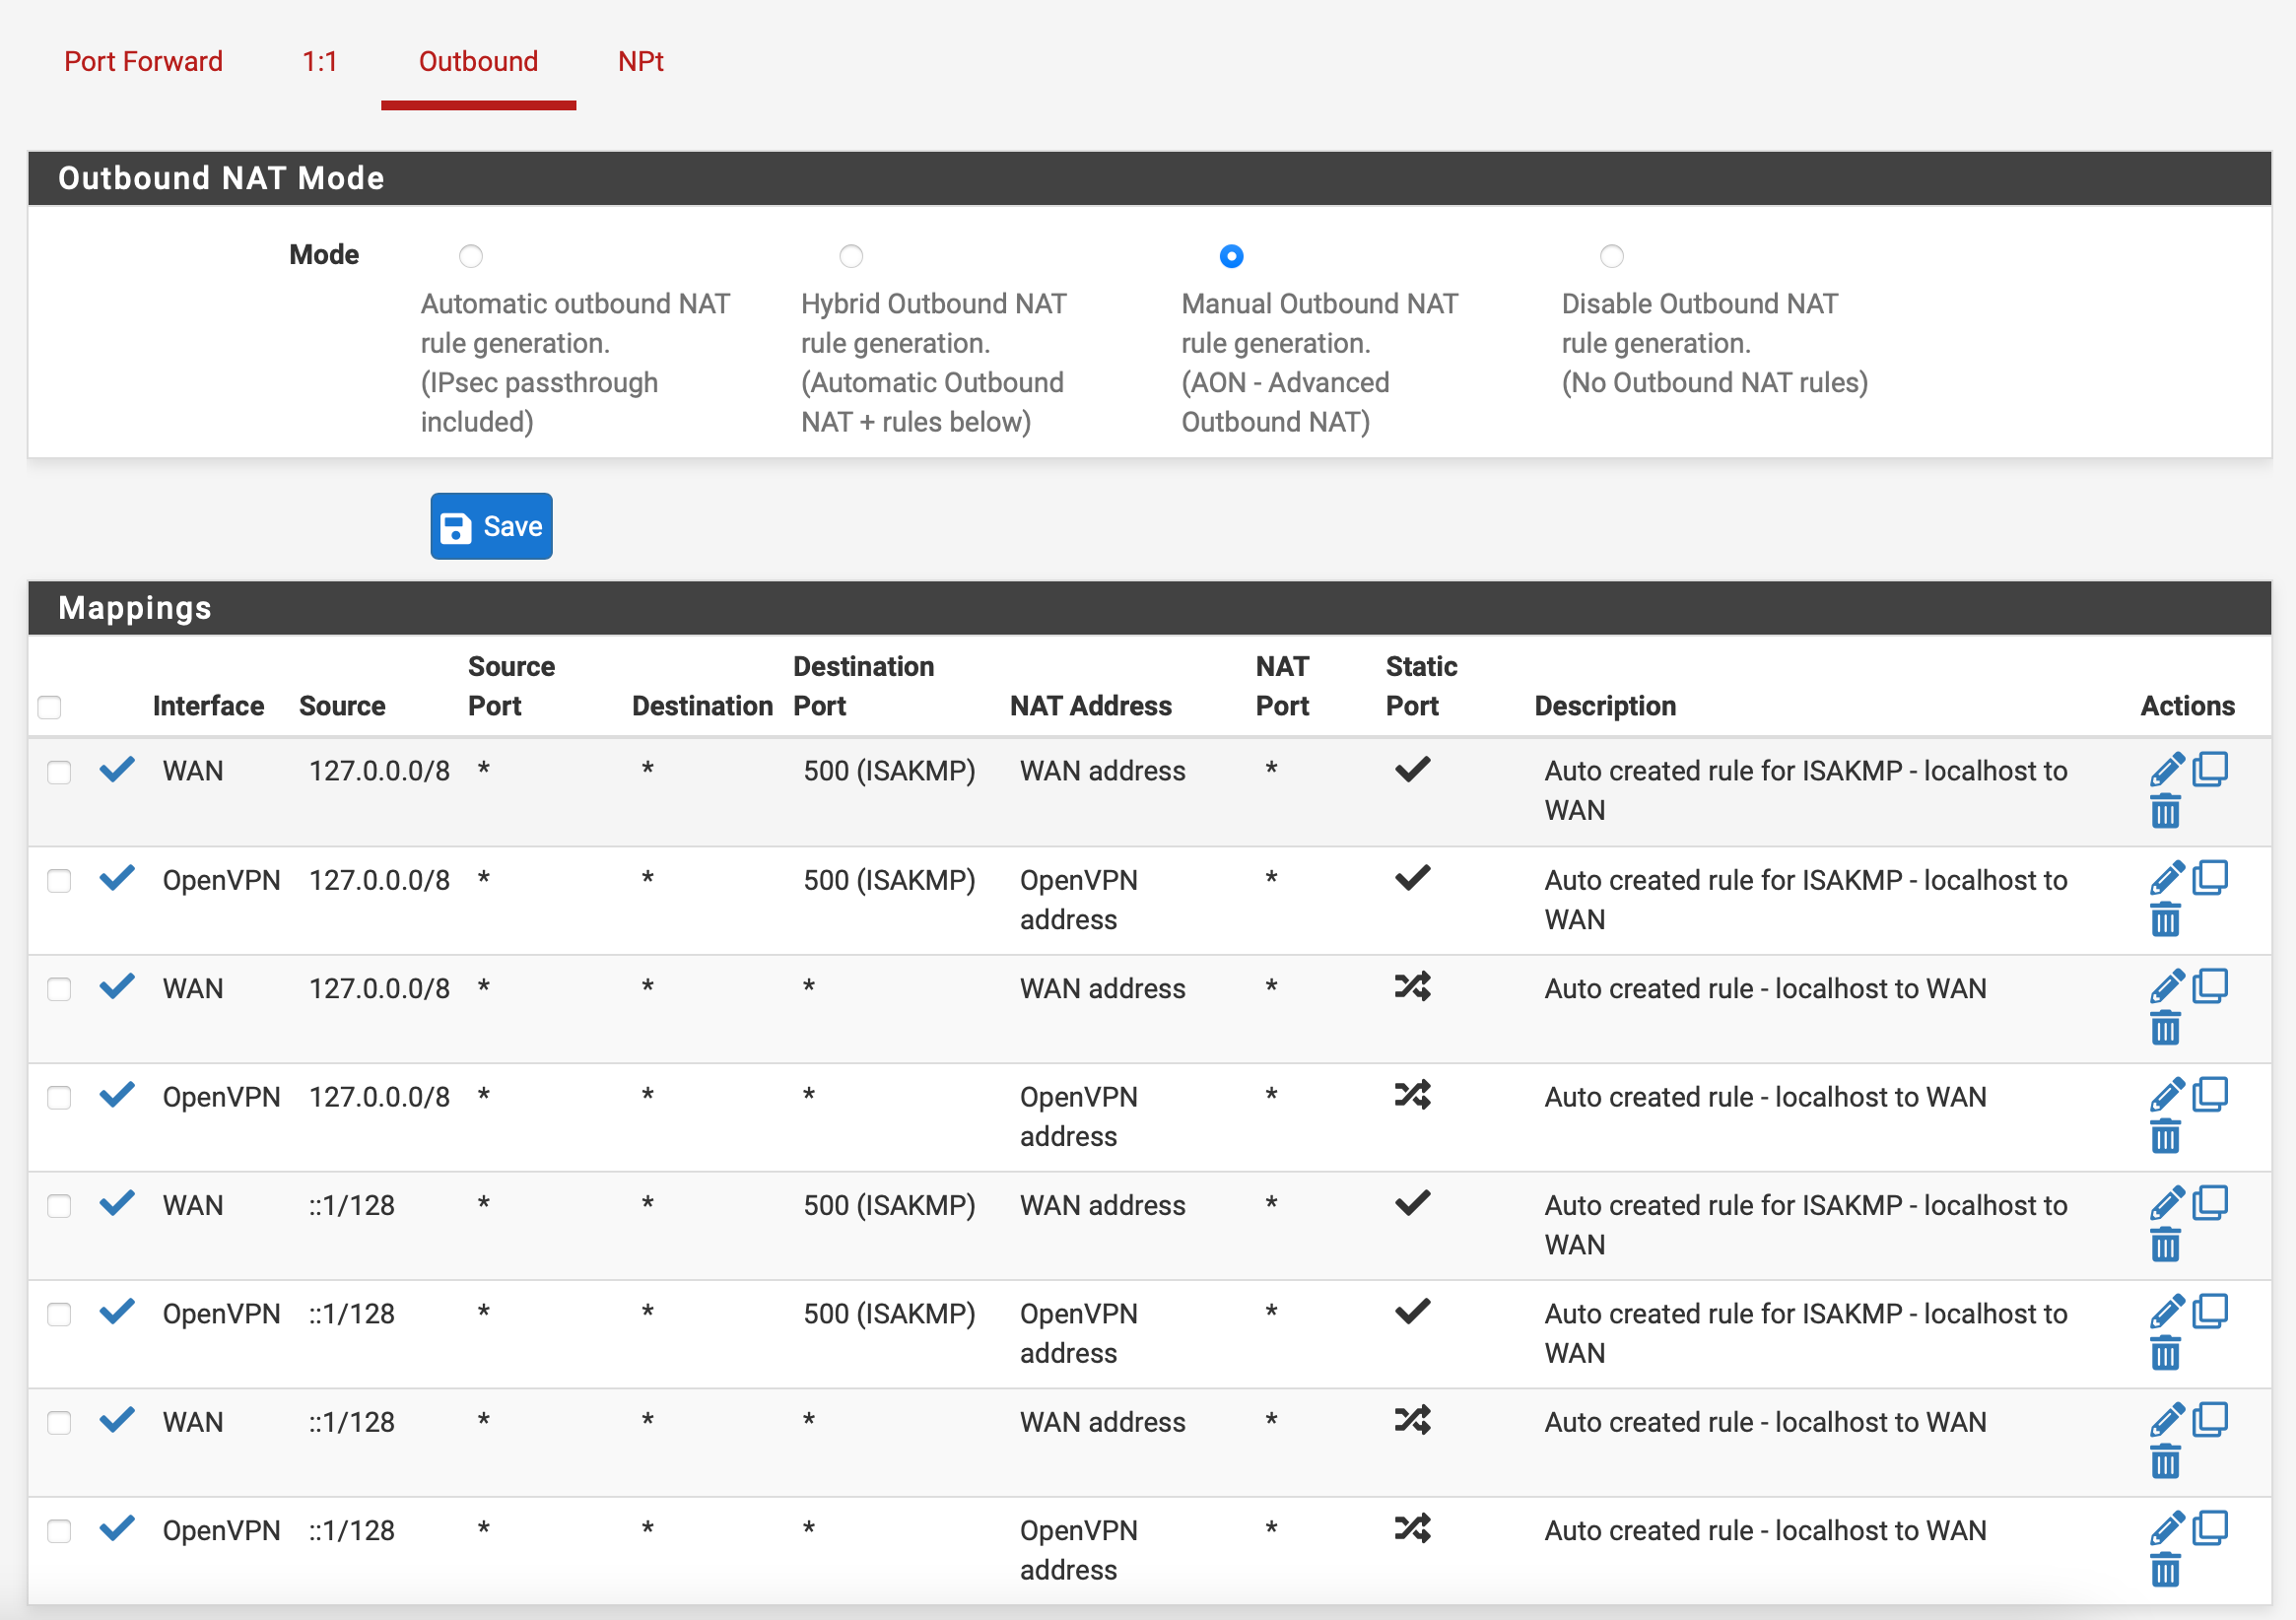
Step 4: Configure NAT Rules
🔧 NAT Configuration Required
This step ensures all traffic routes through the VPN tunnel
Navigate to Firewall → NAT → Outbound:
- Select Manual Outbound NAT rule generation
- Click Save
- You should see 4 existing rules
- For each rule, click the duplicate icon (two pages)
- Change Interface to OpenVPN
- Click Save after each duplicate
- After all 4 are duplicated, click Apply Changes
Step 5: Configure DNS
Navigate to System → General Setup:
DNS Server Settings
| DNS Server 1 | 1.1.1.1 (Cloudflare) |
| DNS Server 2 | 10.8.0.1 (TorGuard DNS) |
| DNS Server Override | Uncheck "Allow DNS server list to be overridden" |
Step 6: Verify Connection
Navigate to Status → OpenVPN to check connection status:

Visit TorGuard's IP Check to verify your VPN IP address.
Quick Reference Card
📋 Configuration Summary
- Protocol: UDP (recommended) or TCP
- Port: 1912 (default) or alternatives
- Encryption: AES-128-GCM
- Auth: SHA256
- Compression: Disabled (version-specific)
- DNS: 1.1.1.1 + 10.8.0.1
- NAT: Manual outbound rules required
Troubleshooting
- Verify username/password are correct
- Check server hostname is typed correctly
- Ensure certificate was imported properly
- Try a different server or port
- Check pfSense logs: Status → System Logs → OpenVPN
- Verify NAT rules were created correctly
- Check DNS servers are configured
- Ensure "Pull DNS" is checked in tunnel settings
- Restart pfSense after configuration
- Check firewall rules aren't blocking traffic
- Try a server closer to your location
- Switch between UDP and TCP protocols
- Check hardware crypto settings
- Monitor CPU usage during transfers
- Consider upgrading pfSense hardware
- Uncheck "Allow DNS server override" in General Setup
- Set DNS servers to TorGuard DNS only
- Enable "DNS Resolver" instead of "DNS Forwarder"
- Configure DHCP to push VPN DNS to clients
Advanced Features
🚀 Power User Tips
- Policy Routing: Route only specific devices through VPN
- Multi-WAN: Configure failover VPN connections
- Kill Switch: Block all traffic if VPN disconnects
- Split Tunneling: Exclude specific IPs from VPN
- Port Forwarding: Forward ports through VPN tunnel
Performance Optimization
⚡ Speed Optimization
- Hardware: Enable AES-NI CPU support if available
- MTU: Try MTU 1400-1450 for better performance
- Buffer: Increase send/receive buffer for high-speed connections
- Compression: Keep disabled for best performance
- Protocol: UDP generally faster than TCP
Need Help?
If you're experiencing issues with your pfSense setup:
Include your pfSense version and OpenVPN logs for fastest resolution