⚡ About WireGuard on PrivateRouter
PrivateRouter offers custom OpenWRT routers with an easy-to-use WireGuard setup tool designed specifically for TorGuard. This integration provides the fastest VPN performance possible on router hardware with automatic connection management.
WireGuard Performance
🚀 Why WireGuard?
Faster than OpenVPN
Lines of code (vs 100k+)
Connection time
ChaCha20 encryption
PrivateRouter Benefits
🏠 Why Use PrivateRouter?
Pre-configured
TorGuard-optimized firmware
Easy Setup
Custom tgwireguard app
Web Interface
User-friendly LuCI GUI
Network-wide
All devices protected
High Performance
Hardware acceleration
Auto-reconnect
Persistent connection
Prerequisites
📋 Before You Start
- ✅ Active TorGuard VPN subscription
- ✅ PrivateRouter with OpenWRT firmware
- ✅ Access to router admin panel
- ✅ TorGuard VPN username/password
- ✅ Internet connection to router
⚠️ Compatibility Note
This guide is specific to PrivateRouter devices. For other OpenWRT routers, use the standard OpenWRT guide.
WireGuard vs OpenVPN
⚡ WireGuard
- ✅ 3-5x faster speeds
- ✅ Lower CPU usage
- ✅ Instant connections
- ✅ Better battery life
- ✅ Modern cryptography
- ✅ Simpler configuration
Best for: Maximum performance
🔒 OpenVPN
- ✅ Mature & proven
- ✅ More server options
- ✅ TCP fallback
- ✅ Obfuscation support
- ⚠️ Higher overhead
- ⚠️ Complex setup
Best for: Compatibility
Step-by-Step Setup
Generate WireGuard Config
Visit TorGuard's config generator and create your WireGuard configuration:
- Go to TorGuard Config Generator
- Select "WireGuard" as VPN tunnel type
- Choose your desired server location
- Enter your TorGuard VPN username
- Click "Generate Config"
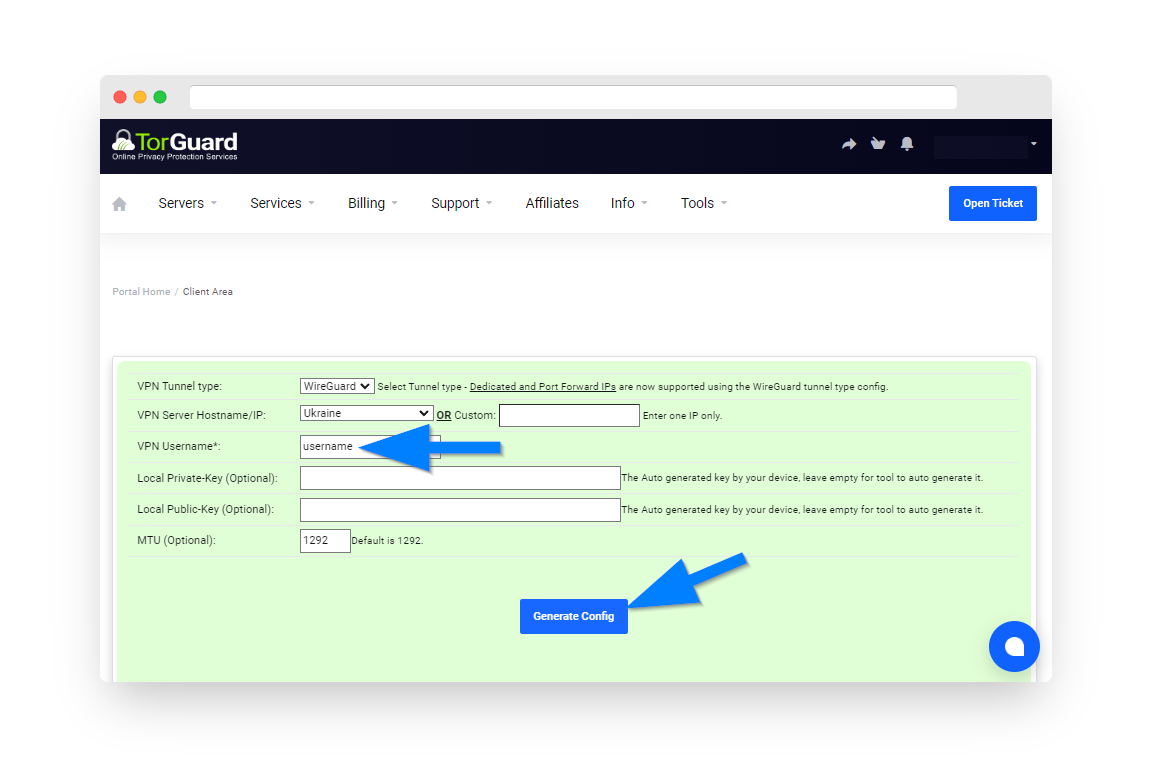
💡 Server Selection Tips
- Choose geographically closest server for best speed
- Consider server load indicators
- Some locations offer better streaming support
Copy Configuration Values
From the generated config, you'll need these specific values:
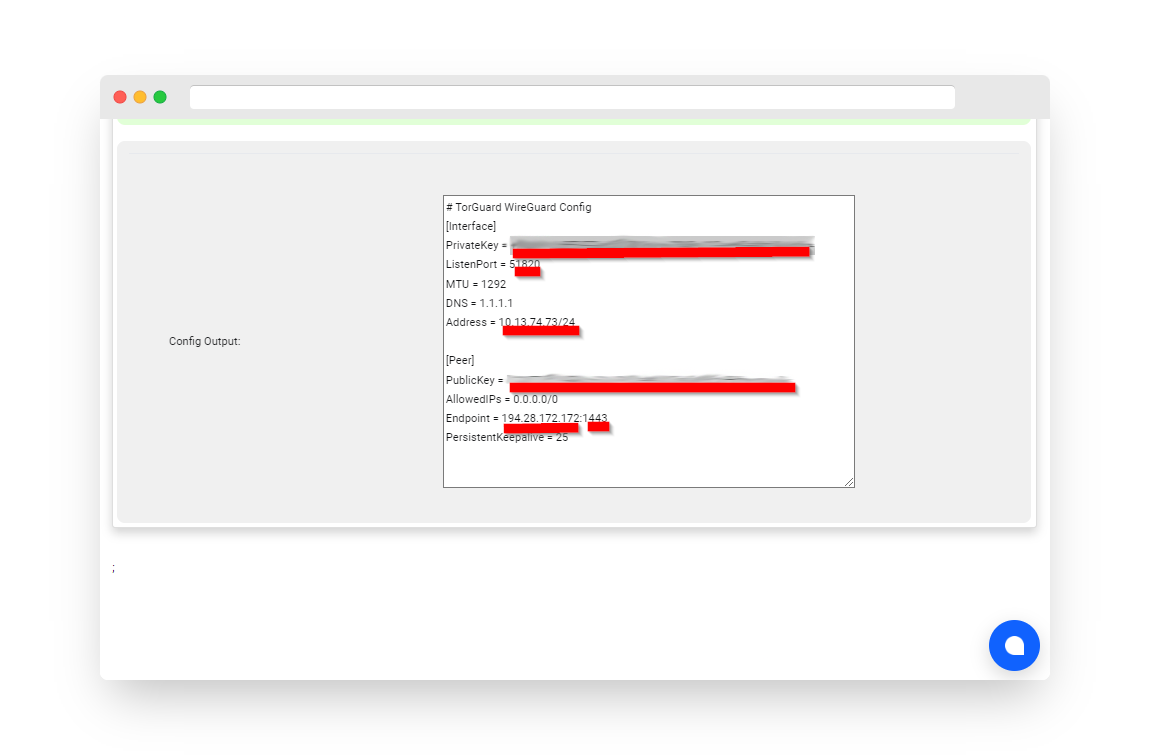
⚠️ Important
Copy these values exactly as shown, including any equals signs or special characters. A single typo will prevent connection.
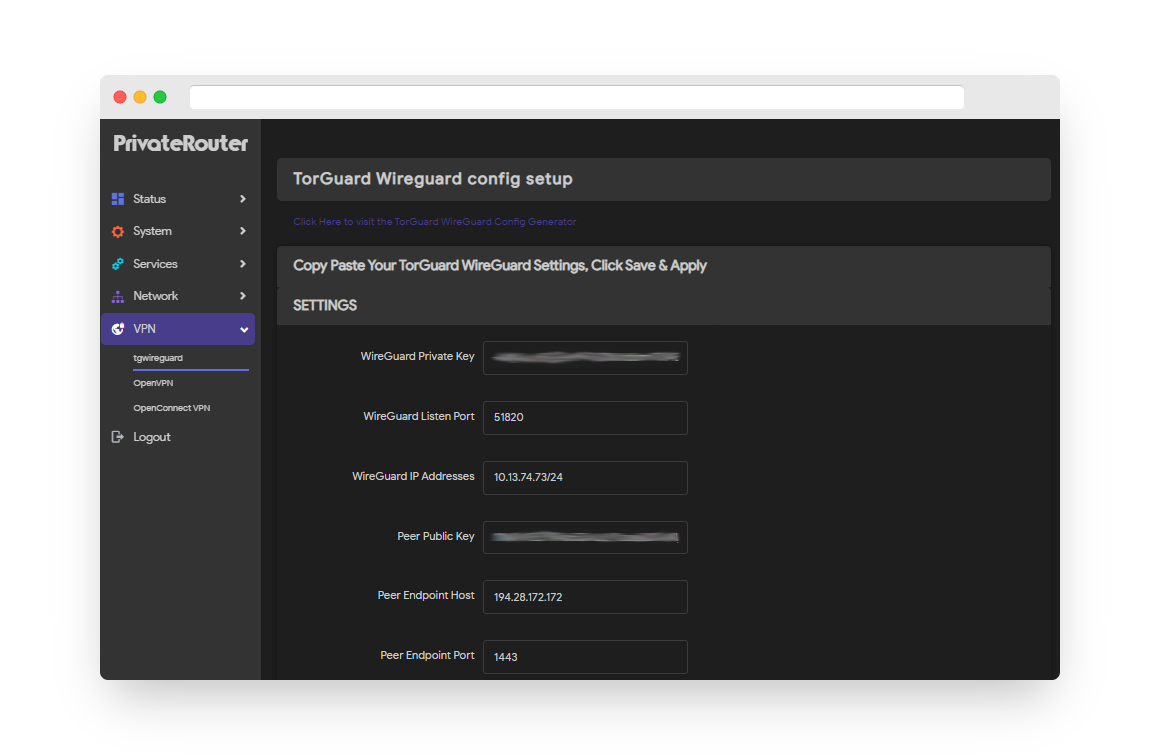
Configure PrivateRouter
Now configure your router with the WireGuard settings:
A. Access tgwireguard App
- Log into your PrivateRouter admin panel
- Click the VPN tab
- Click "tgwireguard"
B. Install tgwireguard (if needed)
If you don't see the tgwireguard option:
- Download from GitHub
- Go to System → Software
- Click "Upload Package"
- Select the downloaded .ipk file
- Click "Install"
C. Enter Configuration
Paste each value from Step 2 into the matching fields:
- Private Key: Your client private key
- Listen Port: Port from config
- Address: Your VPN IP address
- Public Key: Server public key
- Endpoint: Server address:port
Click "Save & Apply" when done.
tgwireguard Features
🛠️ App Capabilities
Connection Management
🎮 Using Your VPN Connection
- Start VPN: Click "Start WireGuard" button
- Stop VPN: Click "Stop WireGuard" button
- Auto-start: Enabled by default on router boot
- Status: Check connection status in the interface
- Logs: View logs under System → System Log
Router Compatibility
| Router Model | CPU | RAM | Expected Speed |
|---|---|---|---|
| PrivateRouter Mini | MediaTek MT7621 | 256MB | ~200 Mbps |
| PrivateRouter Pro | Qualcomm IPQ4019 | 512MB | ~400 Mbps |
| PrivateRouter Ultra | Qualcomm IPQ8072 | 1GB | ~800 Mbps |
| Generic OpenWRT | Various | 128MB+ | Varies |
Advanced Settings
🔧 Power User Options
1. DNS Configuration
Force all DNS through VPN:
# Add to WireGuard config
DNS = 10.8.0.1
2. Kill Switch
Block internet if VPN disconnects:
# Firewall rule (automatic with tgwireguard)
PostUp = iptables -I FORWARD -o wan -j DROP
PreDown = iptables -D FORWARD -o wan -j DROP
3. Split Tunneling
Route specific devices outside VPN:
- Use Policy-Based Routing
- Configure in Network → Firewall
- Add device MAC/IP exceptions
4. Multiple Configs
Switch between servers:
- Save multiple configurations
- Name them by location
- Quick switch via interface
Troubleshooting
🔍 Common Issues & Solutions
No Internet After Connect
- Check firewall settings
- Verify DNS configuration
- Restart router services
- Check WAN connection
Connection Failed
- Verify all config values
- Check server status
- Try different endpoint
- Regenerate config
Slow Speeds
- Try closer server
- Check router CPU usage
- Update router firmware
- Test without VPN first
App Not Found
- Download latest .ipk
- Check OpenWRT version
- Install dependencies
- Reboot after install
Config Not Saving
- Check special characters
- No extra spaces
- Use Save & Apply
- Clear browser cache
DNS Leaks
- Set custom DNS servers
- Disable ISP DNS
- Use TorGuard DNS
- Test at dnsleaktest.com
Security Benefits
🔐 WireGuard Security Features
- ChaCha20-Poly1305: Authenticated encryption
- Curve25519: Key exchange
- BLAKE2s: Hashing
- Perfect Forward Secrecy: Key rotation
- Minimal Attack Surface: ~4,000 lines of code
- No Key Negotiation: Resistant to downgrade attacks
Performance Optimization
⚡ Speed Tips
- MTU Size: Set to 1420 for optimal performance
- Server Selection: Use ping tests to find fastest
- Hardware Acceleration: Enable if router supports
- QoS Settings: Prioritize VPN traffic
- Channel Width: Use 80MHz on 5GHz WiFi
- CPU Governor: Set to performance mode
Need Help?
If you need assistance with your PrivateRouter setup:
Support Resources:
Include your router model and any error messages