🏠 About Self-Hosting with Private VPN Cloud
TorGuard's Private VPN Cloud combined with PrivateRouter OpenWRT enables you to self-host web applications securely from your home network. Using Docker containers and Nginx Proxy Manager, you can run services like file sharing, media servers, and more with professional SSL certificates and custom domains.
Why Self-Host?
Self-hosting gives you complete control over your data, privacy, and services. With Private VPN Cloud, your applications are accessible worldwide through secure VPN tunnels while keeping your home IP address private.
Benefits of Self-Hosting
Data Privacy
Your data stays on your hardware
Cost Savings
No monthly cloud hosting fees
Global Access
Access from anywhere securely
Hidden IP
Your home IP stays private
Unlimited Storage
Limited only by your hardware
Full Control
Customize everything
System Architecture
🏗️ How It Works
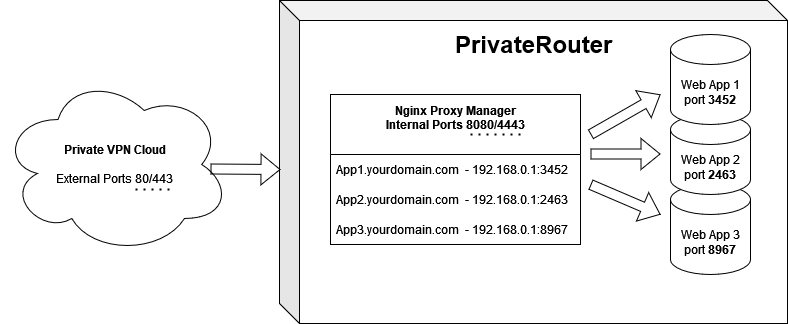
Traffic flows: Internet → VPN Cloud → PrivateRouter → Nginx Proxy Manager → Docker Apps
Prerequisites
📋 What You'll Need
- ✅ Active TorGuard Private VPN Cloud subscription
- ✅ PrivateRouter OpenWRT router
- ✅ A domain name (for SSL certificates)
- ✅ Basic networking knowledge
- ✅ Home internet connection with stable upload speed
⚠️ Important Note
This guide requires a PrivateRouter device with Docker support. Standard routers won't work for this setup.
Step 1: Access VPN Cloud Management
Login to Member Area
Access your TorGuard account and navigate to VPN Cloud:
- Login to TorGuard member area
- Search for your Private VPN Cloud service
- Click Manage to open the dropdown
- Select Manage VPN Cloud

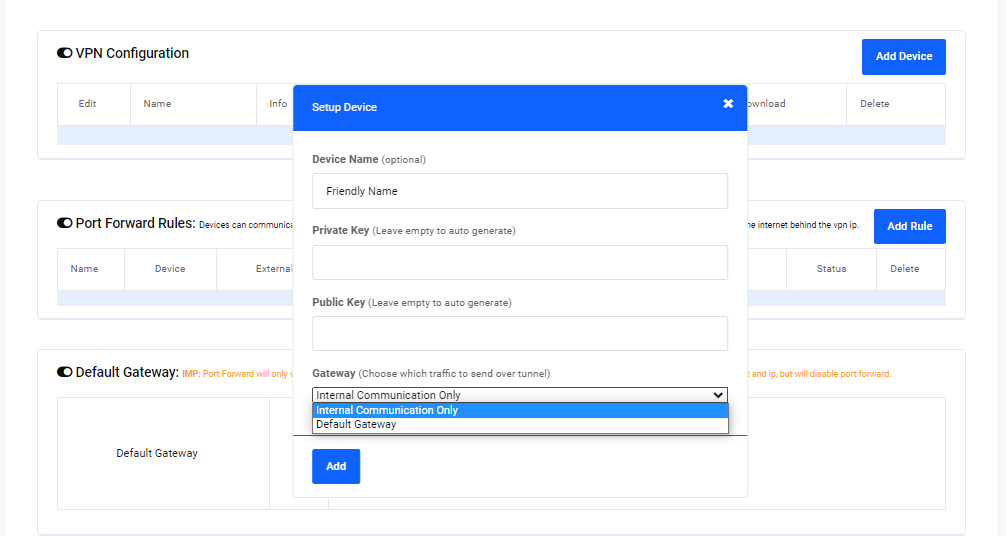
Step 2: Add Your PrivateRouter Device
Create Device Configuration
Add your PrivateRouter to the VPN Cloud:
Click the Add Device button in the VPN Configuration table:

Step 3: Configure Device Settings
Device Configuration
Fill in the device details:
Click "Add" to create your device:
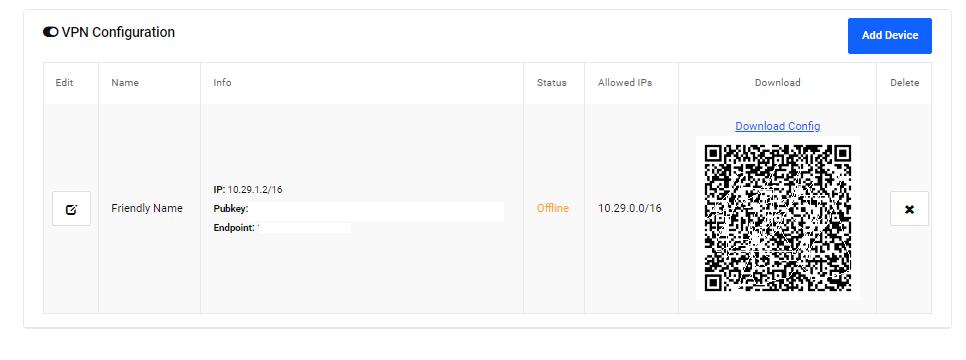
Step 4: Download & Configure WireGuard
Get WireGuard Configuration
Download your WireGuard config file:
- Click "Download Config" link
- Open the file with a text editor (Notepad, TextEdit)
- Keep this window open for the next step
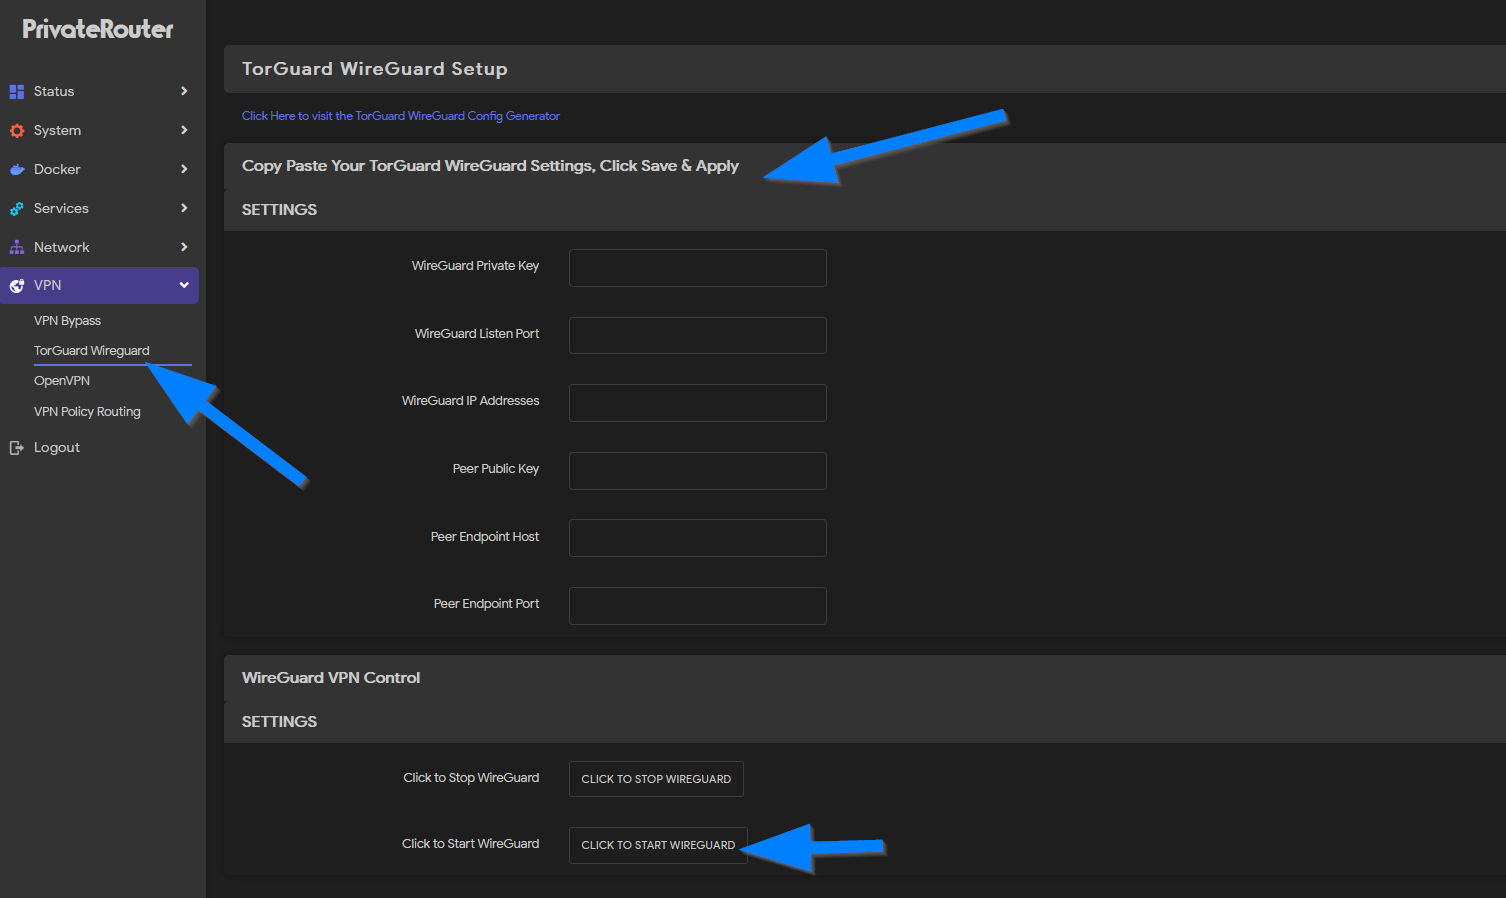
Configure PrivateRouter WireGuard:
- Access your PrivateRouter at
http://192.168.0.1 - Click the VPN tab
- Select TorGuard WireGuard
- Copy values from config file to matching fields
- Click Save/Apply
- Click Start WireGuard
✅ Verify Connection
Open a new browser tab and check your IP at https://torguard.net/whats-my-ip.php - it should show your VPN Cloud IP.
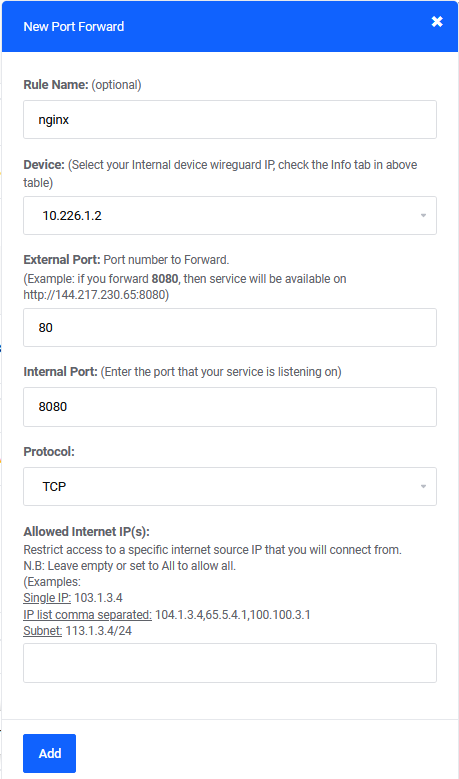
Step 5: Configure Port Forwarding
Set Up VPN Port Forwarding
Forward ports from VPN Cloud to your router for web access:
| External Port | Internal Port | Protocol | Purpose |
|---|---|---|---|
| 80 | 8080 | TCP | HTTP Traffic |
| 443 | 4443 | TCP | HTTPS/SSL Traffic |
Add these rules in your VPN Cloud dashboard:
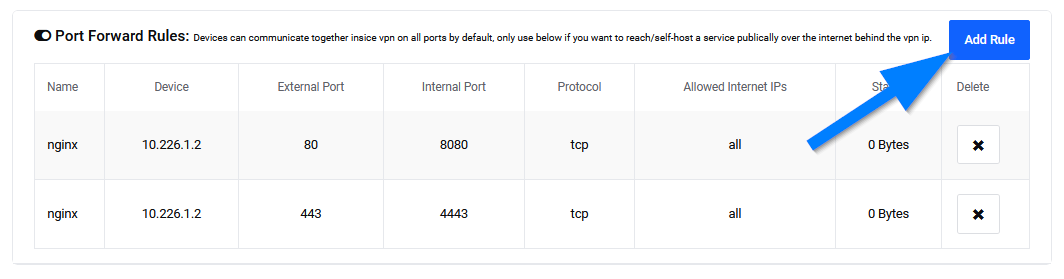
Example of adding a port forward rule:
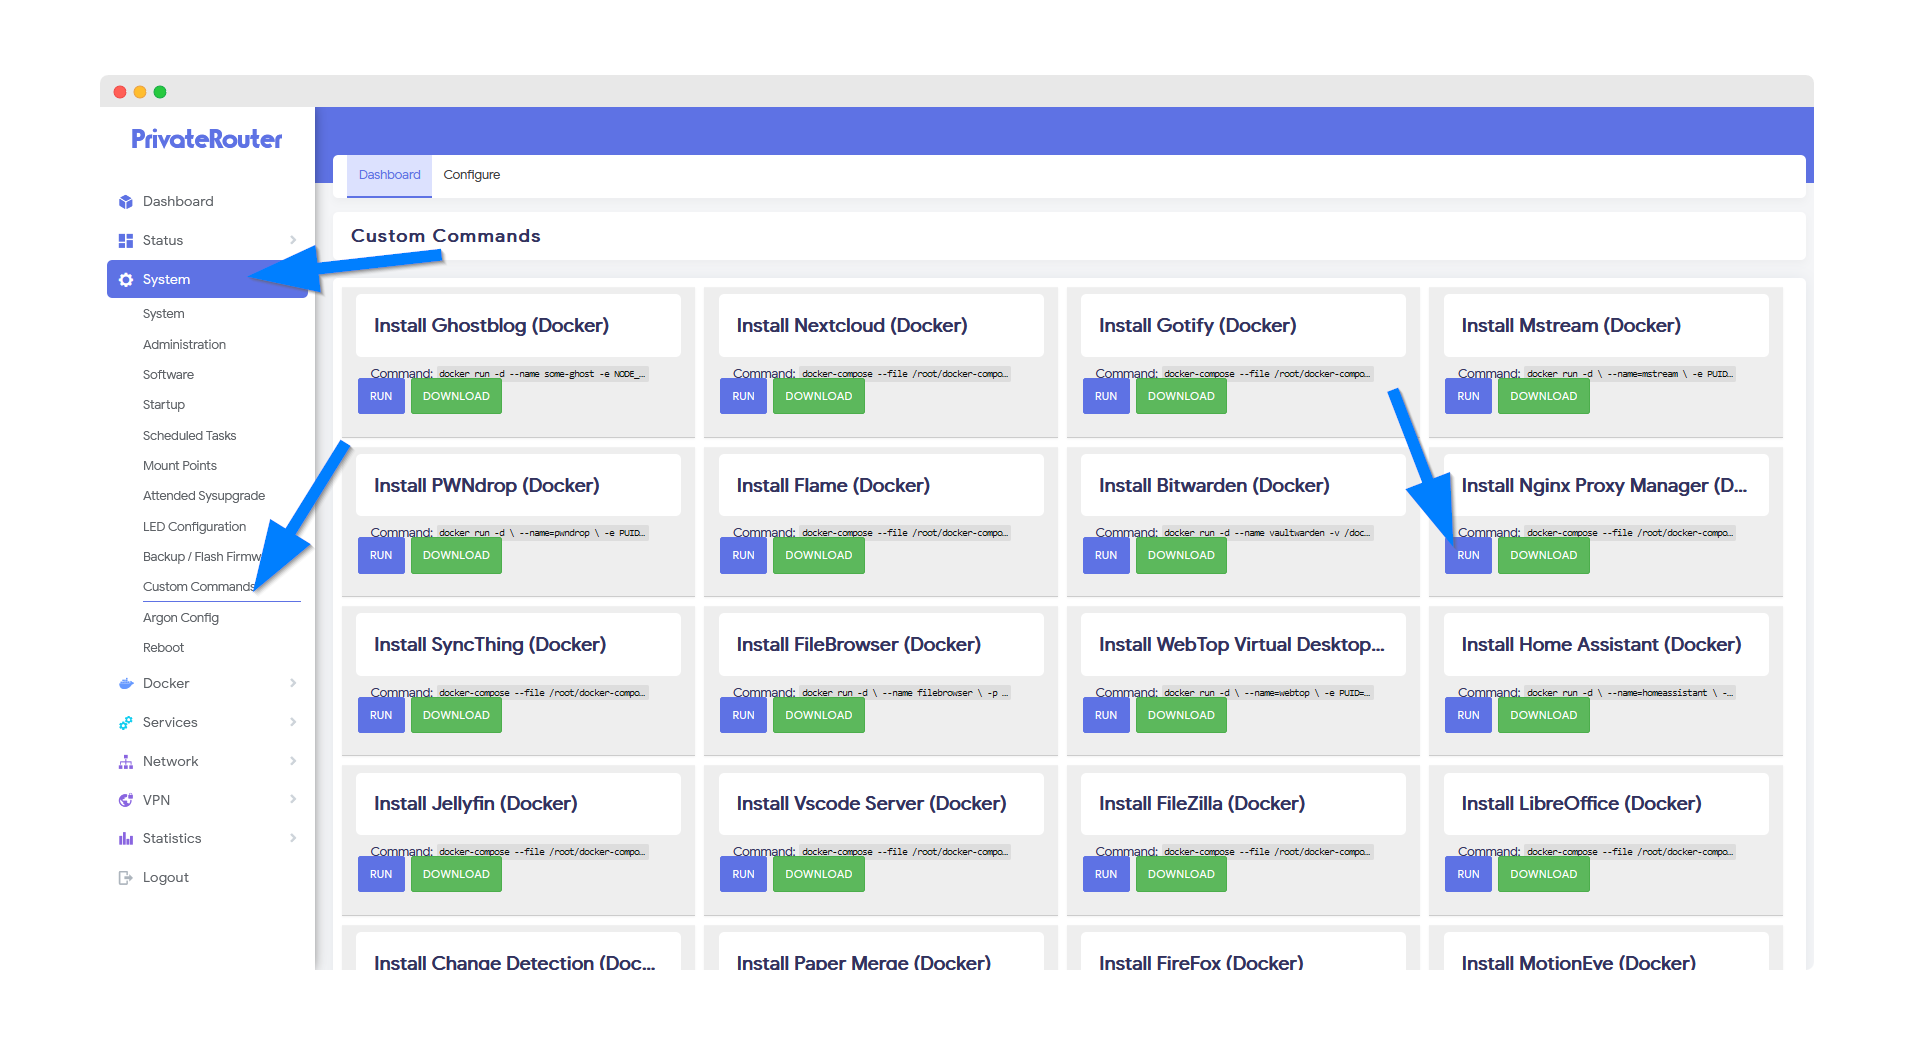
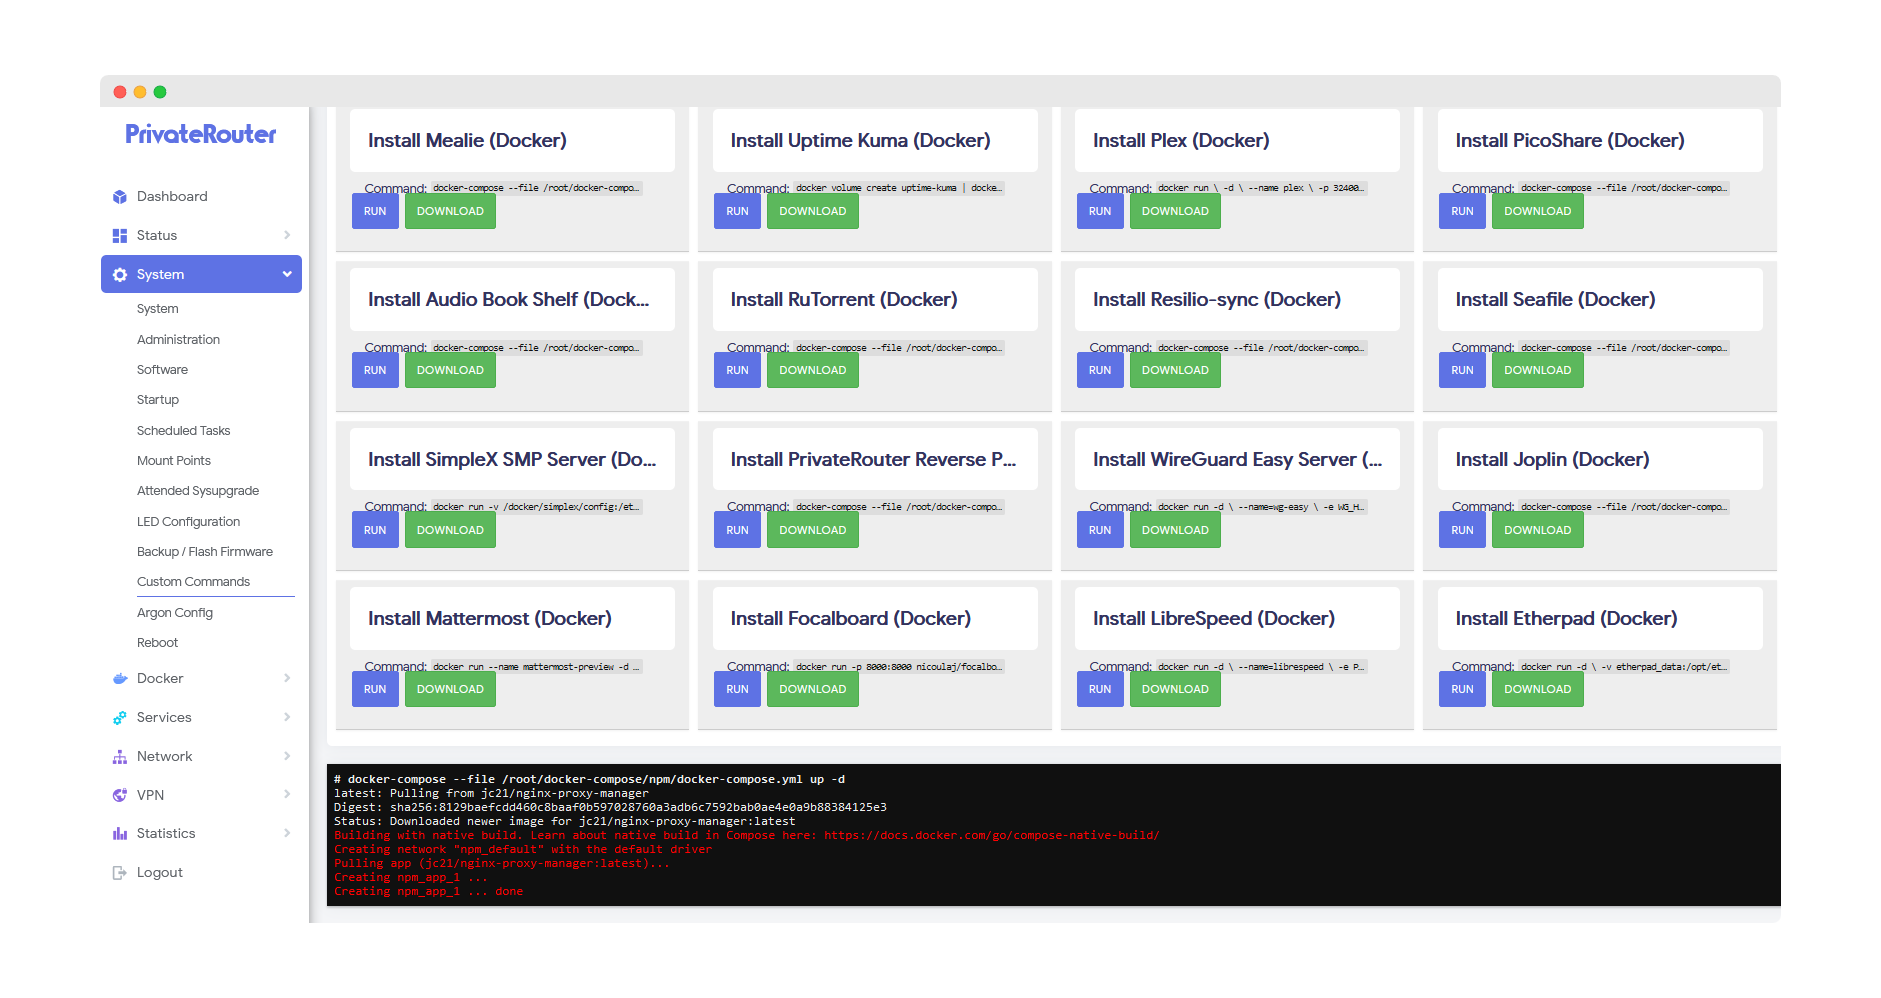
Step 6: Install Nginx Proxy Manager
Set Up Nginx Proxy Manager
💡 Pre-installed Routers
If you ordered a pre-configured PrivateRouter, Nginx may already be installed. Skip to accessing it at http://192.168.0.1:81
Installation Steps:
- Login to PrivateRouter admin panel
- Navigate to System → Custom Commands
- Find "Nginx Proxy Manager"
- Click RUN button
Wait for installation to complete (you'll see Docker output):
Step 7: Access Nginx Proxy Manager
Login to Nginx Interface
Access the Nginx Proxy Manager:
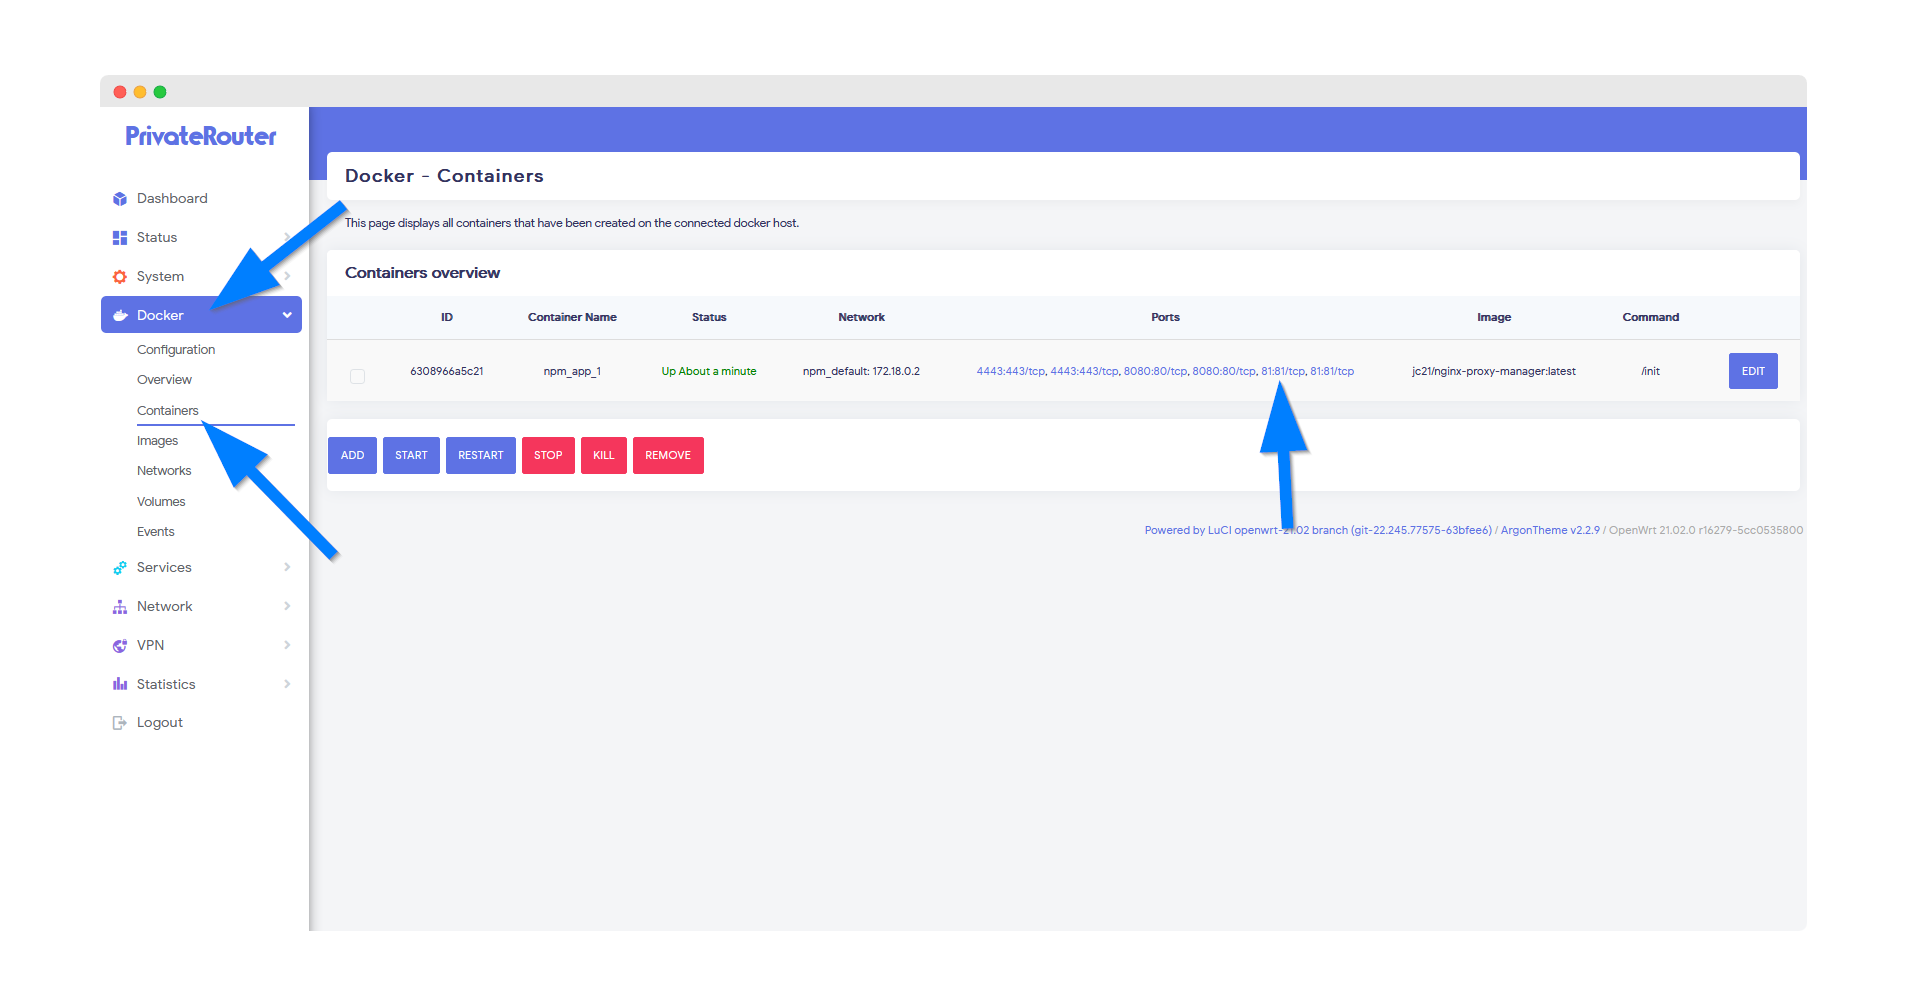
- Go to Docker → Containers
- Click the port link for Nginx Proxy Manager
- Default URL:
http://192.168.0.1:81
Default Login Credentials:
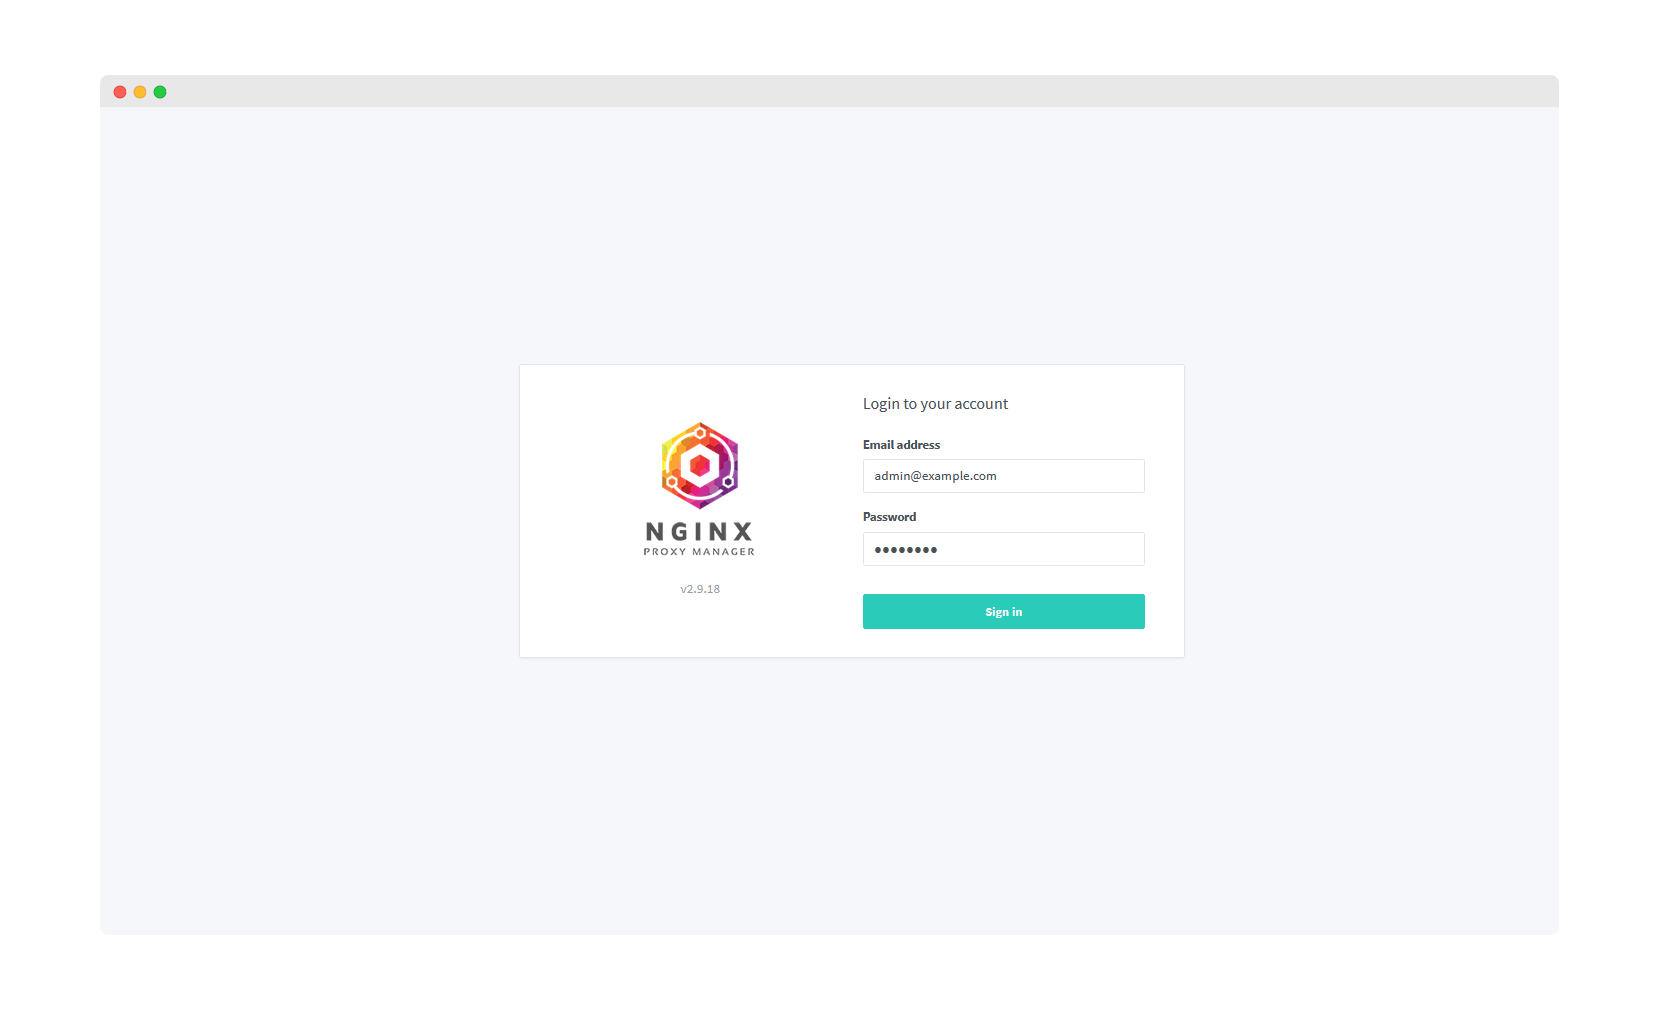
Change the default password when prompted:
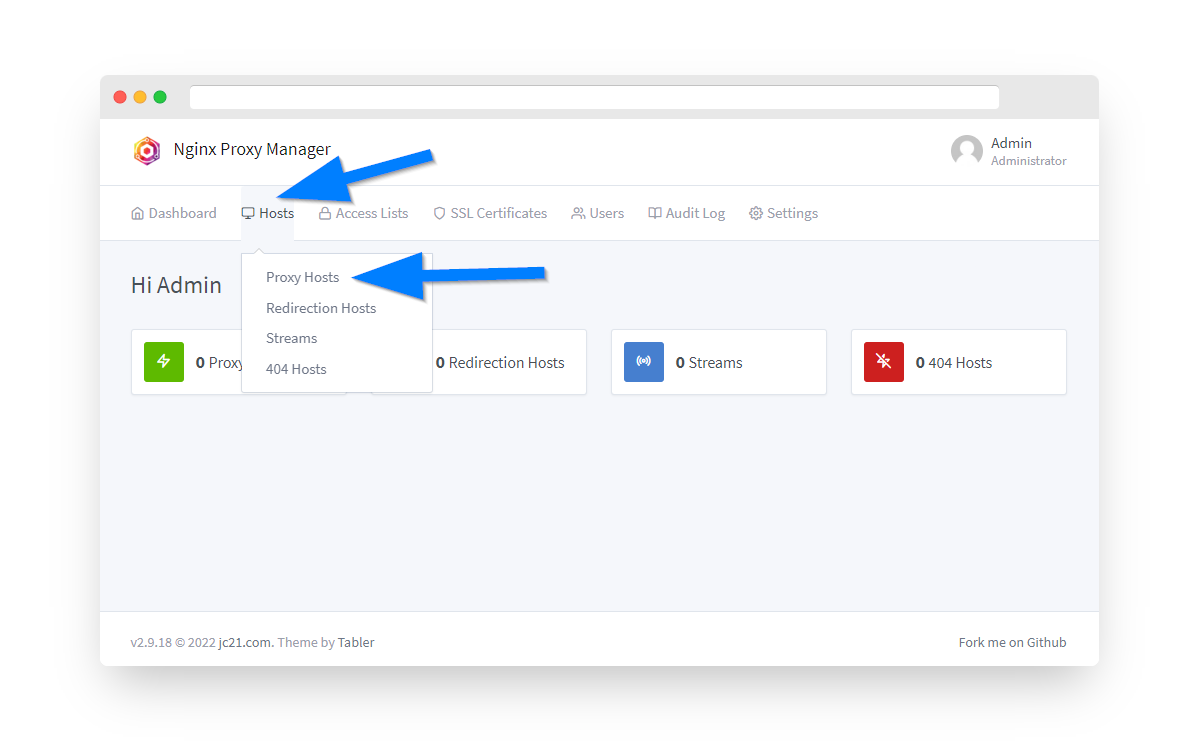
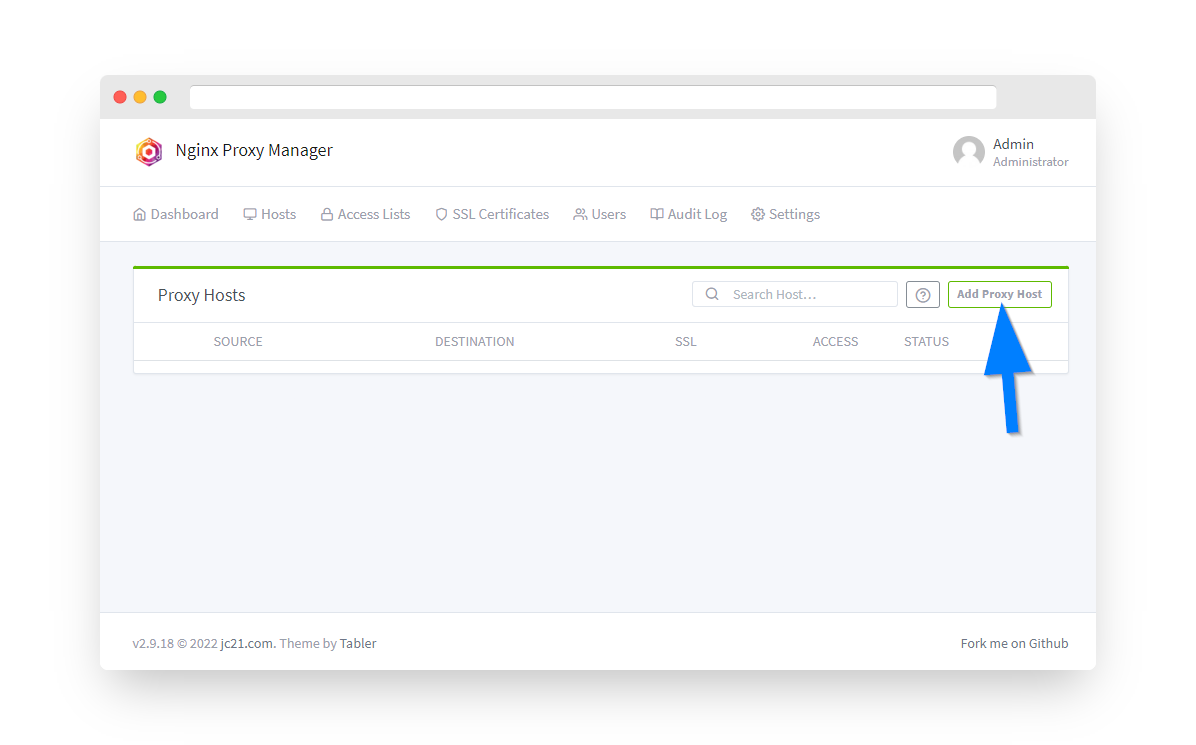
Step 8: Add Your First Proxy Host
Configure Domain Proxy
Set up your first web application:
- Click Hosts → Proxy Hosts
- Click Add Proxy Host
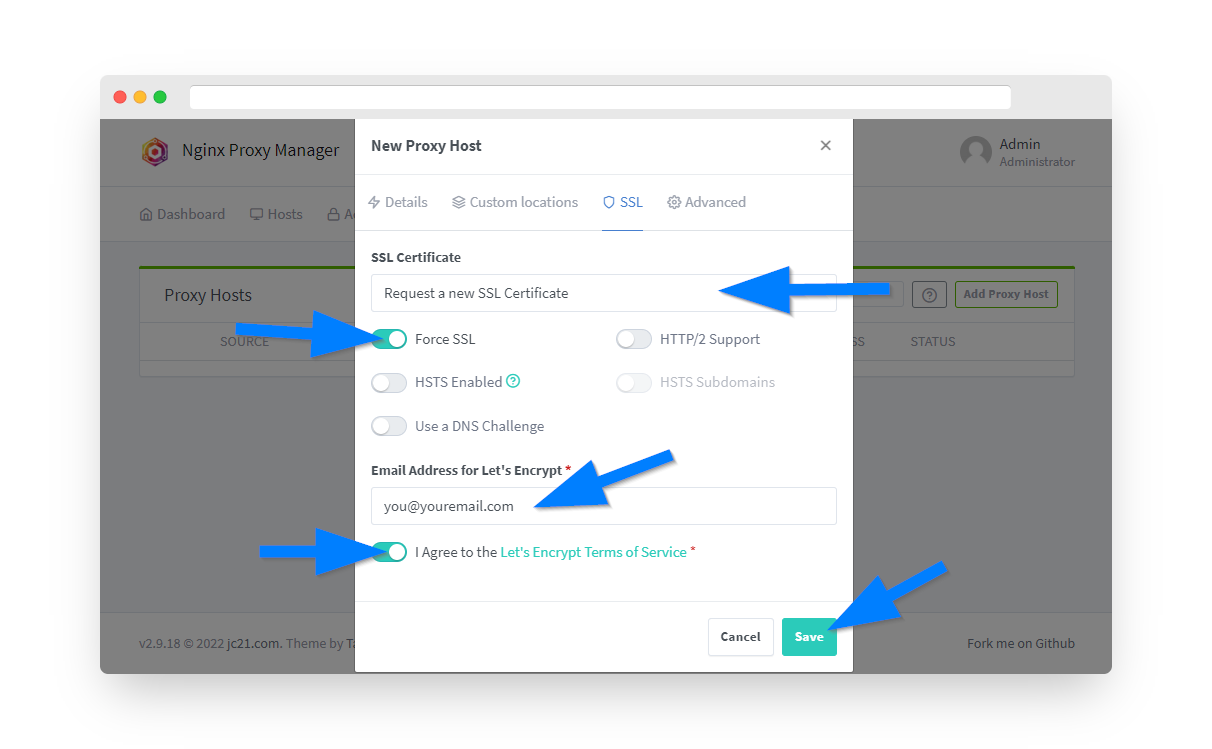
Step 9: Configure Proxy Settings
Domain & SSL Configuration
⚠️ DNS Setup Required
Before proceeding, ensure your domain's A record points to your VPN Cloud IP address!
Details Tab:
- Domain Names: Your subdomain (e.g., files.yourdomain.com)
- Scheme: https
- Forward Hostname/IP: 192.168.0.1
- Forward Port: Your app's port (e.g., 8984)
- Websockets Support: Enable for most apps

SSL Tab:
- Select "Request a new SSL Certificate with Let's Encrypt"
- Enable "Force SSL"
- Enter your email for certificate notifications
- Agree to Let's Encrypt terms
- Click Save
✅ Success!
Your app should now be accessible at your domain with SSL encryption!
Popular Self-Hosted Applications
🚀 What Can You Host?
Nextcloud
File storage & sync
Jellyfin
Media server
PhotoPrism
Photo management
Home Assistant
Smart home
Vaultwarden
Password manager
Element
Chat server
Grafana
Monitoring
Game Servers
Minecraft, etc.
Nginx Proxy Manager Features
🛠️ What Nginx Provides
DNS Configuration
🌐 Setting Up Your Domain
You need to point your domain to your VPN Cloud IP:
Option 1: Single Subdomain
Create an A record: app.yourdomain.com → VPN_CLOUD_IP
Option 2: Wildcard (Recommended)
Create an A record: *.yourdomain.com → VPN_CLOUD_IP
This allows unlimited subdomains without additional DNS changes
💡 DNS Propagation
DNS changes can take 5-30 minutes to propagate. Use DNS Checker to verify.
Security Considerations
⚠️ Important Security Notes
- Strong Passwords: Use unique, complex passwords for all services
- 2FA: Enable two-factor authentication where possible
- Updates: Keep Docker containers and router firmware updated
- Backups: Regular backups of your data and configurations
- Access Logs: Monitor Nginx logs for suspicious activity
- Firewall: Only open necessary ports
- SSL Only: Always force SSL for all services
Troubleshooting
🔧 Common Issues & Solutions
Domain Not Resolving
- Check DNS A record
- Wait for propagation
- Verify VPN Cloud IP
- Test with nslookup
SSL Certificate Failed
- Ensure port 80 is open
- Check domain DNS
- Verify email address
- Try HTTP validation
502 Bad Gateway
- Check app is running
- Verify internal IP/port
- Check Docker status
- Review Nginx logs
Slow Performance
- Check upload bandwidth
- Monitor CPU usage
- Optimize Docker settings
- Enable caching
Connection Timeout
- Verify WireGuard active
- Check port forwards
- Test VPN connectivity
- Review firewall rules
WebSocket Errors
- Enable WebSocket support
- Check proxy headers
- Update Nginx config
- Verify app compatibility
Best Practices
✅ Self-Hosting Tips
- Start Small: Begin with one app and expand gradually
- Documentation: Document your setup and configurations
- Monitoring: Set up uptime monitoring for critical services
- Resource Planning: Monitor router CPU/RAM usage
- Bandwidth: Ensure adequate upload speed for your needs
- Testing: Test from external networks regularly
- Automation: Use Docker Compose for complex setups
- Community: Join self-hosting communities for tips
Need Help?
Self-hosting can be complex. If you need assistance:
Our team can help with VPN Cloud and PrivateRouter configuration