🔐 What is SSH Tunneling?
SSH tunneling creates an encrypted tunnel through which your VPN traffic flows, making it appear as regular SSH traffic. This powerful technique bypasses even the most sophisticated censorship systems and corporate firewalls that block VPN protocols.
When to Use SSH Tunneling
Censorship & Blocking Scenarios
- 🔴 Heavy Censorship: Countries with DPI (Deep Packet Inspection) blocking VPN protocols
- 🟡 Corporate Firewalls: Workplaces blocking all VPN traffic but allowing SSH
- 🟠 Hotel/Public WiFi: Networks restricting VPN connections
- 🔵 ISP Throttling: When ISPs detect and throttle VPN traffic
- ⚫ Stealth Required: When you need traffic to look like normal SSH
SSH Tunnel vs Other Methods
| Method | Bypass Ability | Speed | Complexity | Best For |
|---|---|---|---|---|
| SSH Tunnel | Excellent | Good | Medium | Heavy censorship |
| Standard VPN | Poor | Excellent | Easy | Open networks |
| Stealth VPN | Good | Very Good | Easy | Moderate blocking |
| Shadowsocks | Very Good | Good | Medium | China GFW |
| V2Ray | Excellent | Good | Complex | Advanced users |
How SSH Tunneling Works
Traffic Flow Visualization
VPN traffic encapsulated in SSH protocol (Port 22)
Prerequisites
⚠️ Before You Begin
- Active TorGuard VPN subscription
- Windows PC (Bitvise is Windows-only)
- SSH tunneling enabled in TorGuard client area
- Port 22 (SSH) must not be blocked on your network
- Administrator access may be required
Required Downloads
📥 Software Downloads
- TorGuard VPN Client: Download Page
- Bitvise SSH Client:
- Primary: Download from TorGuard
- Mirror: Alternative Download
Step-by-Step Configuration
1Enable SSH Tunneling
Log into your TorGuard client area and navigate to Tools → Enable SSH Tunnelling:
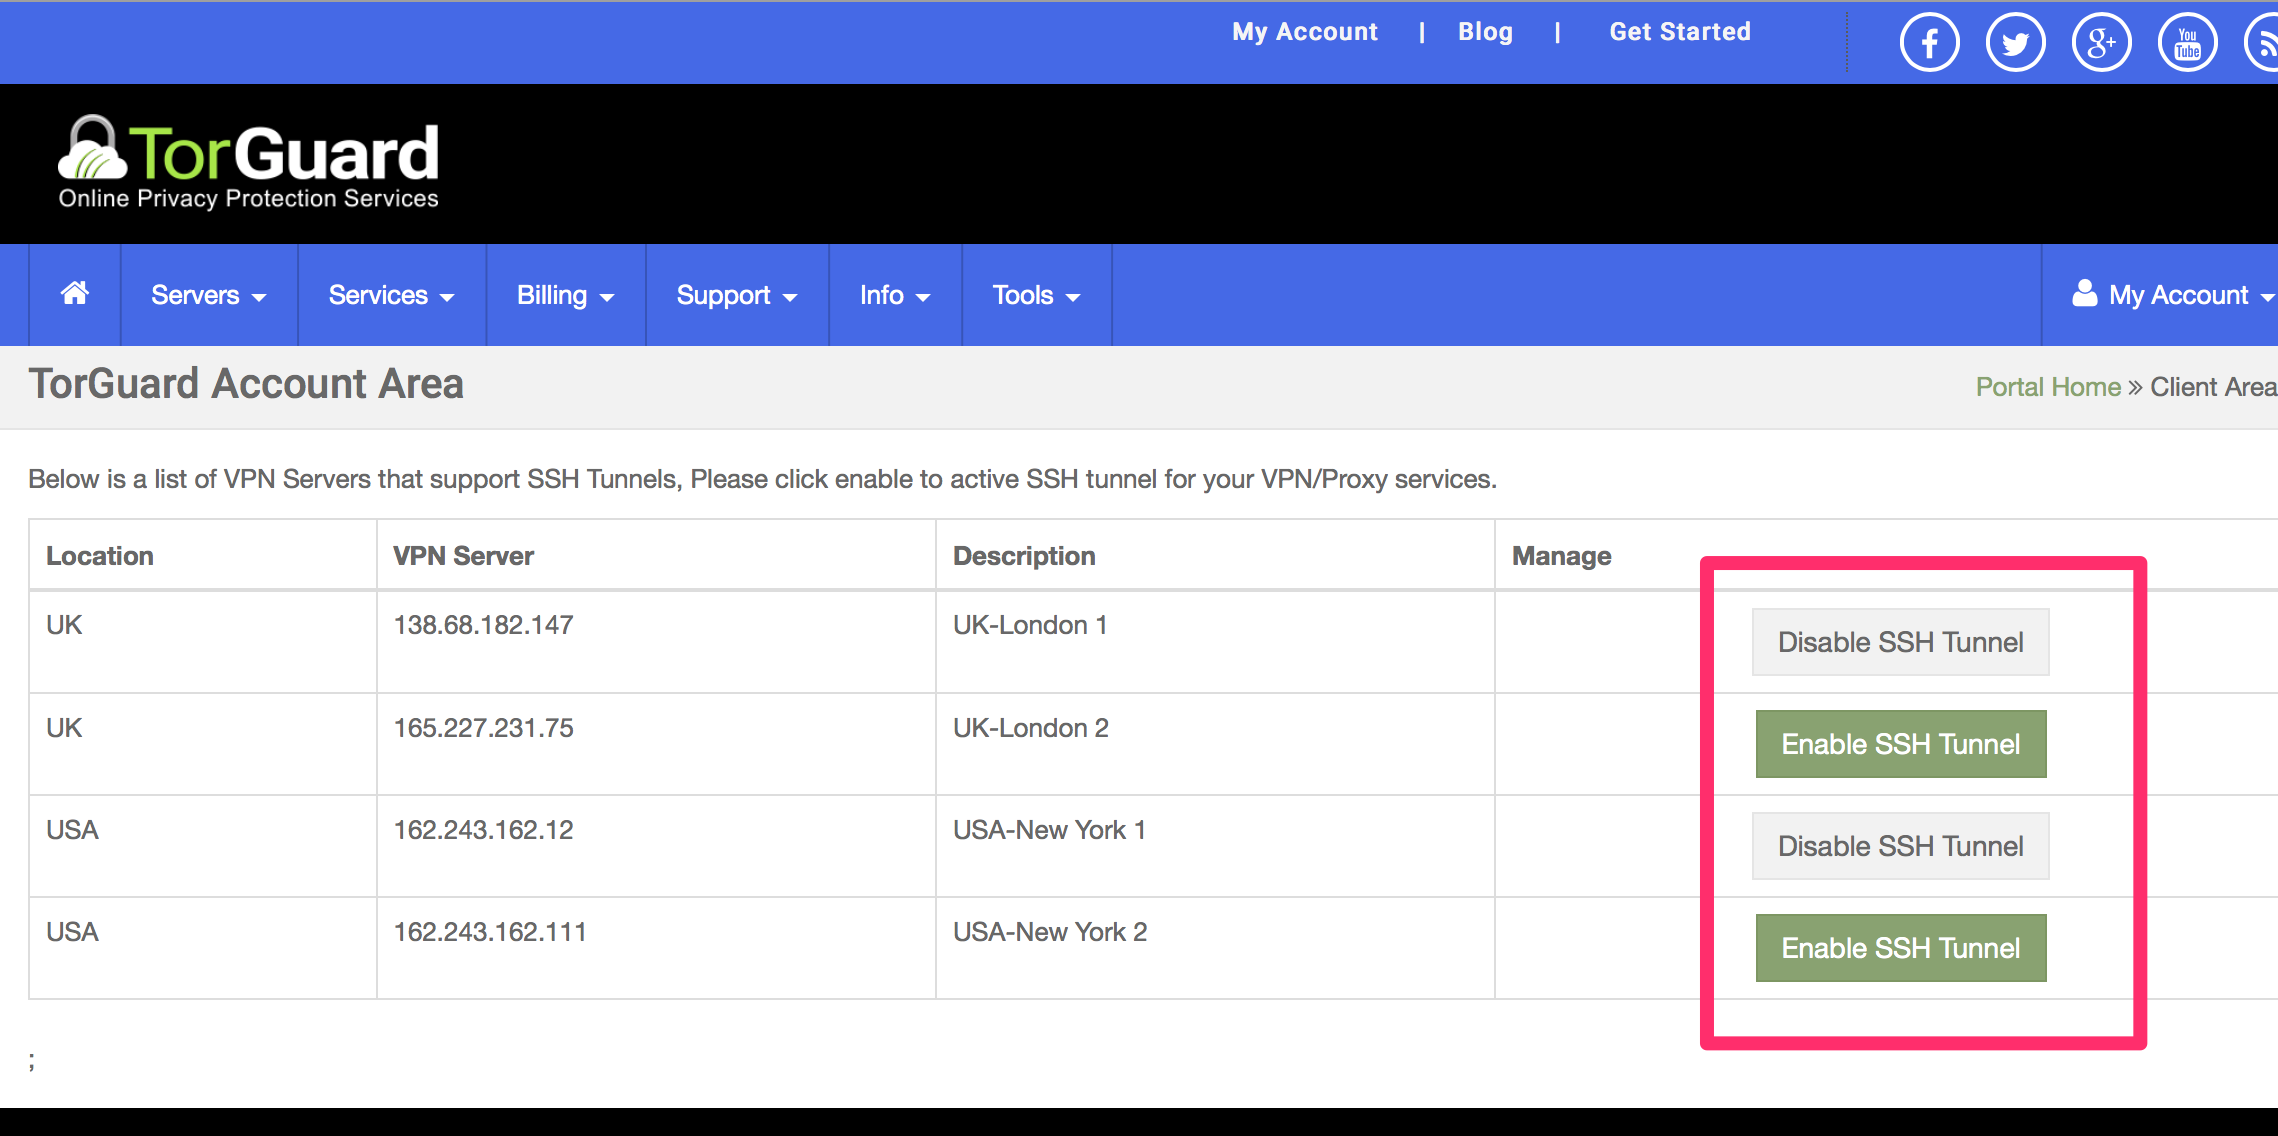
Enable SSH on your chosen server location
⚠️ Important
SSH tunneling must be enabled for each server you want to use. This authorizes your VPN credentials for SSH access.
2Configure Bitvise SSH Client
Launch Bitvise and configure the Server settings:
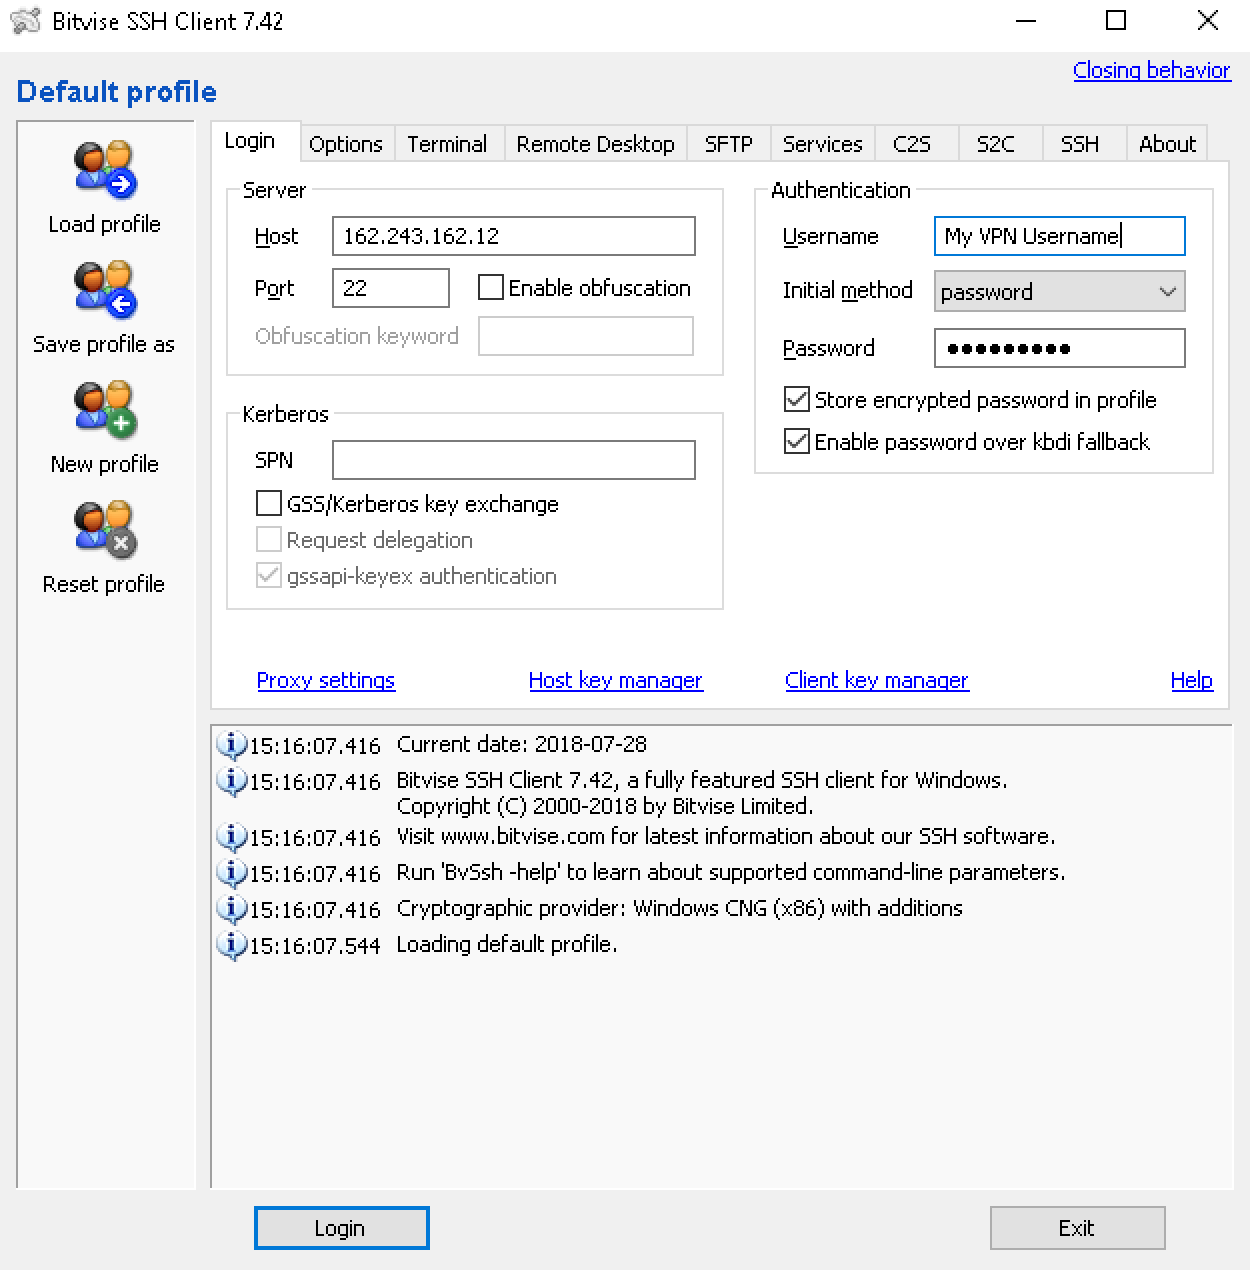
Enter SSH server details and credentials
Server Configuration:
- Host: SSH Proxy IP (from step 1)
- Port: 22 (default SSH port)
- Username: Your TorGuard VPN username
- Initial method: Password
- Password: Your TorGuard VPN password
3Enable Proxy Forwarding
Click the Services tab and configure SOCKS proxy:

Enable SOCKS/HTTP Proxy Forwarding
Proxy Settings:
- ✓ Enable SOCKS/HTTP Proxy Forwarding
- Listen interface: 127.0.0.1
- Listen port: 443 (or any free port)
4Connect to SSH Server
Click "Login" in Bitvise. A terminal window may appear with an error - this is normal:
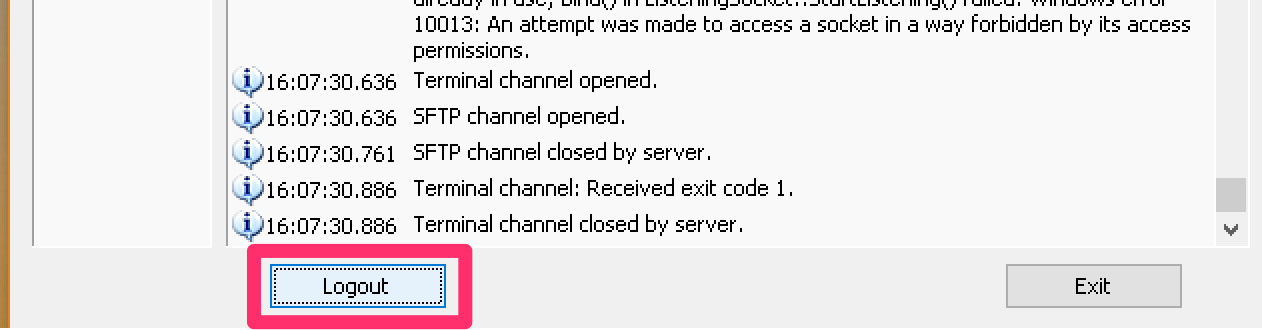
Login button changes to "Logout" when connected
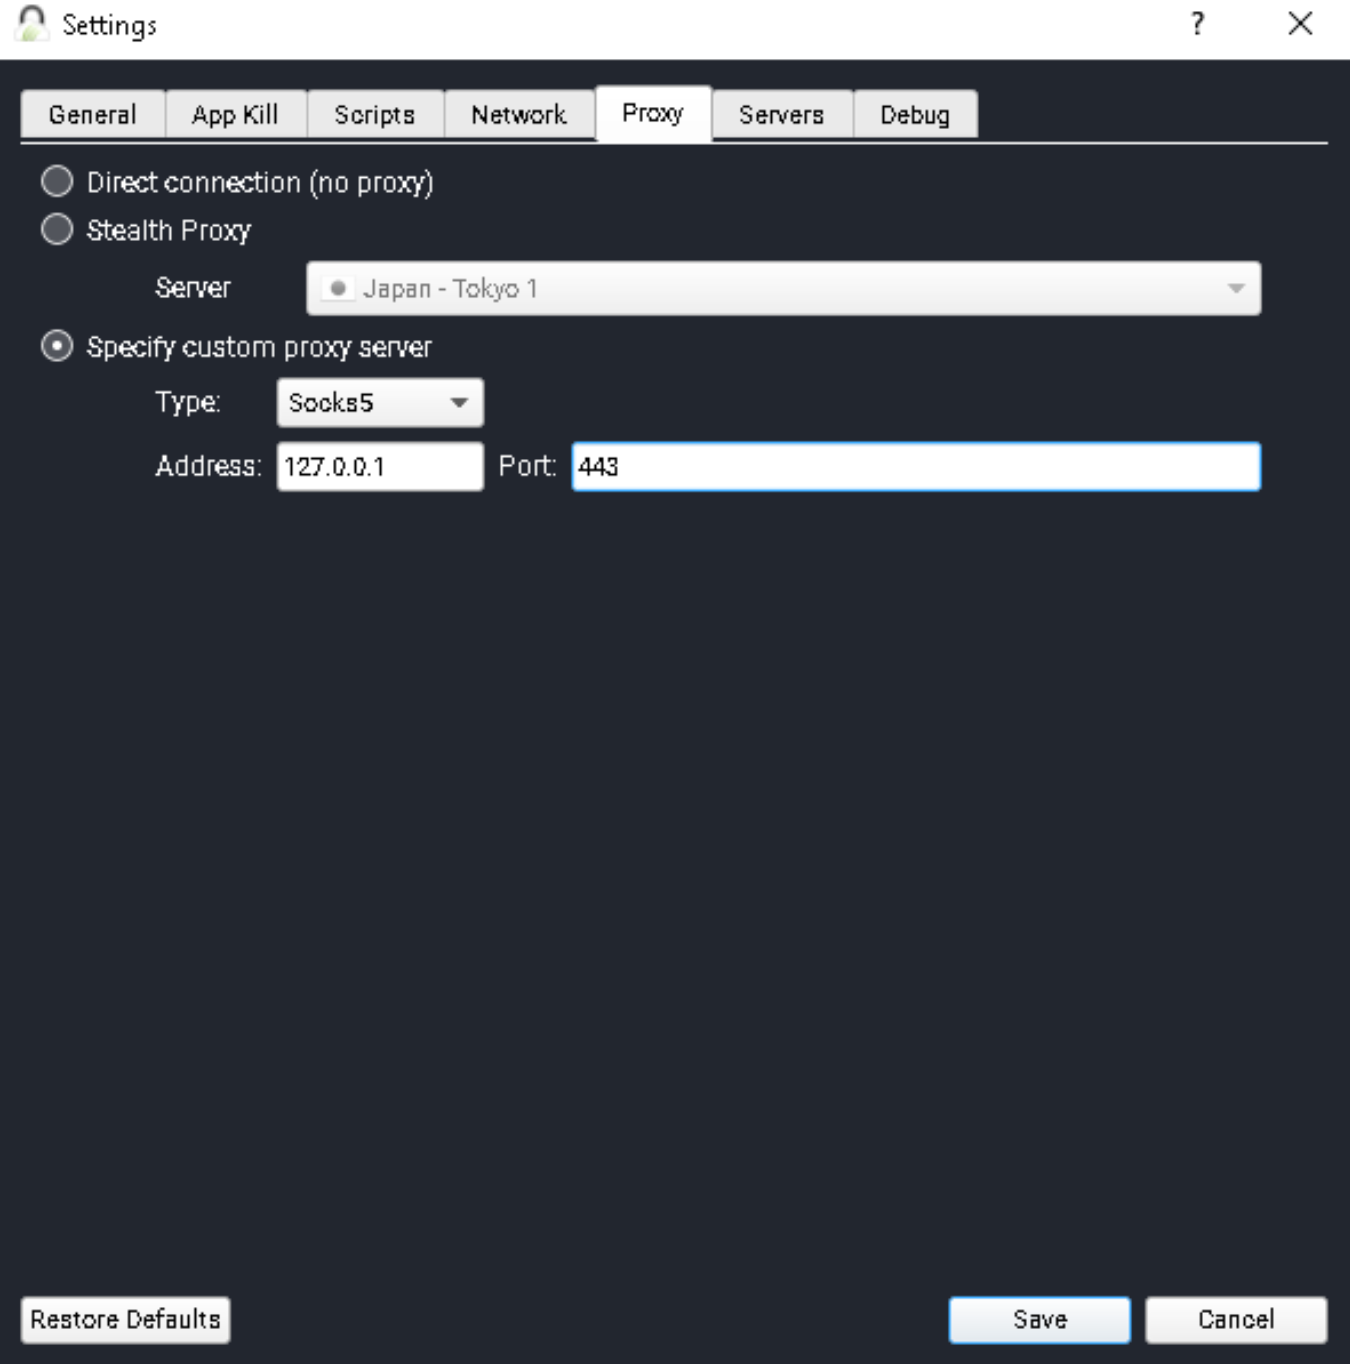
5Configure TorGuard Client
Open TorGuard Client → More Settings → Proxy Tab:
Configure custom SOCKS5 proxy
TorGuard Proxy Configuration:
- Select "Specify Custom Proxy"
- Type: SOCKS5
- Address: 127.0.0.1
- Port: 443 (or your chosen port)
6Connect Through SSH Tunnel
Save settings and connect to any TorGuard server:
Protocol shows "Custom Proxy" when using SSH tunnel
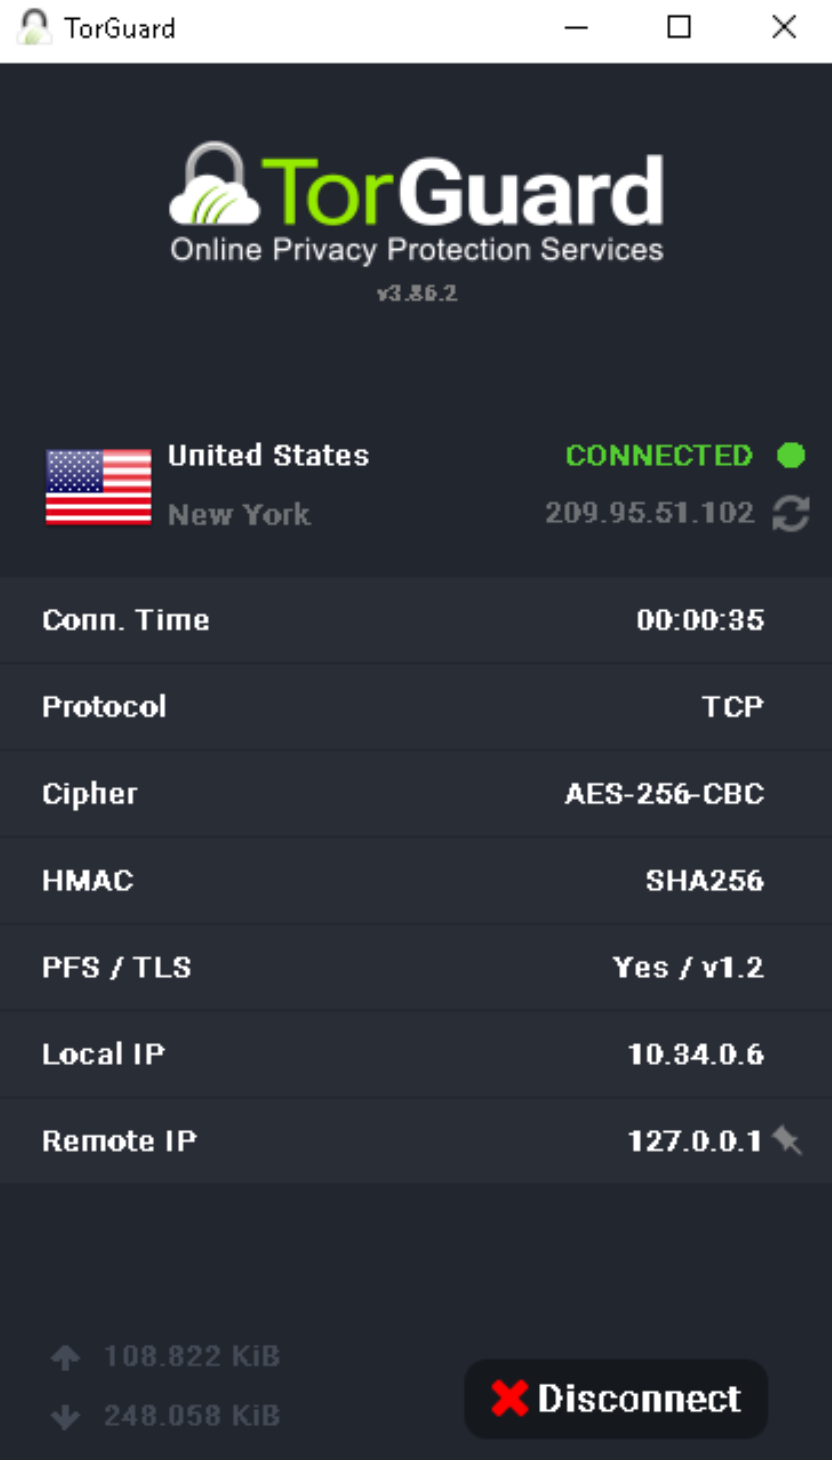
7Verify Connection
Check your IP to confirm VPN connection:
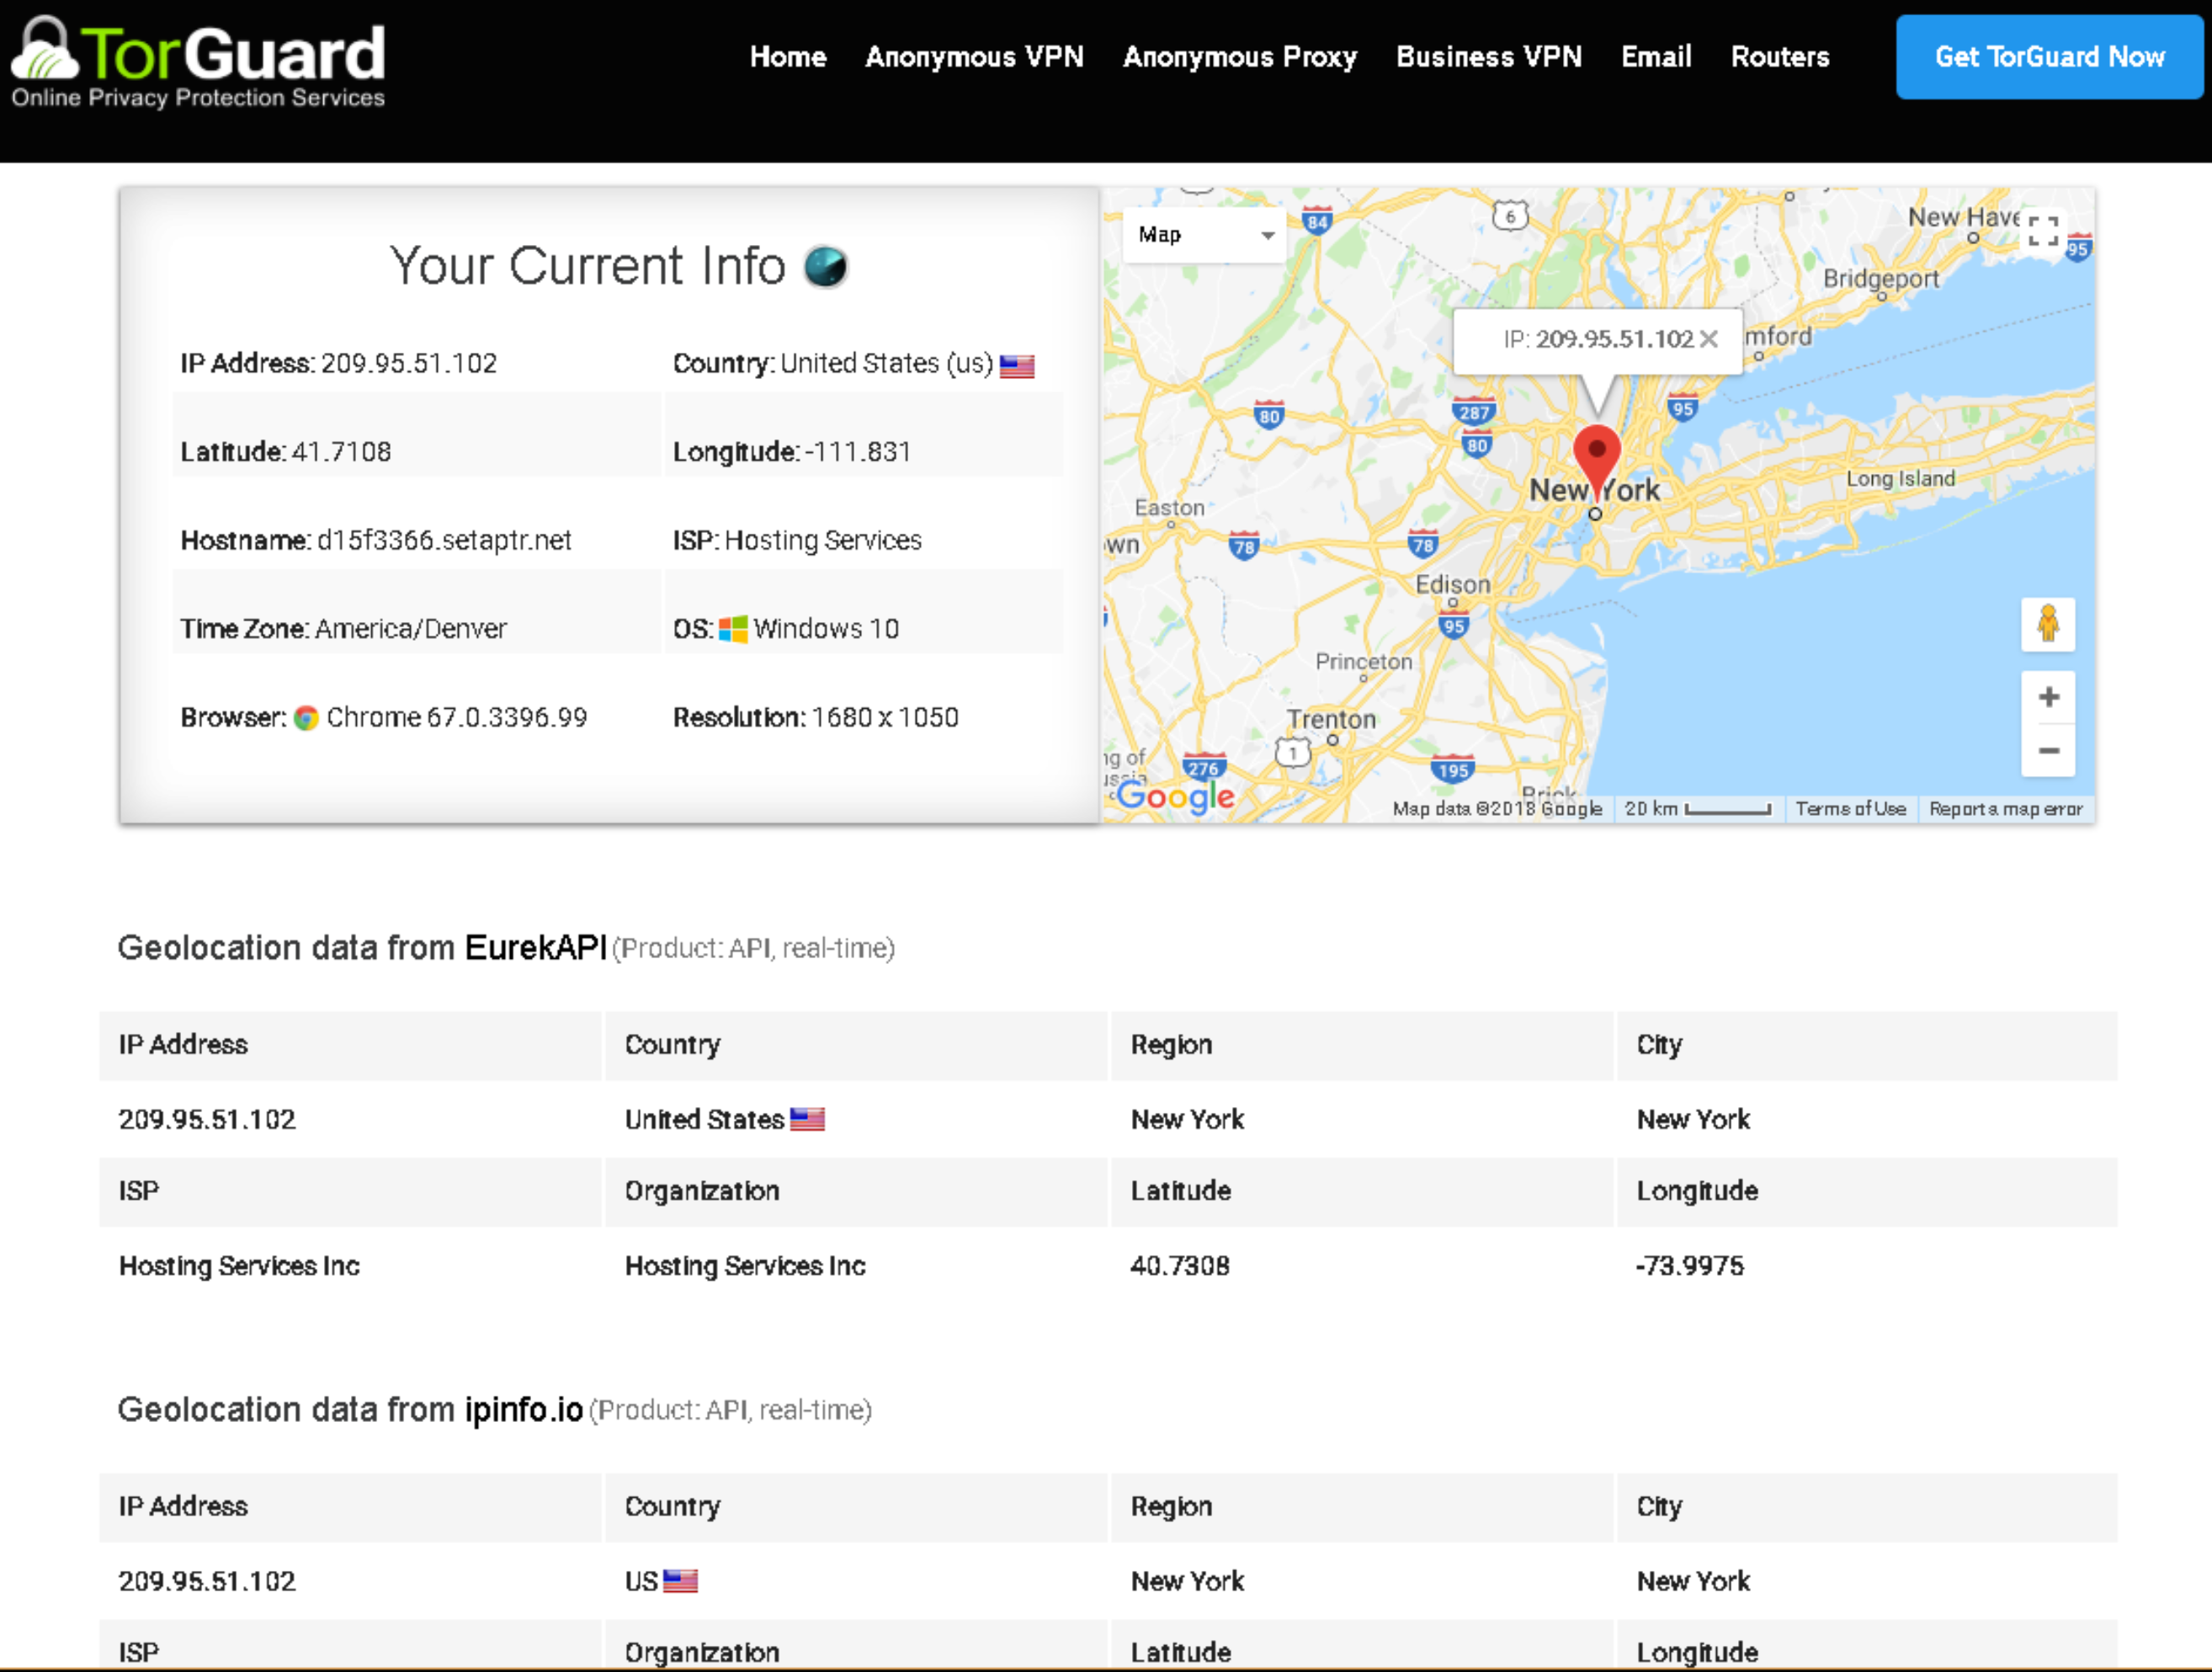
Your IP should show the VPN server location
Security Benefits
🛡️ Why SSH Tunneling is Effective
- Protocol Obfuscation: VPN traffic hidden inside SSH protocol
- Port 22 Usage: SSH is rarely blocked as it's needed for server management
- Encryption Layers: Double encryption (SSH + VPN)
- DPI Resistance: Bypasses Deep Packet Inspection
- Legitimate Traffic: Appears as normal SSH server connection
Performance Considerations
📊 Speed Impact
- Overhead: ~10-20% speed reduction due to double encapsulation
- Latency: Adds 5-15ms depending on SSH server location
- CPU Usage: Higher due to dual encryption processes
- Stability: Very stable once connected
Tip: Choose SSH servers geographically close to VPN servers for best performance.
Advanced Configuration
Alternative Ports
If port 22 is blocked, try these common alternatives:
- Port 443 (HTTPS) - Often allowed
- Port 80 (HTTP) - Usually open
- Port 53 (DNS) - Rarely blocked
- Port 2222 - Alternative SSH port
Key-Based Authentication
For enhanced security, configure SSH key authentication:
- Generate SSH key pair in Bitvise
- Upload public key to TorGuard account
- Configure Bitvise to use key authentication
- More secure than password authentication
Troubleshooting
SSH Connection Failed
- Verify SSH is enabled in client area
- Check correct server IP
- Confirm port 22 not blocked
- Try alternative SSH server
VPN Won't Connect
- Ensure Bitvise shows "Logout"
- Verify proxy settings match
- Check Windows Firewall
- Restart both applications
Slow Performance
- Try closer SSH server
- Use wired connection
- Close unnecessary apps
- Check CPU usage
Common Issues and Solutions
Terminal Window Error
The "No such file or directory" error in the terminal is normal. Simply close the terminal window - the SSH connection remains active.
Port Already in Use
If port 443 is in use, try:
- 8443
- 1080
- 3128
- Any port above 1024
Connection Drops
For persistent connections:
- Enable SSH keepalive in Bitvise
- Set ServerAliveInterval to 30
- Disable power saving on network adapter
Alternative SSH Clients
While Bitvise is recommended, alternatives include:
- PuTTY: Free, lightweight, manual port forwarding setup
- OpenSSH: Built into Windows 10+, command-line based
- SecureCRT: Professional, paid, advanced features
- MobaXterm: Feature-rich, includes X server
Best Practices
- Connection Order: Always connect Bitvise before TorGuard
- Server Selection: Use SSH and VPN servers in same region
- Monitoring: Watch for connection drops in Bitvise
- Updates: Keep both applications updated
- Backup Methods: Have alternative bypass methods ready
When SSH Tunneling Fails
If SSH is also blocked, consider these alternatives:
- Stealth VPN: TorGuard's obfuscated servers
- Shadowsocks: Designed for heavy censorship
- V2Ray: Advanced protocol with multiple transports
- Bridge Servers: For extreme censorship scenarios
Need Help?
If you're having trouble with SSH tunnel setup:
Specify your location and blocking type for specialized assistance