🛡️ TorGuard Desktop Ad-Block DNS
Block ads, malware, tracking, and phishing sites at the DNS level across all applications on Windows, macOS, and Linux. Our Ad-Block DNS uses daily-updated blocklists to provide comprehensive protection without requiring browser extensions or additional software.
Why Use Ad-Block DNS?
⚡ Complete System-Wide Protection
Block All Ads
Eliminate ads in browsers, apps, games, and system services
Malware Defense
Block known malicious domains before they can load
Privacy Protection
Stop trackers from monitoring your online activity
Anti-Phishing
Automatic blocking of fake and scam websites
Faster Internet
Pages load faster without ads and tracking scripts
Save Bandwidth
Reduce data usage by blocking unwanted content
Blocklist Comparison
🛡️ TorGuard Ad-Block DNS
- ✅ 1M+ blocked domains
- ✅ Daily automatic updates
- ✅ Multiple blocklist sources
- ✅ Malware & phishing protection
- ✅ No logs or tracking
- ✅ Optimized performance
- ✅ Custom whitelist support
Best for: Maximum protection & privacy
🌐 Standard DNS
- ✅ No content filtering
- ✅ All sites accessible
- ✅ Maximum compatibility
- ✅ No logs or tracking
- ❌ No ad blocking
- ❌ No threat protection
- ❌ Full tracking exposure
Best for: Unrestricted access
📊 Browser Extensions
- ✅ Browser-only protection
- ✅ Element-level blocking
- ✅ Custom filter rules
- ❌ No app protection
- ❌ Each browser needs setup
- ❌ Can be detected by sites
- ❌ Performance overhead
Best for: Browser-only users
Performance Impact
Setup Instructions
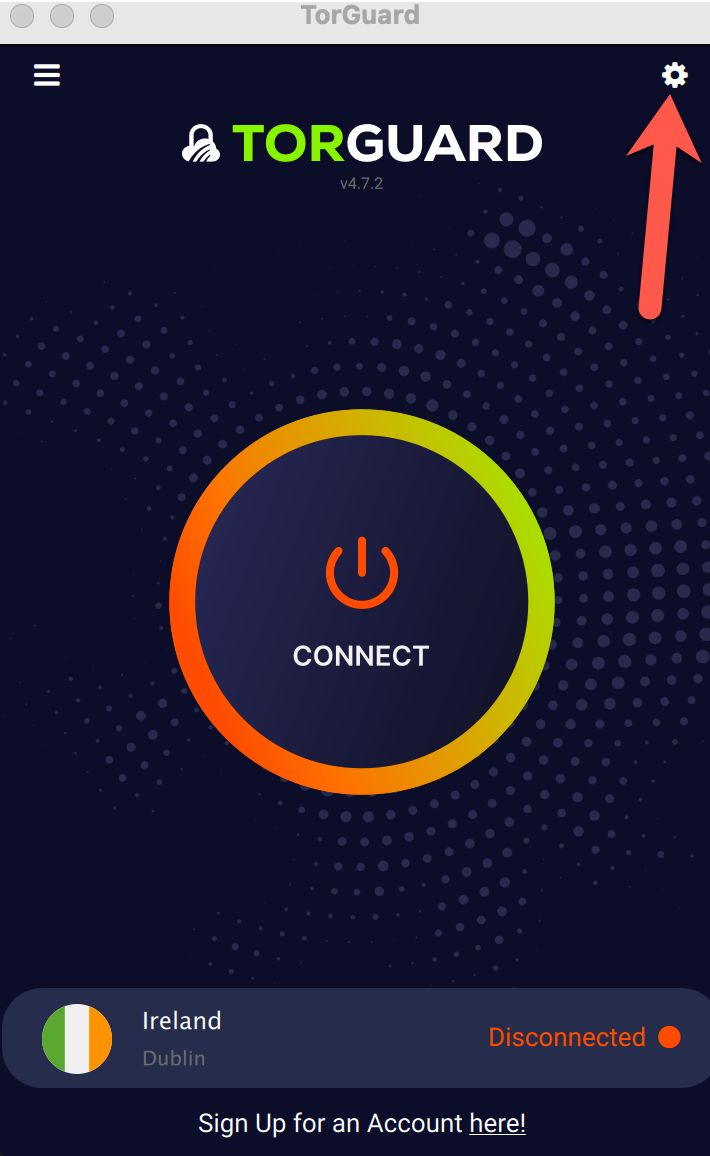
Open TorGuard Settings
On the TorGuard Desktop Client main screen, click the settings cog icon in the top right corner:
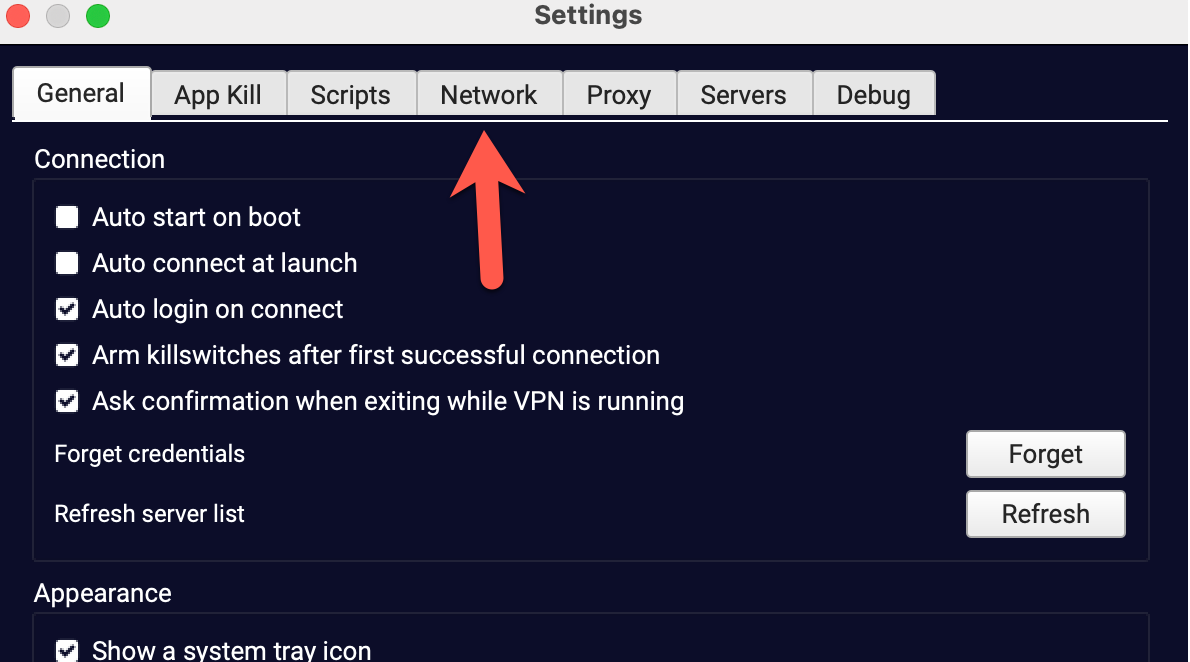
Navigate to Network Tab
Click the Network tab to access DNS settings:
Enable Ad-Block DNS
Check the radio button next to "Use Ad Blocking DNS when Connected":
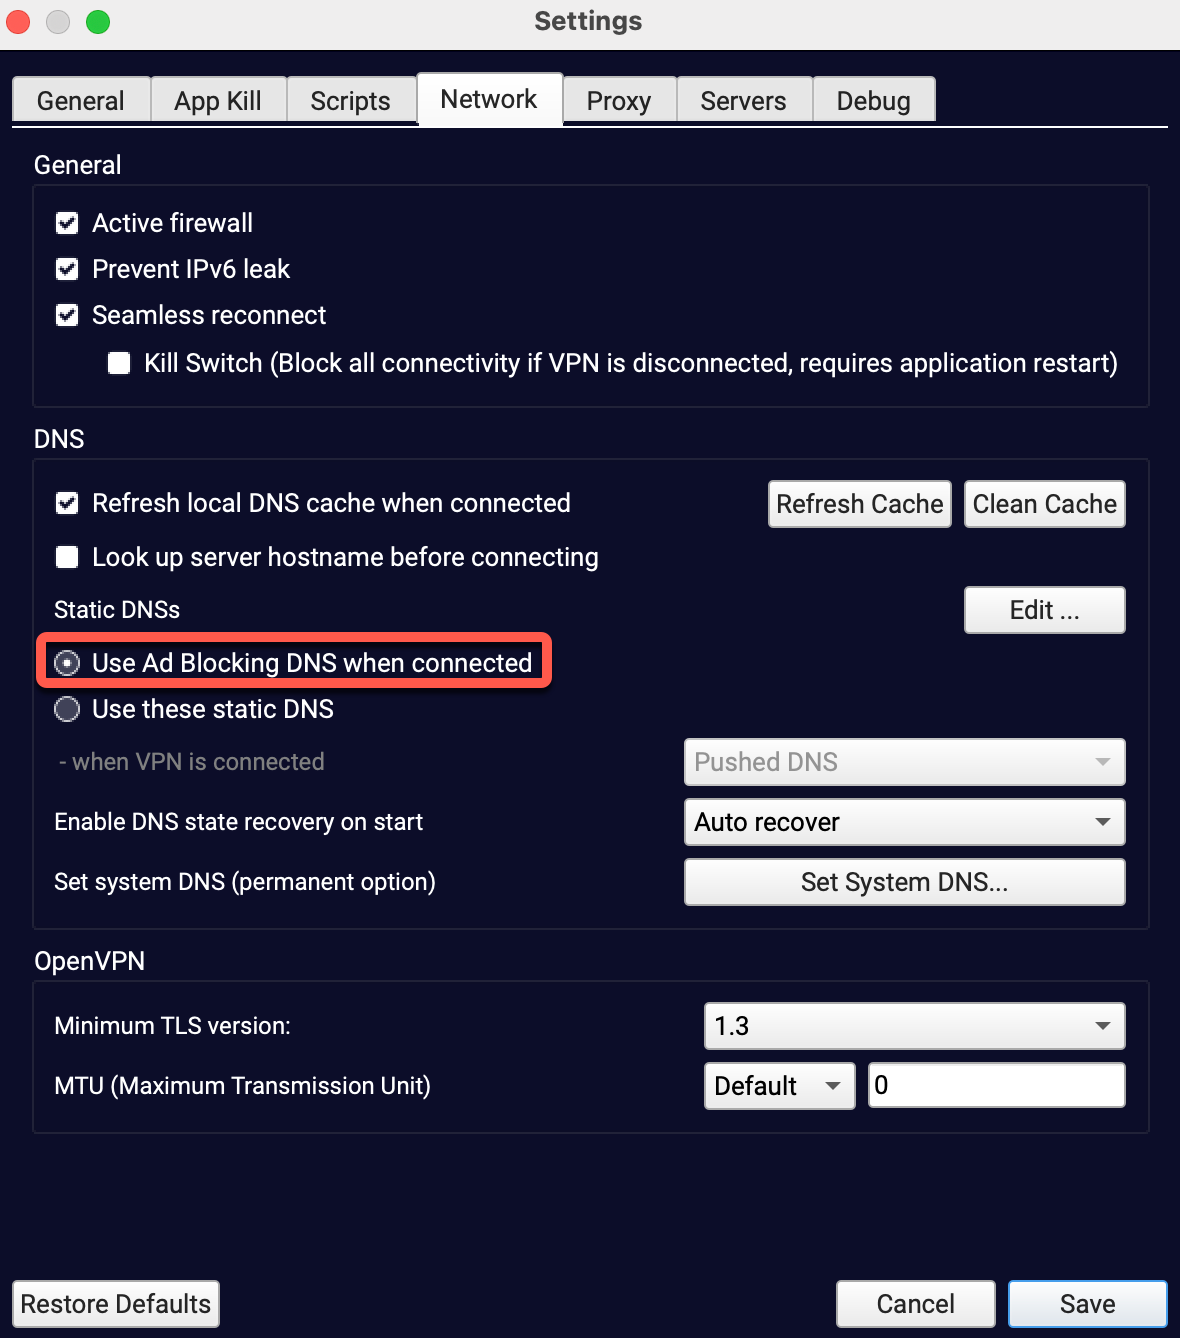
✅ Ad-Block DNS Enabled!
The setting is automatically applied when selected.
Save and Connect
Click "Save" to apply the settings, then return to the main screen and connect to enjoy an ad-free experience.
⚠️ Important
You must reconnect to VPN for the Ad-Block DNS to take effect.
Windows-Specific Tips
- DNS Cache: Run
ipconfig /flushdnsas Administrator - Browser Cache: Clear cache in Edge/Chrome/Firefox
- Windows Store Apps: May require app restart
- Windows Update: Won't be affected by Ad-Block DNS
macOS-Specific Tips
- DNS Cache: Run
sudo dscacheutil -flushcache - Safari: Clear cache from Develop menu
- App Store: Apps download normally
- System Services: Apple services unaffected
Linux-Specific Tips
- DNS Cache: Run
sudo systemctl restart systemd-resolved - NetworkManager: May need restart on some distros
- Browsers: Clear cache manually
- Package Managers: Updates work normally
Testing Your Ad-Block DNS
🧪 Verify Ad-Blocking is Working
1. DNS Leak Test
Visit dnsleaktest.com and run Extended Test
Expected: Should show TorGuard DNS servers only
3. Command Line Test
# Windows
nslookup doubleclick.net

# macOS/Linux
dig doubleclick.net
Expected: Should return 0.0.0.0 or similar blocking response
Clearing DNS Cache
🪟 Windows
- Open Command Prompt as Admin
- Run:
ipconfig /flushdns - Clear browser cache
- Restart browsers
🍎 macOS
- Open Terminal
- Run:
sudo dscacheutil -flushcache - Clear browser cache
- Restart browsers
🐧 Linux
- Open Terminal
- Run:
sudo systemctl restart systemd-resolved - Or:
sudo service nscd restart - Clear browser cache
Advanced Settings
🔧 Customization Options
Custom DNS Servers
If you need specific DNS servers while keeping ad-blocking:
- Select "Custom DNS" instead of Ad-Block DNS
- Add TorGuard's Ad-Block DNS IPs manually
- Combine with other DNS services if needed
Split DNS
For advanced users who need different DNS for specific domains:
- Use system DNS overrides
- Configure hosts file for exceptions
- Set up conditional forwarding
Troubleshooting Common Issues
Ads Still Showing
- Clear all DNS caches
- Restart browsers completely
- Check VPN is connected
- Verify Ad-Block DNS is selected
- Some apps use hardcoded DNS
Website Blocked
- Legitimate site may be false positive
- Temporarily switch to Standard DNS
- Report to support for whitelist
- Check if site is actually malicious
Slow DNS Resolution
- Initial queries build cache
- Try different VPN server
- Check internet connection
- Restart TorGuard client
App Not Working
- Some apps require ad servers
- Games with reward ads affected
- Try app-specific exclusions
- Use Standard DNS for that app
YouTube Ads
- YouTube serves ads from same servers
- DNS blocking less effective
- Use browser ad-blocker too
- Consider YouTube Premium
Banking Sites
- Some banks use ad networks
- Switch to Standard DNS temporarily
- Add bank to trusted sites
- Report false positives
Privacy & Security Features
🔐 Complete Privacy Protection
- No DNS Logs: We never log your DNS queries
- Encrypted Queries: All DNS traffic through VPN tunnel
- DNSSEC Validation: Prevents DNS spoofing
- No Third Parties: All DNS handled by TorGuard
- No Data Sales: Your browsing data is never sold
- Open Source Lists: Transparent blocklist sources
DNS Options Comparison
| Feature | Ad-Block DNS | Standard DNS | ISP DNS | Public DNS |
|---|---|---|---|---|
| Ad Blocking | ✅ Full | ❌ None | ❌ None | ❌ None |
| Malware Protection | ✅ Yes | ❌ No | ❌ No | ⚠️ Limited |
| Privacy | ✅ No logs | ✅ No logs | ❌ Logged | ⚠️ Varies |
| Speed | ✅ Fast | ✅ Fast | ⚠️ Varies | ✅ Fast |
| Reliability | ✅ 99.9% | ✅ 99.9% | ⚠️ Varies | ✅ High |
Best Practices
💡 Tips for Maximum Protection
- Always clear cache after enabling Ad-Block DNS
- Restart applications that were open before connecting
- Combine with browser extensions for element-level blocking
- Report false positives to help improve blocklists
- Use Custom DNS if you need specific exceptions
- Test regularly to ensure blocking is working
Need Help?
If you're experiencing issues with Ad-Block DNS or need to report a false positive:
Include the blocked domain and why it should be whitelisted