Enabling port forwarding on your local router isn't always an easy process. It often requires navigating complex settings on an ISP-provided router and, more importantly, exposes your personal IP address to the internet—defeating the benefits of privacy and security.
That's why TorGuard offers easy and instant port forwarding on any shared, dedicated, or residential IP in our network. With just a few clicks in the TorGuard member's area, you can configure a port forwarding rule on any IP address instantly. When combined with Gluetun, you get a powerful, fully containerized VPN privacy stack.
What is Gluetun?
Gluetun is a lightweight and secure VPN client that runs inside a Docker container, supporting multiple VPN providers, including TorGuard. It's designed to be easy to use and configure, offering robust privacy features without the overhead of traditional VPN setups.
By integrating TorGuard's instant port forwarding with Gluetun, you can securely route traffic through a VPN while forwarding specific ports to access self-hosted services, torrent clients, and other applications.
Step 1: Choose Your VPN IP for Port Forwarding
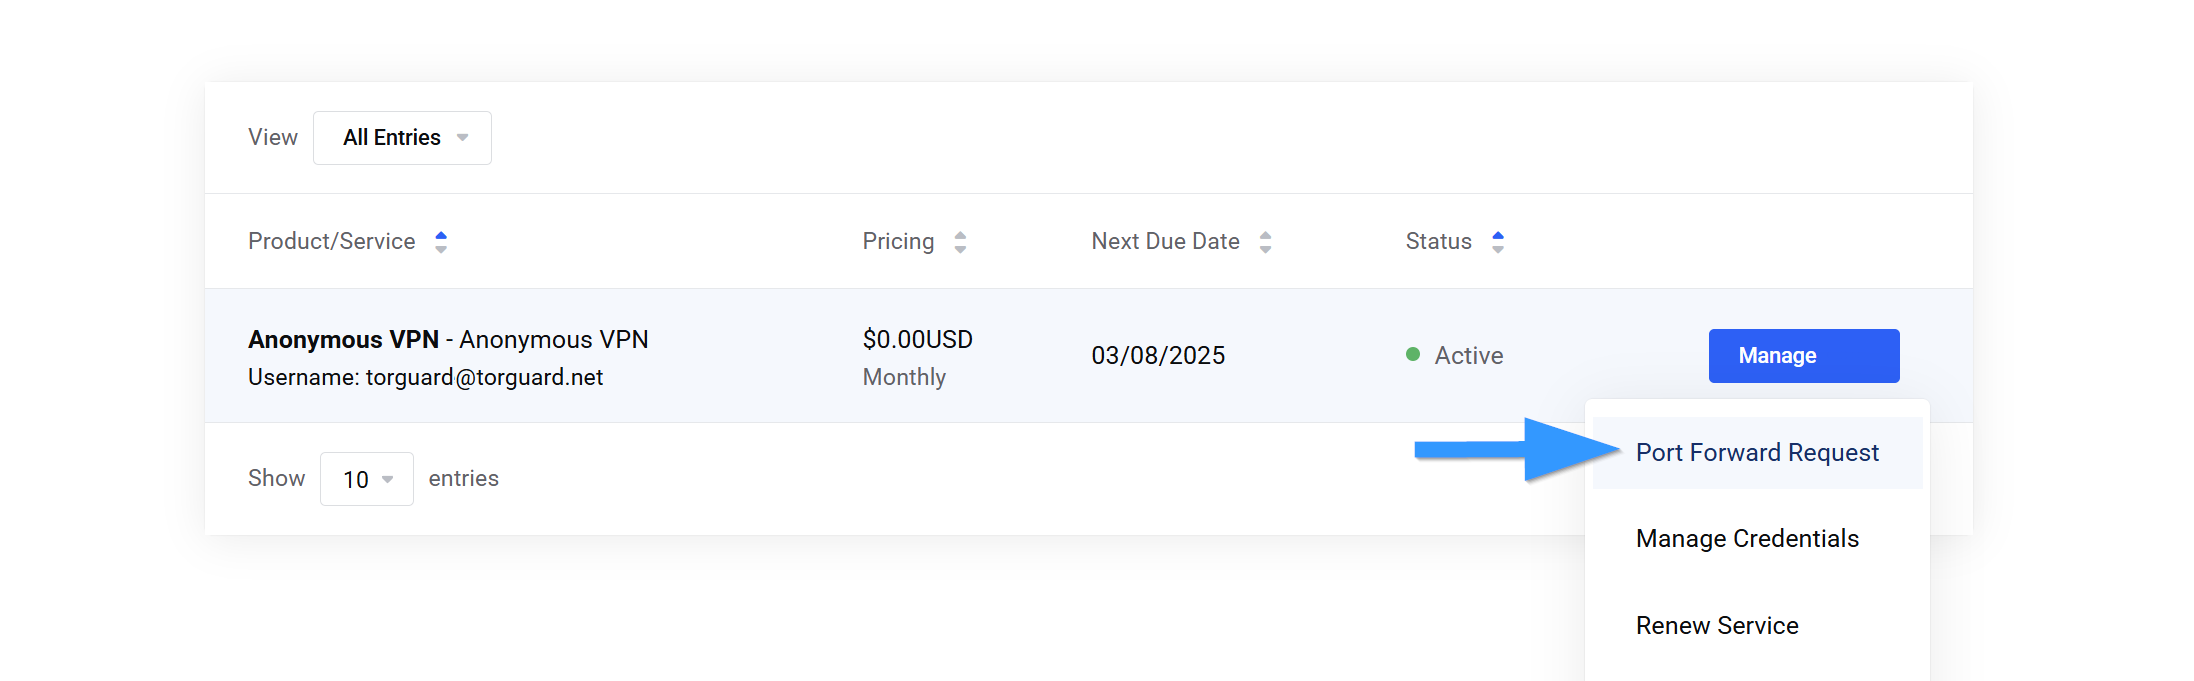
- Log into the TorGuard member's area.
- Select your active VPN service.
- Click on "Port Forward Request" to proceed.
Step 2: Configure Your Port Forward Request
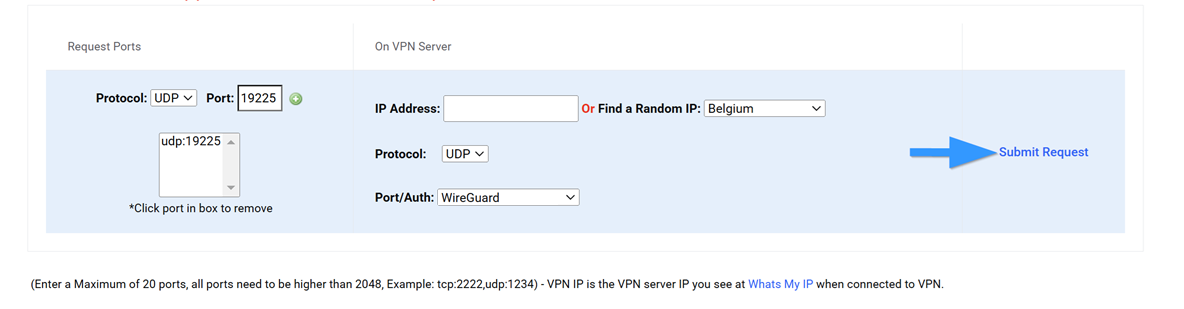
- In the Port Forward Manager, choose the port you want to forward (UDP for WireGuard).
- Click the "+" button to add the port.
- Enter the exact shared, dedicated, or residential VPN server IP, along with the protocol (UDP) and WireGuard as the VPN type. (You can also forward ports for OpenVPN or OpenConnect.)
- If you don't have a specific IP in mind, you can select a country from the dropdown menu, and TorGuard will randomly assign an IP from that region.
- Click "Submit Request" to deploy your port forward.
Important: Once submitted, you'll see your active port forward request displayed, with the option to edit or cancel if needed. Be sure to note the assigned IP address, port, and protocol, as you'll need them in the next step.
Step 3: Create Your WireGuard Configuration
Next, we need to create a custom WireGuard configuration for your shared, dedicated, or residential IP VPN server that you just applied the port forward request on.
1. Create a Directory for Your Docker and WireGuard Files
Open a terminal and run:
mkdir gluetun
cd gluetun
2. Download Your TorGuard WireGuard Config
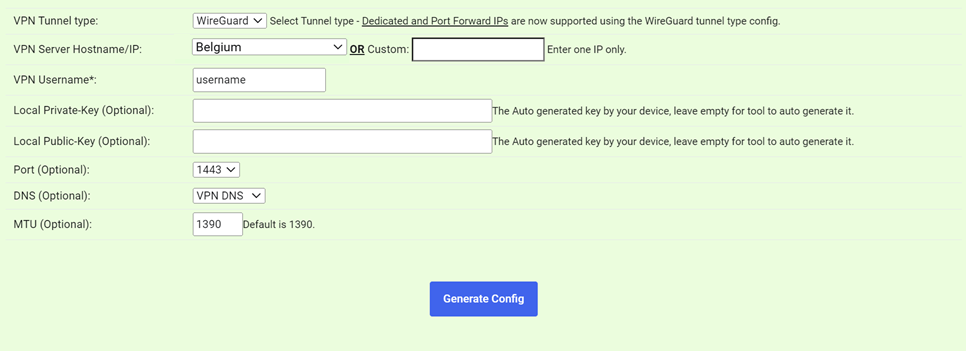
Head over to the TorGuard member's area and use the WireGuard config generator to download the latest WireGuard config file for the server you wish to connect to.
Note: Make sure to enter the exact server IP address of your port forward server in the "Custom" VPN server Hostname section.
Click the "Generate Config" button and copy the WireGuard config. Inside the gluetun directory, create a new file called wg0.conf:
nano wg0.confPaste the entire contents of the TorGuard WireGuard config file you generated, then save the file.
Step 4: Create Your Docker Compose File for Gluetun
Using Docker Compose makes managing containers much easier. Create a new file called docker-compose.yml:
nano docker-compose.ymlPaste the following contents into the file:
services:
  gluetun:
    image: qmcgaw/gluetun
    container_name: gluetun
    cap_add:
      - NET_ADMIN
    environment:
      - VPN_SERVICE_PROVIDER=custom
      - VPN_TYPE=wireguard
      - FIREWALL_VPN_INPUT_PORTS=19225 # Your port forward number
    ports:
      - "8080:8080/tcp" # Qbittorrent Web UI
    volumes:
      - /etc/localtime:/etc/localtime:ro
      - ./wg0.conf:/gluetun/wireguard/wg0.conf
    restart: unless-stopped

  qbittorrent:
    image: linuxserver/qbittorrent:latest
    container_name: qbittorrent
    environment:
      - PUID=1000
      - PGID=1000
      - TZ=Etc/UTC
      - WEBUI_PORT=8080
      - TORRENTING_PORT=6881
    volumes:
      - ./config:/config
      - ./downloads:/downloads
    network_mode: "service:gluetun"
    depends_on:
      - gluetun
    restart: unless-stopped
This Docker Compose file ensures that:
- • The Gluetun container mounts your local WireGuard config file (wg0.conf).
- • All container traffic is routed through the VPN.
- • Your port forward is properly configured via
FIREWALL_VPN_INPUT_PORTS. - • qBittorrent is attached to the Gluetun network, routing all traffic through the VPN.
Ensure that your docker-compose.yml file is in the same folder as your wg0.conf.
Step 5: Start Your Containers
To start the containers, run:
docker-compose up -dThis will download and launch the Gluetun and qBittorrent containers. Once complete, you can verify that the VPN connection is active by checking the logs:
docker logs gluetunTo obtain your temporary qBittorrent Web UI password, run:
docker logs qbittorrentStep 6: Verify Your VPN IP and Port Forwarding
Once your setup is complete, open qBittorrent in your web browser:
http://localhost:8080/To confirm that your torrent traffic is routed through the VPN, use TorGuard's torrent IP check tool. This will verify that your containerized qBittorrent client is using the VPN-assigned IP.
Why Use Gluetun with TorGuard's VPN Port Forwarding?
By containerizing your WireGuard connection with Gluetun and Docker, you unlock several benefits:
🔐 Isolate Applications Behind a VPN
Any containerized application can be forced to use the VPN tunnel for network traffic.
🛡️ Improved Security & Anonymity
Your real IP address remains hidden while still allowing incoming connections on forwarded ports.
🏠 Self-Hosting Made Easy
Host game servers, local apps, and private services without exposing your home IP.
⚙️ Enhanced Port Management
Easily request and manage port forwarding without relying on ISP router settings.
Pro Tip: You can further extend this setup by adding more applications to your Docker/Gluetun config, or even managing everything through Portainer for a web-based Docker management interface.
Troubleshooting Common Issues
Port not accessible from outside?
Ensure the port number in FIREWALL_VPN_INPUT_PORTS matches exactly what you configured in the TorGuard member's area.
Container can't connect to VPN?
Double-check that your WireGuard config uses the exact IP address from your port forward request, not a generic server hostname.
qBittorrent showing wrong IP?
Verify that qBittorrent is using network_mode: "service:gluetun" in the docker-compose.yml file.
Conclusion
Using TorGuard's instant port forwarding with Gluetun provides a powerful way to route and secure your containerized applications. Whether you're self-hosting or setting up a secure VPN gateway, this setup ensures maximum privacy while keeping things simple.
Try it out today and take full control over your VPN-connected Docker environment with TorGuard and Gluetun! 🚀