This guide will show you how to configure TorGuard's Premium HTTP/HTTPS proxy service on macOS. Using the built-in macOS network settings, you can route all your system traffic through TorGuard's secure proxy servers.
What is TorGuard Premium Proxy?
TorGuard's Premium Proxy service provides high-speed HTTP/HTTPS proxy servers with premium bandwidth allocation, dedicated resources, and priority routing for optimal performance on your Mac.
Premium Bandwidth
Dedicated resources with no throttling or speed limits
HTTPS Encryption
Secure SSL/TLS encryption for all proxy traffic
Global Network
Premium servers in multiple countries worldwide
macOS Integration
Native integration with macOS network stack
🚀 Benefits of System Proxy on macOS:
- System-wide proxy coverage for all applications
- No additional software installation required
- Native macOS integration
- Works with Safari, Chrome, and other browsers
- Automatic proxy authentication
- Easy to enable/disable as needed
Prerequisites
Before you begin, ensure you have:
- macOS (any recent version)
- Active TorGuard Premium Proxy subscription
- TorGuard proxy username and password
- Internet connection
⚠️ Important: This guide is for TorGuard Premium Proxy service. Regular VPN subscriptions use different servers and credentials.
Ways to Access Proxy Settings
📱 Via Safari
Safari → Preferences → Advanced → Change Settings
⚙️ Via System Preferences
Apple Menu → System Preferences → Network
🔍 Via Spotlight
Cmd+Space → Type "Network" → Network Preferences
Configuration Steps
Step 1: Open Safari Preferences
In the Safari app ![]() on your Mac, choose Safari > Preferences, then click Advanced.
on your Mac, choose Safari > Preferences, then click Advanced.
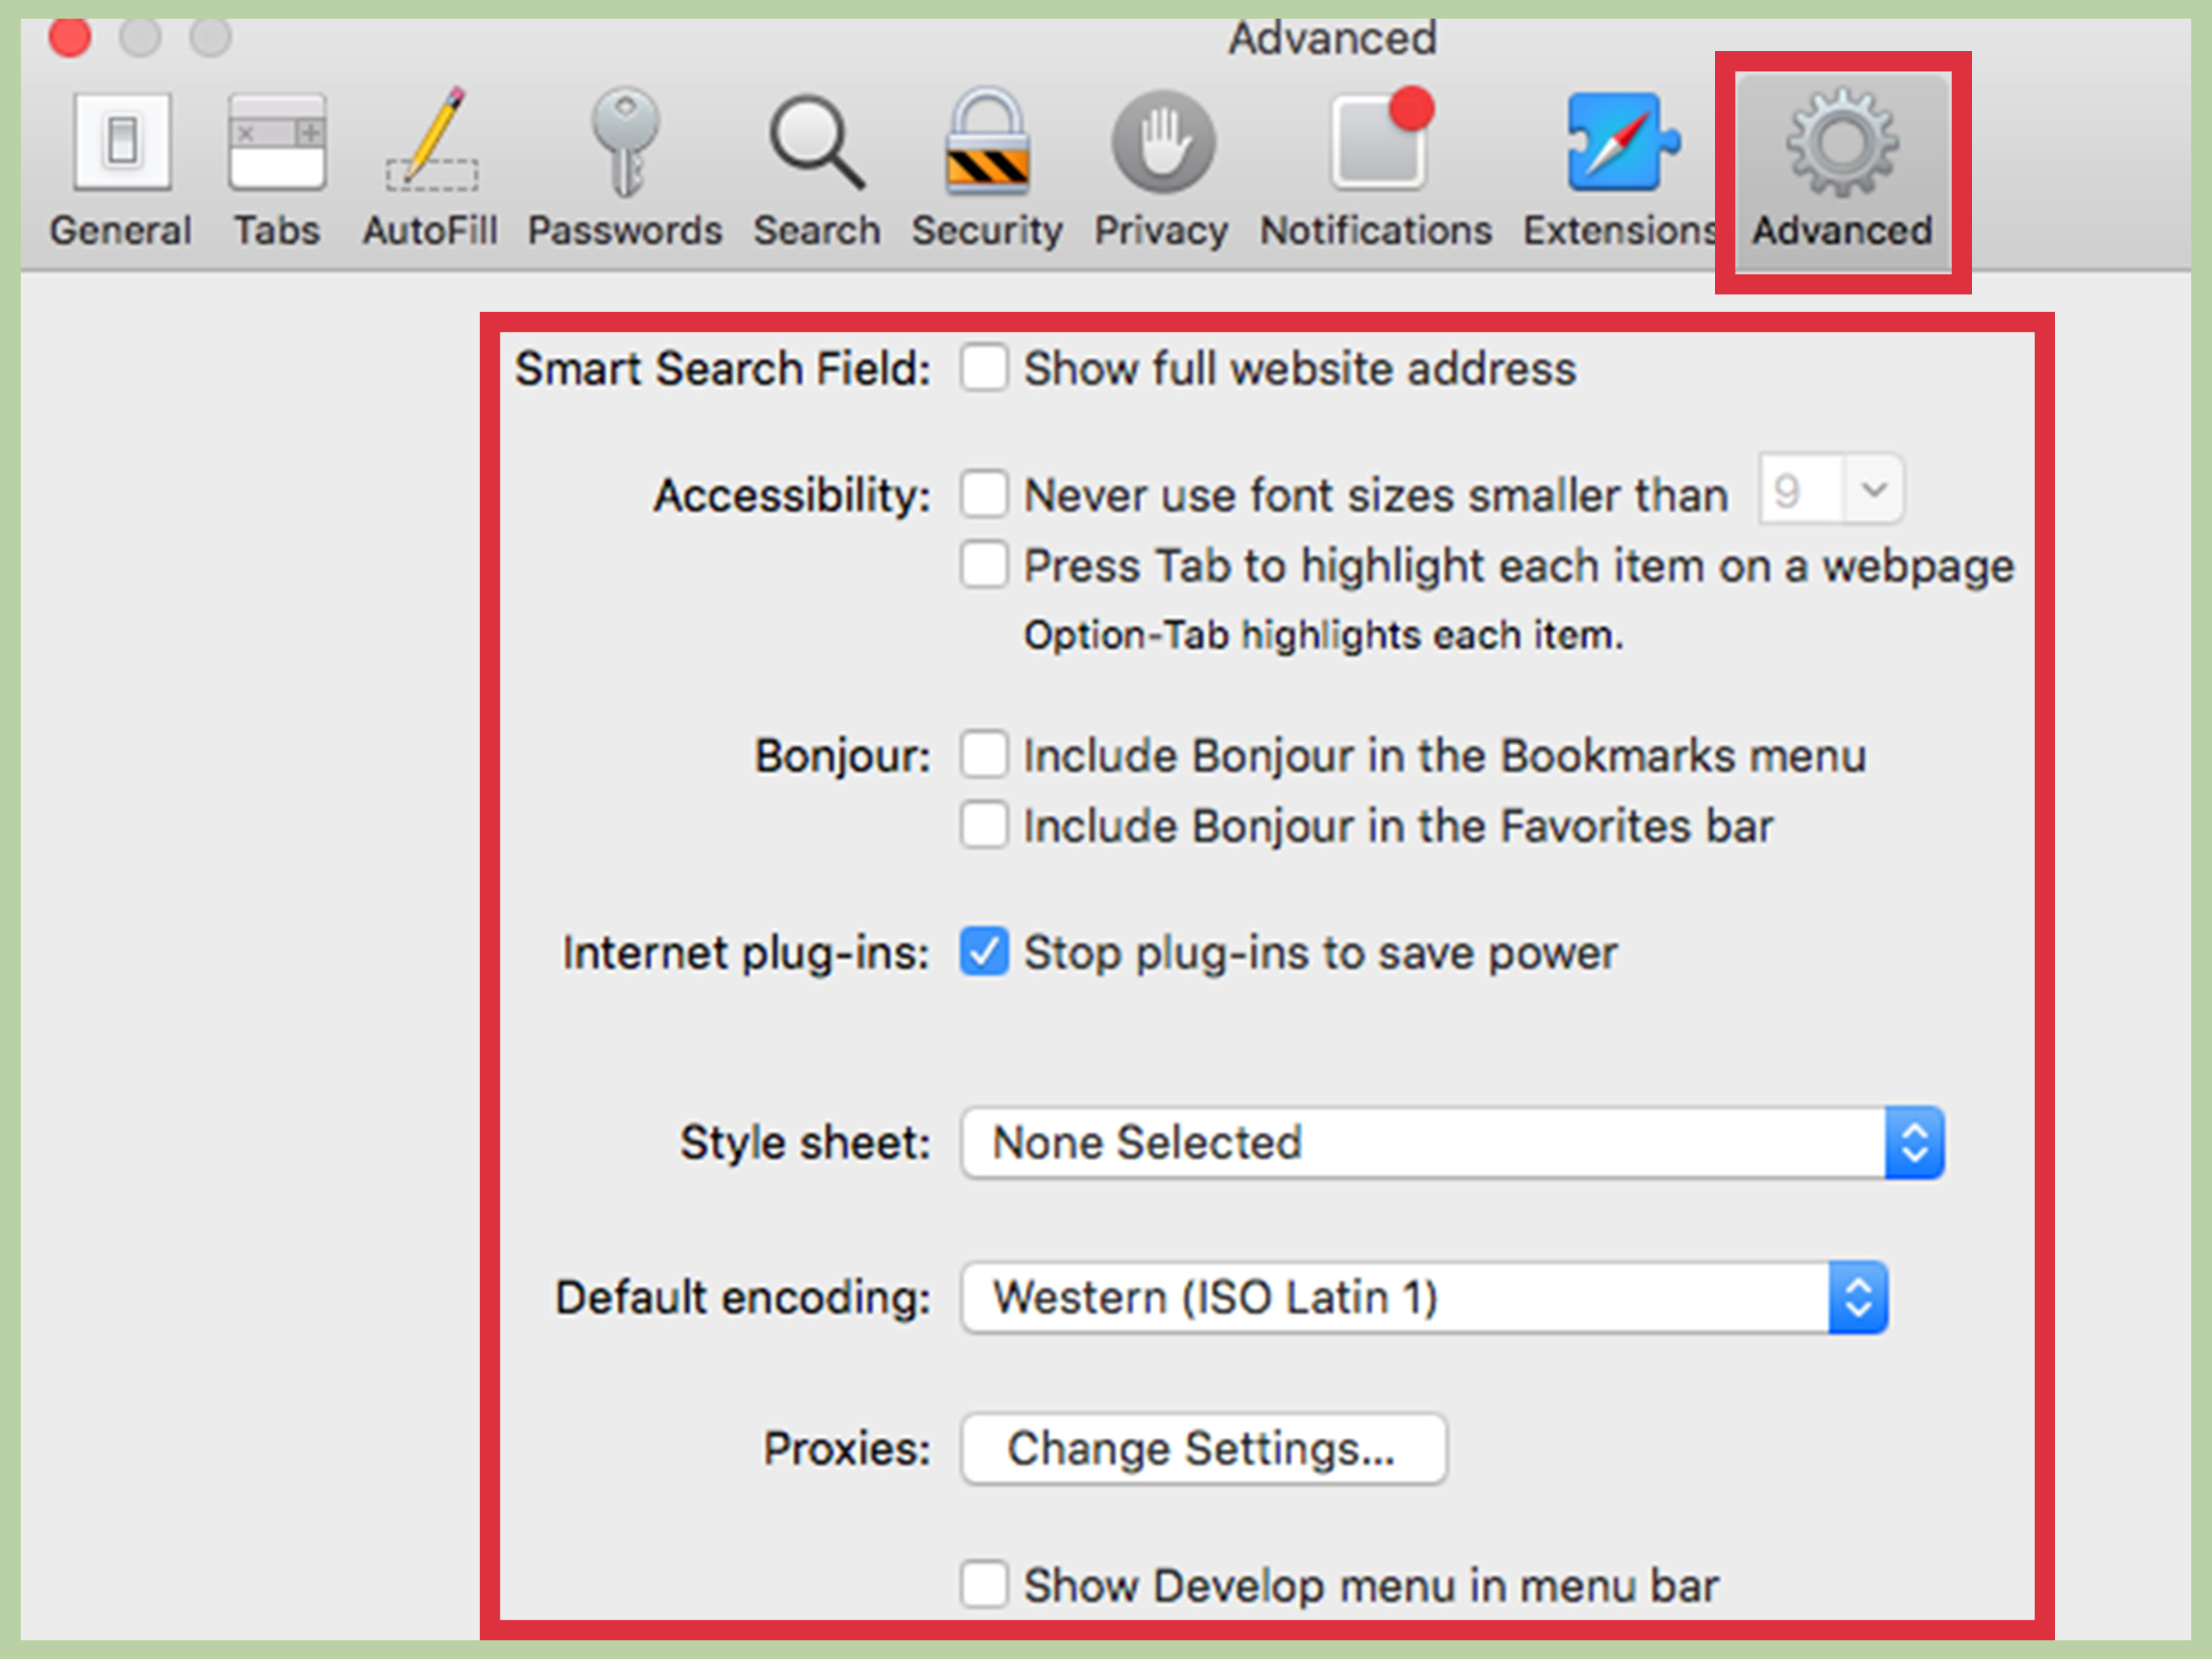
💡 Alternative for newer macOS: On macOS Monterey and later, it's Safari → Settings → Advanced.
Step 2: Open Network Settings
Click Change Settings (next to Proxies) to open Network settings.
📝 Note: This will open System Preferences → Network with your current network connection selected.
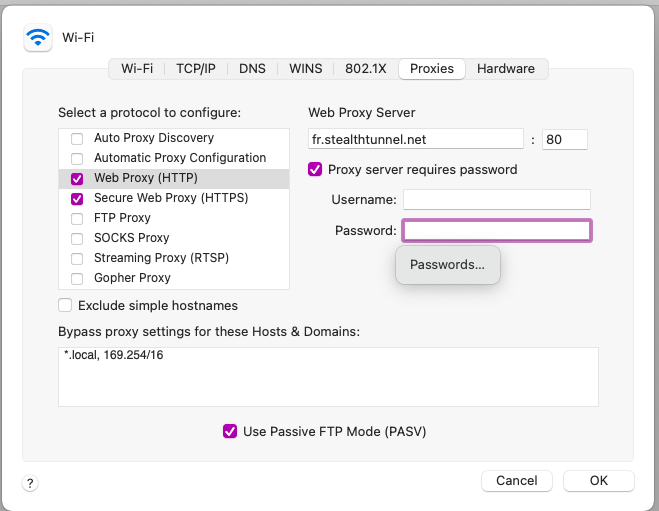
Step 3: Configure Proxy Settings
Enable both "Web Proxy (HTTP)" and "Secure Web Proxy (HTTPS)" and configure with TorGuard's server information.
HTTP Proxy Configuration:
- Check Web Proxy (HTTP)
- Server: [country].stealthtunnel.net
- Port: 80
- Username: Your TorGuard proxy username
- Password: Your TorGuard proxy password
Example using France server:
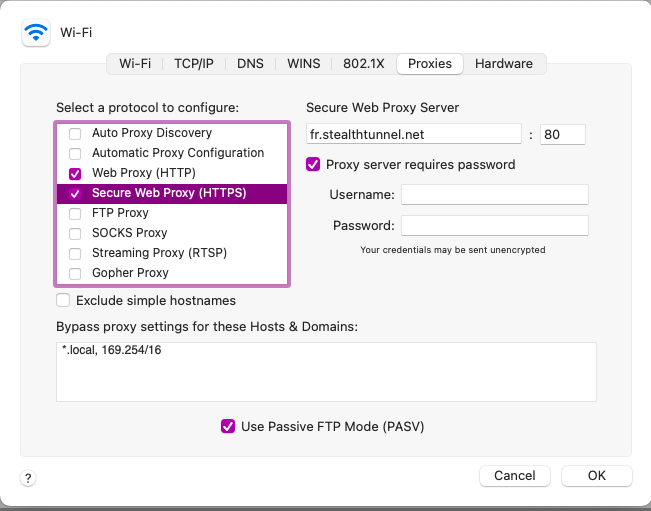
HTTPS Proxy Configuration:
- Check Secure Web Proxy (HTTPS)
- Server: [country].stealthtunnel.net
- Port: 443
- Use same username and password
📍 Available Servers: Find the complete list of Premium Proxy servers at torguard.net/proxynetwork
⚠️ Important: Configure BOTH HTTP and HTTPS proxy for complete coverage.
Step 4: Apply Settings
Click OK to close the proxy configuration window, then click Apply button to save the network settings.
💡 Tip: macOS will remember your credentials, so you won't need to enter them repeatedly.
Step 5: Verify Connection
Browse to TorGuard's What's My IP page and confirm your IP has changed.
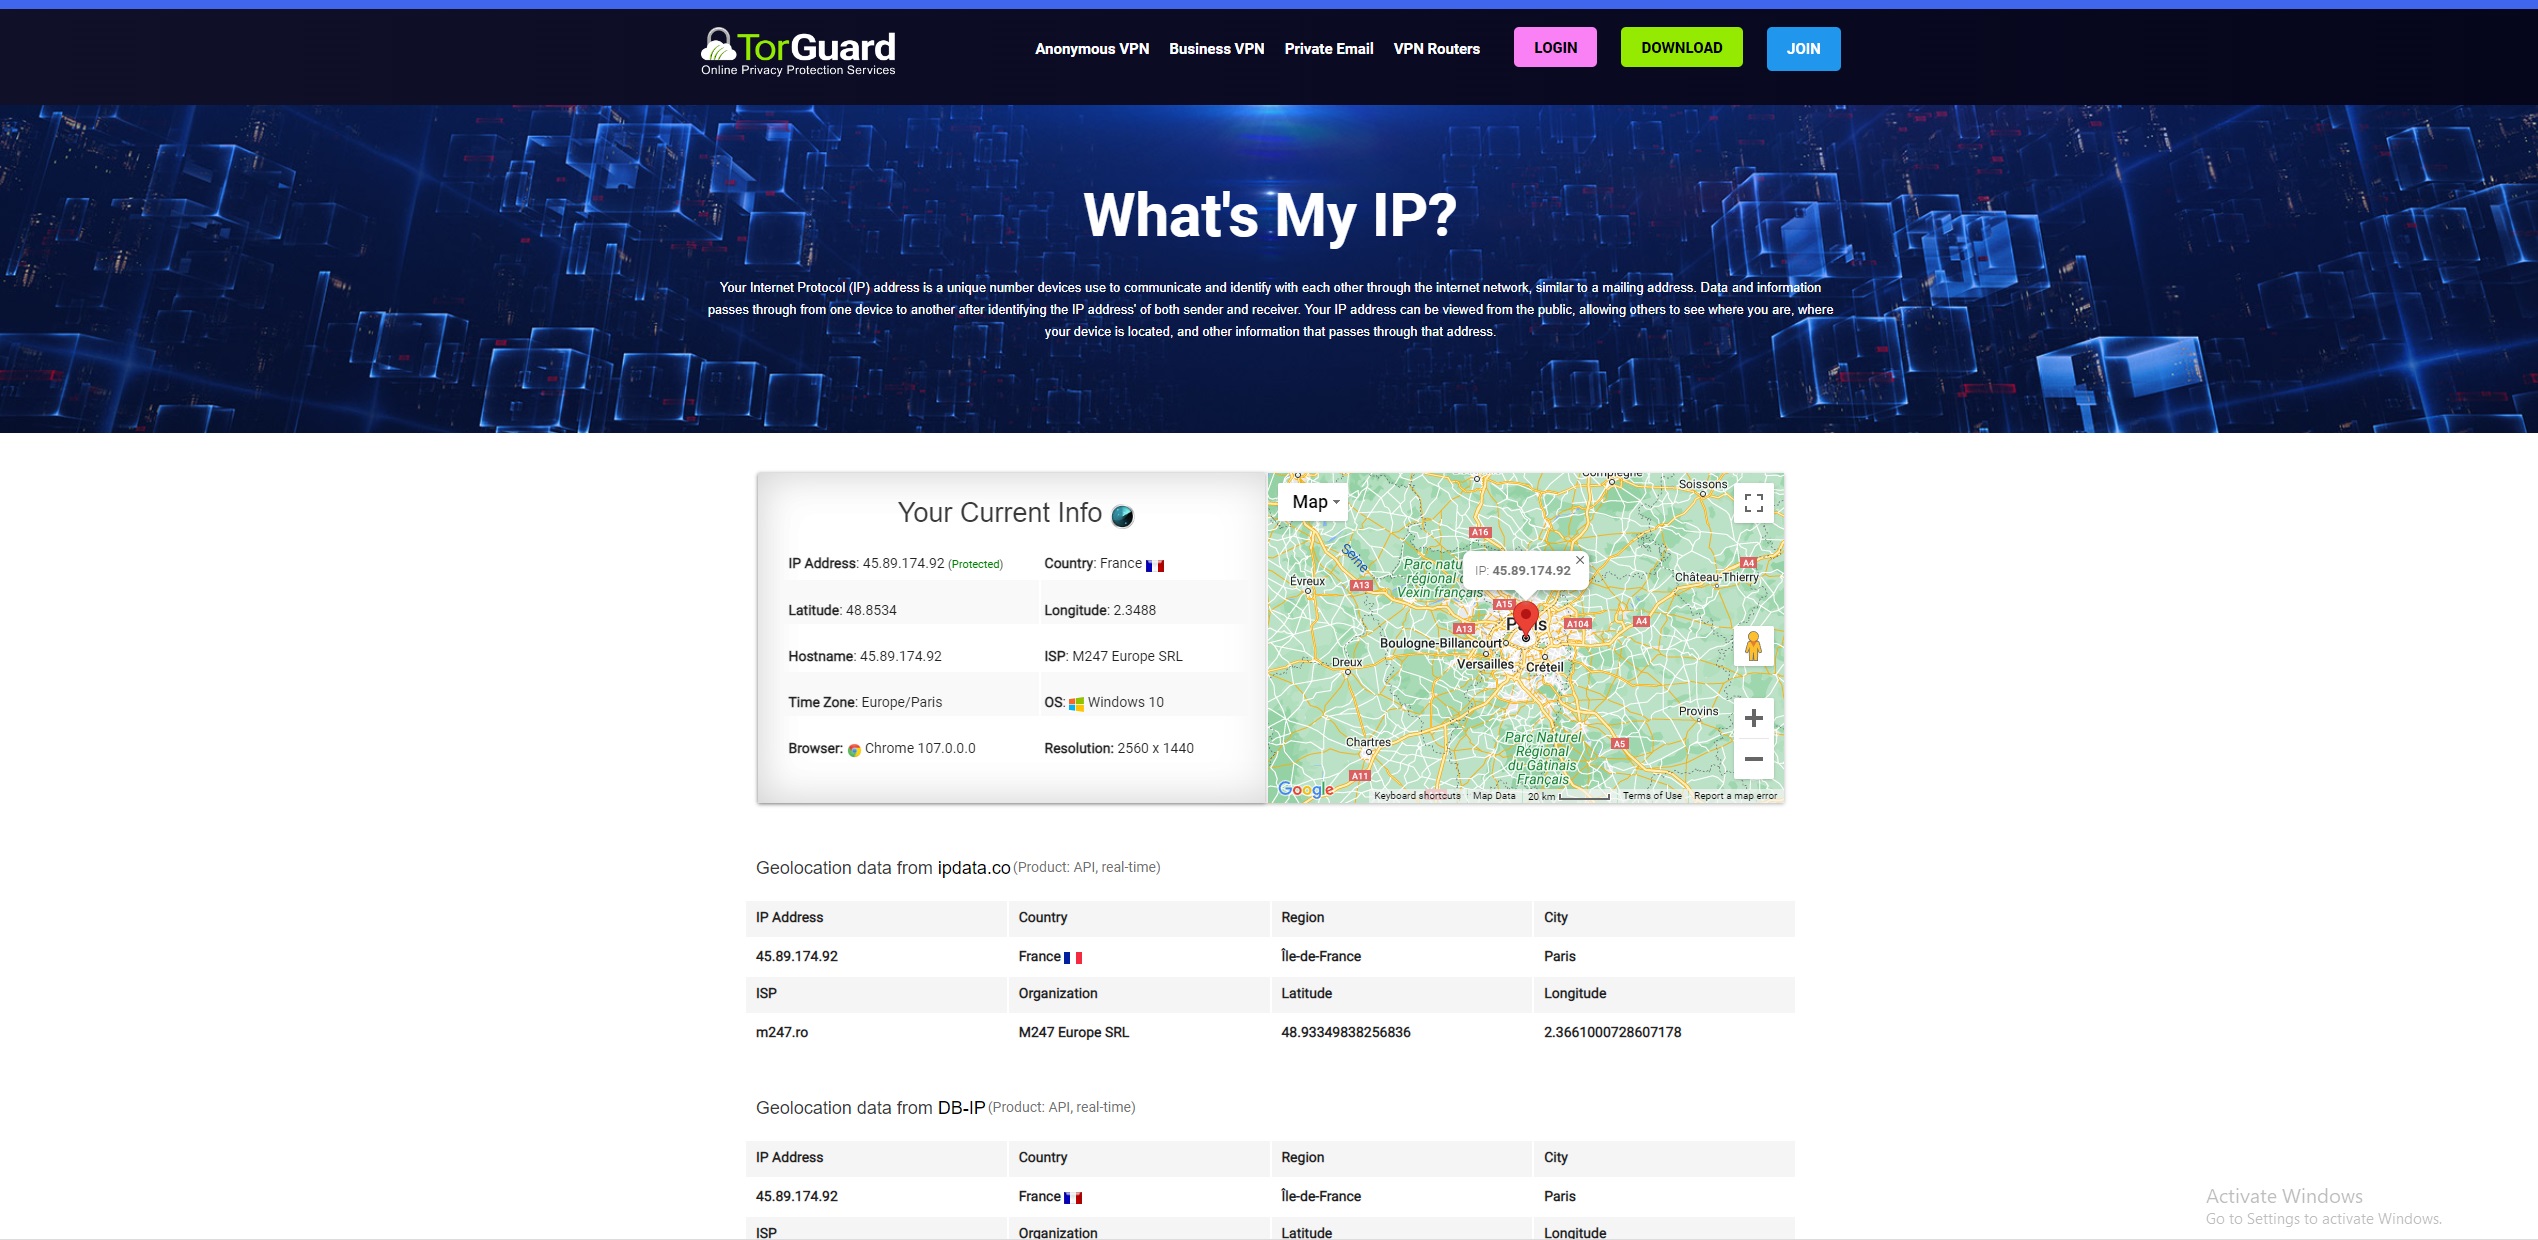
✅ Success! If you see a different IP address and location, your proxy is working correctly.
macOS Specific Features
🍎 Network Locations
Create different network locations for easy proxy switching:
- System Preferences → Network → Location dropdown
- Create locations: "Home", "Work", "Proxy"
- Configure proxy only in "Proxy" location
- Switch locations from Apple menu
🔐 Keychain Integration
macOS securely stores proxy credentials:
- Credentials saved in Keychain
- Automatic authentication
- No need to re-enter password
- Manage in Keychain Access app
📋 Per-Application Proxy
Some apps have their own proxy settings:
- Safari: Uses system proxy
- Chrome: Uses system proxy by default
- Firefox: Can use system or custom
- Terminal: May need export commands
🚫 Proxy Bypass
Configure exceptions in Advanced settings:
- Click "Advanced" in proxy settings
- Add local domains: *.local, localhost
- Add IP ranges: 192.168.*, 10.*
- Separate with commas or new lines
Terminal Commands
Configure proxy via Terminal for automation:
# Enable HTTP proxy
networksetup -setwebproxy "Wi-Fi" fr.stealthtunnel.net 80 on username password

# Enable HTTPS proxy
networksetup -setsecurewebproxy "Wi-Fi" fr.stealthtunnel.net 443 on username password

# View current proxy settings
networksetup -getwebproxy "Wi-Fi"
networksetup -getsecurewebproxy "Wi-Fi"

# Disable proxy
networksetup -setwebproxystate "Wi-Fi" off
networksetup -setsecurewebproxystate "Wi-Fi" off

# Export for Terminal sessions
export http_proxy="http://username:[email protected]:80"
export https_proxy="https://username:[email protected]:443"
💡 Note: Replace "Wi-Fi" with your network interface name (use networksetup -listallnetworkservices to see all).
Troubleshooting Common Issues
Authentication Keeps Failing
Solution:
- Verify you're using Premium Proxy credentials (not VPN)
- Check credentials at managecredentials.php
- Clear saved passwords in Keychain Access
- Try entering credentials without saving first
- Ensure account is active
Some Apps Not Using Proxy
Solution:
- Check app-specific proxy settings
- Some apps ignore system proxy
- For Terminal: export proxy variables
- Try restarting the app
- Check firewall settings
Slow Connection Speed
Solution:
- Switch to server closer to your location
- Check Activity Monitor for high CPU/network usage
- Disable proxy for local resources
- Try different ports (80 vs 443)
- Clear DNS cache:
sudo dscacheutil -flushcache
Cannot Access Local Network
Solution:
- Add local addresses to bypass list
- Common bypasses: *.local, localhost, 192.168.*
- Include your router IP
- Add Time Machine backup destinations
- Include local printer IPs
Security Best Practices
🔐 Connection Security
- Use HTTPS proxy when possible
- Verify proxy is active before browsing
- Check for DNS leaks
- Use HTTPS websites
🍎 macOS Security
- Keep macOS updated
- Enable FileVault encryption
- Use strong login password
- Enable firewall
🔑 Credential Security
- Use Keychain for password storage
- Enable two-factor authentication
- Don't share proxy credentials
- Regularly update passwords
🌐 Privacy Enhancement
- Use Safari's privacy features
- Enable private browsing
- Clear cookies regularly
- Disable location services
Proxy Methods on macOS
| Method | Coverage | Setup | Best For |
|---|---|---|---|
| System Proxy | All apps (mostly) | Built-in | General use |
| Browser Extension | Browser only | Simple | Web browsing |
| VPN App | All traffic | App required | Full protection |
| PAC File | Selective | Advanced | Complex rules |
Summary
You've successfully configured TorGuard Premium HTTP/HTTPS proxy on macOS! This setup provides:
- ✅ System-wide proxy coverage
- ✅ Premium bandwidth and speed
- ✅ Secure HTTPS encryption option
- ✅ Native macOS integration
- ✅ Keychain credential storage
- ✅ Easy location-based switching