This guide will show you how to configure TorGuard's Premium HTTP/HTTPS proxy service on Windows 10. Using the built-in Windows proxy settings, you can route all your system traffic through TorGuard's secure proxy servers.
What is TorGuard Premium Proxy?
TorGuard's Premium Proxy service provides high-speed HTTP/HTTPS proxy servers with premium bandwidth allocation, dedicated resources, and priority routing for optimal performance.
Premium Bandwidth
Dedicated resources with no throttling or speed limits
HTTPS Encryption
Secure SSL/TLS encryption for all proxy traffic
Global Network
Premium servers in multiple countries worldwide
No Logs Policy
Complete privacy with zero traffic logging
🚀 Benefits of System Proxy on Windows:
- System-wide proxy coverage for all applications
- No additional software installation required
- Native Windows integration
- Automatic authentication handling
- Works with all browsers and apps
- Easy to enable/disable as needed
Prerequisites
Before you begin, ensure you have:
- Windows 10 (any edition)
- Active TorGuard Premium Proxy subscription
- TorGuard proxy username and password
- Internet connection
⚠️ Important: This guide is for TorGuard Premium Proxy service. Regular VPN subscriptions use different servers and credentials.
HTTP vs HTTPS Proxy
| Feature | HTTP Proxy | HTTPS Proxy |
|---|---|---|
| Encryption | ❌ None | ✅ SSL/TLS |
| Port | 80 | 443 |
| Security | ⚠️ Basic | ✅ High |
| Speed | ✅ Fastest | ✅ Fast |
| Firewall Bypass | ⚠️ Often blocked | ✅ Excellent |
| Recommendation | Local networks only | ✅ Recommended |
💡 TorGuard Recommends: Always use HTTPS proxy (port 443) for better security and firewall bypass capabilities.
Configuration Steps
Step 1: Open Network Settings
Open Windows taskbar, right-click the Network Icon then click Open Network & Internet Settings.
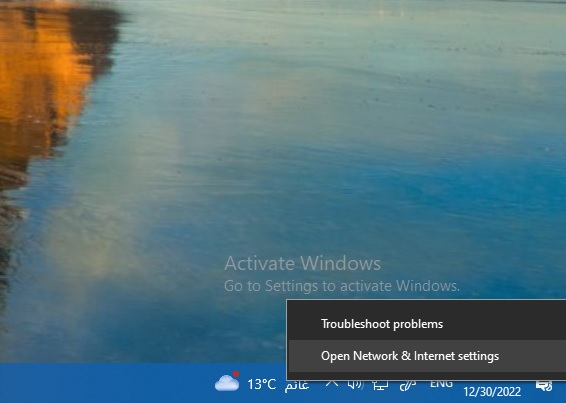
💡 Alternative Method: You can also press Windows + I to open Settings, then navigate to Network & Internet.
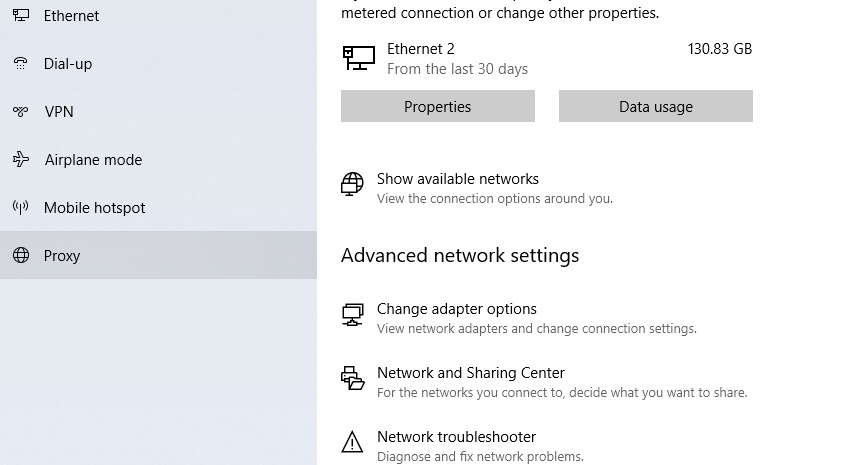
Step 2: Navigate to Proxy Settings
Click Proxy from the left menu.
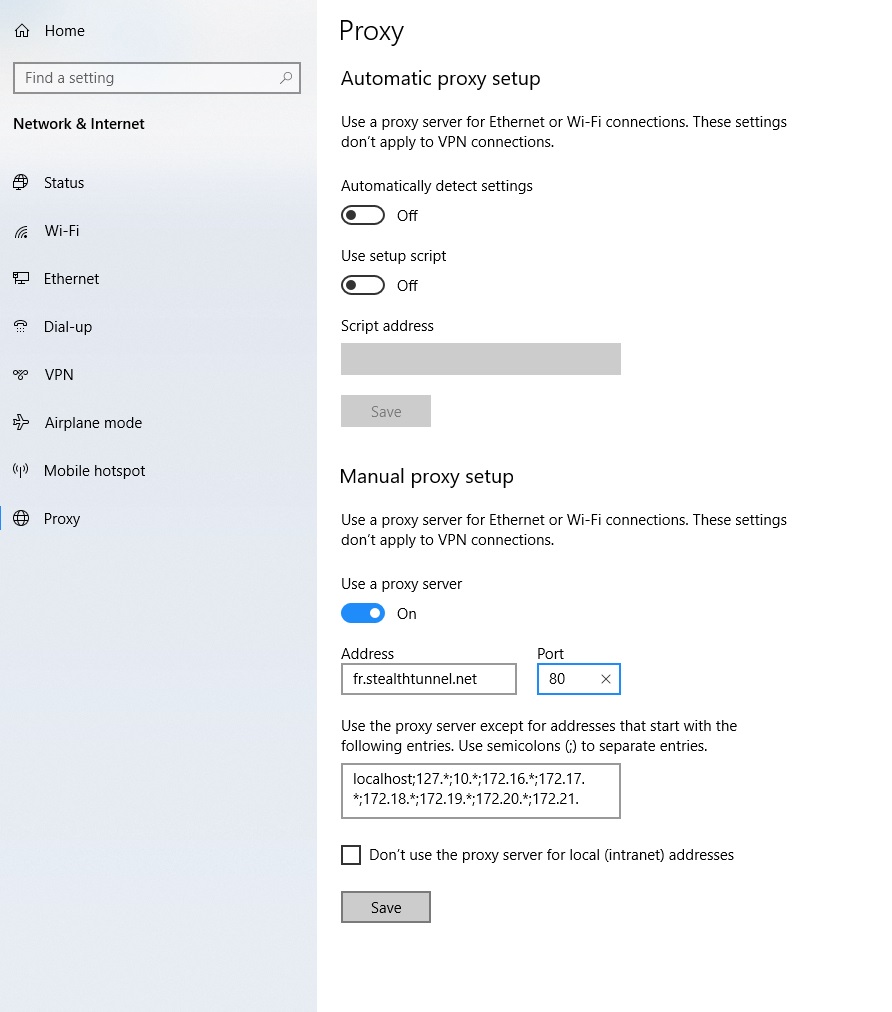
Step 3: Configure Proxy Server
Toggle "Use a proxy server" to ON and configure using TorGuard's server addresses.
Option A: HTTP Proxy (Port 80)
For basic HTTP proxy, use:
- Address: [country].stealthtunnel.net
- Port: 80
- Example: fr.stealthtunnel.net
Option B: HTTPS Proxy (Port 443) - Recommended
For secure HTTPS proxy, use:
- Address: https://[country].stealthtunnel.net
- Port: 443
- Example: https://fr.stealthtunnel.net
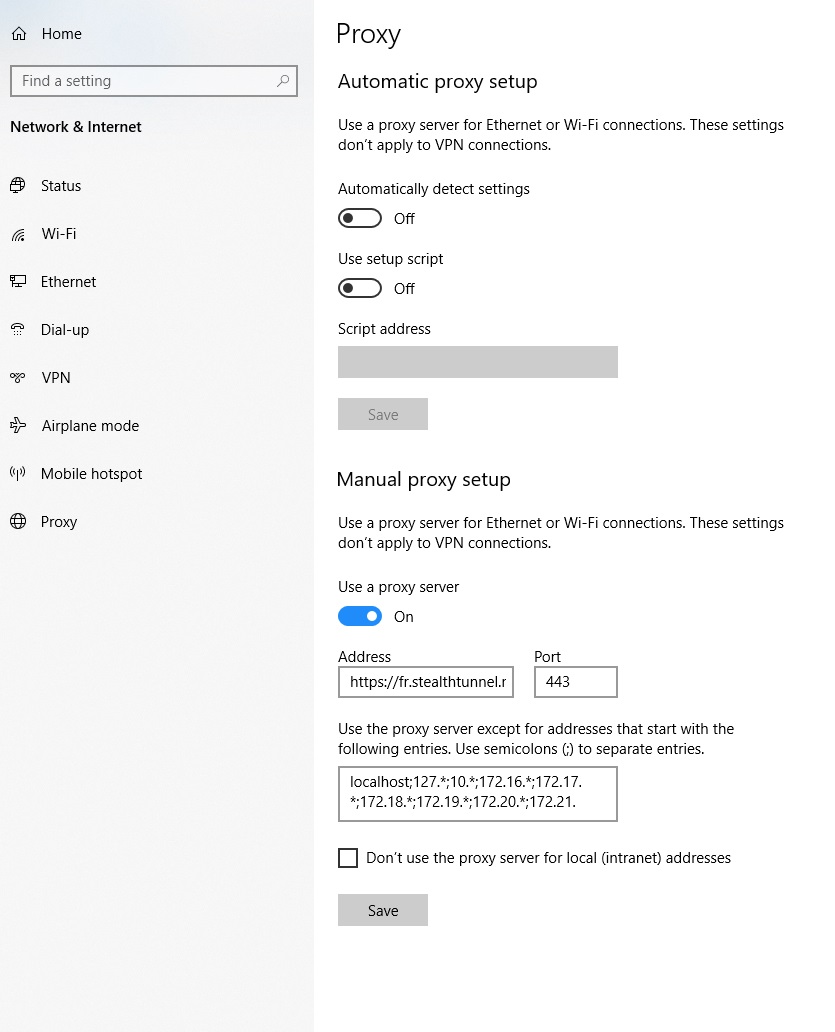
⚠️ Important for HTTPS: You must add https:// before the address to tell Windows to use HTTPS protocol.
📍 Available Servers: Find the complete list of Premium Proxy servers at torguard.net/proxynetwork
Step 4: Enter Credentials
Click Save, then browse to any website. Windows will prompt you to enter your TorGuard Premium Proxy username and password.
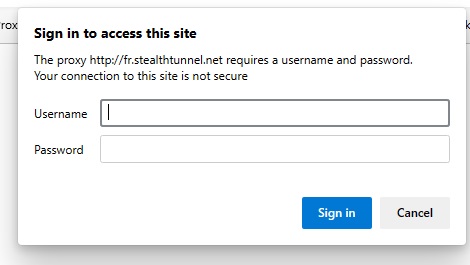
🔑 Credential Management: Not sure of your proxy credentials? They can be managed at torguard.net/managecredentials.php
💡 Save Credentials: Check "Remember my credentials" to avoid entering them repeatedly.
Step 5: Verify Connection
Browse to TorGuard's What's My IP page and confirm your IP has changed.
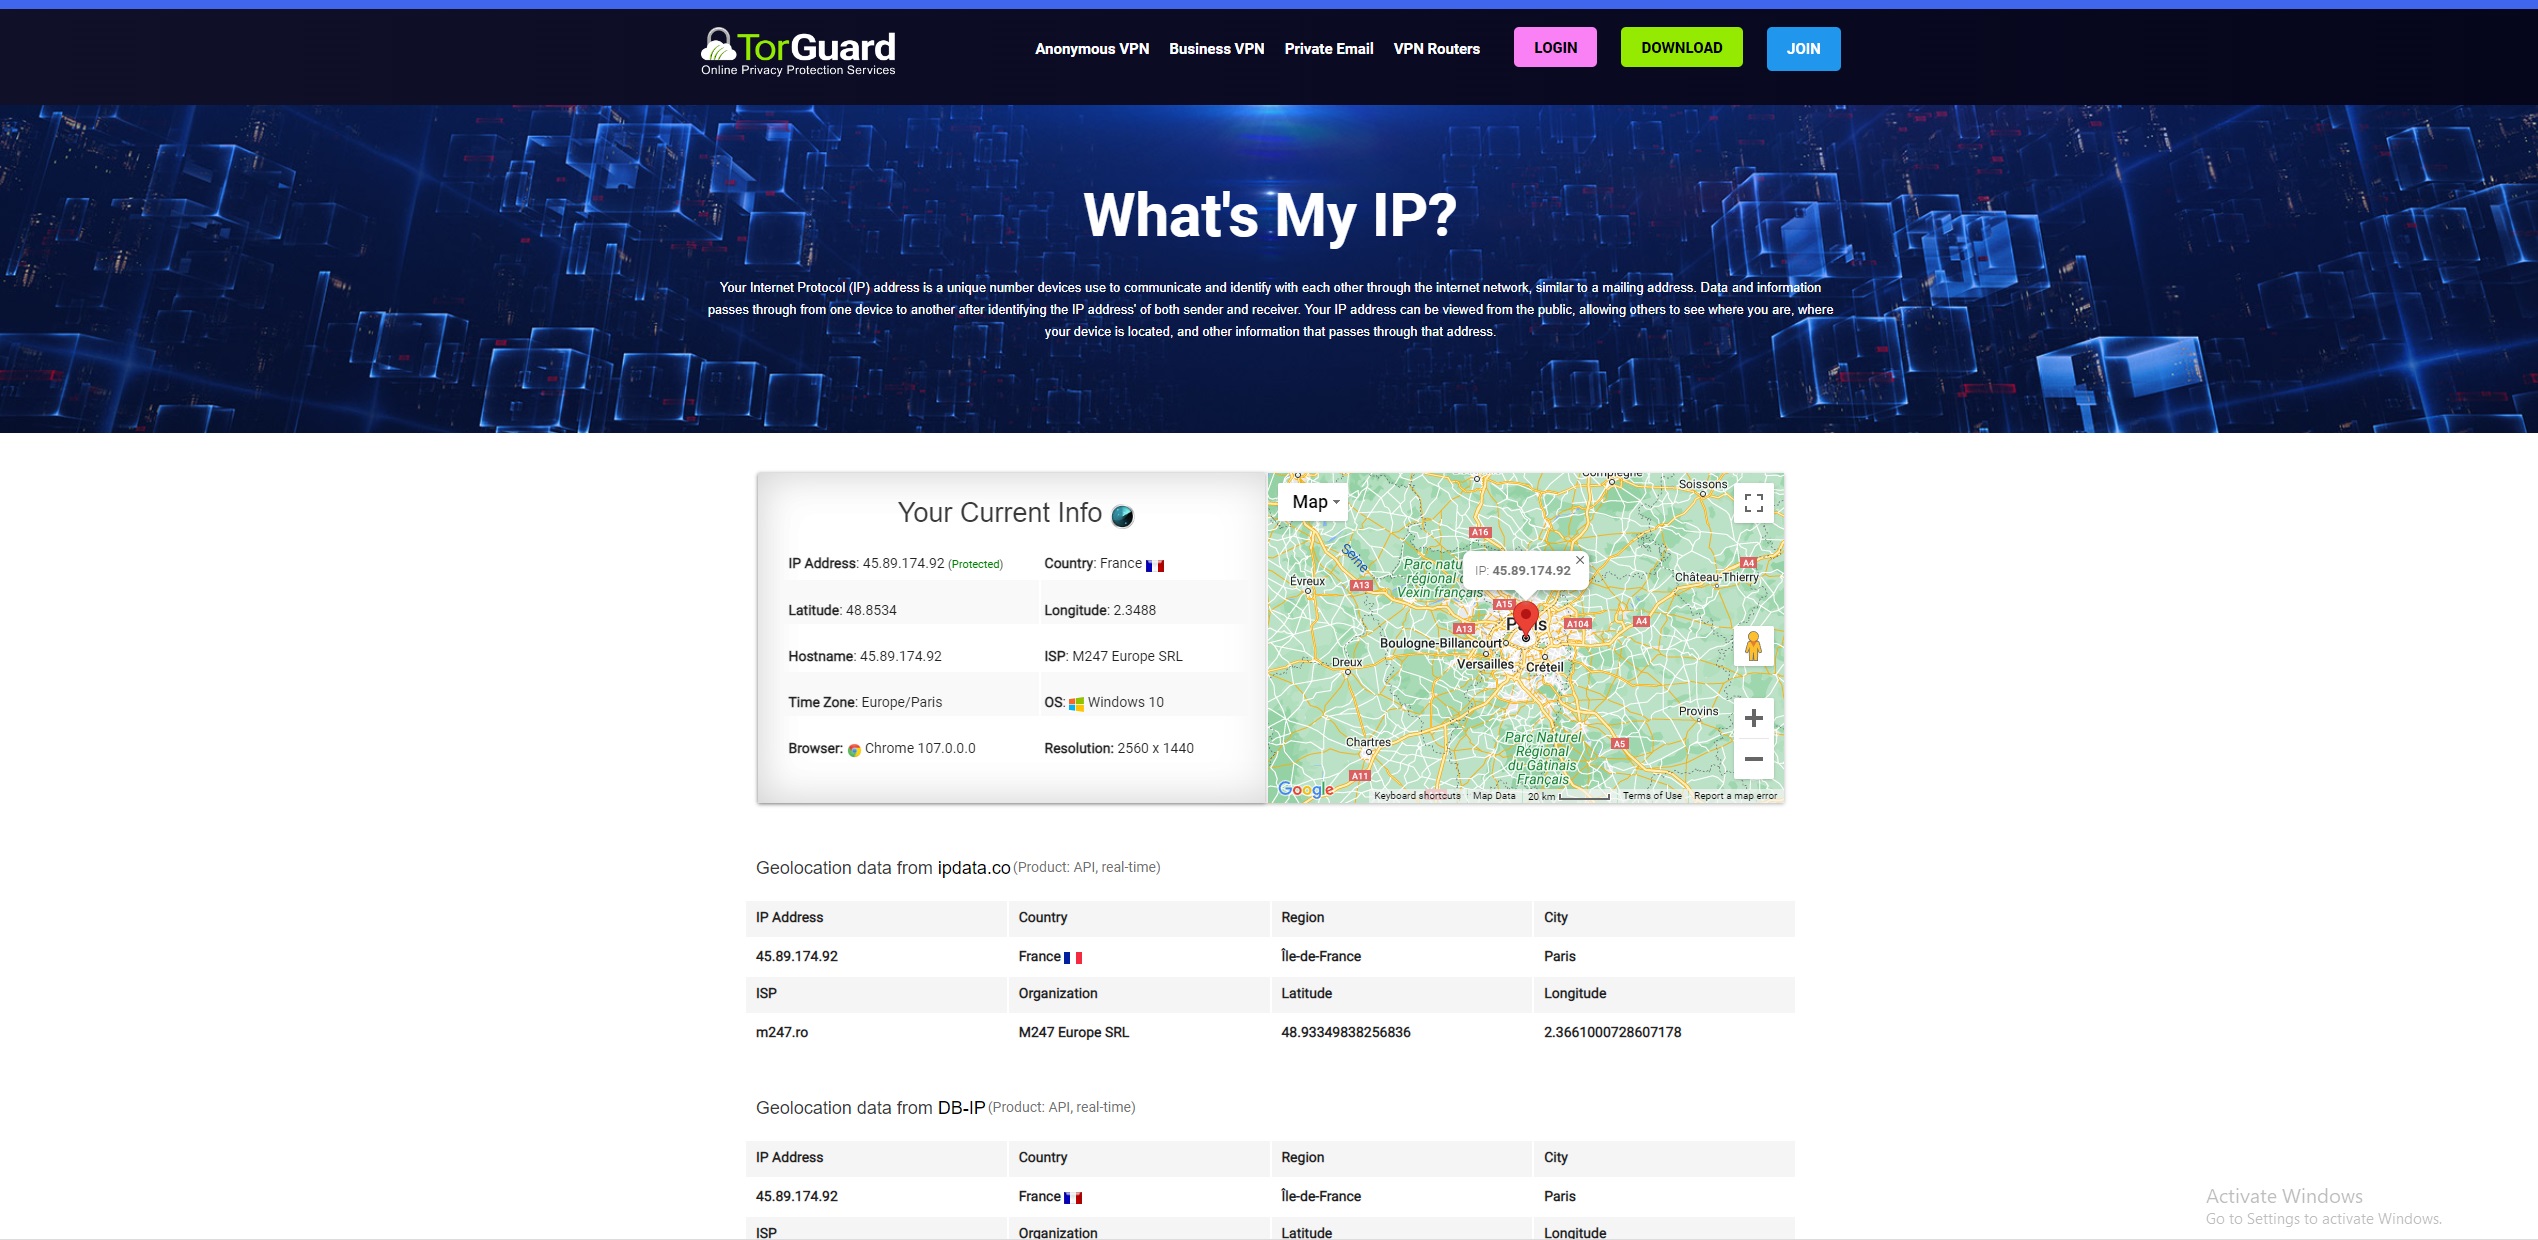
✅ Success! If you see a different IP address and location, your proxy is working correctly.
Advanced Configuration
🔧 Proxy Exceptions
Configure addresses that should bypass the proxy:
- In proxy settings, find "Use the proxy server except for addresses that start with"
- Add local addresses:
localhost;127.0.0.1;192.168.* - Add specific domains:
*.local;*.mycompany.com - Separate multiple entries with semicolons
📋 Per-Application Proxy
Some applications have their own proxy settings:
- Chrome: Uses system proxy by default
- Firefox: Can use system or custom proxy
- Edge: Uses system proxy settings
- Apps: Check individual app settings
🌐 Multiple Proxy Profiles
For quick switching between servers:
- Use third-party proxy switcher extensions
- Create PowerShell scripts for different servers
- Use browser profiles with different proxies
- Consider FoxyProxy for advanced management
⚡ Performance Optimization
- Choose servers closest to your location
- Use HTTPS for better compatibility
- Disable proxy for local network resources
- Clear browser cache if experiencing issues
PowerShell Commands
Manage proxy settings via PowerShell for automation:
# Enable proxy
netsh winhttp set proxy "https://fr.stealthtunnel.net:443"

# View current proxy settings
netsh winhttp show proxy

# Reset proxy settings
netsh winhttp reset proxy

# Set proxy with exceptions
netsh winhttp set proxy "https://fr.stealthtunnel.net:443" bypass-list="*.local;localhost"
Troubleshooting Common Issues
Authentication Keeps Failing
Solution:
- Verify you're using Premium Proxy credentials (not VPN)
- Check credentials at managecredentials.php
- Ensure account is active and not suspended
- Try clearing saved credentials in Windows Credential Manager
- Disable and re-enable proxy settings
Some Apps Not Using Proxy
Solution:
- Check if app has its own proxy settings
- Some apps ignore system proxy (use app-specific config)
- Try running app as administrator
- Check Windows Firewall exceptions
- Consider using VPN for full coverage
Slow Connection Speed
Solution:
- Switch to server closer to your location
- Try different port (80 vs 443)
- Check base internet speed without proxy
- Disable proxy for local resources
- Clear browser cache and cookies
Cannot Access Local Network
Solution:
- Add local addresses to proxy exceptions
- Common exceptions:
localhost;127.0.0.1;192.168.*;10.* - Include your router IP in exceptions
- Add local domain names if used
Security Best Practices
🔐 Connection Security
- Always use HTTPS proxy when possible
- Verify proxy is active before sensitive browsing
- Check for DNS leaks
- Use HTTPS websites
🛡️ Account Security
- Use strong proxy password
- Don't share credentials
- Enable 2FA on TorGuard account
- Monitor account activity
💻 System Security
- Keep Windows 10 updated
- Use antivirus software
- Enable Windows Firewall
- Review app permissions
🌐 Privacy Tips
- Clear cookies regularly
- Use private browsing
- Disable location services
- Review browser privacy settings
Proxy vs VPN
| Feature | System Proxy | VPN |
|---|---|---|
| Coverage | HTTP/HTTPS traffic | All traffic |
| Speed | ✅ Faster | ⚠️ Variable |
| Setup | ✅ Built-in | Requires app |
| Encryption | HTTPS only | Full tunnel |
| App Support | HTTP/HTTPS apps | All apps |
Summary
You've successfully configured TorGuard Premium HTTP/HTTPS proxy on Windows 10! This setup provides:
- ✅ System-wide proxy coverage
- ✅ Premium bandwidth and speed
- ✅ Secure HTTPS encryption option
- ✅ No additional software needed
- ✅ Easy to enable/disable
- ✅ Works with all browsers