This guide will show you how to configure TorGuard's Premium HTTP/HTTPS proxy service on Windows 11. Using the built-in Windows proxy settings, you can route all your system traffic through TorGuard's secure proxy servers.
What is TorGuard Premium Proxy?
TorGuard's Premium Proxy service provides high-speed HTTP/HTTPS proxy servers with premium bandwidth allocation, dedicated resources, and priority routing for optimal performance.
Premium Bandwidth
Dedicated resources with no throttling or speed limits
HTTPS Encryption
Secure SSL/TLS encryption for all proxy traffic
Global Network
Premium servers in multiple countries worldwide
No Logs Policy
Complete privacy with zero traffic logging
🚀 Benefits of System Proxy on Windows 11:
- System-wide proxy coverage for all applications
- No additional software installation required
- Native Windows 11 integration
- Improved performance vs Windows 10
- Works with all browsers and apps
- Easy to enable/disable as needed
Prerequisites
Before you begin, ensure you have:
- Windows 11 (any edition)
- Active TorGuard Premium Proxy subscription
- TorGuard proxy username and password
- Internet connection
⚠️ Important: This guide is for TorGuard Premium Proxy service. Regular VPN subscriptions use different servers and credentials.
HTTP vs HTTPS Proxy
| Feature | HTTP Proxy | HTTPS Proxy |
|---|---|---|
| Encryption | ❌ None | ✅ SSL/TLS |
| Port | 80 | 443 |
| Security | ⚠️ Basic | ✅ High |
| Speed | ✅ Fastest | ✅ Fast |
| Firewall Bypass | ⚠️ Often blocked | ✅ Excellent |
| Recommendation | Local networks only | ✅ Recommended |
💡 TorGuard Recommends: Always use HTTPS proxy (port 443) for better security and firewall bypass capabilities.
Configuration Steps
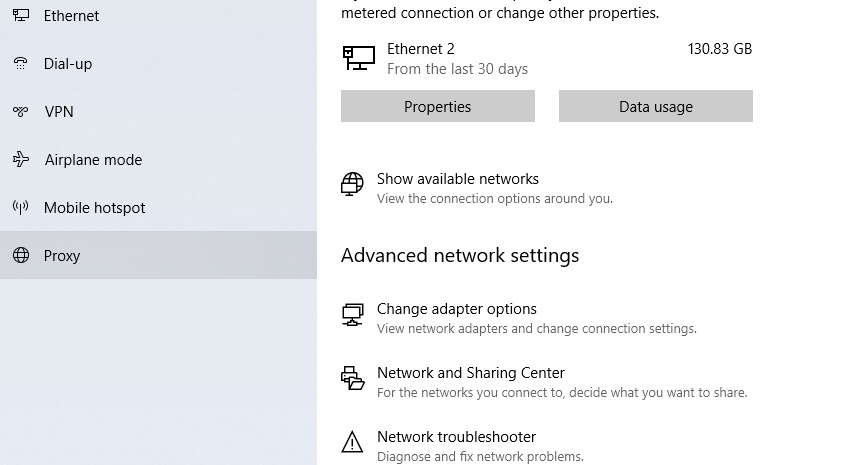
Step 1: Open Proxy Settings
Open Windows taskbar, click the Settings Icon then search for proxy and select Change Manual proxy server settings.

💡 Alternative Methods:
- Press Windows + I → Network & Internet → Proxy
- Right-click Start → Settings → Network & Internet → Proxy
- Search "proxy" in Start menu
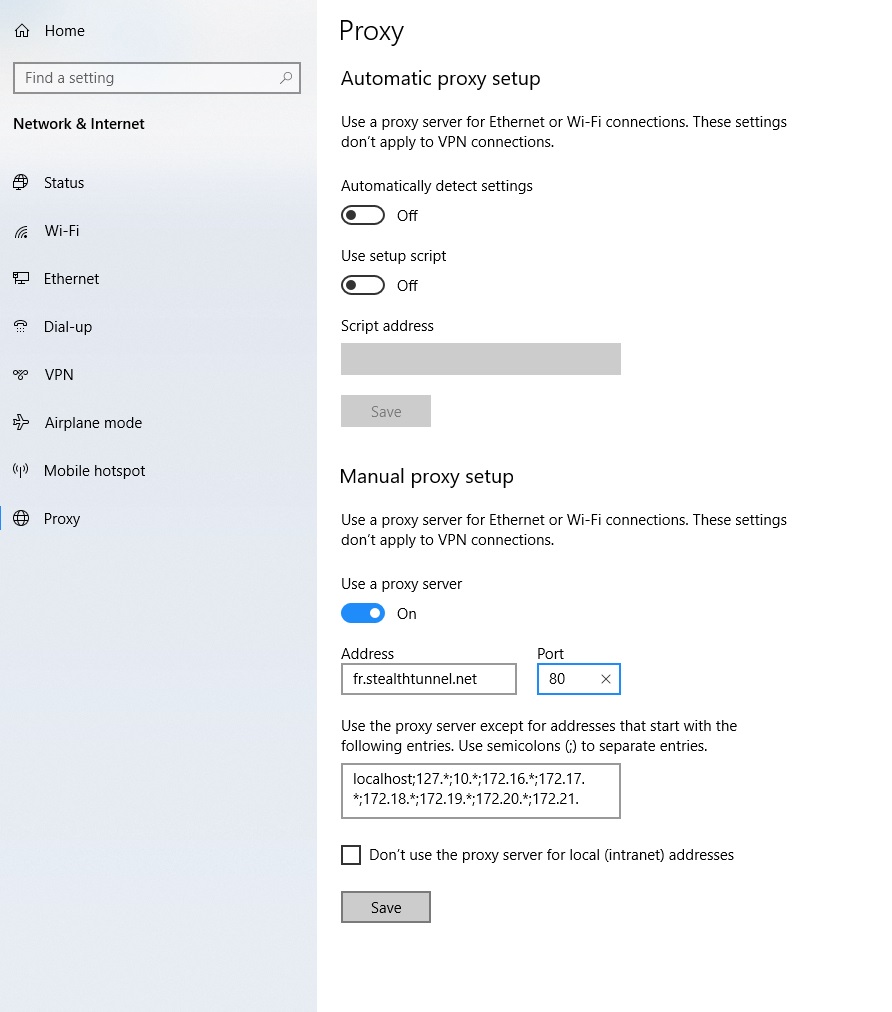
Step 2: Navigate to Proxy Settings
Click Proxy from the left menu.
Step 3: Configure Proxy Server
Toggle "Use a proxy server" to ON and configure using TorGuard's server addresses.
Option A: HTTP Proxy (Port 80)
For basic HTTP proxy, use:
- Address: [country].stealthtunnel.net
- Port: 80
- Example: fr.stealthtunnel.net
Option B: HTTPS Proxy (Port 443) - Recommended
For secure HTTPS proxy, use:
- Address: https://[country].stealthtunnel.net
- Port: 443
- Example: https://fr.stealthtunnel.net
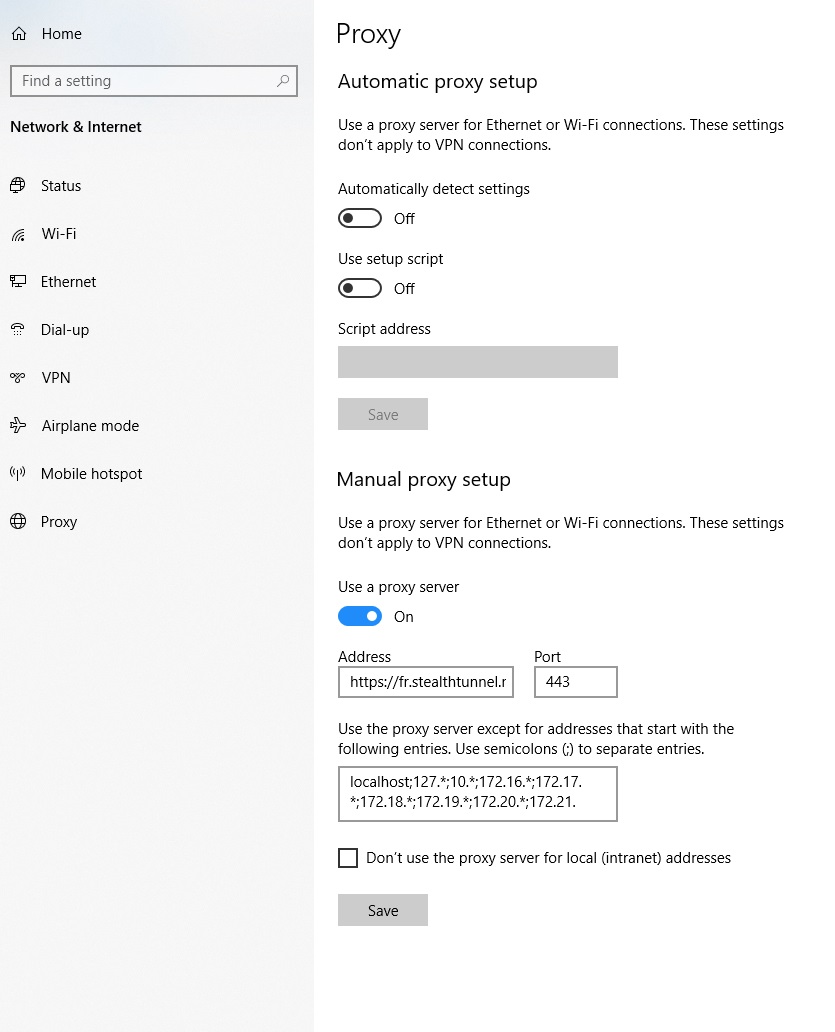
⚠️ Important for HTTPS: You must add https:// before the address to tell Windows to use HTTPS protocol.
📍 Available Servers: Find the complete list of Premium Proxy servers at torguard.net/proxynetwork
Step 4: Enter Credentials
Click Save, then browse to any website. Windows will prompt you to enter your TorGuard Premium Proxy username and password.
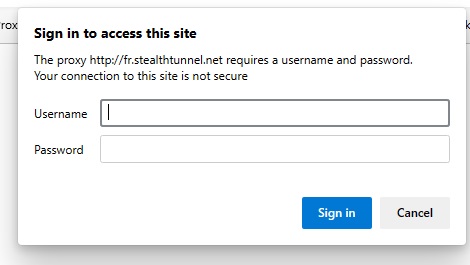
🔑 Credential Management: Not sure of your proxy credentials? They can be managed at torguard.net/managecredentials.php
💡 Windows 11 Tip: Windows 11 better handles credential storage. Check "Remember my credentials" to avoid re-entering them.
Step 5: Verify Connection
Browse to TorGuard's What's My IP page and confirm your IP has changed.
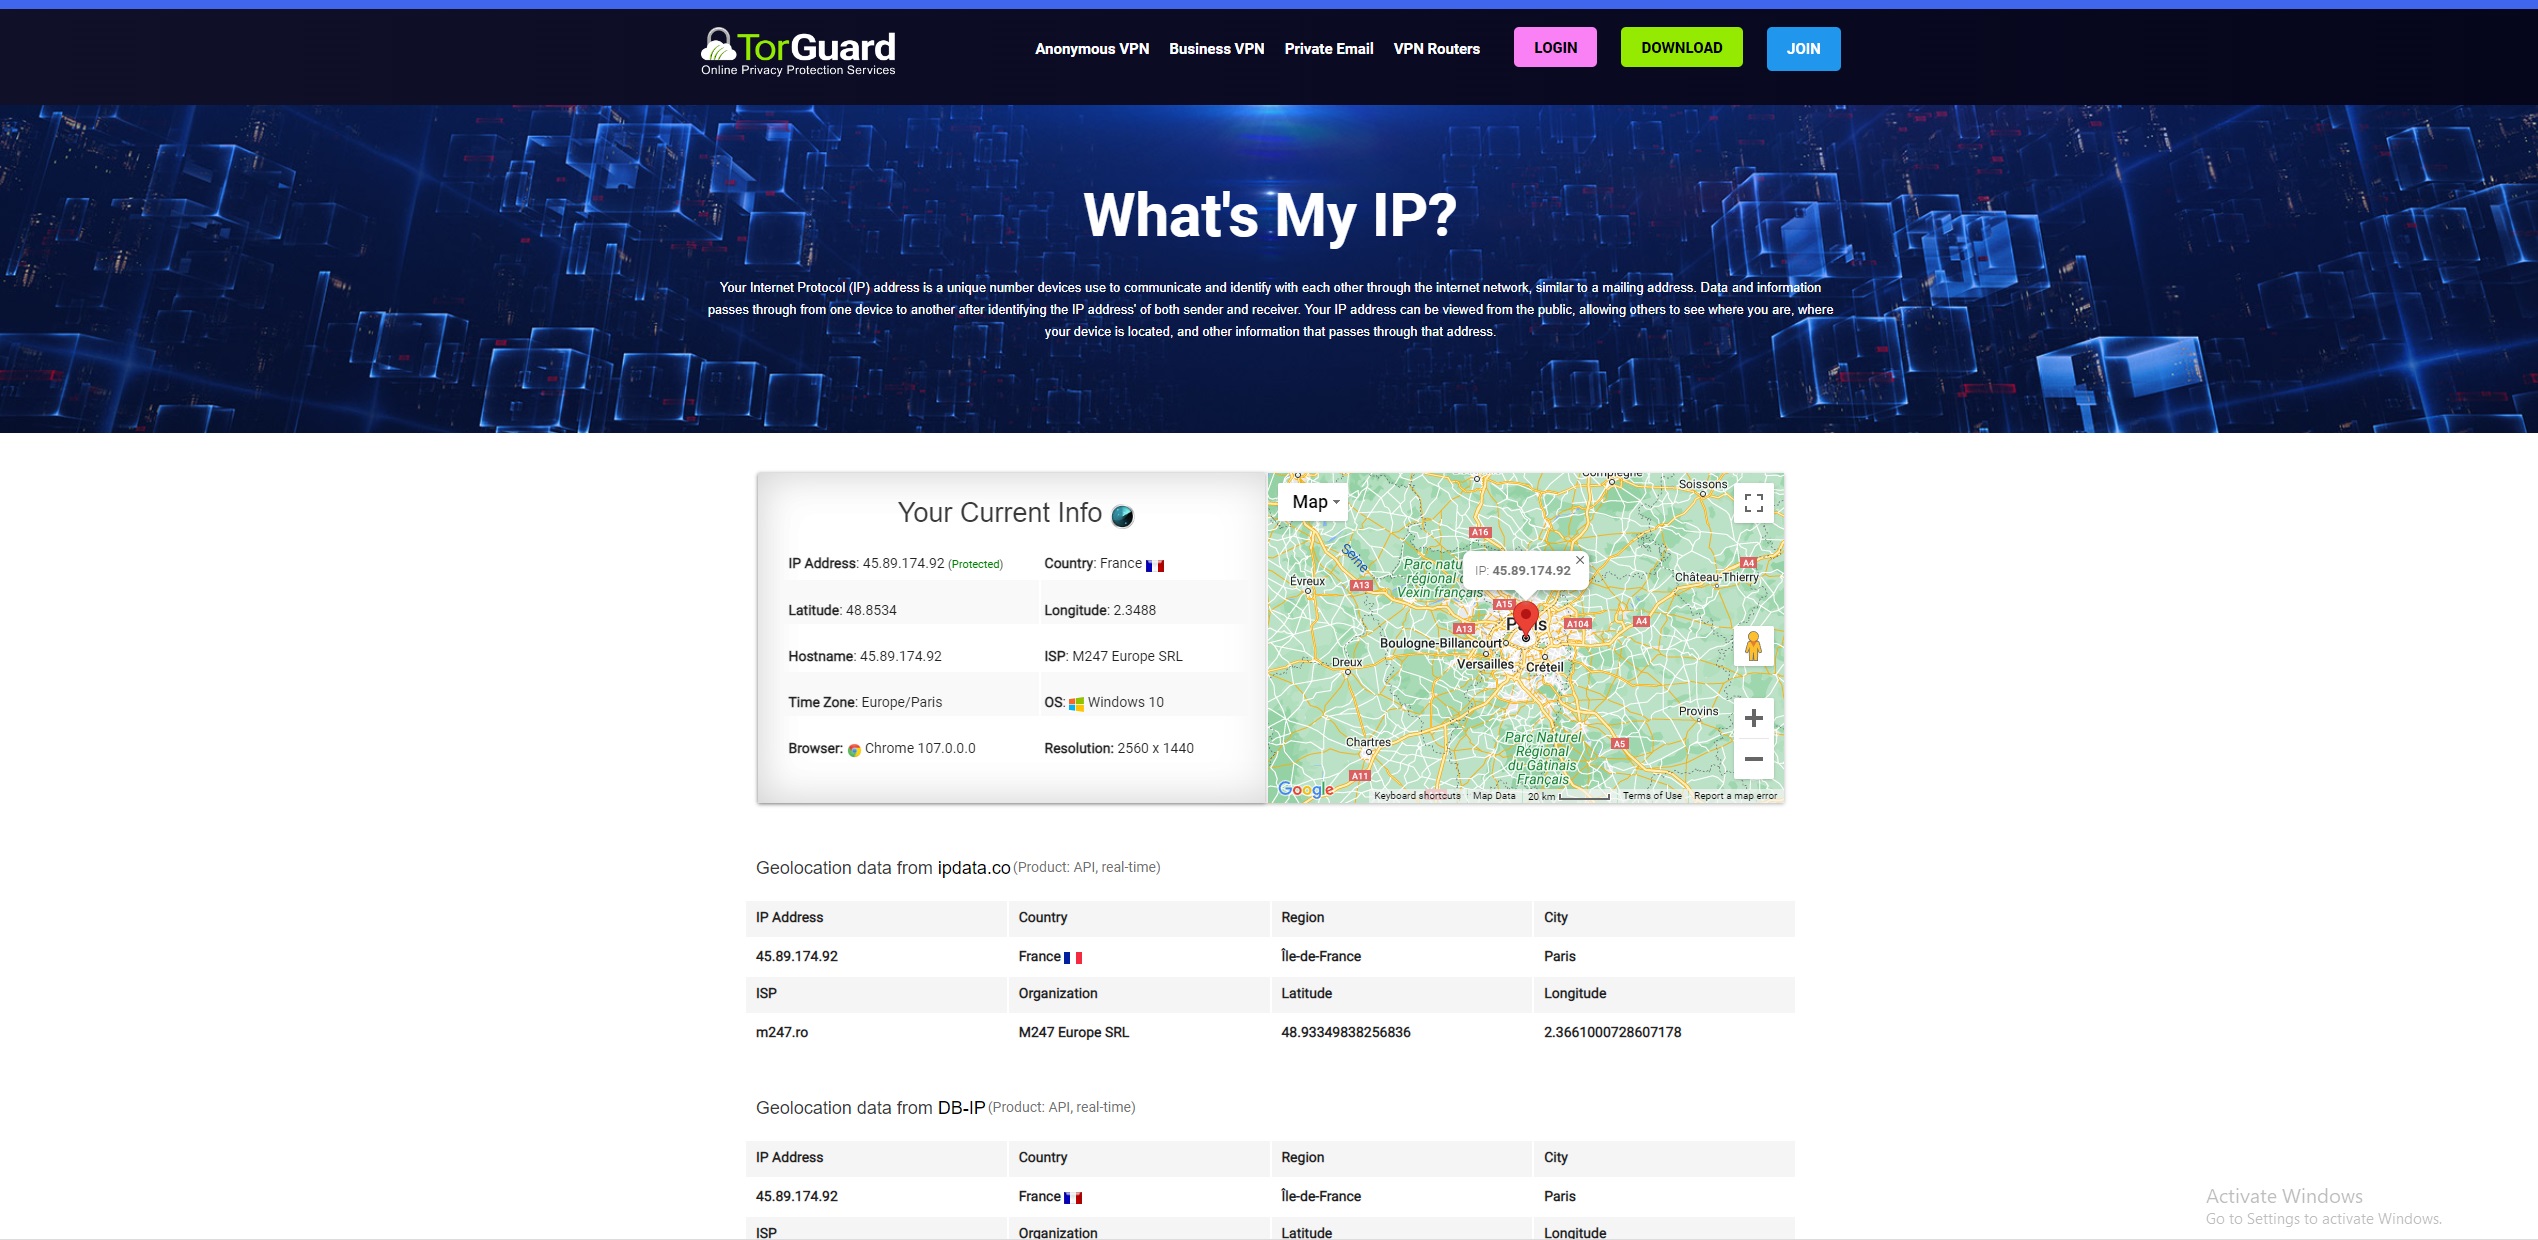
✅ Success! If you see a different IP address and location, your proxy is working correctly.
Windows 11 Specific Features
🎨 New Settings Interface
Windows 11 provides a cleaner, more intuitive settings interface:
- Improved search functionality
- Better organized network settings
- Quick toggle switches
- Modern UI with better accessibility
🔒 Enhanced Security
Windows 11 includes improved proxy security features:
- Better credential management
- Enhanced encryption support
- Improved certificate handling
- Secure DNS over HTTPS support
⚡ Performance Improvements
- Faster proxy connection establishment
- Better memory management
- Improved network stack
- Optimized for modern hardware
Advanced Configuration
🔧 Proxy Exceptions
Configure addresses that should bypass the proxy:
- In proxy settings, find "Use the proxy server except for addresses that start with"
- Add local addresses:
localhost;127.0.0.1;192.168.* - Add specific domains:
*.local;*.mycompany.com - Windows 11 supports more complex patterns
📋 Quick Settings Access
Windows 11 quick access methods:
- Pin proxy settings to Start menu
- Add to Quick Settings panel
- Use Windows Terminal for command-line config
- Create desktop shortcut:
ms-settings:network-proxy
🌐 Multiple Proxy Profiles
For quick switching between servers:
- Use PowerShell scripts for different servers
- Create batch files for quick switching
- Use third-party proxy managers
- Set up browser-specific proxies
PowerShell Commands for Windows 11
Manage proxy settings via PowerShell or Windows Terminal:
# Enable proxy
netsh winhttp set proxy "https://fr.stealthtunnel.net:443"

# View current proxy settings
netsh winhttp show proxy

# Reset proxy settings
netsh winhttp reset proxy

# Set proxy with exceptions
netsh winhttp set proxy "https://fr.stealthtunnel.net:443" bypass-list="*.local;localhost"

# Windows 11 specific - Set system proxy via Registry
Set-ItemProperty -Path 'HKCU:\Software\Microsoft\Windows\CurrentVersion\Internet Settings' -Name ProxyEnable -Value 1
Set-ItemProperty -Path 'HKCU:\Software\Microsoft\Windows\CurrentVersion\Internet Settings' -Name ProxyServer -Value "https://fr.stealthtunnel.net:443"
Troubleshooting Common Issues
Authentication Keeps Failing
Solution:
- Verify you're using Premium Proxy credentials (not VPN)
- Check credentials at managecredentials.php
- Clear saved credentials: Settings → Accounts → Sign-in options → Manage passwords
- Try Windows Credential Manager cleanup
- Disable and re-enable proxy settings
Microsoft Store Not Working
Solution:
- Add Microsoft domains to proxy exceptions
- Exception list:
*.microsoft.com;*.windows.com;*.live.com - Temporarily disable proxy for Store updates
- Use WSReset.exe to clear Store cache
Slow Connection Speed
Solution:
- Switch to server closer to your location
- Enable Windows 11 network optimizations
- Check for background Windows updates
- Disable proxy for local resources
- Try different ports or protocols
Windows 11 Apps Not Using Proxy
Solution:
- Some UWP apps ignore system proxy
- Check app-specific network settings
- Use Windows Firewall to force proxy usage
- Consider VPN for full app coverage
- Check if app has built-in proxy settings
Security Best Practices
🔐 Connection Security
- Always use HTTPS proxy when possible
- Verify proxy is active before sensitive browsing
- Check for DNS leaks
- Use HTTPS websites
🛡️ Windows 11 Security
- Enable Windows Security features
- Use Windows Hello for authentication
- Keep Windows 11 updated
- Enable Secure Boot
💻 Account Security
- Use strong proxy password
- Enable 2FA on TorGuard account
- Don't share credentials
- Regularly review account activity
🌐 Privacy Enhancement
- Configure Windows 11 privacy settings
- Disable telemetry where possible
- Use privacy-focused browsers
- Clear browsing data regularly
Summary
You've successfully configured TorGuard Premium HTTP/HTTPS proxy on Windows 11! This setup provides:
- ✅ System-wide proxy coverage
- ✅ Premium bandwidth and speed
- ✅ Secure HTTPS encryption option
- ✅ Native Windows 11 integration
- ✅ Enhanced security features
- ✅ Modern, intuitive interface