- Windows VPN Setup
- Mac OS VPN Setup
- Linux VPN Setup
- Android VPN Setup
- iOS VPN Setup
- Chrome Extension
- Firefox Extension
How to setup the TorGuard VPN client on Windows
We recommend you remove all current VPN apps when installing the TorGuard Client to prevent conflict.
STEP 1:
Download TorGuard Client and run the installer.STEP 2:
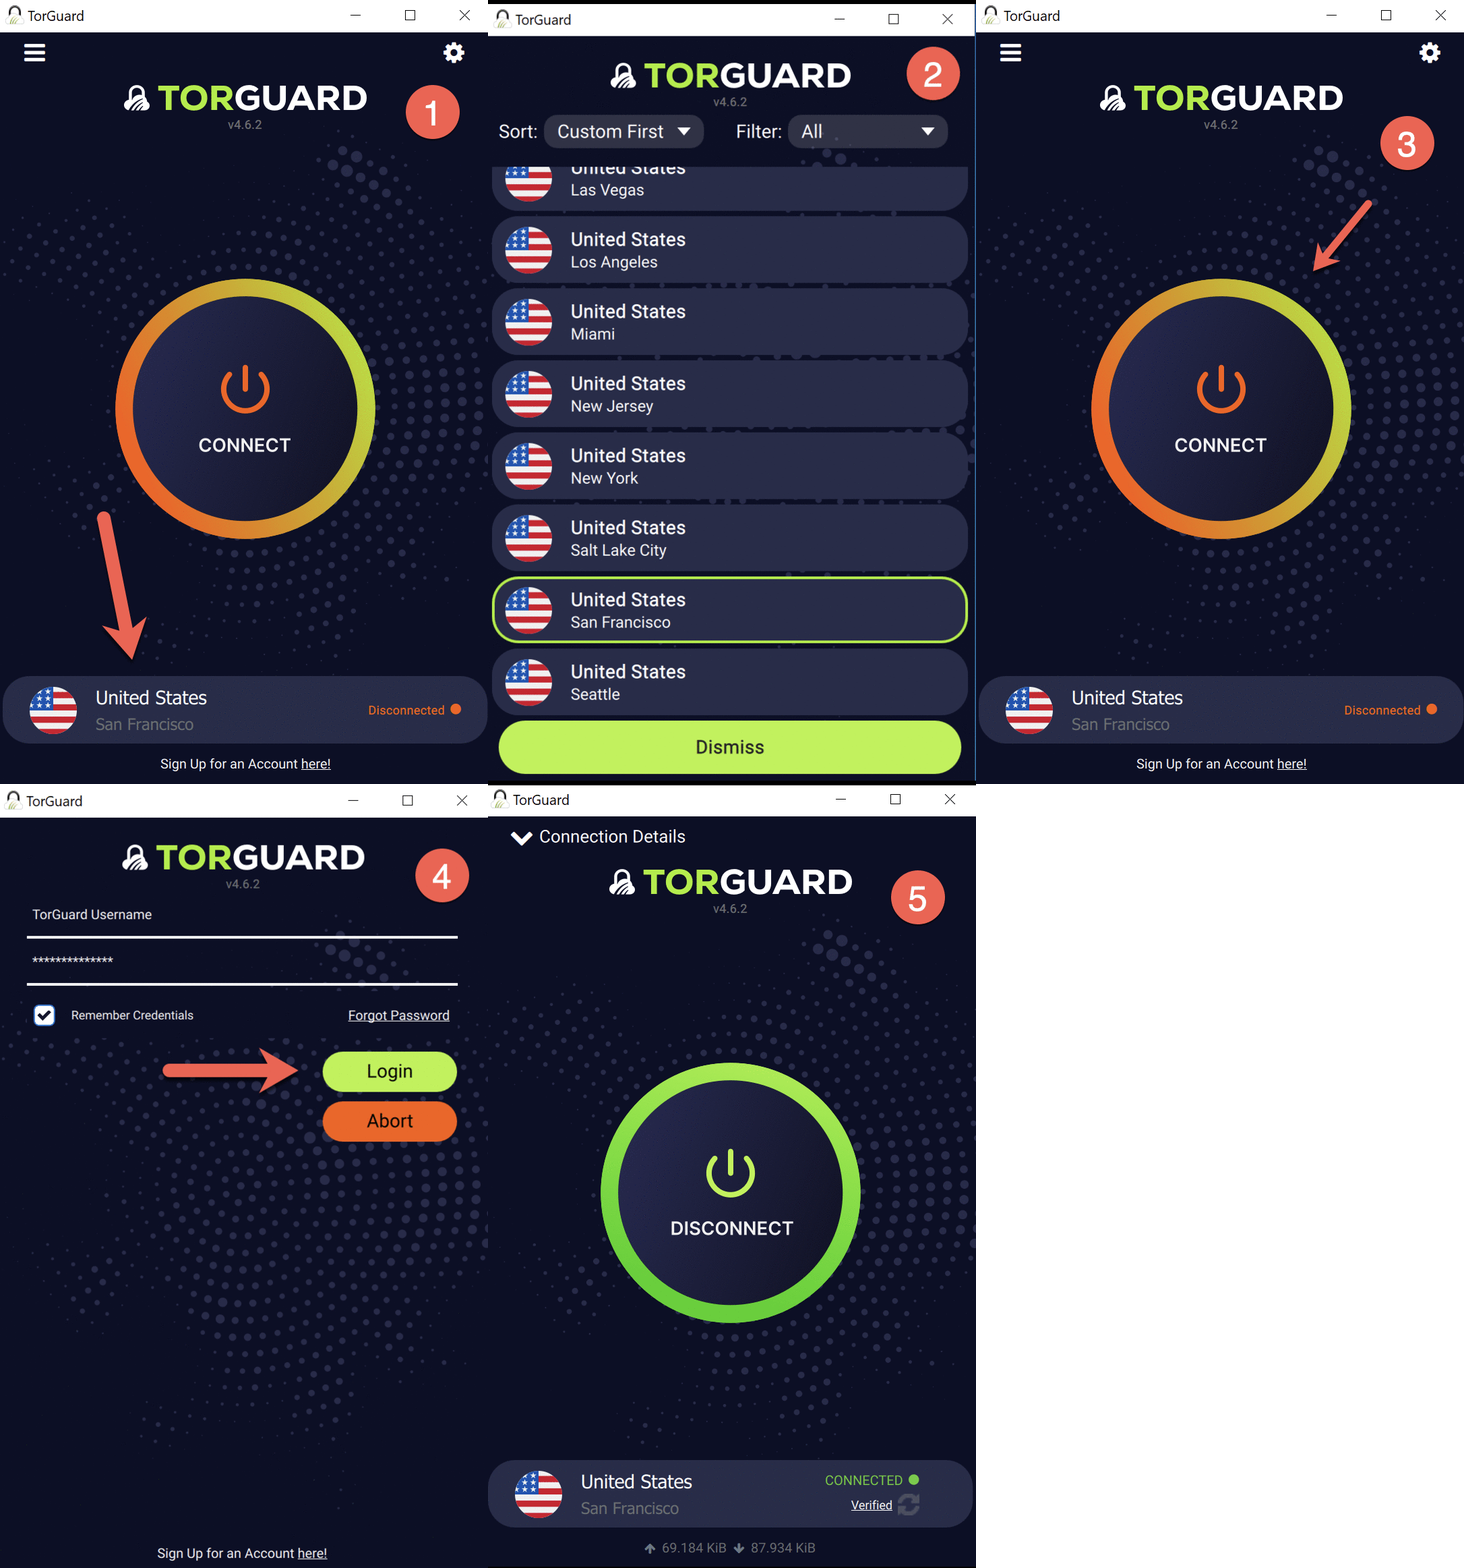
Once installed, click the bottom location name to chose a location you wish to connect with.STEP 3:
Now click Connect to connect to your chosen location.For speed, try to select the closest location to you, also try switch between Tunnel Types and Protocols: TCP/UDP to see what works best for you.
STEP 4:
It should then try connect you to the VPN - once you see a "Connected" status it should then read next to the location name "Verified" (this can take a few seconds or more to verify). This means you are 100% connected and secured.STEP 5:
To Disconnect just hit the Disconnect button.How to setup the TorGuard VPN client on Mac OS
We recommend you remove all current VPN apps when installing the TorGuard Client to prevent conflict.
STEP 1:
Download TorGuard Client and run the installer.STEP 2:
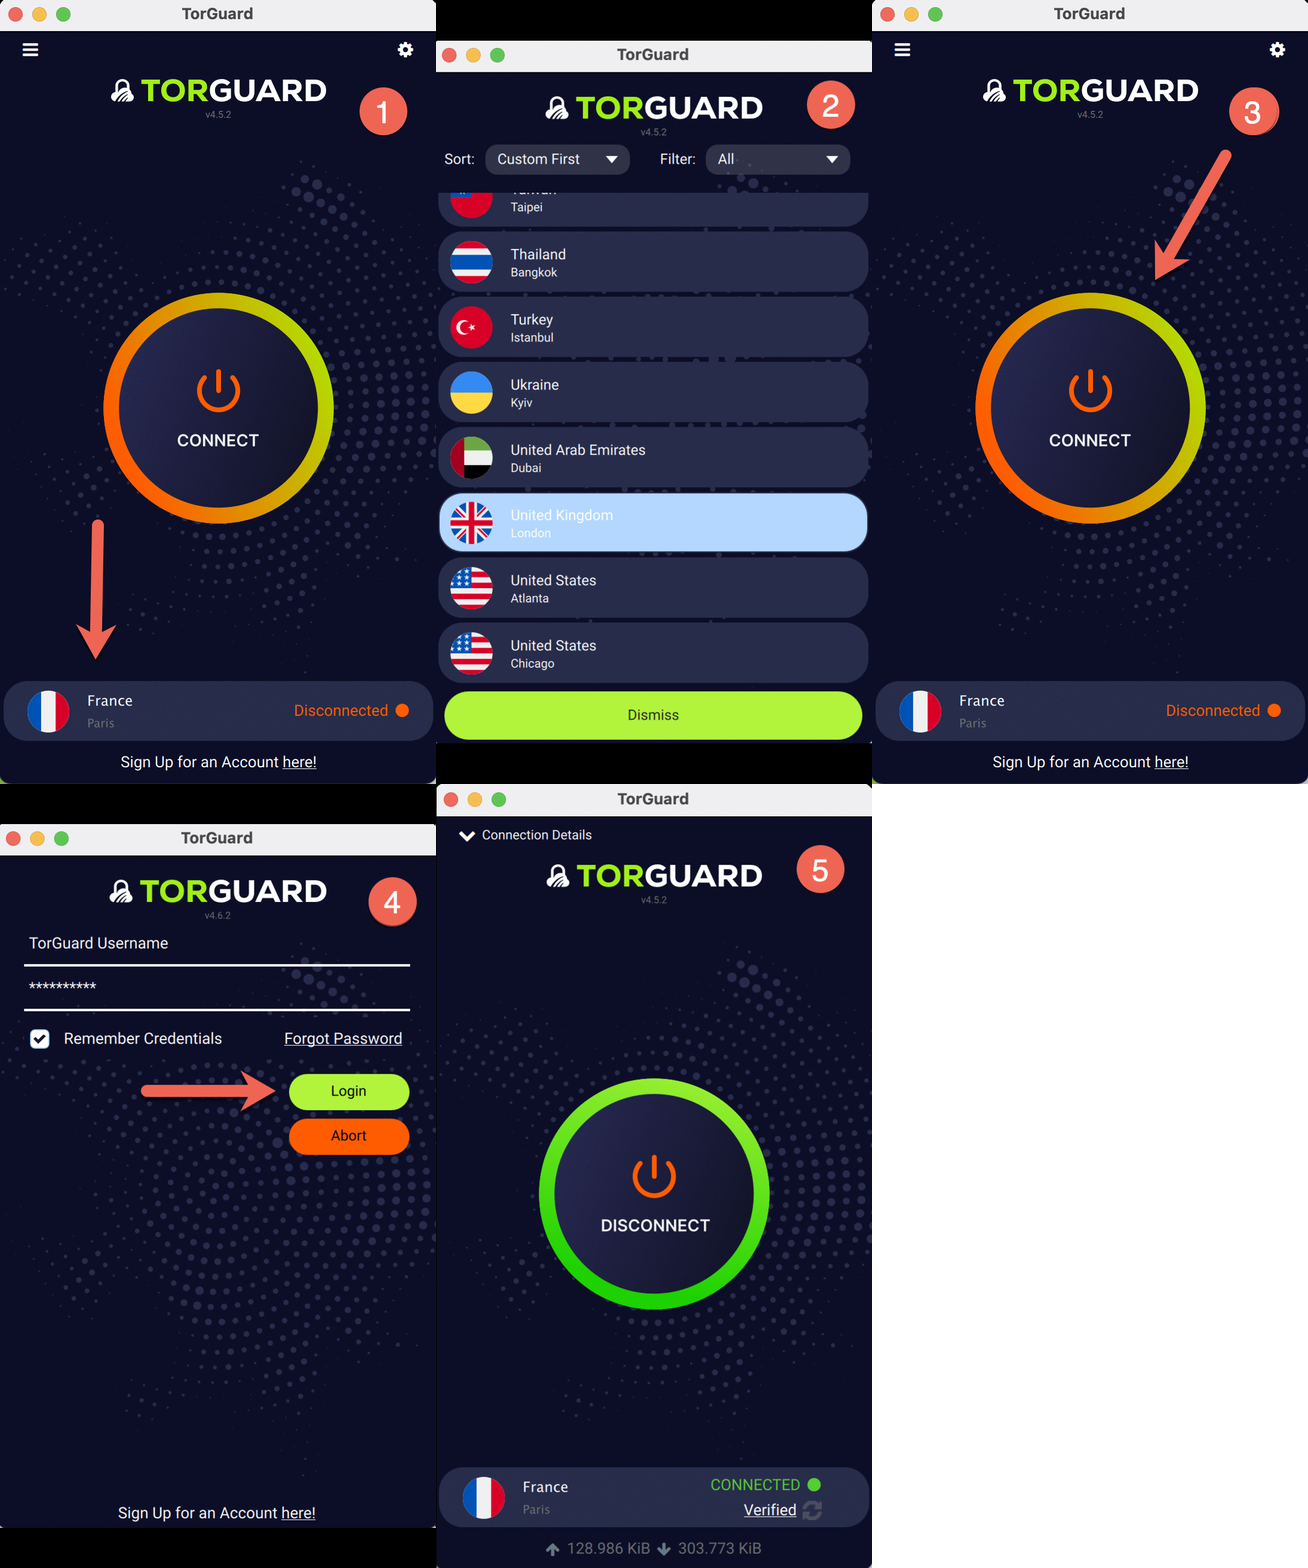
Once installed, click the bottom location name to chose a location you wish to connect with.STEP 3:
Now click Connect to connect to your chosen location.For speed, try to select the closest location to you, also try switch between Tunnel Types and Protocols: TCP/UDP to see what works best for you.
STEP 4:
It should then try connect you to the VPN - once you see a "Connected" status it should then read next to the location name "Verified" (this can take a few seconds or more to verify). This means you are 100% connected and secured.STEP 5:
To Disconnect just hit the Disconnect button.How to setup the TorGuard VPN Client in Debian
STEP 1:
Download the latest build for your OS, it may prompt you to open with "Software Install (default)" click OK, alternatively open up terminal and run the below commands to download the package you need:
cd Downloads
wget https://updates.torguard.biz/Software/Linux/torguard-latest-amd64.deb
STEP 2:
The Ubuntu software installer should appear click "Install", it will prompt to authenticate, enter your OS account password, alternatively follow below if you downloaded the above packages
cd Downloads
sudo dpkg -i torguard-latest-amd64.deb
STEP 3:
Click the dash home icon in the top left of the screen and search for TorGuard. Click the TorGuard VPN client option. This launches the TorGuard VPN Client, you may need to enter your OS account password again.
STEP 4:
Once installed, you will see Tunnel Type, Protocol, Port / Auth and Cipher are set to give you a good balance between security and performance.You can change these values as needed but bear in mind perfromance can be affected when you select higher levels of encryption, you may want to change UDP to TCP as UDP is often filtered on some networks, this normally causes a "Wait" status.
STEP 5:
Now click "Select Server..." and choose your desired location.STEP 6:
Click Connect - it will then prompt you for your VPN service username and password and make sure to check "Remember Credentials" so you don't need to keep typing those in.
STEP 7:
It should then try connect you to the VPN - once you see a "Connected" status it should then read directly below it "Verified" this means you are 100% connected and secured. STEP 8:
To Disconnect just hit the Disconnect button at the bottom of the "Connected" window.How to Connect to the TorGuard Android App
STEP 1:
First, on your Android device navigate to Google Play and search for TorGuard. Select the Install button.
STEP 2:
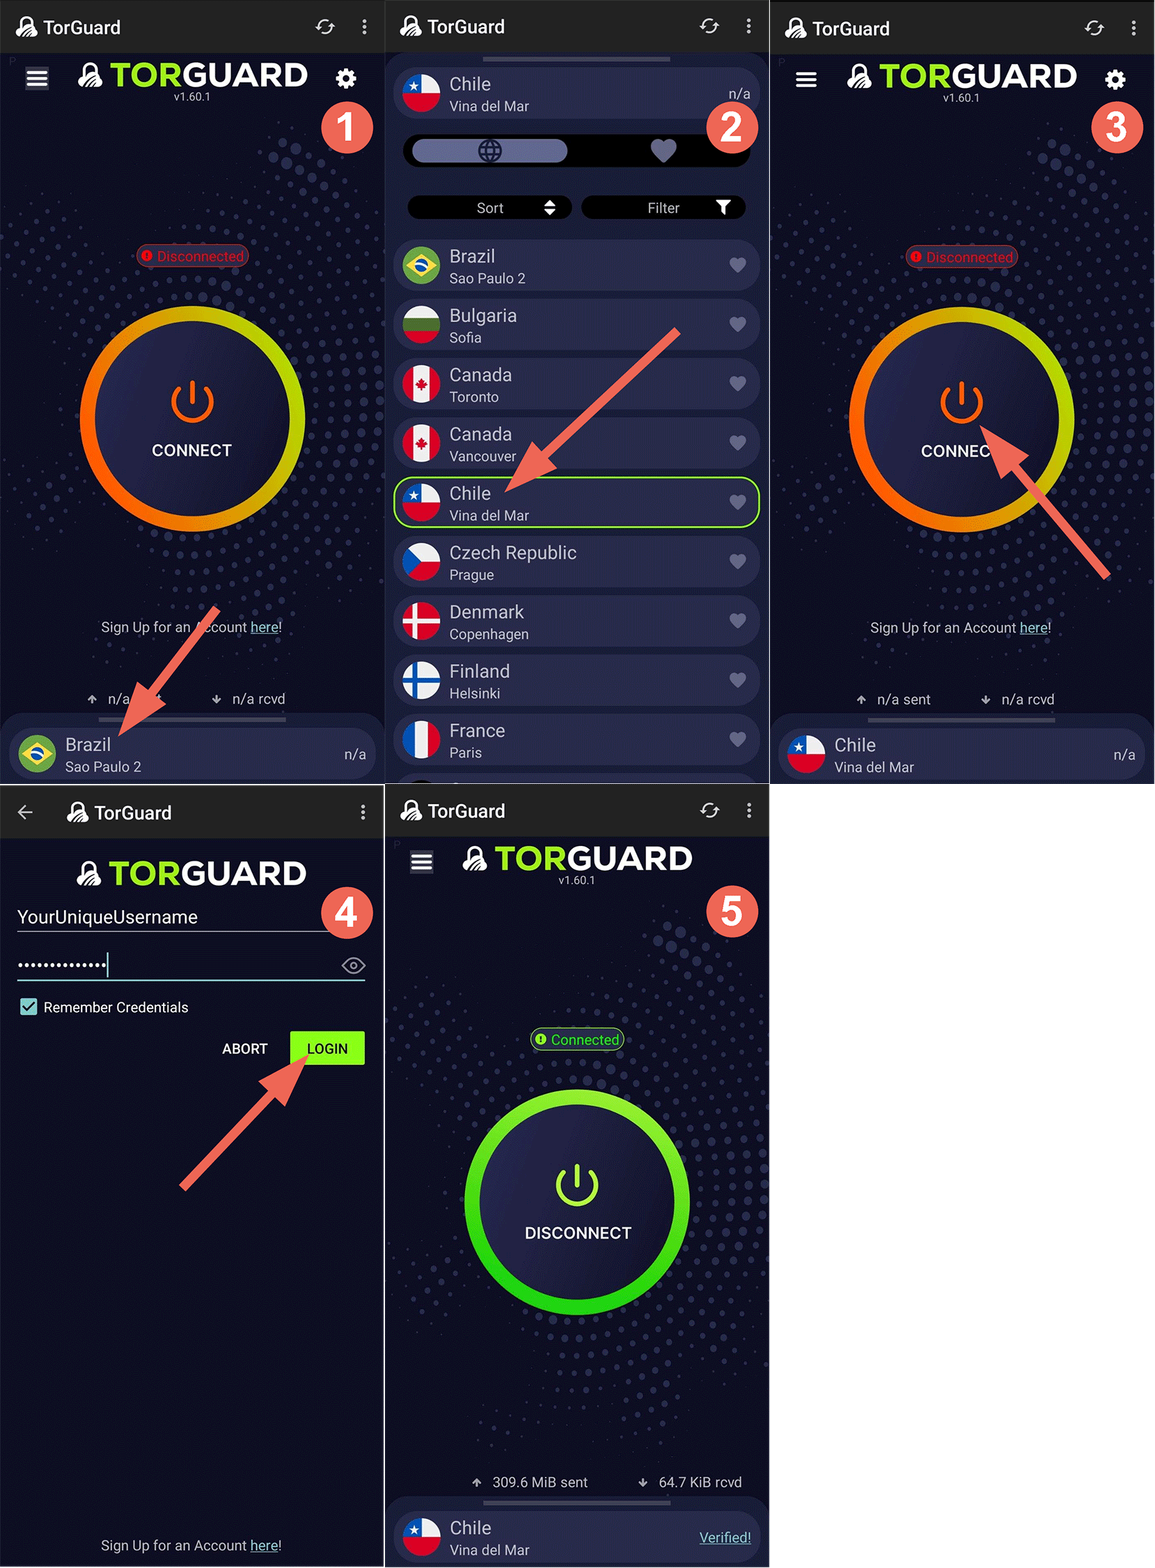
Open your applications menu and tap the newly installed TorGuard icon. Select the VPN server that you wish to connect to by tapping the country name and then tap connect.
STEP 3:
When prompted, enter your VPN Username and Password (you can manage those here) and tap the login button. You should now see a connected status! This means your VPN is active and all traffic is tunneled through the secure server. You can check your IP at the following url https://torguard.net/whats-my-ip.php
STEP 4:
If you need access to the local LAN when connected to VPN please tap the top right hand corner menu and then settings, here you would check the "LAN bypass" option.
STEP 5:
On occasion you may be on a Wifi hotspot, work network or restrictive mobile ISP that are sometimes likely to block access to our hostnames, to prevent this please tap the mnu on top right hand corner and then settings, tap "Server IP Lookup" and check "Use Direct IP".

How to Connect to the TorGuard iOS App
STEP 1:
First, visit the App Store and download and install the TorGuard iOS app.STEP 2:
Locate the TorGuard icon and tap to launchSTEP 3:
On the first screen click the Login button.STEP 4:
You will be asked how you made your purchase, if you purchased through the website tap this option, if you signedup through the iOS app tap the TorGuard iOS app option.STEP 5:
Enter your TorGuard VPN username and password when prompted and tap "Log in".STEP 6:
Tap "Chose your location" at the bottom of your screen and select your preferred location.STEP 7:
You will be asked to allow this VPN configuration, click Allow to continue.STEP 8:
Tap connect to connect to the VPN, once it shows as "Connected" check your IP has changed here.How to setup the TorGuard's Chrome Browser Extension
It's important to know that a browser extension will only protect traffic contained within your browser - it will not protect software outside the browser or your operating system.
STEP 1:
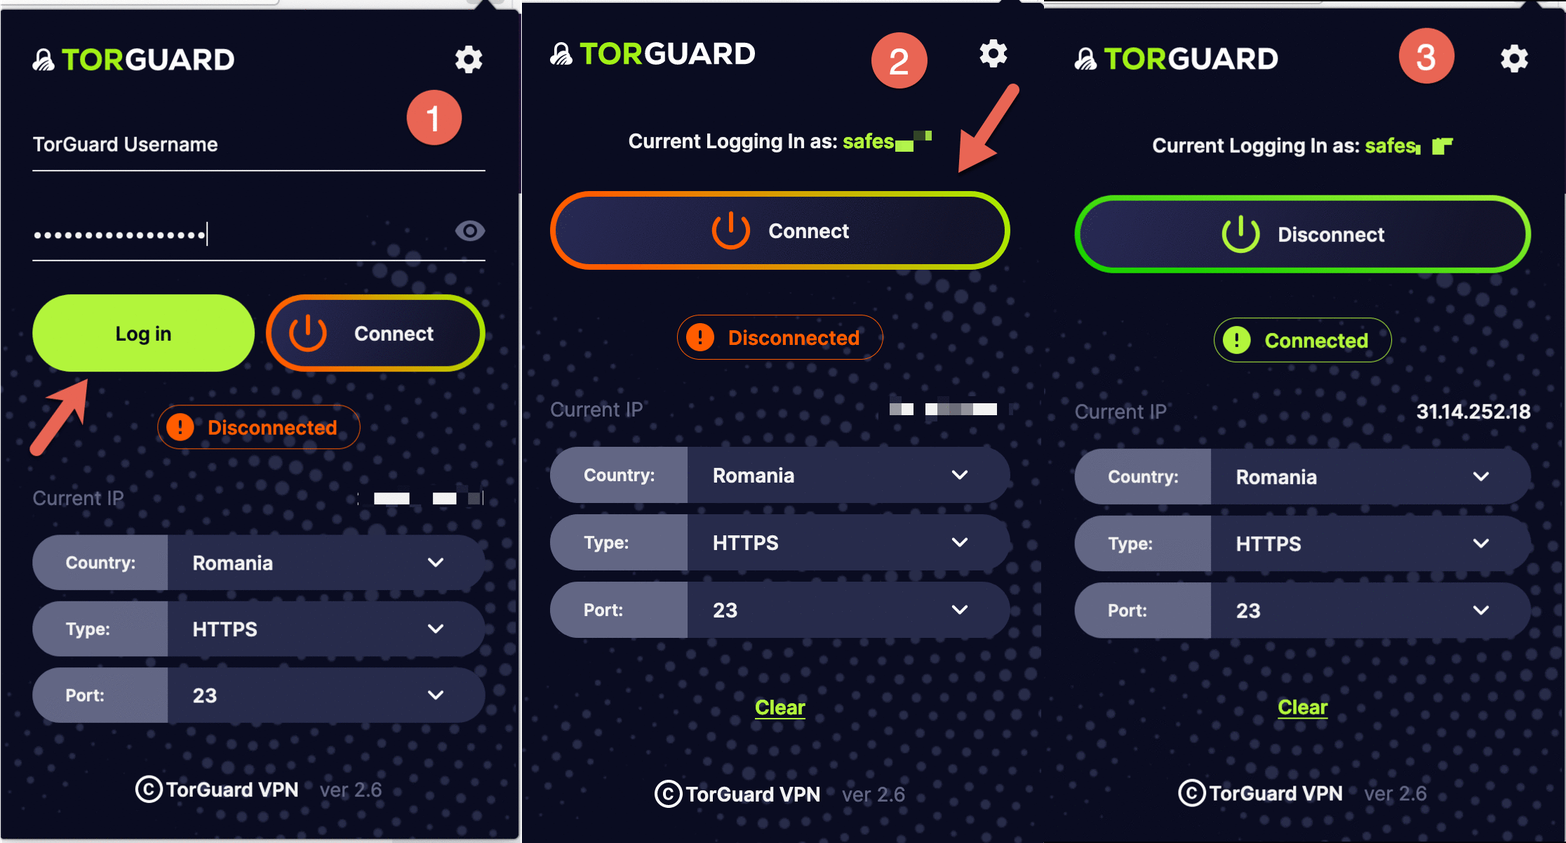
Using the Chrome browser visit the webstore at following URL: Chrome Extension - click "Add to Chrome" to install the extension.STEP 2:
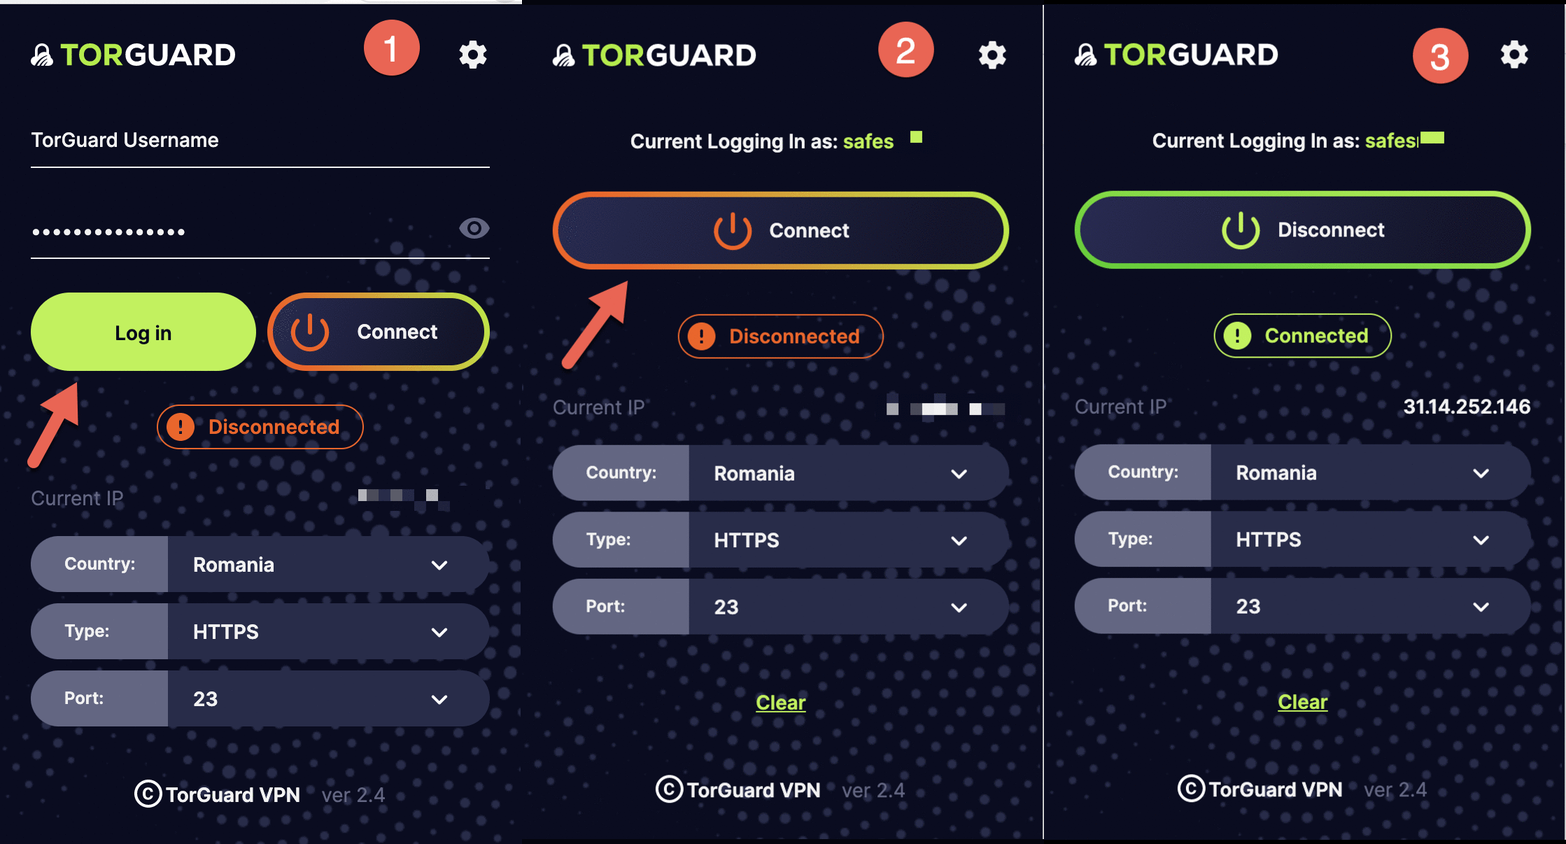
Once installed, you will see the TorGuard icon on the top right hand corner of your address bar - click it to produce the extensions interface and enter your credentials - then hit Login.STEP 3:
Now click the "Country" menu and choose your desired location - you can also select your proxy type or port based on your needs.STEP 4:
Click Connect - your status should change to "Connected".STEP 5:
To Disconnect just hit the Disconnect button.How to setup the TorGuard Firefox Browser Extension
It's important to know that a browser extension will only protect traffic contained within your browser - it will not protect software outside the browser or your operating system.
STEP 1:
Using the Firefox browser visit the Mozilla store at the following URL: Firefox Extension - click "Add to Firefox" to install the extension.
STEP 2:
Once installed, you will see the TorGuard icon on the top right hand corner of your address bar - click it to produce the extensions interface and enter your credentials - then hit Login.STEP 3:
Now click the "Country" menu and choose your desired location - you can also select your proxy type or port based on your needs.


 Cryptocurrency

