Windows Vista allows manual DNS configuration to improve privacy and bypass ISP restrictions. However, it's crucial to understand that Vista is no longer supported by Microsoft, creating significant security risks for users still running this operating system.
⚠️ Windows Vista End of Life Warning
Windows Vista support ended April 11, 2017! This means:
- ❌ No security updates for 8+ years
- ❌ Unpatched vulnerabilities accumulating
- ❌ No protection against modern threats
- ❌ Incompatible with current software
- ❌ Limited antivirus support
Strongly recommend upgrading to Windows 10 or 11 for security!
Vista vs Modern Windows
| Feature | Windows Vista | Windows 10/11 | Risk Level |
|---|---|---|---|
| Security Updates | Ended 2017 | Active | 🔴 Critical |
| Browser Support | Obsolete browsers | Modern browsers | 🔴 Critical |
| DNS over HTTPS | Not supported | Supported | 🟠 High |
| Malware Protection | Limited | Windows Defender | 🔴 Critical |
Recommended DNS Providers
| Provider | Primary DNS | Secondary DNS | Features | Vista Compatible |
|---|---|---|---|---|
| TorGuard | 10.8.0.1 | 10.8.0.2 | VPN users only | ✅ (with VPN) |
| Quad9 | 9.9.9.9 | 149.112.112.112 | Malware blocking | ✅ |
| Cloudflare | 1.1.1.1 | 1.0.0.1 | Fast, private | ✅ |
| OpenDNS | 208.67.222.222 | 208.67.220.220 | Content filtering | ✅ |
Step-by-Step DNS Configuration
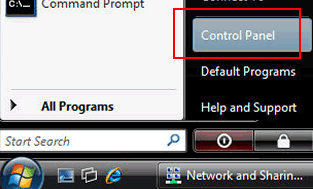
Step 1: Open Control Panel
Go to the Start Menu and click Control Panel:
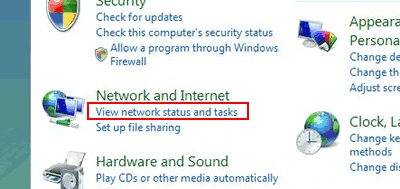
Step 2: Navigate to Network Settings
In Control Panel, under Network and Internet, click View network status and tasks:
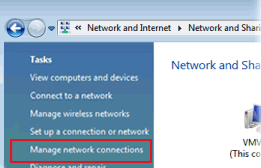
Step 3: Access Your Connection
Click the link next to Connections. This will be:
- Local Area Connection for wired
- Wireless Network Connection for Wi-Fi
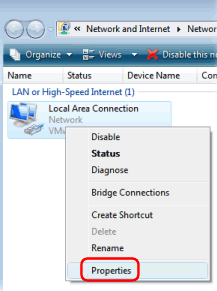
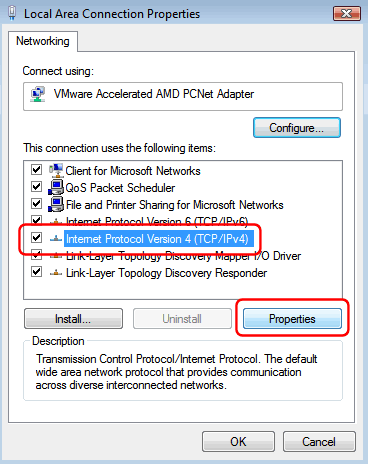
Step 4: Open Connection Properties
In the connection status window, click Properties:
Step 5: Select Internet Protocol Version 4
Select Internet Protocol Version 4 (TCP/IPv4) and click Properties:
Step 6: Configure DNS Servers
Select Use the following DNS server addresses and enter your chosen DNS:
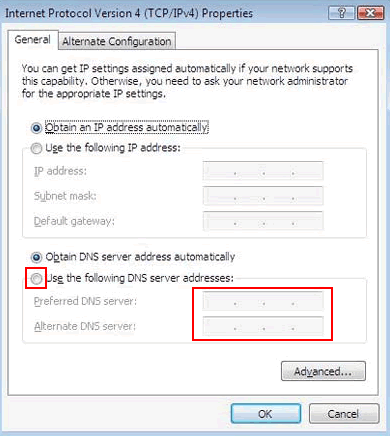
Recommended secure DNS options:
- Quad9 (Malware blocking): 9.9.9.9 and 149.112.112.112
- Cloudflare (Privacy): 1.1.1.1 and 1.0.0.1
- OpenDNS (Filtering): 208.67.222.222 and 208.67.220.220
Step 7: Save Configuration
Click OK in all windows to save your changes.
IPv6 DNS Configuration
Vista supports IPv6. To configure:
- Select Internet Protocol Version 6 (TCP/IPv6)
- Click Properties
- Enter IPv6 DNS servers:
| Provider | Primary IPv6 | Secondary IPv6 |
|---|---|---|
| Quad9 | 2620:fe::fe | 2620:fe::9 |
| Cloudflare | 2606:4700:4700::1111 | 2606:4700:4700::1001 |
Verify DNS Changes
Method 1: Command Prompt
# Open Command Prompt
Start → All Programs → Accessories → Command Prompt

# Check DNS configuration
ipconfig /all

# Test DNS resolution
nslookup google.com
Method 2: Network Diagnostics
- Right-click network icon in system tray
- Select "Diagnose and repair"
- View DNS information in report
Security Measures for Vista
⚠️ Critical Security Steps
Since Vista is unsupported, take these precautions:
- Use DNS with Malware Blocking:
- Quad9 (9.9.9.9) - blocks known threats
- CleanBrowsing Security (185.228.168.9)
- Essential Security Software:
- Antivirus that still supports Vista
- Firewall beyond Windows Firewall
- Anti-malware scanner
- Browser Security:
- Use last supported Firefox ESR
- Avoid Internet Explorer
- Disable unnecessary plugins
- Network Protection:
- Always use VPN when possible
- Avoid sensitive activities (banking)
- Regular malware scans
Vista-Specific DNS Issues
DNS Cache Problems
Vista had known DNS cache issues. Clear regularly:
# Clear DNS cache
ipconfig /flushdns

# Disable DNS cache (temporary)
net stop dnscache
net start dnscache
Slow DNS Resolution
Vista DNS can be slow. Optimize:
- Disable IPv6 if not used
- Use closer DNS servers
- Reduce DNS cache size in registry
Upgrade Options from Vista
| Option | Cost | Difficulty | Hardware Required |
|---|---|---|---|
| Windows 10 | ~$140 | Moderate | 2GB RAM minimum |
| Linux Mint | Free | Easy | Vista hardware OK |
| Ubuntu | Free | Easy | Vista hardware OK |
| Chrome OS Flex | Free | Very Easy | Vista hardware OK |
Vista Security Reality in 2025
📊 Vista Vulnerability Statistics
- 8+ years without security updates
- Hundreds of unpatched vulnerabilities
- No modern browser support
- Limited software compatibility
- Minimal antivirus protection
Migration Checklist
Before abandoning Vista:
- ✅ Backup all important data
- ✅ List installed programs you need
- ✅ Check hardware compatibility with new OS
- ✅ Export browser bookmarks/passwords
- ✅ Save product keys and licenses
- ✅ Create recovery media
Vista DNS Management Tools
Built-in Tools
# View DNS servers
netsh interface ip show dns

# Set DNS via command line
netsh interface ip set dns "Local Area Connection" static 9.9.9.9

# Add secondary DNS
netsh interface ip add dns "Local Area Connection" 149.112.112.112 index=2
Third-party DNS Managers
Some tools still support Vista:
- DNS Jumper (portable)
- QuickSetDNS
- DNS Benchmark
✅ Best Practice for Vista Users
- Use malware-blocking DNS (Quad9)
- Enable Vista firewall + third-party firewall
- Keep critical data backed up daily
- Plan migration to supported OS ASAP
- Avoid sensitive activities online
Need Help Upgrading from Vista?
Our support team can guide you through upgrading to a modern, secure operating system or help secure your Vista installation if upgrade isn't immediately possible.
Get Upgrade Support