Changing DNS servers in Windows 7 can improve your internet speed, privacy, and security by replacing your ISP's default DNS with trusted alternatives. While Windows 7 still functions, it's critical to understand the security implications of using an unsupported operating system.
🚨 Windows 7 End of Life Warning
Windows 7 support ended January 14, 2020! Microsoft no longer provides security updates, leaving your system vulnerable to:
- ❌ Unpatched security vulnerabilities
- ❌ New malware and ransomware attacks
- ❌ Zero-day exploits with no fixes
- ❌ Compatibility issues with modern software
Strongly consider upgrading to Windows 10 or 11 for continued security!
Why Change DNS in Windows 7?
- Privacy: ISP DNS servers log all your browsing activity
- Speed: Public DNS servers often respond faster
- Security: Some DNS providers block malware domains
- Reliability: Avoid ISP DNS outages and errors
- Bypass Censorship: Access blocked websites
Recommended DNS Providers
| Provider | Primary DNS | Secondary DNS | Features | Privacy |
|---|---|---|---|---|
| TorGuard DNS | 10.8.0.1 | 10.8.0.2 | No logs, VPN users only | ⭐⭐⭐⭐⭐ |
| Cloudflare | 1.1.1.1 | 1.0.0.1 | Fastest, malware block option | ⭐⭐⭐⭐ |
| Quad9 | 9.9.9.9 | 149.112.112.112 | Malware blocking | ⭐⭐⭐⭐⭐ |
| OpenDNS | 208.67.222.222 | 208.67.220.220 | Content filtering | ⭐⭐⭐ |
| 8.8.8.8 | 8.8.4.4 | Fast, reliable | ⭐⭐ |
Step-by-Step DNS Configuration
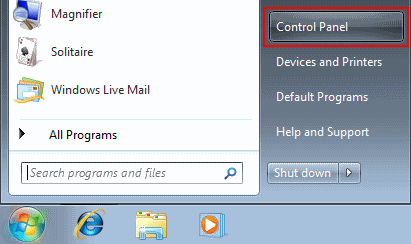
Step 1: Open Control Panel
Click the Start Menu and select Control Panel:
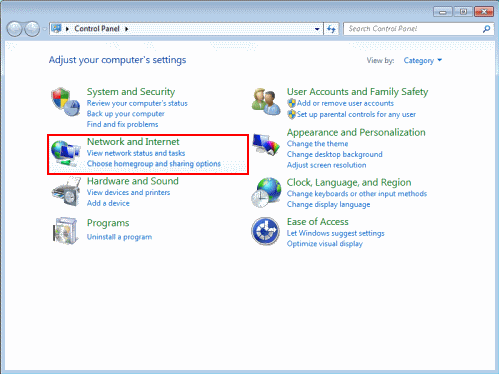
Step 2: Navigate to Network Settings
In Control Panel, under Network and Internet, click View network status and tasks:
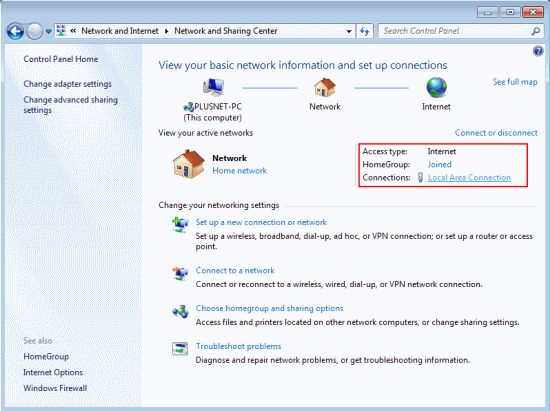
Step 3: Access Your Connection
Click the link next to Connections. This will be:
- Local Area Connection for wired connections
- Wireless Network Connection for Wi-Fi
Step 4: Open Connection Properties
In the connection status window, click Properties:

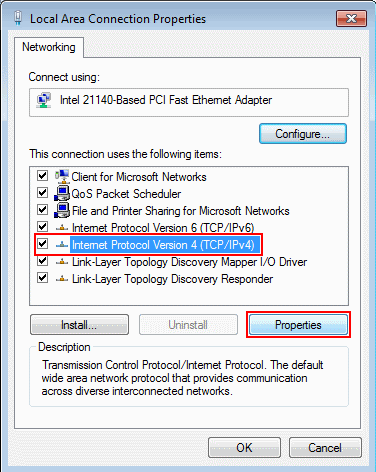
Step 5: Select Internet Protocol Version 4
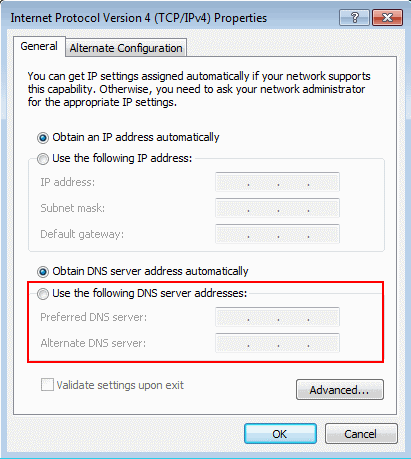
Select Internet Protocol Version 4 (TCP/IPv4) and click Properties:
Step 6: Configure DNS Servers
Select Use the following DNS server addresses and enter your chosen DNS:
Example configurations:
- Cloudflare: 1.1.1.1 and 1.0.0.1
- Quad9: 9.9.9.9 and 149.112.112.112
- OpenDNS: 208.67.222.222 and 208.67.220.220
Step 7: Save Changes
Click OK in all windows to save your changes. DNS changes take effect immediately.
IPv6 DNS Configuration (Optional)
If your network supports IPv6:
- Select Internet Protocol Version 6 (TCP/IPv6)
- Click Properties
- Select Use the following DNS server addresses
- Enter IPv6 DNS servers:
| Provider | Primary IPv6 | Secondary IPv6 |
|---|---|---|
| Cloudflare | 2606:4700:4700::1111 | 2606:4700:4700::1001 |
| Quad9 | 2620:fe::fe | 2620:fe::9 |
| 2001:4860:4860::8888 | 2001:4860:4860::8844 |
Verify DNS Changes
Method 1: Command Prompt
# Open Command Prompt and run:
nslookup google.com

# Check which DNS server responds
# Should show your configured DNS
Method 2: ipconfig
# View current DNS servers
ipconfig /all

# Look for "DNS Servers" under your adapter
Method 3: Online Test
- Visit dnsleaktest.com
- Click "Standard test"
- Verify results show your chosen DNS provider
Clear DNS Cache
After changing DNS, clear the cache to ensure immediate effect:
# Open Command Prompt as Administrator
ipconfig /flushdns

# You should see:
# "Successfully flushed the DNS Resolver Cache."
Multiple Network Adapters
If you have multiple network connections:
- Change DNS for each active adapter
- Prioritize adapters:
- Control Panel → Network Connections
- Press Alt → Advanced → Advanced Settings
- Adjust adapter priority
Troubleshooting DNS Issues
Cannot Access Websites
- Double-check DNS addresses for typos
- Try alternate DNS servers
- Temporarily revert to automatic DNS
- Check firewall isn't blocking DNS (port 53)
Slow DNS Resolution
- Use DNS benchmark tool to find fastest servers
- Try servers geographically closer to you
- Disable IPv6 if not properly configured
DNS Reverts to Automatic
- Some antivirus software may override DNS
- Group Policy might enforce DNS settings
- Malware can hijack DNS settings
DNS with VPN
✅ Best Practice: VPN + Custom DNS
When using TorGuard VPN:
- VPN automatically uses TorGuard DNS (10.8.0.1)
- This prevents DNS leaks
- No manual DNS configuration needed
- Test for leaks at ipleak.net
Windows 7 Security Hardening
Since Windows 7 is unsupported, take extra precautions:
- Use Secure DNS: Choose providers with malware blocking
- Enable Firewall: Windows Firewall + third-party option
- Antivirus Essential: Use updated antivirus that still supports Win7
- Browser Security: Use modern browsers with security updates
- VPN Protection: Encrypt all traffic with VPN
- Regular Backups: Prepare for potential security incidents
Alternative DNS Configuration Methods
Method 1: netsh Command
# Set DNS via command line (run as admin)
netsh interface ip set dns "Local Area Connection" static 1.1.1.1
netsh interface ip add dns "Local Area Connection" 1.0.0.1 index=2
Method 2: Router-Level DNS
Configure DNS on your router instead:
- Affects all devices on network
- No per-device configuration needed
- Survives Windows reinstalls
DNS Provider Details
Privacy-Focused Options
- Quad9: Non-profit, blocks malware, Swiss privacy laws
- Cloudflare: Promises to delete logs within 24 hours
- NextDNS: Customizable filtering, analytics
Family-Safe DNS
- CleanBrowsing: 185.228.168.9 (family filter)
- OpenDNS Family: 208.67.222.123
- Cloudflare Family: 1.1.1.3
⚠️ Final Windows 7 Warning
While changing DNS improves privacy, it doesn't fix Windows 7's fundamental security issues. Consider:
- Upgrading to Windows 10/11
- Switching to Linux for better security
- Using Windows 7 only offline or in isolated environments
Need DNS or Upgrade Help?
Our support team can assist with DNS configuration, VPN setup for Windows 7, or guidance on upgrading to a secure operating system.
Get Support