L2TP/IPsec provides a significant security upgrade over PPTP while maintaining broad compatibility. This protocol combines L2TP (Layer 2 Tunneling Protocol) with IPsec encryption, offering reasonable security for general use. While not as feature-rich as OpenVPN or as fast as WireGuard, L2TP/IPsec works natively on Windows 10 without additional software.
📊 L2TP/IPsec Quick Facts
- Security: Good - Uses AES-256 encryption
- Speed: Moderate - IPsec overhead affects performance
- Compatibility: Excellent - Built into Windows
- Best For: Users needing built-in VPN support
- Avoid For: Maximum security or speed requirements
VPN Protocol Comparison
| Protocol | Security | Speed | Setup Ease | Recommendation |
|---|---|---|---|---|
| WireGuard | ⭐⭐⭐⭐⭐ | ⭐⭐⭐⭐⭐ | ⭐⭐⭐⭐ | Best Overall |
| OpenVPN | ⭐⭐⭐⭐⭐ | ⭐⭐⭐⭐ | ⭐⭐⭐ | Most Secure |
| L2TP/IPsec | ⭐⭐⭐⭐ | ⭐⭐⭐ | ⭐⭐⭐⭐⭐ | Good Balance |
| IKEv2 | ⭐⭐⭐⭐ | ⭐⭐⭐⭐ | ⭐⭐⭐⭐ | Mobile Users |
| ❌ | ⭐⭐⭐⭐⭐ | ⭐⭐⭐⭐⭐ | Never Use |
Prerequisites
- Windows 10 (any version)
- TorGuard VPN account
- Internet connection
- Admin rights on computer
- UDP ports 500 and 4500 not blocked
Step 1: Open Network Settings
Right-click the network icon in your system tray and select "Open Network & Internet settings":

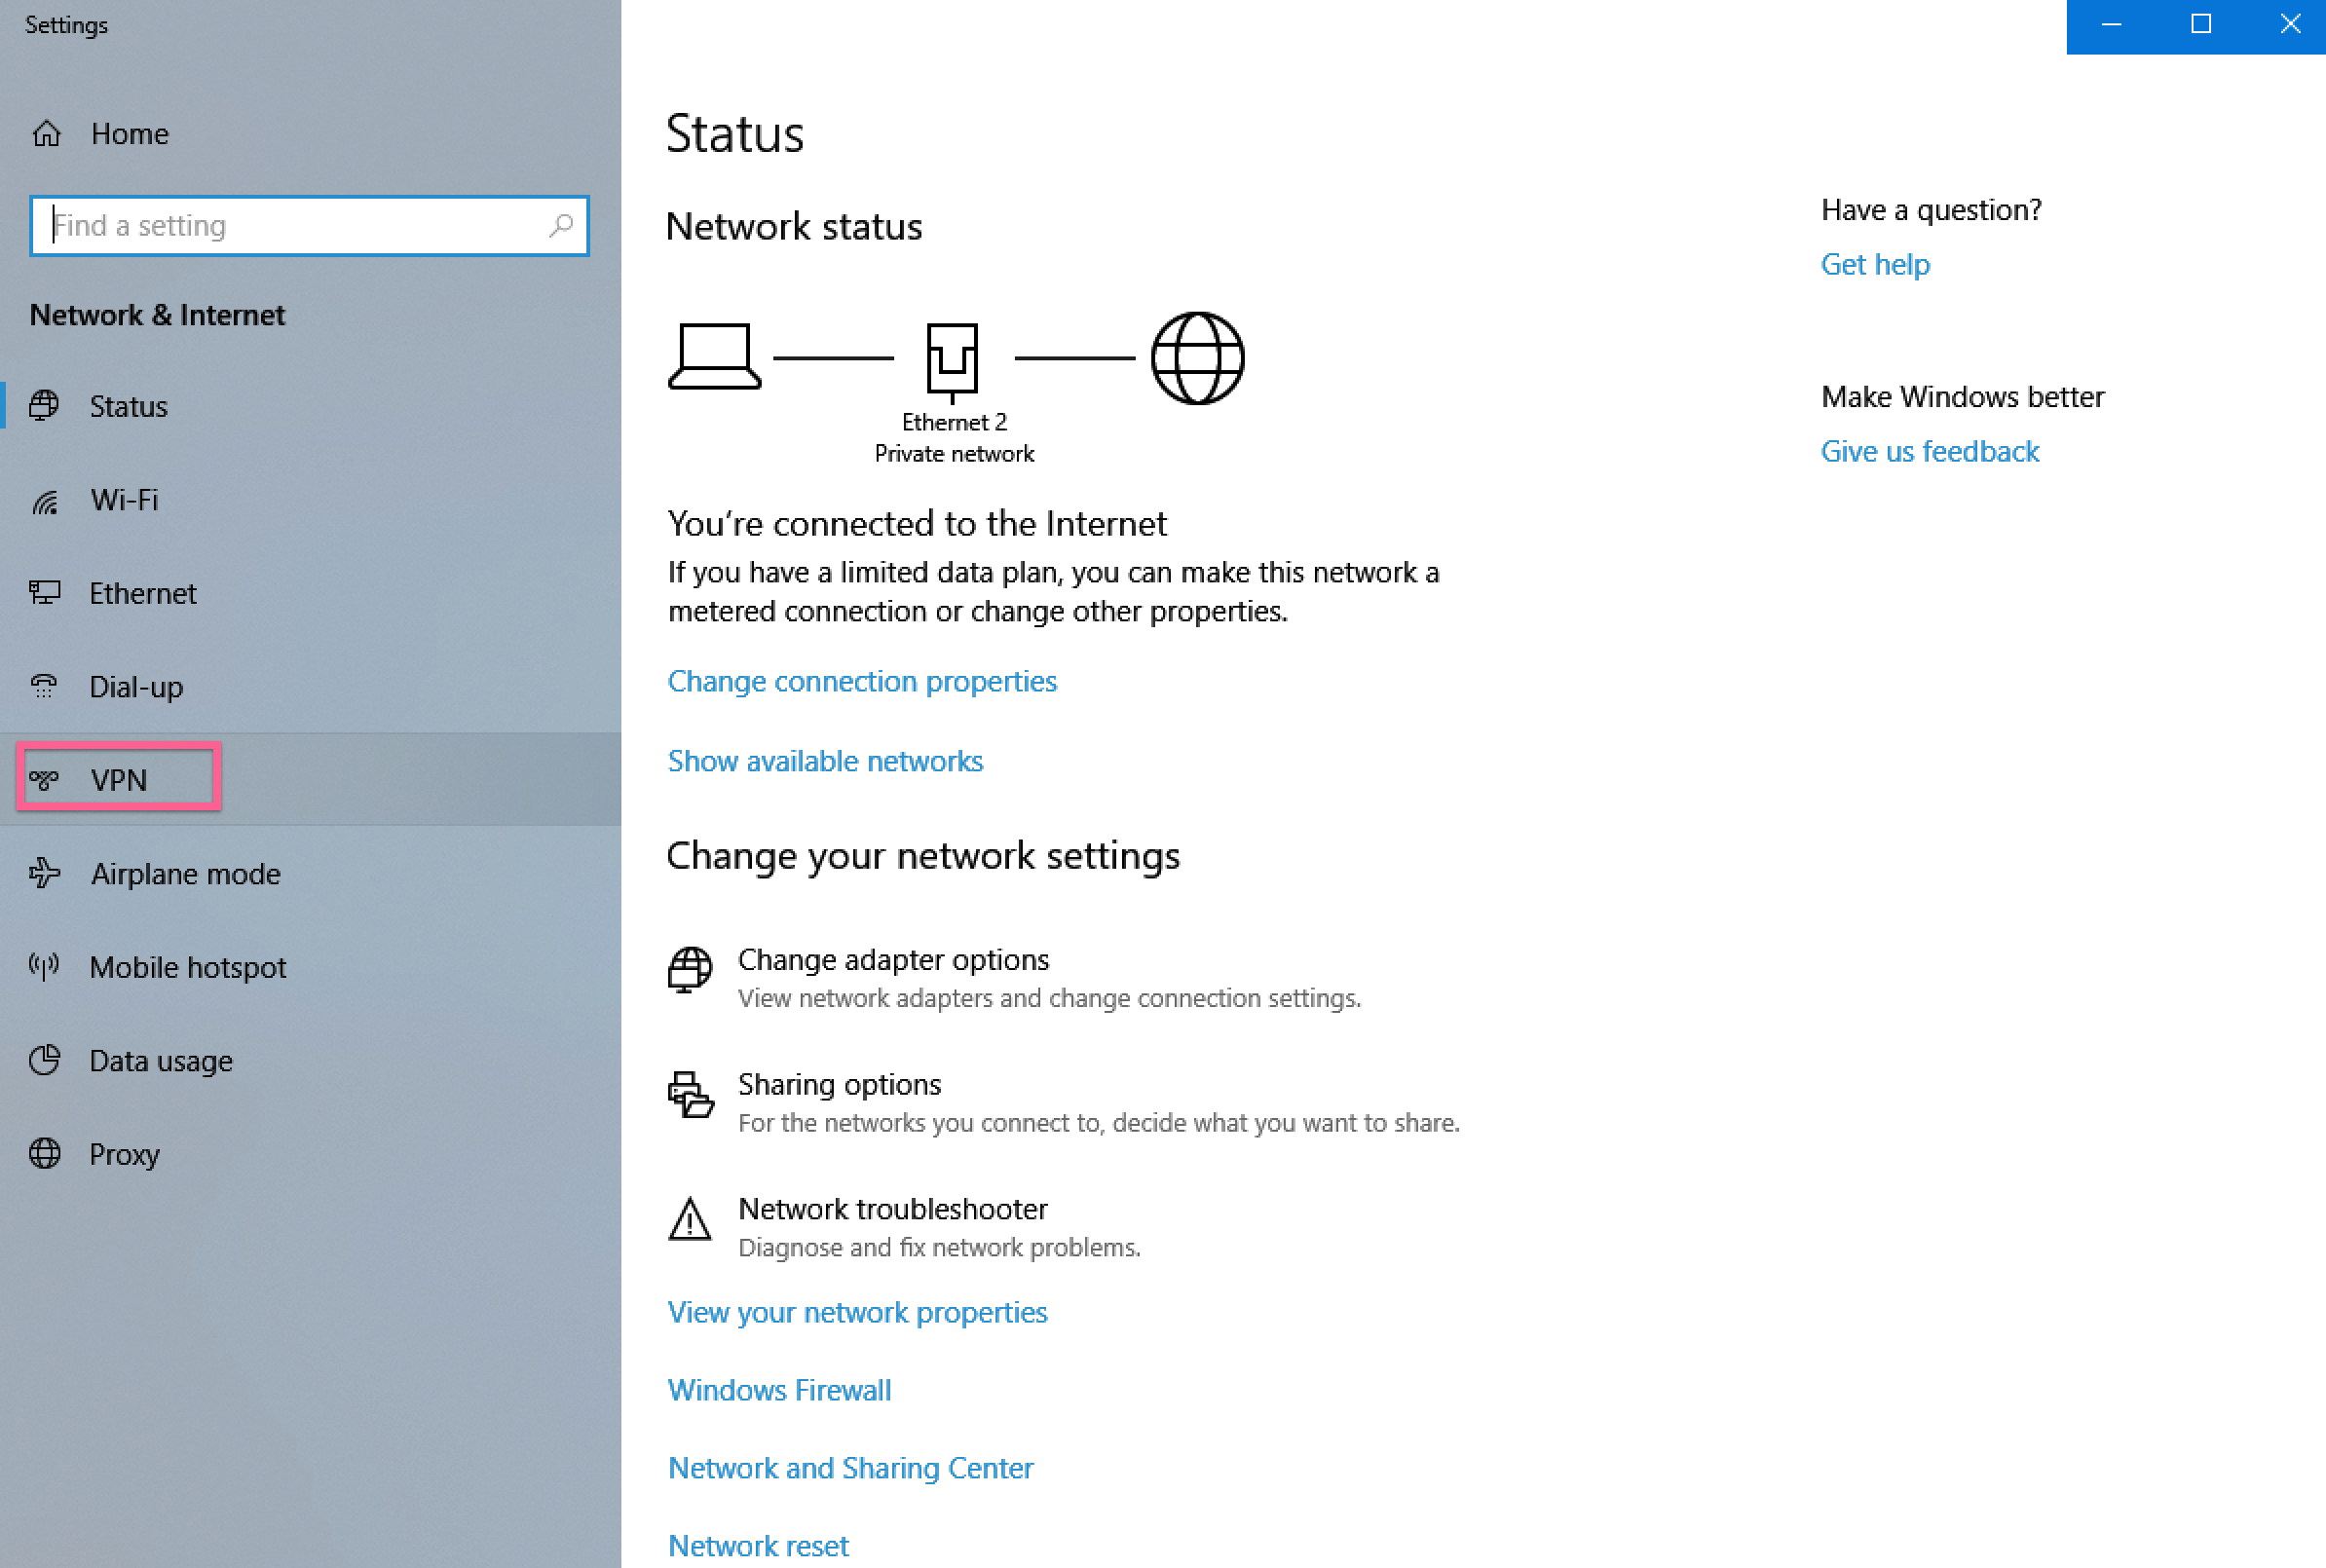
Step 2: Navigate to VPN Section
In the Settings window, click on "VPN" in the left sidebar:
Step 3: Add VPN Connection
Click the "Add a VPN connection" button:

Step 4: Configure L2TP/IPsec Settings
Fill in the connection details:
| Setting | Value | Notes |
|---|---|---|
| VPN provider | Windows (built-in) | Default selection |
| Connection name | TorGuard L2TP | Any name you prefer |
| Server name or address | ny.east.usa.torguardvpnaccess.com | View all servers |
| VPN type | L2TP/IPsec with pre-shared key | Select from dropdown |
| Pre-shared key | torguard | Standard PSK |
| Type of sign-in info | User name and password | Standard auth |
| User name | Your VPN username | Not email address |
| Password | Your VPN password | From client area |
Check "Remember my sign-in info" and click Save:

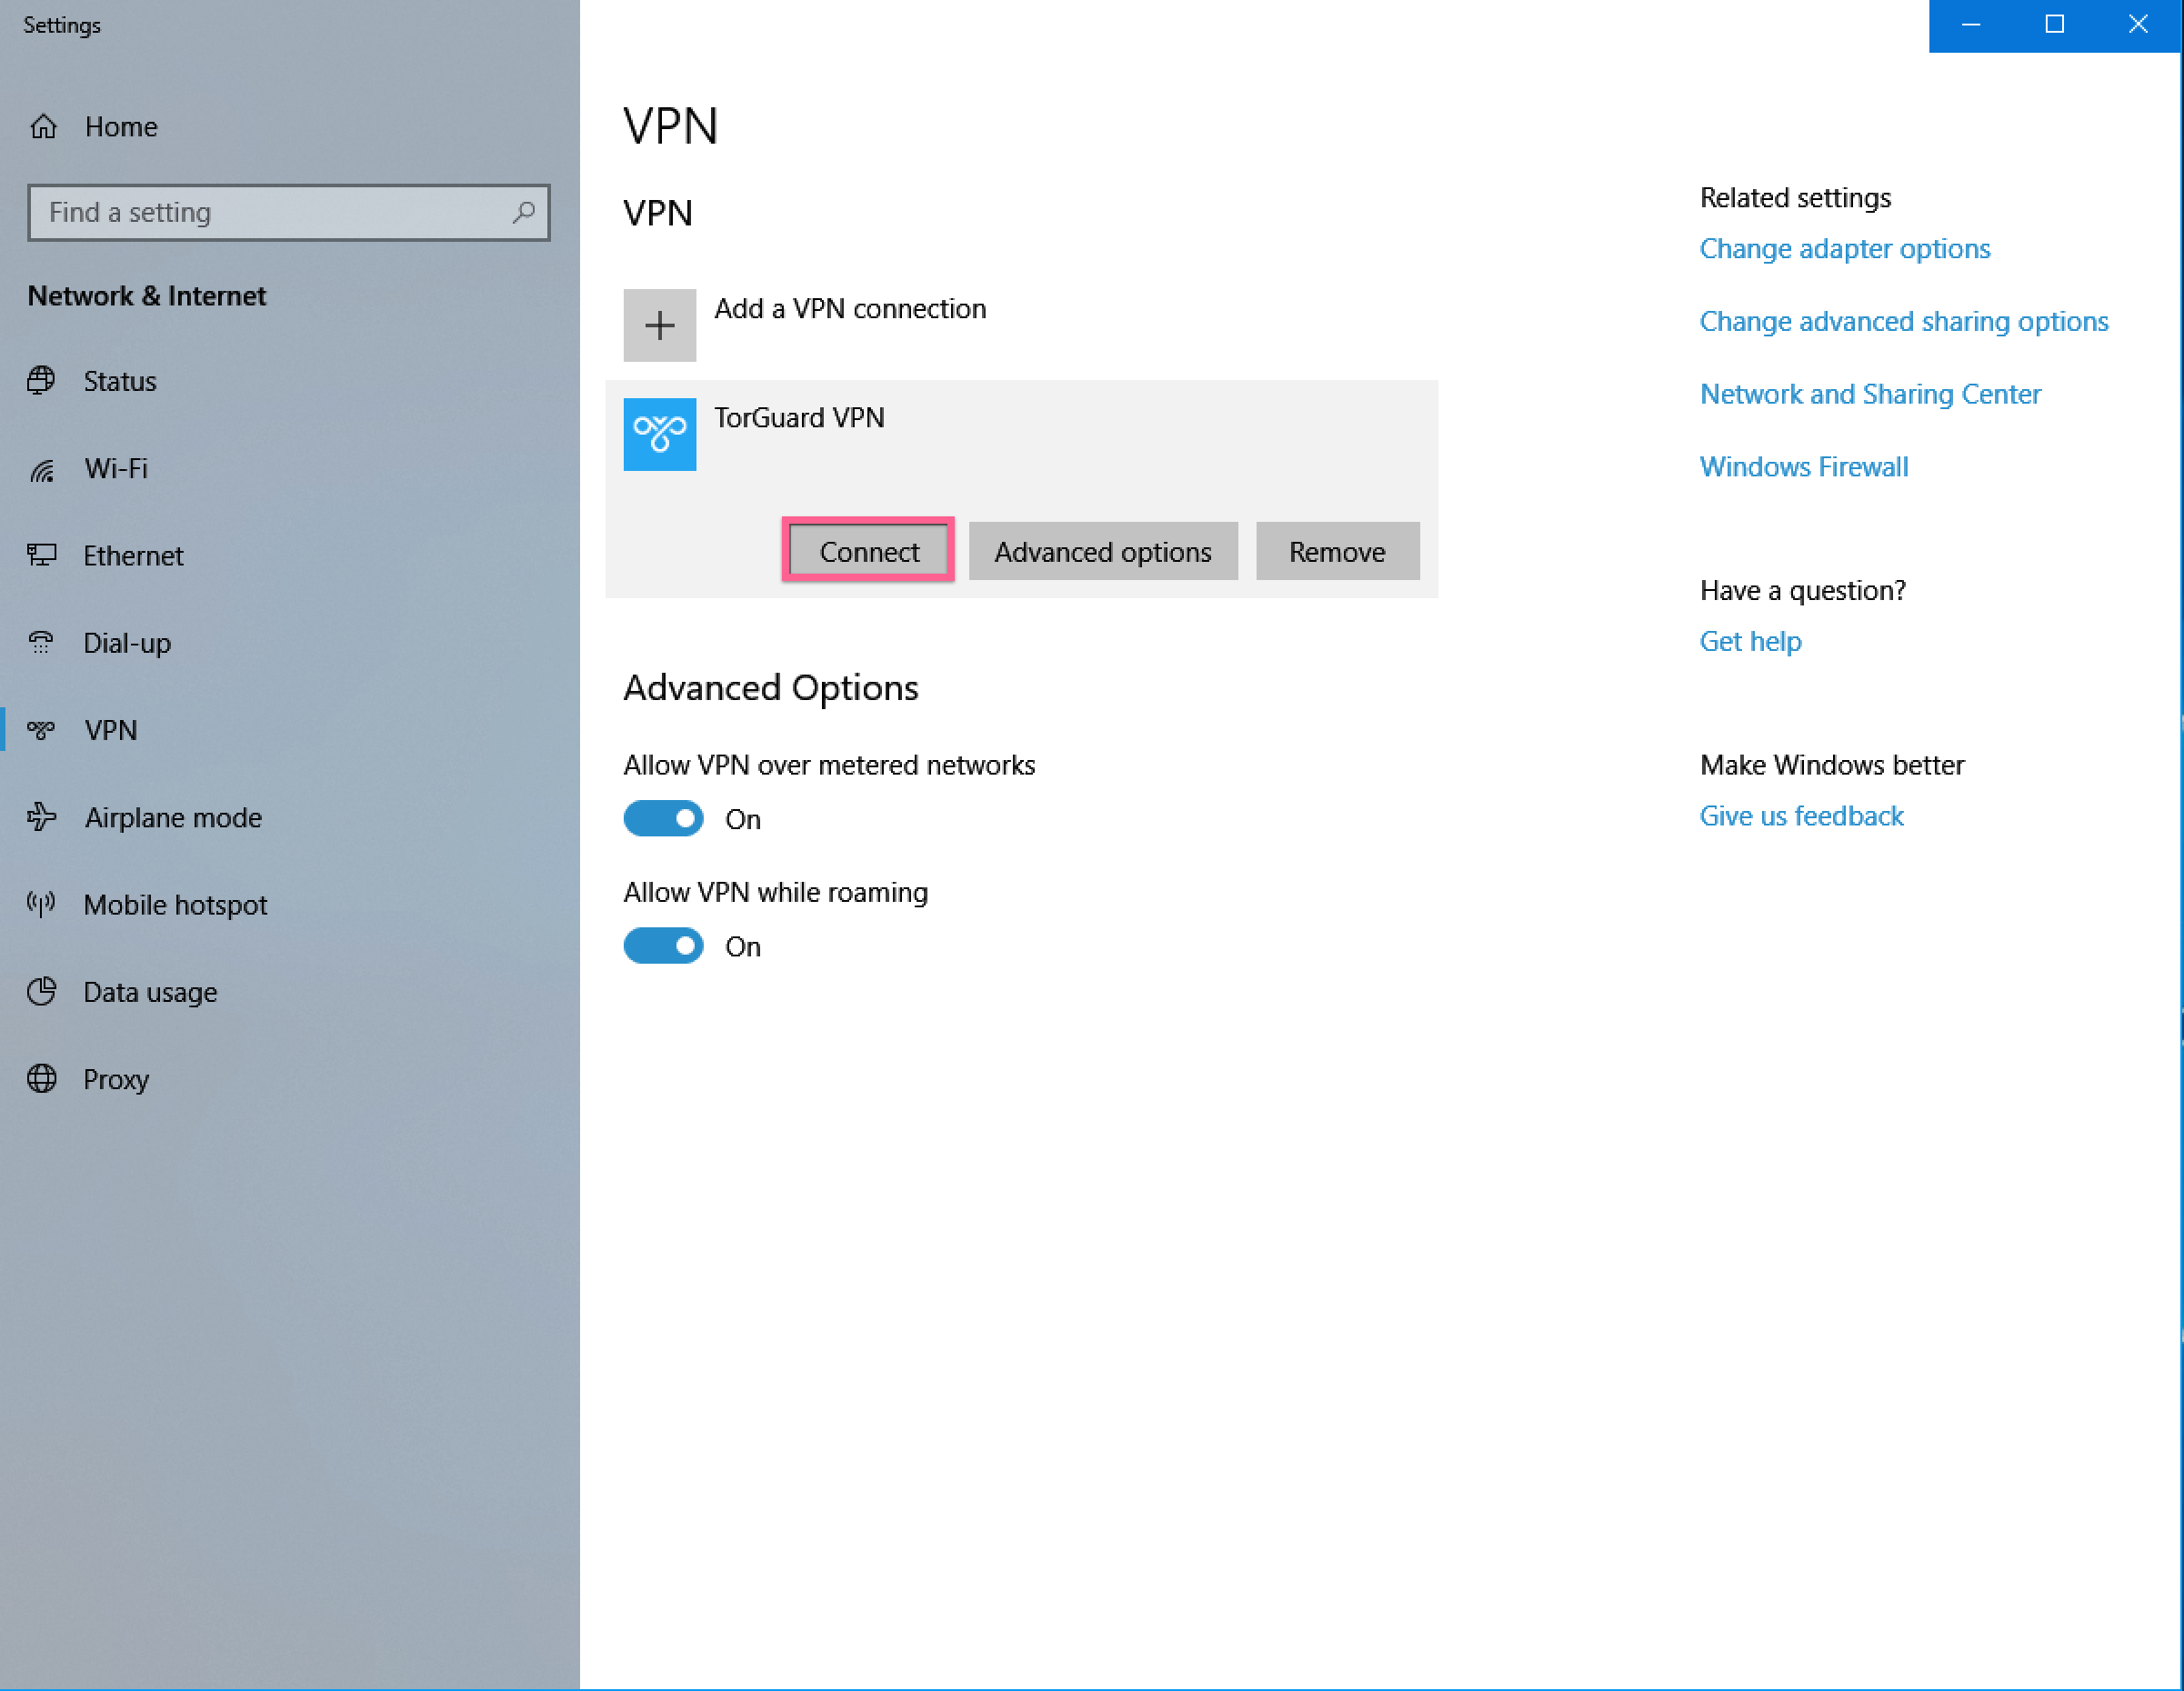
Step 5: Connect to VPN
Click on your new VPN connection and click "Connect":
Step 6: Verify Connection
Once connected, you'll see the connection status:

Step 7: Verify IP Address
Confirm your IP has changed by visiting TorGuard's IP check page:

Advanced L2TP/IPsec Settings
Enable NAT Traversal
For connections behind NAT/firewall:
- Open Registry Editor (regedit)
- Navigate to:
HKEY_LOCAL_MACHINE\SYSTEM\CurrentControlSet\Services\PolicyAgent - Create DWORD:
AssumeUDPEncapsulationContextOnSendRule - Set value to:
2 - Restart computer
Optimize for Performance
# PowerShell commands for optimization
Set-VpnConnection -Name "TorGuard L2TP" -SplitTunneling $false
Set-VpnConnection -Name "TorGuard L2TP" -IdleDisconnectSeconds 0
Common Issues and Solutions
Error 809: Connection Failed
- Cause: Firewall blocking VPN
- Solution: Open UDP ports 500, 4500, and 1701
- Alternative: Try different server or use OpenVPN
Error 789: Security Layer Error
- Cause: IPsec negotiation failed
- Solution: Verify pre-shared key is "torguard"
- Check: Windows Firewall exceptions
Slow Connection Speeds
- IPsec Overhead: L2TP/IPsec double encapsulates data
- Solution: Try closer server location
- Better Option: Switch to WireGuard for 3x speed
L2TP/IPsec Security Analysis
⚠️ Security Considerations
- NSA Concerns: Leaked documents suggest L2TP/IPsec may be compromised
- Pre-shared Key: Same PSK for all users reduces security
- Double Encapsulation: Adds overhead, reduces speed
- Port Blocking: Many networks block L2TP ports
Recommendation: Use OpenVPN or WireGuard for better security
Windows 10 Specific Features
Always On VPN
Configure automatic connection:
- Settings → Network & Internet → VPN
- Click your VPN → Advanced options
- Turn on "Connect automatically"
VPN Through Settings App
Quick connect options:
- Action Center: VPN tile for quick toggle
- System Tray: Network icon → VPN name
- Settings: Win+I → Network → VPN
Performance Optimization
| Setting | Impact | Recommendation |
|---|---|---|
| MTU Size | Fragmentation | Set to 1400 for L2TP |
| Server Location | Latency | Choose nearest server |
| Network Adapter | Throughput | Use wired connection |
| Background Apps | Bandwidth | Close P2P applications |
Alternative: TorGuard App
✅ Easier Option: TorGuard Desktop App
For better features and easier setup:
- Download TorGuard app
- Install and login
- Select any protocol (WireGuard recommended)
- One-click connect
Benefits: Kill switch, port forwarding, stealth mode, multiple protocols
When to Use L2TP/IPsec
Good For:
- Quick setup without software installation
- Basic privacy needs
- Corporate networks that block OpenVPN
- Devices that don't support modern protocols
Not Ideal For:
- Maximum security requirements
- Streaming or gaming (speed limitations)
- Networks that block UDP 500/4500
- Torrenting (use OpenVPN/WireGuard)
Upgrade Path to Better Protocols
- Current: L2TP/IPsec (built-in, moderate security)
- Better: IKEv2 (built-in, faster reconnection)
- Best Security: OpenVPN (app required, maximum features)
- Best Speed: WireGuard (app required, 3-5x faster)
Need VPN Setup Help?
Our support team can help you choose the best protocol for your needs and guide you through advanced configurations.
Get VPN Support