TorGuard's VMess proxy network is one of the fastest encrypted proxy protocols that can also bypass the most strict VPN blocks or firewalls. There are many VMess client apps available, but in this tutorial we'll be using the client software V2RayA.
What is VMess Protocol?
VMess is V2Ray's native protocol, designed specifically to bypass sophisticated censorship and deep packet inspection (DPI). It offers superior obfuscation compared to traditional proxy protocols, making it ideal for macOS users in restricted networks.
Advanced Obfuscation
Dynamic encryption and traffic obfuscation
macOS Integration
Native system proxy support
High Performance
Optimized for Apple Silicon and Intel
Homebrew Support
Easy installation and updates
🚀 Why Use VMess with V2RayA on macOS?
- Bypass the most sophisticated firewalls and censorship
- Native macOS system proxy integration
- Works on both Intel and Apple Silicon Macs
- Easy management through web interface
- Homebrew package management
- Low resource usage
Prerequisites
Before you begin, ensure you have:
- macOS 10.15 (Catalina) or later
- Administrator access
- Active TorGuard Premium Proxy subscription
- Access to TorGuard VMess server list
- Internet connection
- Terminal access
⚠️ Important: VMess is available only with TorGuard Premium Proxy service, not standard VPN subscriptions.
🍎 Apple Silicon Note: V2RayA works natively on both Intel and Apple Silicon (M1/M2/M3) Macs.
What is Homebrew?
Homebrew is the missing package manager for macOS. It installs the stuff you need that Apple didn't, making it perfect for installing V2RayA and its dependencies.
- ✅ Simple installation commands
- ✅ Automatic dependency management
- ✅ Easy updates with
brew upgrade - ✅ Clean uninstalls
- ✅ Active community support
Installation and Configuration
Step 1: Open Terminal
Before setting up V2RayA, we must first install Homebrew so that all dependencies can install.
Open the Utilities folder and double-click the Terminal icon:
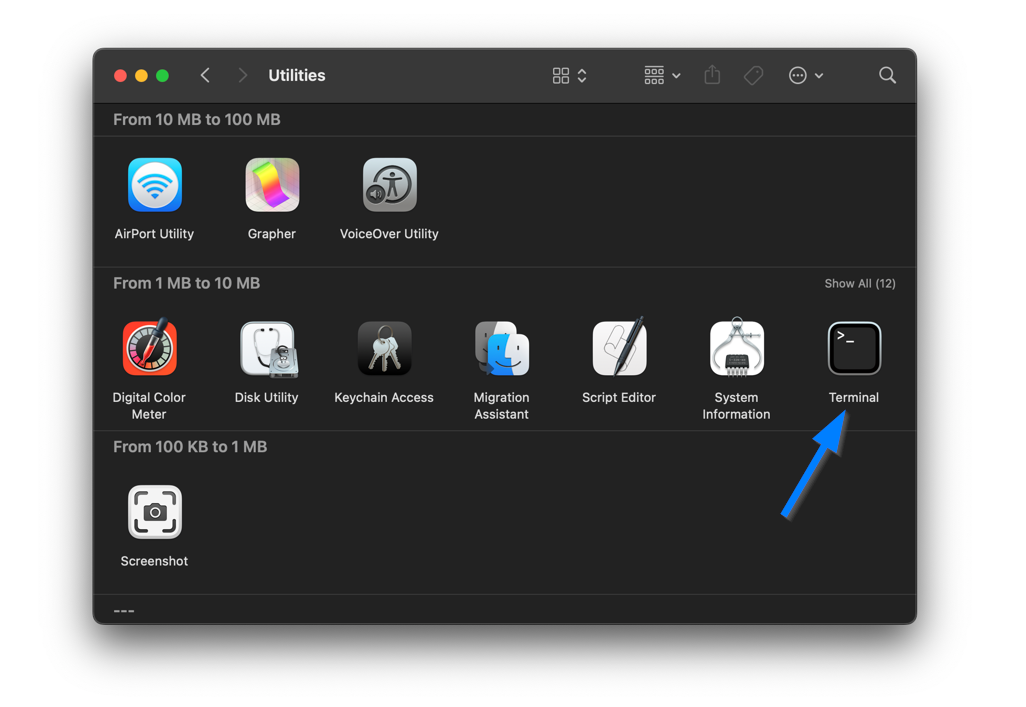
💡 Quick Access: You can also open Terminal by pressing Cmd + Space and searching for "Terminal".
Step 2: Install Homebrew
In the Terminal window, copy and paste the Homebrew install script URL below and press Enter:
/bin/bash -c "$(curl -fsSL https://raw.githubusercontent.com/Homebrew/install/HEAD/install.sh)"
⚠️ Important: After Homebrew completes the install, make sure to copy and paste the two commands it tells you to in the Terminal window to add Homebrew to your PATH. Then press Enter to complete the Homebrew install.
🔑 macOS Password: You'll be prompted for your macOS password during installation. This is normal as Homebrew needs admin access.
Step 3: Install V2RayA via Homebrew
Now that Homebrew is installed, we'll proceed to install V2RayA.
First, add V2RayA to your Homebrew tap:
brew tap v2raya/v2raya
Then install V2RayA:
brew install v2raya/v2raya/v2raya
After the install completes, start V2RayA service:
brew services start v2raya
✅ V2RayA Installed! The service is now running in the background and will auto-start on system boot.
Step 4: Access V2RayA Web Interface
Open a browser and visit http://127.0.0.1:2017 to access the V2RayA admin menu. Create a username and password to access this web UI. This information is stored locally on your computer.
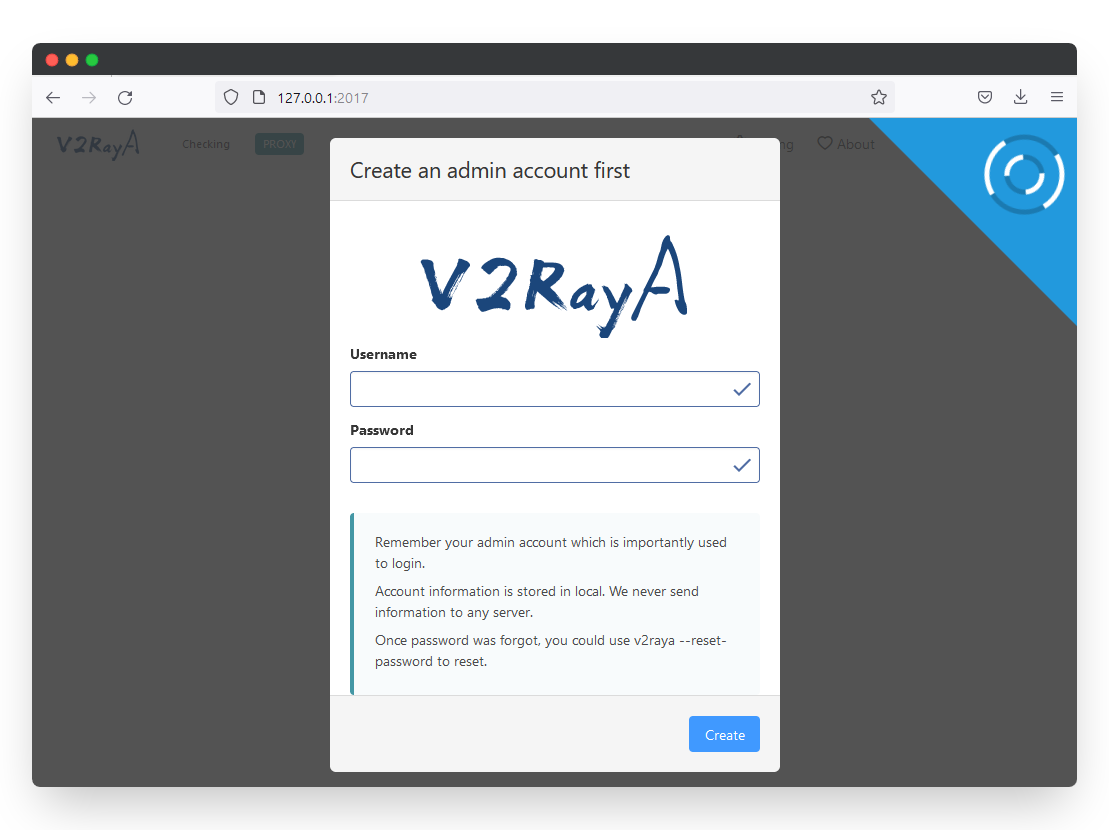
🔒 Security Tip: Use a strong password for the web interface. While it's only accessible locally, it controls your proxy settings.
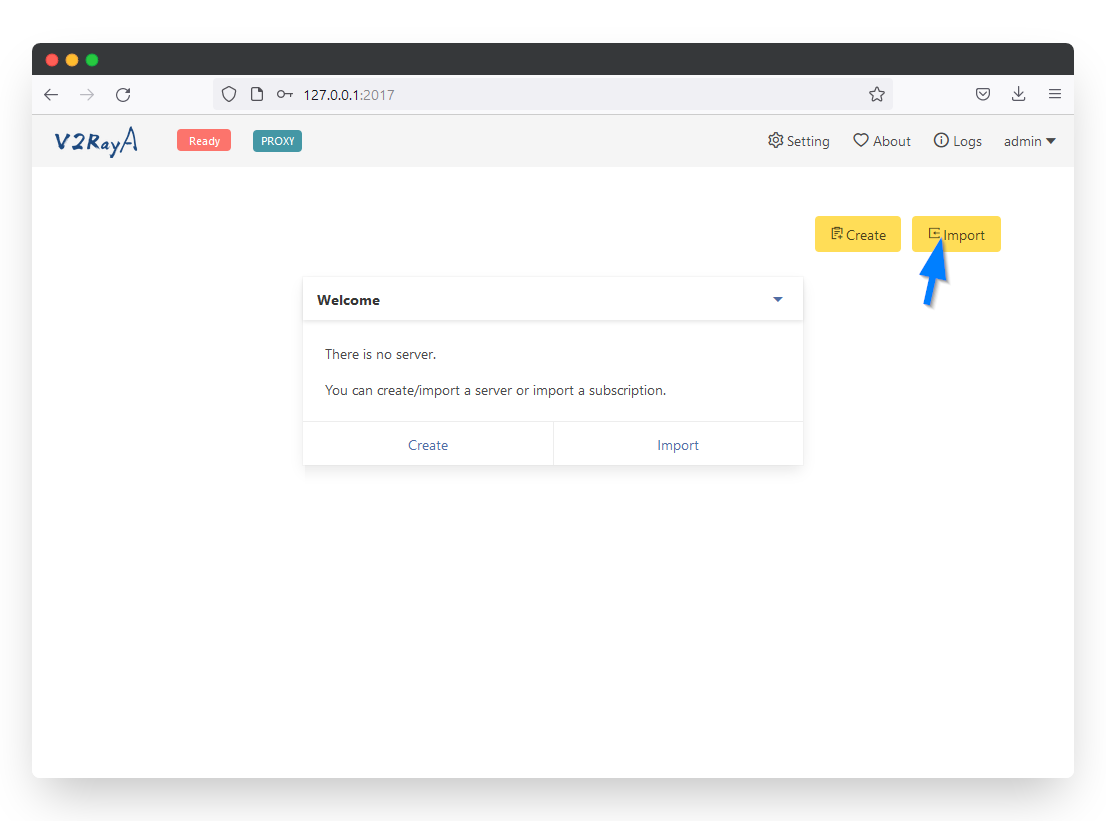
Step 5: Import VMess Server
The fastest way to import a VMess server is to paste the vmess:// link from the TorGuard premium proxy page. (Login to your TorGuard members account to view the page.)
Copy the VMess link of the server you wish to connect to, then click the Import button.
Step 6: Paste VMess Link
Paste the vmess:// link in the server address text box and click the confirm button:
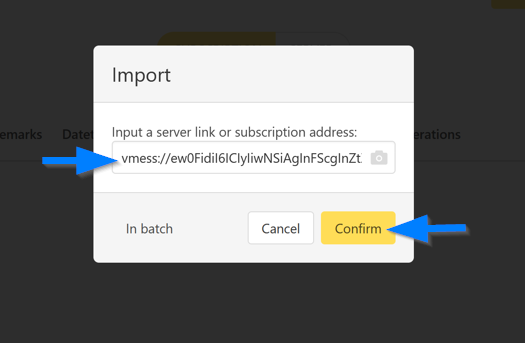
💡 Server Selection: Choose servers geographically close to you for best performance, or select based on your needs (streaming, general browsing, etc.).
Step 7: Configure Proxy Settings
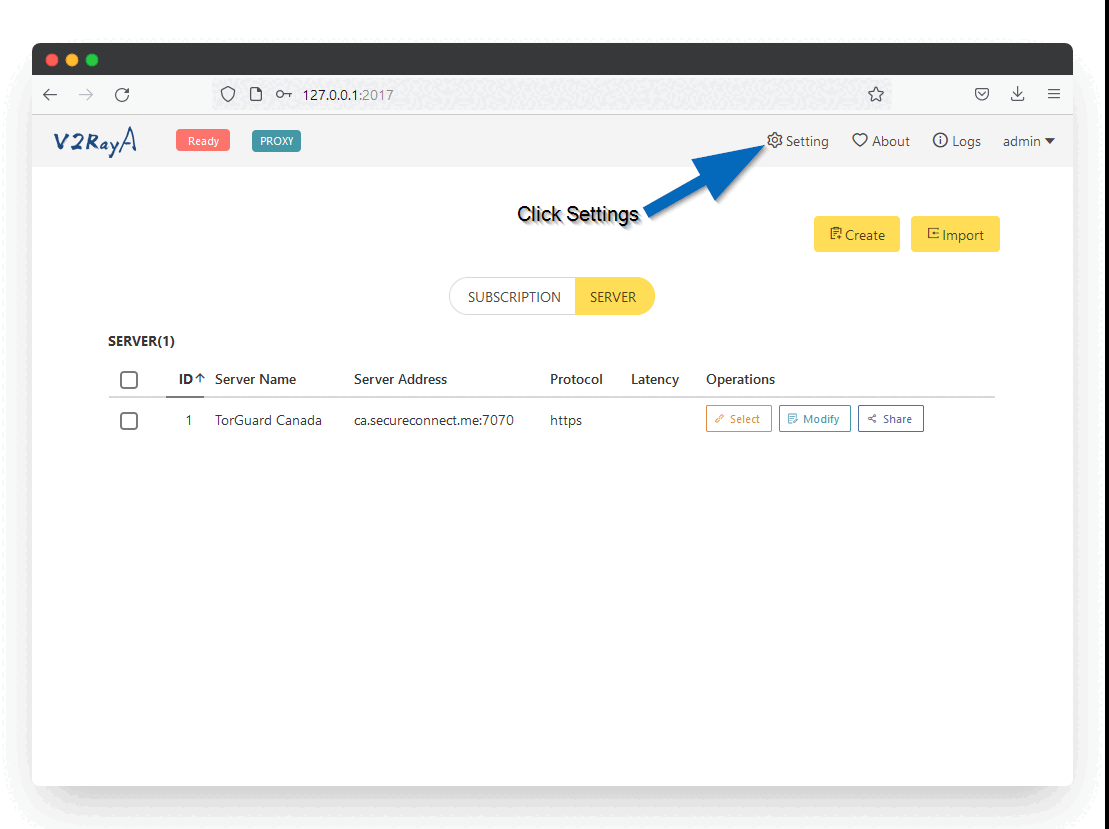
Click the Settings button in the top right corner and configure:
- Under Transparent proxy select Proxy All Traffic
- In the Transparent proxy implementation select System Proxy
- Under prevent DNS spoofing select Forward DNS Requests
Click the Save and Apply button.
Step 8: Connect to VMess Proxy
Now you're ready to connect. Click the Select button on the newly added VMess proxy server. Then in the top left click the Ready button to connect. When you see the "Running" message, your proxy is connected.

✅ Connected! Your internet traffic is now routed through TorGuard's VMess proxy. Check your IP at torguard.net/whats-my-ip.php
macOS Specific Configuration
🍎 System Proxy Integration
V2RayA automatically configures macOS system proxy settings:
- Works with Safari, Chrome, and most apps
- Visible in System Preferences → Network → Advanced → Proxies
- Automatically disabled when V2RayA stops
- No manual configuration needed
🚀 Launch at Login
V2RayA service auto-starts with macOS. To manage:
# Check service status
brew services list

# Stop service
brew services stop v2raya

# Start service
brew services start v2raya

# Restart service
brew services restart v2raya
🔧 Terminal Proxy
To use proxy in Terminal sessions:
# Add to ~/.zshrc or ~/.bash_profile
export http_proxy="http://127.0.0.1:20171"
export https_proxy="http://127.0.0.1:20171"
export ALL_PROXY="socks5://127.0.0.1:20170"
📱 iOS Device Sharing
Share VMess proxy with iOS devices on same network:
- Find Mac's IP: System Preferences → Network
- Configure iOS proxy: Settings → WiFi → Proxy
- Use Mac's IP and port 20171
- Ensure Mac firewall allows connections
Troubleshooting Common Issues
Homebrew Installation Failed
Solution:
- Ensure Xcode Command Line Tools are installed:
xcode-select --install - Check macOS version compatibility
- Try manual Homebrew installation
- Check disk space availability
- Run Terminal with full disk access
Cannot Access V2RayA Interface
Solution:
- Check if service is running:
brew services list - Try http://localhost:2017 or http://[::1]:2017
- Check firewall settings
- Restart service:
brew services restart v2raya - Check logs:
tail -f /usr/local/var/log/v2raya.log
Apps Not Using Proxy
Solution:
- Check System Preferences → Network → Advanced → Proxies
- Some apps ignore system proxy (use app settings)
- Restart apps after enabling proxy
- Try PAC mode for selective proxying
- Check app-specific proxy settings
Performance Issues
Solution:
- Activity Monitor: Check V2RayA CPU/memory usage
- Try different server locations
- Enable Mux in advanced settings
- Check for background downloads
- Update to latest V2RayA version
Updates and Maintenance
🔄 Updating V2RayA
# Update Homebrew
brew update

# Upgrade V2RayA
brew upgrade v2raya

# Restart service
brew services restart v2raya
🗑️ Uninstalling V2RayA
# Stop service
brew services stop v2raya

# Uninstall V2RayA
brew uninstall v2raya

# Remove tap
brew untap v2raya/v2raya
Security Best Practices
🔐 Connection Security
- Always verify proxy is active
- Use HTTPS websites
- Check for DNS leaks
- Monitor connection status
🍎 macOS Security
- Keep macOS updated
- Enable FileVault
- Use firewall
- Review app permissions
🔑 Account Security
- Protect VMess links
- Use strong web UI password
- Don't share configurations
- Enable 2FA on TorGuard
🌐 Privacy Protection
- Clear browser data
- Use private browsing
- Disable WebRTC
- Check IP regularly
Summary
You've successfully configured V2RayA to connect to TorGuard's VMess proxy network on macOS! This setup provides:
- ✅ Advanced firewall and censorship bypass
- ✅ Native macOS system proxy integration
- ✅ High-speed encrypted connections
- ✅ Easy management via web interface
- ✅ Homebrew package management
- ✅ Support for Apple Silicon and Intel Macs