What is SSH Tunneling? SSH tunneling creates an encrypted connection between your computer and a remote server, allowing you to route your internet traffic securely through the tunnel. This provides enhanced privacy and can bypass network restrictions.
Prerequisites
Before setting up an SSH tunnel with Bitvise, ensure you have:
- Windows 7, 8, 10, or 11 operating system
- Active TorGuard account with SSH tunnel service
- Your TorGuard SSH server details and credentials
- Administrator access on your Windows computer
- Firefox, Chrome, or another SOCKS5-compatible browser
Benefits of SSH Tunneling
SSH tunnels provide several advantages over standard proxy connections:
- Military-Grade Encryption: All traffic is encrypted using SSH protocol
- Bypass Restrictions: Overcome firewalls and content filters
- Stealth Mode: Traffic appears as regular SSH connections
- Port Flexibility: Use multiple ports to avoid blocking
- Obfuscation Support: Hide SSH traffic from deep packet inspection
Step 1: Enable SSH Tunnel Service
- Log in to your TorGuard member area
- Navigate to SSH Tunnel Settings
- Enable SSH tunnel service for your desired location
- Note down the following information:
- SSH server IP address
- Available ports (typically 22, 443, or custom ports)
- Obfuscation key (if using obfuscation)
Important: SSH tunnel service may require separate activation. Check your service status in the member area.
Step 2: Download and Install Bitvise
- Visit the official Bitvise website: Download Bitvise SSH Client
- Download the latest version for Windows
- Run the installer as Administrator
- Follow the installation wizard:
- Accept the license agreement
- Choose installation directory (default is fine)
- Select "Install for all users"
- Complete the installation
- Launch Bitvise SSH Client from the Start Menu
Step 3: Configure SSH Connection in Bitvise
In the Bitvise main window, configure the Login tab with your TorGuard SSH details:
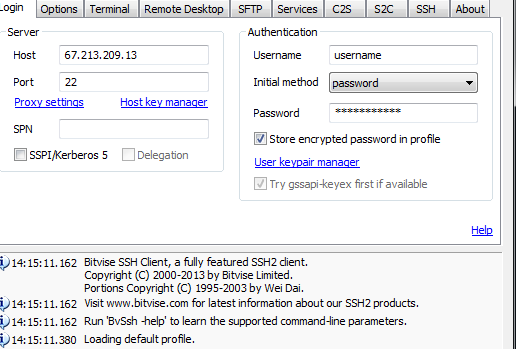
| Setting | Value |
|---|---|
| Host | Your SSH server IP (from activation email) |
| Port | 22 (default) or custom port from server list |
| Username | Your TorGuard VPN/Proxy username |
| Initial method | password |
| Password | Your TorGuard VPN/Proxy password |
| Store encrypted password | Check this for convenience |
Optional: Configure Obfuscation
If you need to hide SSH traffic from deep packet inspection:
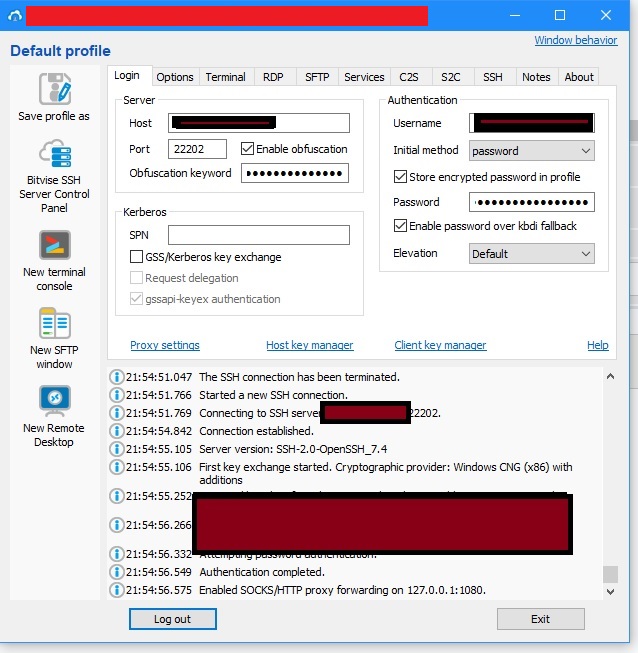
- Click the SSH tab in Bitvise
- Enable Obfuscation
- Enter the obfuscation keyword from your SSH settings page
- Use the corresponding obfuscated port (not port 22)
Step 4: Configure SOCKS5 Proxy Forwarding
Click the Services tab and configure proxy forwarding:

| Setting | Value |
|---|---|
| SOCKS/HTTP Proxy Forwarding | Enabled (check the box) |
| Listen interface | 127.0.0.1 |
| Listen port | 1080 (or any preferred port like 443) |
| Server bind interface | 127.0.0.1 |
| Server bind port | 0.0.0.0 |
Step 5: Establish SSH Connection
- Review all settings to ensure accuracy
- Click the Login button in Bitvise
- If this is your first connection, you'll see a host key verification dialog:
- Click Accept and Save to store the server's key
- This prevents man-in-the-middle attacks
- Wait for the connection to establish
- You should see "Authentication completed" in the log window
- The Bitvise window will minimize to the system tray
Connected! Your SSH tunnel is now active. The SOCKS5 proxy is running on localhost:1080 (or your chosen port).
Step 6: Configure Your Browser
Firefox Configuration
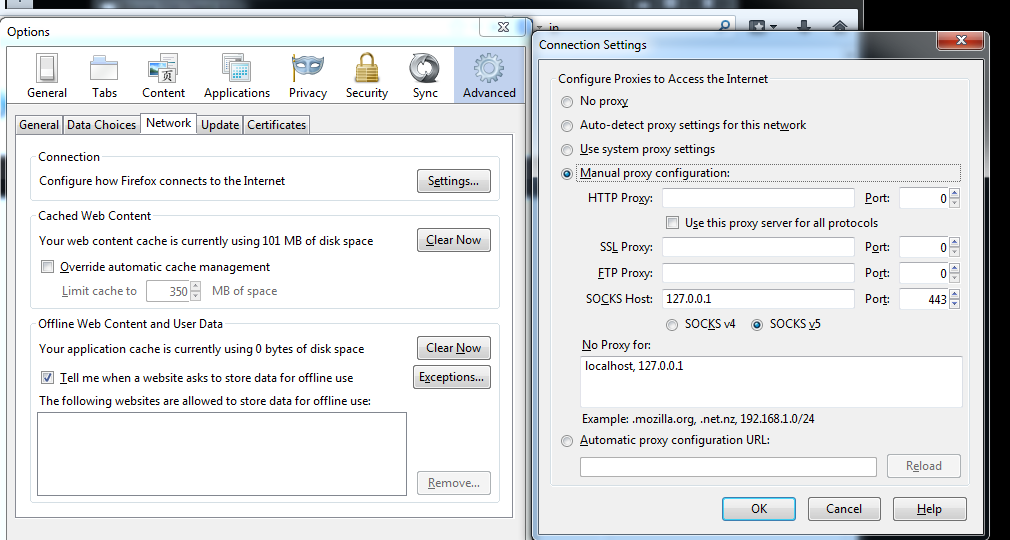
- Open Firefox and go to Settings (☰ menu → Settings)
- Scroll down to Network Settings
- Click Settings... button
- Configure as follows:

- Select Manual proxy configuration
- SOCKS Host: 127.0.0.1
- Port: 1080 (or your chosen port)
- Select SOCKS v5
- Check Proxy DNS when using SOCKS v5
- Click OK
Chrome Configuration
For Chrome, you'll need to use a proxy extension or command-line flags:
Option 1: Using Proxy Extension
- Install Proxy SwitchyOmega
- Create new profile → Select "Proxy Profile"
- Protocol: SOCKS5
- Server: 127.0.0.1
- Port: 1080
- Apply changes and enable the profile
Option 2: Command Line
chrome.exe --proxy-server="socks5://127.0.0.1:1080"
Verifying Your Connection
After configuring your browser, verify the SSH tunnel is working:
- Visit TorGuard IP Check
- Confirm your IP shows the SSH server location
- Check for DNS leaks at DNS Leak Test
- Test browsing speed and functionality
Advanced Configuration
Multiple Port Forwarding
You can forward multiple ports through the SSH tunnel:
- In Bitvise Services tab, click Add
- Configure additional SOCKS or port forwards
- Use different local ports for different services
Auto-Reconnection
Enable automatic reconnection for persistent tunnels:
- In Bitvise, go to Options tab
- Enable Reconnect automatically
- Set reconnection delay (5-10 seconds recommended)
System-Wide Proxy
To route all Windows traffic through the tunnel:
- Windows Settings → Network & Internet → Proxy
- Manual proxy setup → Use a proxy server
- Address: 127.0.0.1, Port: 1080
- Note: Not all Windows apps respect system proxy settings
Troubleshooting Common Issues
Connection Fails
- Check credentials: Ensure using VPN/Proxy username, not website login
- Verify server IP: Confirm SSH server is active in member area
- Try different port: Some networks block port 22, try 443 or 80
- Windows Firewall: Add Bitvise to firewall exceptions
Slow Connection Speed
- Server location: Choose geographically closer servers
- Compression: Enable compression in Bitvise SSH settings
- Encryption: Try different cipher algorithms (AES-128 is faster)
- Network congestion: Test at different times of day
Browser Not Using Proxy
- Check proxy settings: Ensure correct SOCKS5 configuration
- Browser cache: Clear cache and cookies
- Extensions conflict: Disable VPN/proxy extensions
- DNS over HTTPS: Disable in browser settings
Security Best Practices
- Use strong passwords: Enable two-factor authentication if available
- Keep Bitvise updated: Install security updates promptly
- Verify host keys: Don't ignore host key warnings
- Use obfuscation: In restrictive networks or countries
- Monitor connections: Check Bitvise activity log regularly
Alternative SSH Clients
While Bitvise is recommended, alternatives include:
- PuTTY: Free, lightweight, but less user-friendly
- MobaXterm: Feature-rich with X11 forwarding
- SecureCRT: Professional tool with advanced features
- OpenSSH: Built into Windows 10/11 (command-line)
Pro Tip: For mobile devices, consider using SSH tunnel apps like Termux (Android) or Termius (iOS) to create secure connections on the go.
Comparing SSH to Other Protocols
| Feature | SSH Tunnel | VPN | SOCKS5 |
|---|---|---|---|
| Encryption | Strong | Strong | None |
| Speed | Fast | Moderate | Fastest |
| Compatibility | App-specific | System-wide | App-specific |
| Stealth | High | Low | Moderate |