Setting up TorGuard VPN on your ASUS router provides whole-home VPN protection for all connected devices. This guide covers configuration for ASUS routers running stock ASUS-WRT firmware, offering an easy way to secure your entire network without installing VPN software on individual devices.
🏠 Benefits of Router VPN
- Whole Home Protection: All devices automatically use VPN
- Device Limit Bypass: Router counts as one connection
- Smart Home Security: Protect IoT devices that can't run VPN apps
- Guest Network: Offer secure browsing to visitors
Compatible ASUS Router Models
This guide works with ASUS routers running stock ASUS-WRT firmware version 3.0.0.4.380 or newer:
| Router Series | Popular Models | Max VPN Speed | Recommended For |
|---|---|---|---|
| AX Series (WiFi 6) | RT-AX88U, RT-AX86U, RT-AX68U | 200-400 Mbps | High performance |
| AC Series (WiFi 5) | RT-AC88U, RT-AC86U, RT-AC68U | 50-200 Mbps | General use |
| Budget Models | RT-AC66U_B1, RT-AC1750 | 30-50 Mbps | Basic protection |
Prerequisites
- ASUS router with stock firmware (3.0.0.4.380+)
- Active TorGuard VPN subscription
- Your TorGuard VPN username and password
- TorGuard OpenVPN config files for ASUS
- Computer connected to router (wired connection recommended for setup)
Step 1: Access Router Admin Panel
- Connect your computer to the router via Ethernet cable
- Open a web browser and navigate to:
- Primary: 192.168.1.1
- Alternative: router.asus.com
- Enter your router admin credentials:
- Default Username: admin
- Default Password: admin (or password on label)
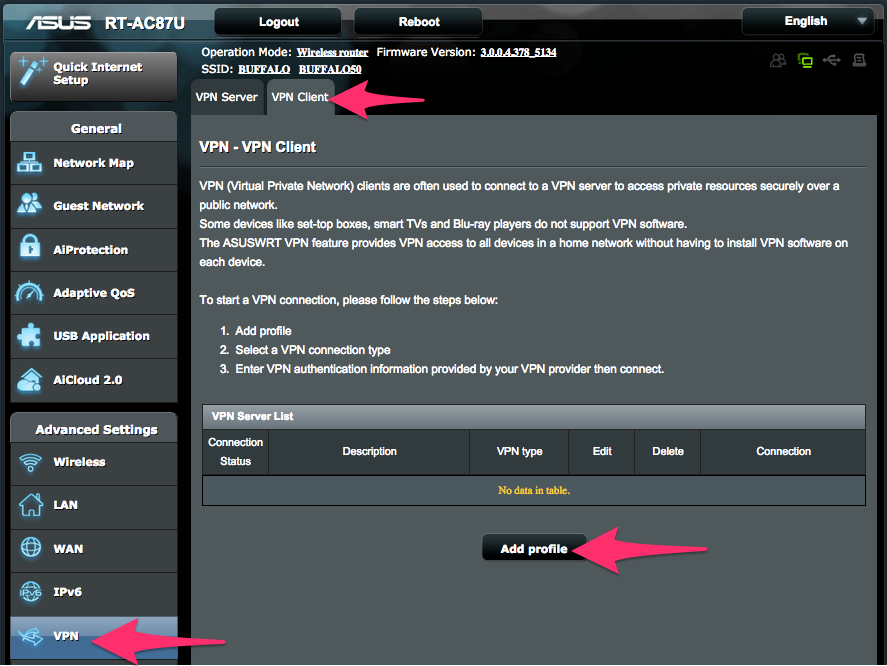
Step 2: Navigate to VPN Settings
Once logged in:
- Click "Advanced Settings" in the left sidebar
- Click "VPN" from the menu
- Click the "VPN Client" tab at the top
- Click "Add profile" button
Step 3: Download TorGuard Config Files
Download the appropriate config package for your needs:
- Extract the downloaded ZIP file
- Choose a server location close to you for best performance
- Keep the .ovpn file ready for upload
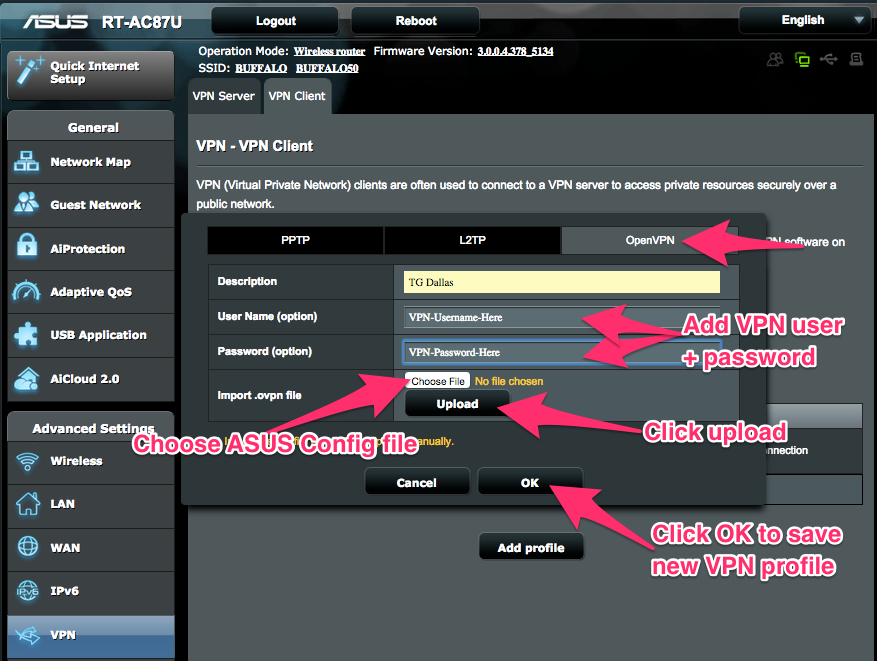
Step 4: Configure OpenVPN Profile
In the Add Profile window:
- Click the "OpenVPN" tab
- Fill in the following details:
- Description: TorGuard [Location] (e.g., "TorGuard USA-NY")
- Username: Your TorGuard VPN username
- Password: Your TorGuard VPN password
- Click "Choose File" next to "Import .ovpn file"
- Select your desired location .ovpn file
- Click "Upload"
- Wait for "Complete!" message
- Click "OK" to save
Step 5: Activate VPN Connection
After saving the profile:
- You'll see your VPN profile listed
- Click the "Activate" button next to your profile
- Connection status will change to "Connecting..."
- Wait for status to show "Connected" with a blue checkmark

Step 6: Verify VPN Connection
Confirm your VPN is working properly:
- From any device connected to your router, visit TorGuard's What's My IP
- Verify:
- IP address matches your VPN server location
- ISP shows as "TorGuard" or datacenter name
- Location matches your selected server
- Run a DNS leak test to ensure no leaks
Advanced VPN Settings
Enable VPN Kill Switch
Prevent internet access if VPN disconnects:
- Go to VPN → VPN Client
- Click "Advanced Settings"
- Set "Force Internet traffic through tunnel" to Yes
- Apply settings
DNS Configuration
For enhanced privacy, configure custom DNS:
- In VPN Advanced Settings
- Set "Accept DNS Configuration" to Exclusive
- Or manually set DNS servers:
- DNS Server 1: 10.8.0.1
- DNS Server 2: 10.9.0.1
Policy-Based Routing
Route specific devices through or around VPN:
- Enable "Policy Rules"
- Add device MAC addresses or IP ranges
- Choose "WAN" to bypass VPN or "VPN" to force through tunnel
Troubleshooting Common Issues
VPN Won't Connect
- Check credentials: Ensure using VPN (not account) username/password
- Try different server: Server may be under maintenance
- Switch protocol: Try TCP if UDP fails
- Update firmware: Ensure router firmware is current
- Check time/date: Router time must be accurate for certificates
Slow VPN Speeds
- Server location: Choose server closer to your location
- Protocol: UDP typically faster than TCP
- Encryption: Consider using AES-128 configs for speed
- Router limits: Check router CPU usage during transfer
- QoS settings: Disable QoS while testing
Devices Can't Access Internet
- Check VPN status: Ensure showing "Connected"
- DNS issues: Try setting device DNS to 8.8.8.8
- Reboot devices: Reconnect WiFi after VPN activation
- Firewall: Check router firewall isn't blocking
Performance Optimization
Best Practices for Speed
- Wired connections: Use Ethernet for bandwidth-intensive devices
- Server selection: Test multiple servers for best performance
- Time of day: Avoid peak hours in target location
- Router placement: Ensure good ventilation to prevent throttling
Router CPU Management
Monitor under System Log → System Status:
- CPU usage over 80% indicates router limitation
- Consider upgrading router for higher VPN speeds
- Disable unused features (AiProtection, Traffic Analyzer)
Managing Multiple VPN Profiles
Create profiles for different use cases:
| Profile Name | Server Location | Use Case |
|---|---|---|
| TorGuard Streaming | USA - Los Angeles | Netflix, Hulu access |
| TorGuard Privacy | Switzerland | Maximum privacy |
| TorGuard Gaming | Nearest city | Low latency gaming |
| TorGuard P2P | Netherlands | Torrenting |
Security Considerations
- Regular updates: Keep router firmware updated
- Strong passwords: Use unique admin and WiFi passwords
- Guest network: Isolate guest devices from main network
- Access control: Limit admin access to local network only
- Backup settings: Save router config before changes
Alternative Firmware Options
For advanced features, consider:
- ASUS Merlin: Enhanced VPN features, better performance
- DD-WRT: Maximum customization options
- Tomato: User-friendly alternative firmware
Need Router VPN Assistance?
Our support team can help with router VPN configuration, performance optimization, and troubleshooting.
Get Router Support