🌐 About Port Forwarding
Port forwarding with TorGuard allows you to open specific ports through the VPN tunnel, enabling remote access to services, gaming, torrenting, and hosting while maintaining VPN protection. This feature is available on both shared and dedicated IPs.
⚠️ Security Warning
- Exposure Risk: Opening ports exposes services to the internet
- Authentication: Always use strong passwords and 2FA when possible
- IP Restrictions: Limit access to specific IPs when feasible
- Regular Updates: Keep all exposed services updated
- Monitor Access: Check logs regularly for unauthorized attempts
Common Use Cases
Media Servers
Plex, Jellyfin, Emby remote access
Share your media library securely
Gaming
Host game servers, reduce NAT issues
Minecraft, CS:GO, Valheim hosting
File Sharing
FTP, SFTP, cloud storage access
Access your NAS remotely
Torrenting
Better seeding ratios, tracker access
Required by private trackers
Remote Access
RDP, VNC, SSH connections
Work from anywhere securely
Web Hosting
Host websites, APIs, services
Development and testing
Port Restrictions
📋 Available Port Ranges
- Allowed: All ports above 2048 (2049-65535)
- Blocked: Ports 1-2048 (reserved for system services)
- Exceptions: Some ports above 2048 may be reserved
- Protocols: Both TCP and UDP supported
- Limit: Multiple ports can be forwarded per IP
IP Types for Port Forwarding
🌍 Shared IP
- ✅ Free with VPN service
- ✅ Port forwarding available
- ⚠️ IP shared with others
- ⚠️ May change occasionally
- 📍 Good for testing
Best for: Casual use, testing
🏠 Dedicated IP
- ✅ Your IP exclusively
- ✅ Never changes
- ✅ Better reputation
- ✅ All ports available
- 💰 Additional cost
Best for: Hosting, business use
Step-by-Step Setup
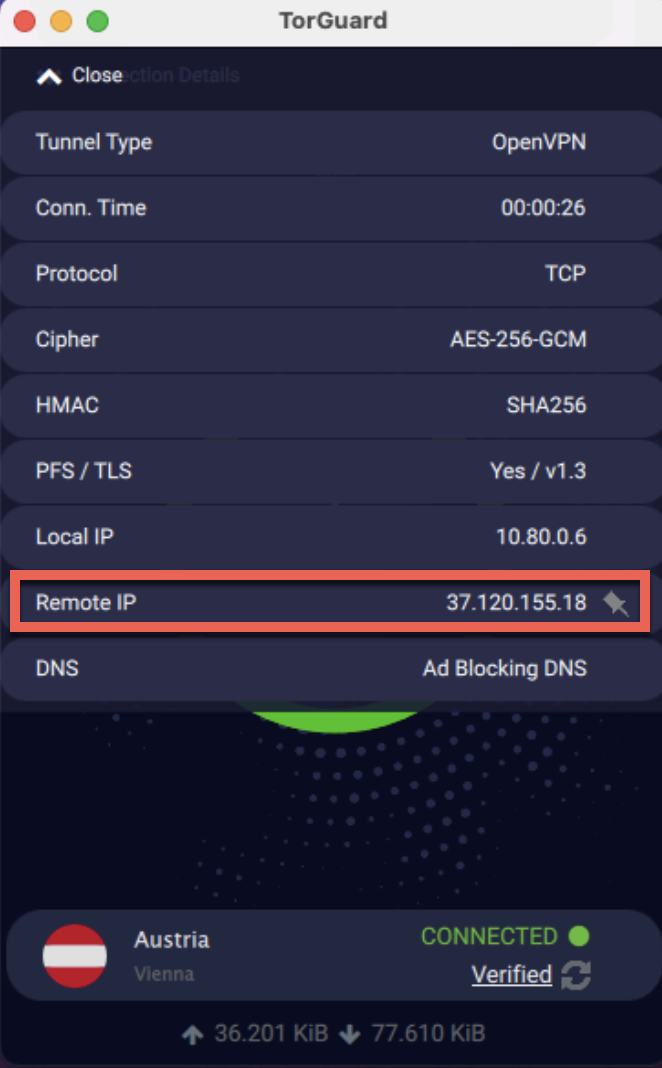
Get Your VPN IP Address
Connect to TorGuard and find your IP address:
- Connect to your desired VPN location
- Click "Connection Details" dropdown (top left)
- Note the "Remote IP" address
💡 Dedicated IP Users
If you have a dedicated IP, skip to Step 4 - your IP is in the activation email
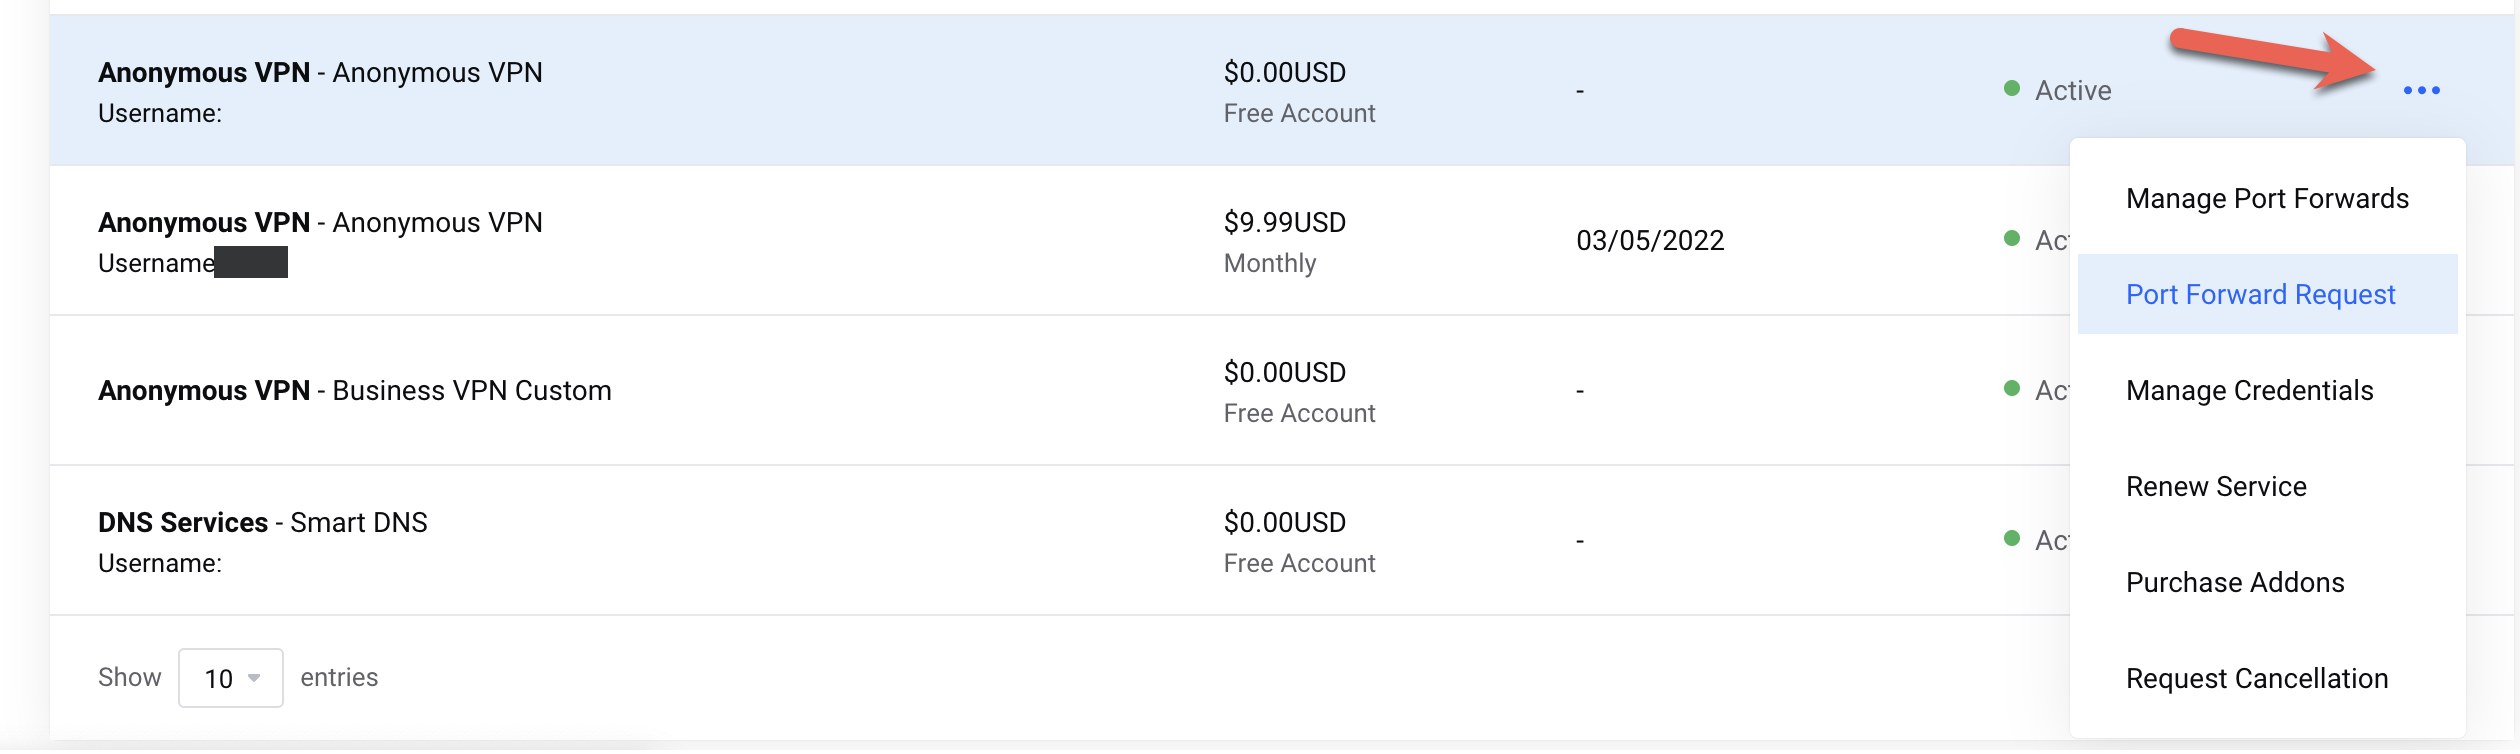
Request Port Forward
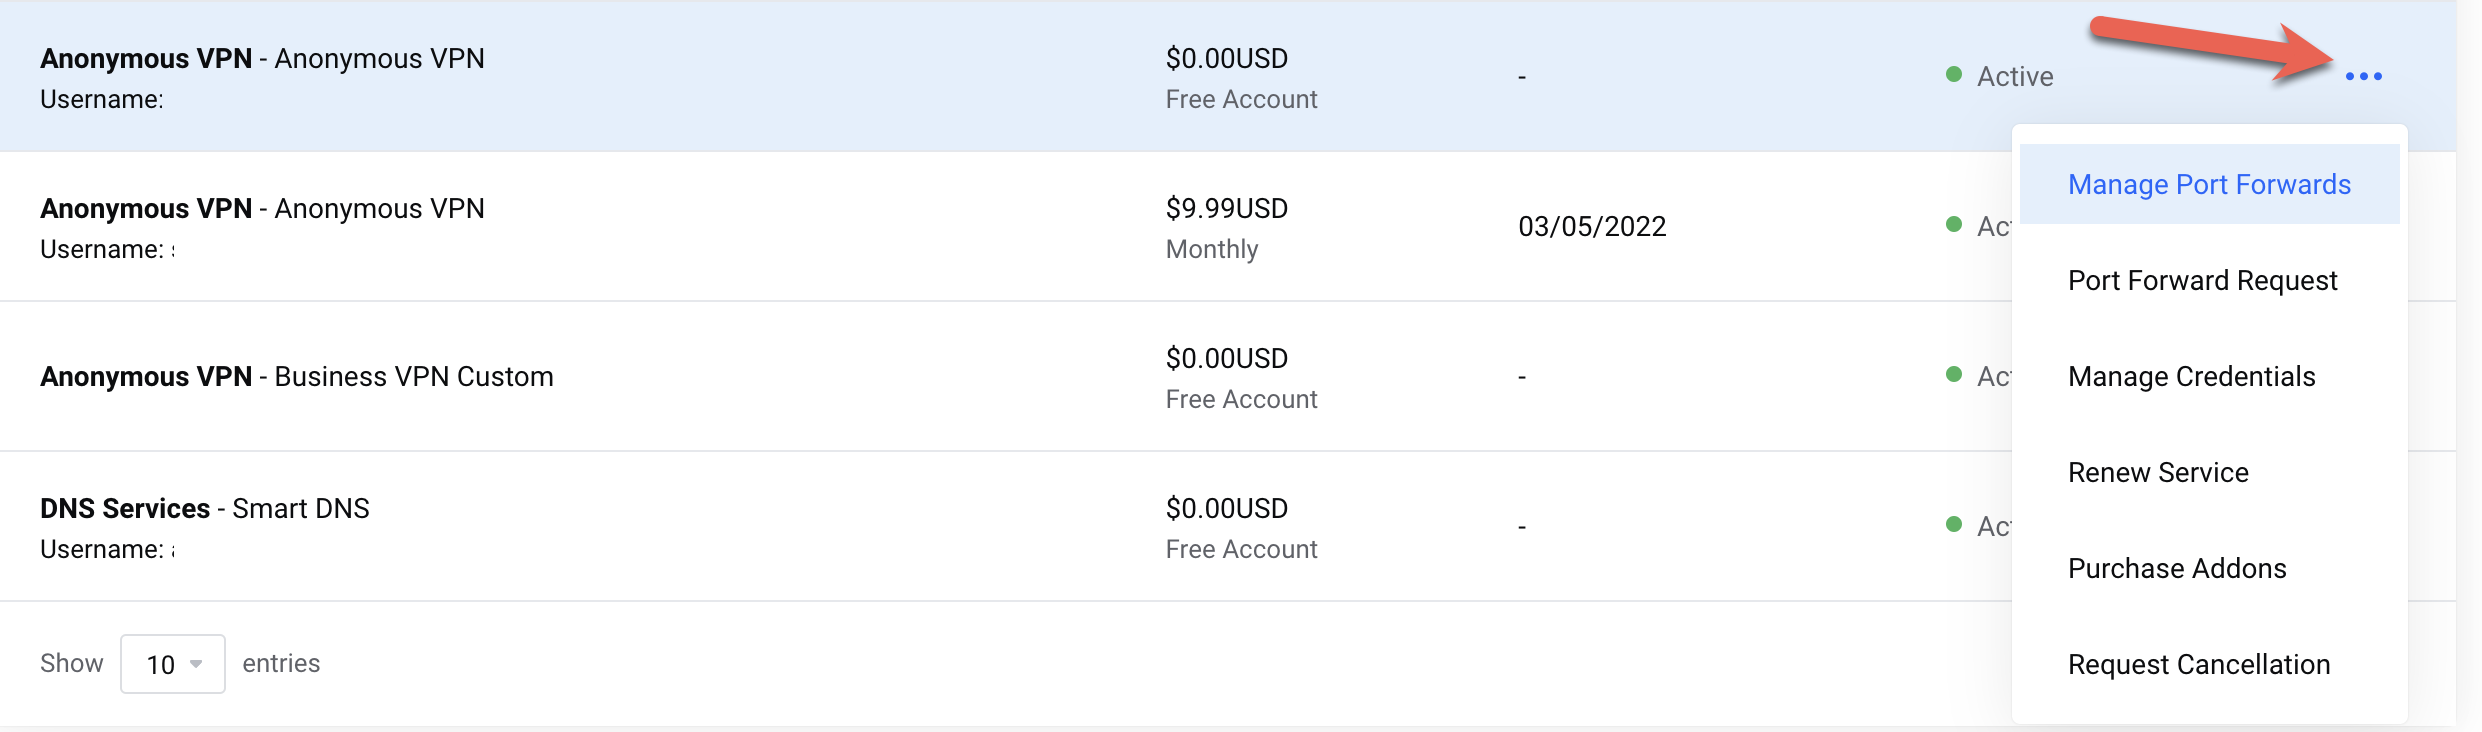
Navigate to your TorGuard client area:
- Go to Services
- Click the ⋮ (three dots) next to your service
- Select "Port Forward Request"
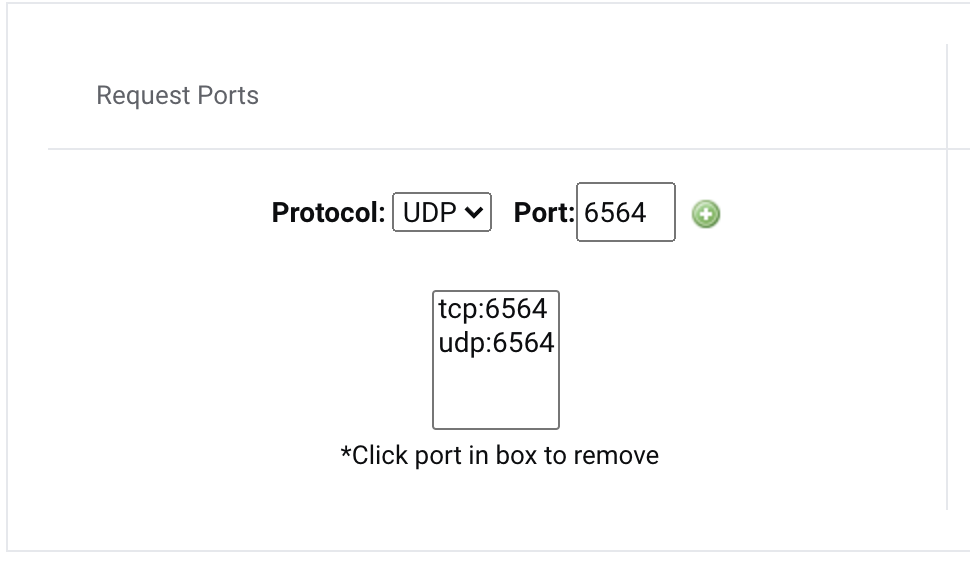
Configure Port Settings
A. Request Ports Section:
- Choose protocol (TCP or UDP)
- Enter port number (must be above 2048)
- Click the + to add port
- Repeat for additional ports
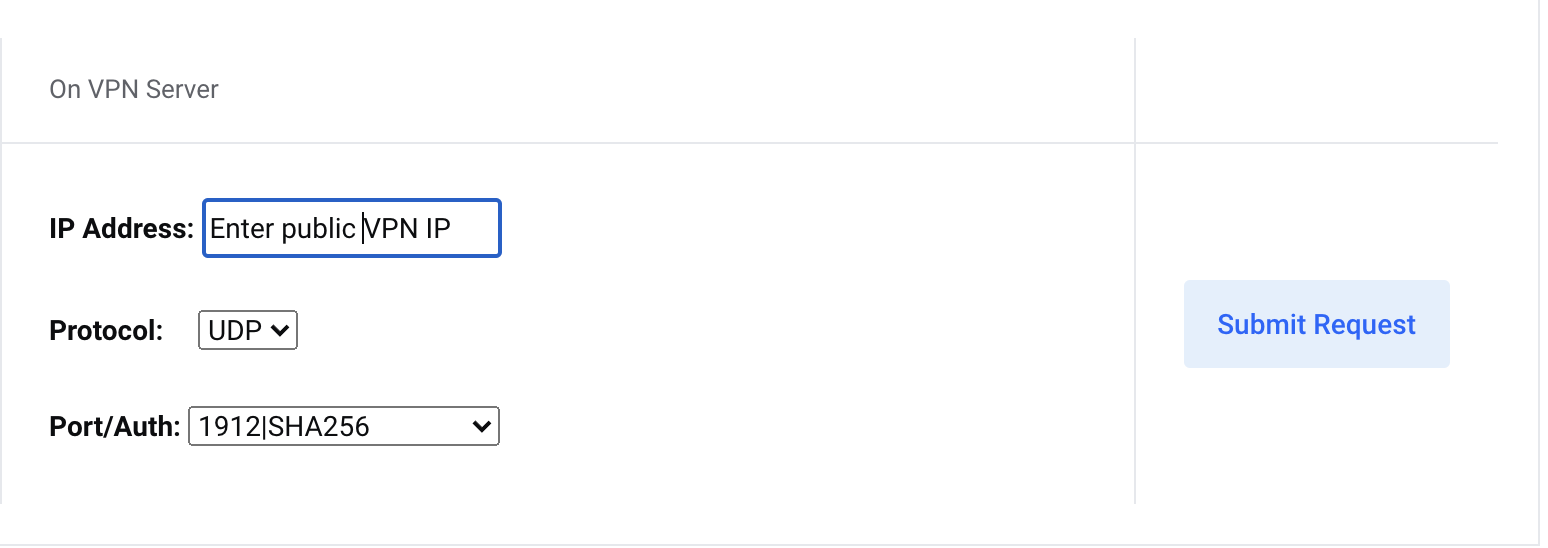
B. VPN Server Configuration:
- Enter your VPN IP from Step 1
- Select connection protocol
- Choose tunnel type (WireGuard/OpenConnect)
- Click "Submit Request"
⏱️ Processing Time
Requests are usually instant but may take up to 24 hours for approval. You'll receive an activation email when ready.
Manage Your Ports
After activation, manage your forwarded ports:
- Go to Services
- Click ⋮ → "Manage Port Forwards"
- Add or remove ports as needed
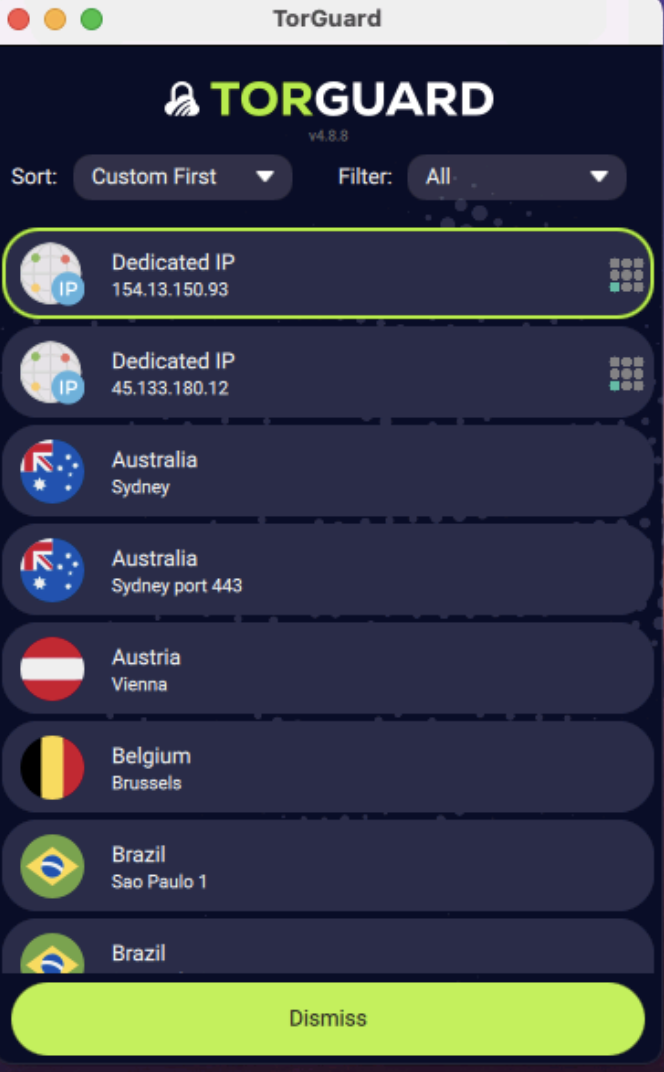
Load IP in TorGuard App
TorGuard Desktop 4.8.8+ automatically loads port forward IPs:
- New users: Just login - IPs load automatically
- Existing users: Logout and login again
- Port forward IPs appear at top of server list
- Settings are locked to prevent errors
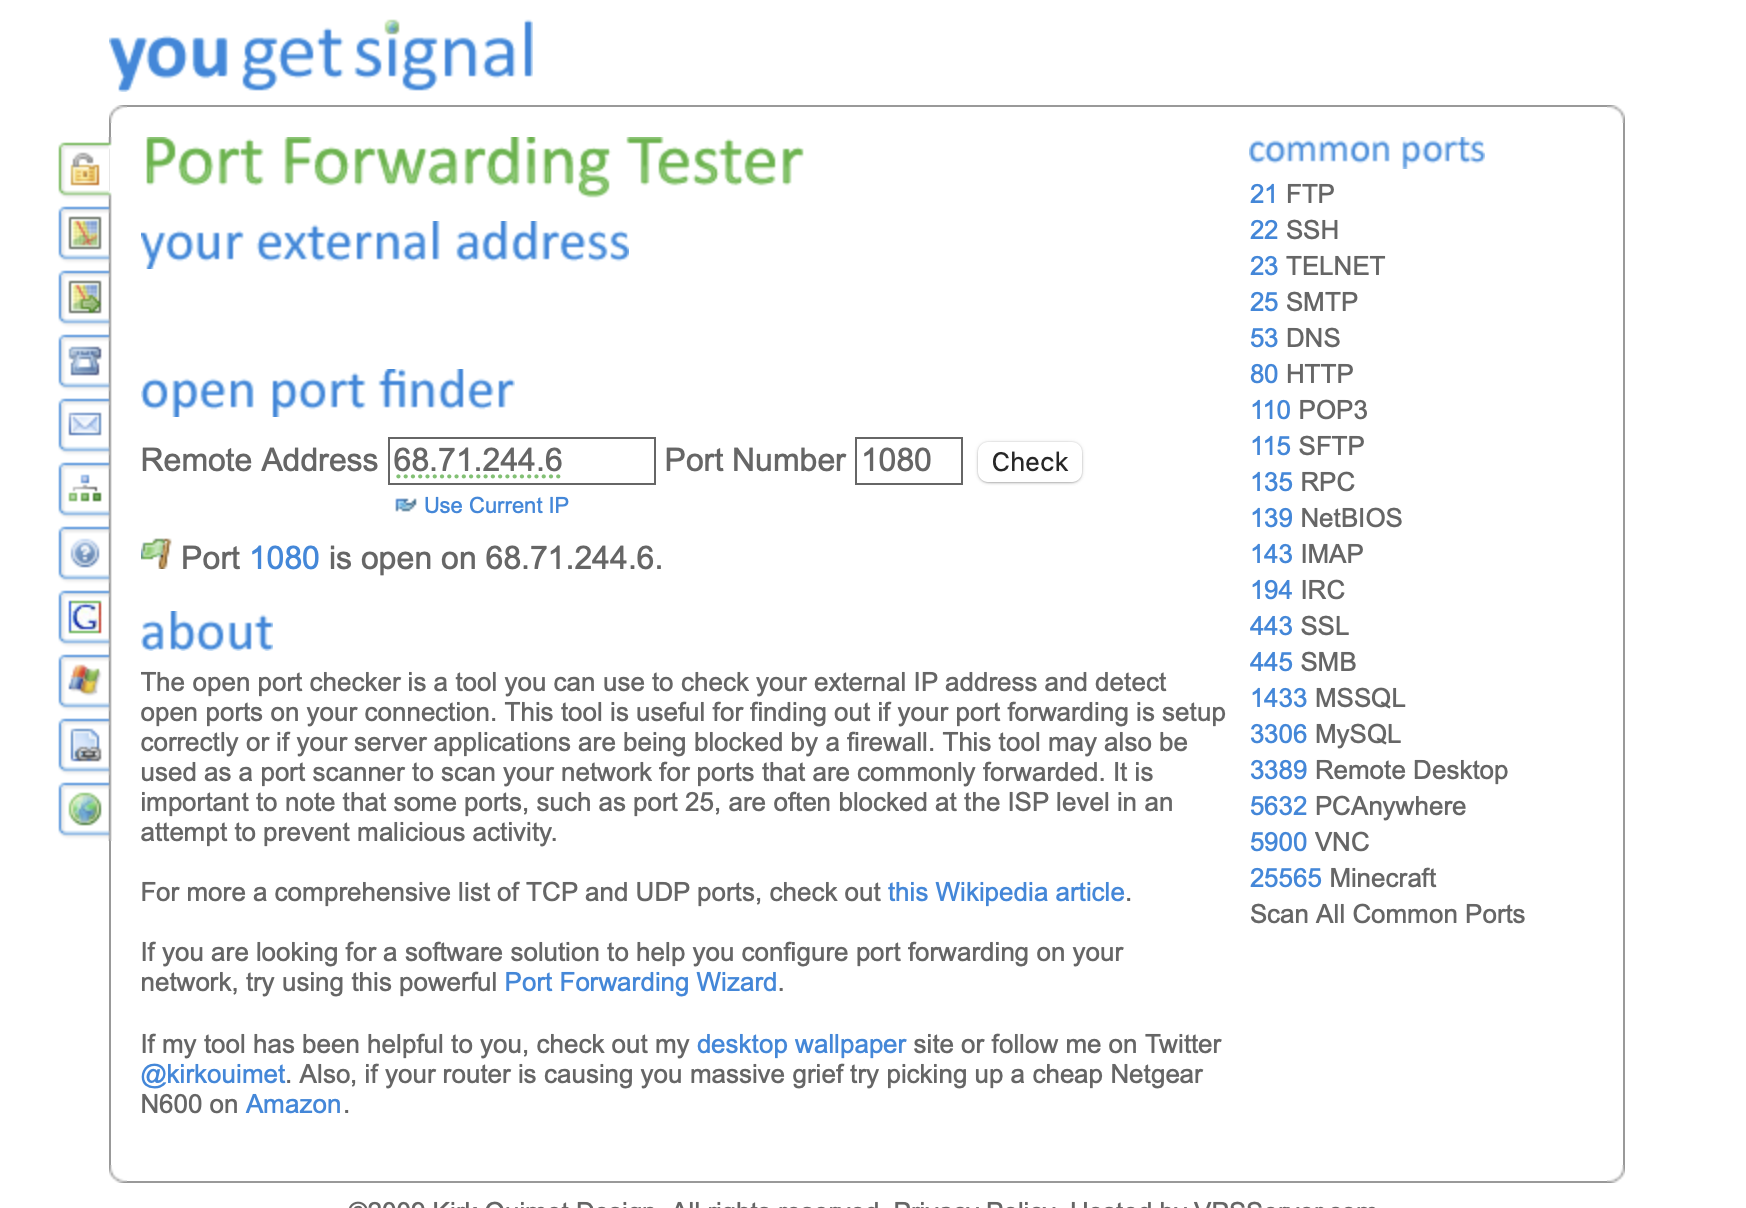
Test Your Port
Verify your port is open and accessible:
- Connect to your port forward IP
- Start the service using the port
- Use a port checking tool
- Verify "Open" status
Protocol Selection
🔧 TCP vs UDP Ports
TCP (Transmission Control)
- ✅ Reliable delivery
- ✅ Error checking
- ✅ Web services
- ✅ Remote access
- ⚠️ Slightly slower
Use for: HTTP, SSH, RDP, FTP
UDP (User Datagram)
- ✅ Faster speed
- ✅ Lower latency
- ✅ Real-time apps
- ⚠️ No error checking
- ⚠️ Can't test easily
Use for: Gaming, VoIP, streaming
Testing Tools
🧪 Port Testing Services
Command Line Test
Test from another computer:
# TCP Test
telnet YOUR_IP PORT

# Alternative
nc -zv YOUR_IP PORT
⚠️ Testing Requirements
- Service must be running on the port
- Test from outside your network
- TCP ports respond to tests, UDP typically don't
Firewall Configuration
🔥 Configure Your Firewall
You may need to allow the port through your local firewall:
Windows Firewall
- Open Windows Defender Firewall
- Click "Advanced settings"
- Select "Inbound Rules" → "New Rule"
- Choose "Port" → Next
- Select TCP/UDP and enter port number
- Allow the connection → Next
- Apply to all profiles → Next
- Name the rule → Finish
macOS Firewall
macOS firewall is application-based, not port-based:
- System Preferences → Security & Privacy
- Firewall tab → Firewall Options
- Add your application (+)
- Set to "Allow incoming connections"
For port-specific rules, use Terminal:
sudo pfctl -e
sudo pfctl -f /etc/pf.conf
Linux (iptables/ufw)
Using ufw (Ubuntu/Debian):
# Allow specific port
sudo ufw allow 25565/tcp

# Allow range
sudo ufw allow 8000:8100/tcp

# Check status
sudo ufw status
Using iptables:
# Allow incoming TCP
sudo iptables -A INPUT -p tcp --dport 25565 -j ACCEPT

# Save rules
sudo iptables-save
Common Port Numbers
📊 Popular Services & Ports
| Service | Port | Protocol | Notes |
|---|---|---|---|
| Plex Media Server | 32400 | TCP | Default Plex port |
| Minecraft Server | 25565 | TCP/UDP | Java Edition default |
| qBittorrent WebUI | 8080 | TCP | Web interface |
| SSH | 22 (use 2222+) | TCP | Change default for security |
| RDP | 3389 | TCP | Windows Remote Desktop |
| VNC | 5900 | TCP | Remote desktop |
| FTP | 21 (use 2121+) | TCP | File transfer |
| Jellyfin | 8096 | TCP | Media server |
Troubleshooting
🔍 Port Still Shows Closed?
Service Not Running
- Start the application first
- Verify it's listening on the port
- Check service logs
- Try local connection first
Firewall Blocking
- Check Windows/Mac firewall
- Router firewall settings
- Antivirus software
- Cloud firewall services
Wrong Connection
- Using wrong tunnel type
- Incorrect protocol selected
- Not using port forward IP
- Check activation email
Port Conflicts
- Port already in use
- Below 2048 (blocked)
- Reserved port number
- Try different port
ISP Blocking
- Some ISPs block ports
- Try different port number
- Use TCP instead of UDP
- Contact ISP support
App Configuration
- Bind to 0.0.0.0 not 127.0.0.1
- Check app firewall rules
- Verify port settings
- Review app documentation
Security Best Practices
🔐 Secure Your Forwarded Ports
- Strong Authentication: Use complex passwords, enable 2FA where possible
- SSL/TLS: Encrypt connections with HTTPS/SSL certificates
- IP Whitelisting: Restrict access to known IPs only
- Non-Standard Ports: Avoid default ports to reduce automated attacks
- Regular Updates: Keep all exposed services patched
- Access Logs: Monitor and review access attempts
- Fail2Ban: Implement brute force protection
- VPN-Only Access: Require VPN connection for sensitive services
Need Help?
If you need assistance with port forwarding:
Include your port number, service type, and any error messages