Why Change DNS? Custom DNS servers can improve browsing speed, enhance privacy, bypass censorship, and resolve VPN connectivity issues. DNS (Domain Name System) translates website names into IP addresses your computer can connect to.
When to Change DNS Settings
Consider changing your DNS servers when you experience:
- DNS Leaks: Your ISP's DNS revealing your browsing despite VPN use
- Slow Website Loading: ISP DNS servers causing delays
- Blocked Websites: ISP or government DNS filtering
- VPN Connection Issues: DNS conflicts preventing VPN connections
- Privacy Concerns: ISP tracking your DNS queries
Recommended DNS Servers
| Provider | Primary DNS | Secondary DNS | Features |
|---|---|---|---|
| TorGuard DNS | 10.8.0.1 | 10.9.0.1 | No logs, VPN optimized |
| Cloudflare | 1.1.1.1 | 1.0.0.1 | Fast, privacy-focused |
| Google DNS | 8.8.8.8 | 8.8.4.4 | Reliable, global coverage |
| OpenDNS | 208.67.222.222 | 208.67.220.220 | Filtering options, security |
| Quad9 | 9.9.9.9 | 149.112.112.112 | Malware blocking |
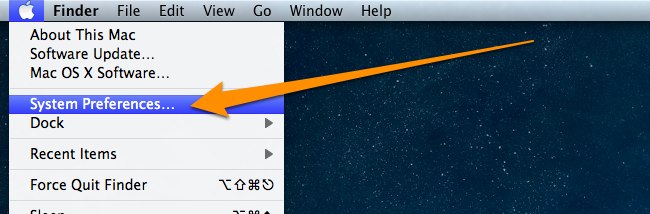
Step 1: Open System Preferences
Access System Preferences using one of these methods:
- Click the Apple logo in the top-left corner → System Preferences
- Click the System Preferences icon in the Dock
- Use Spotlight search (⌘ + Space) and type "System Preferences"
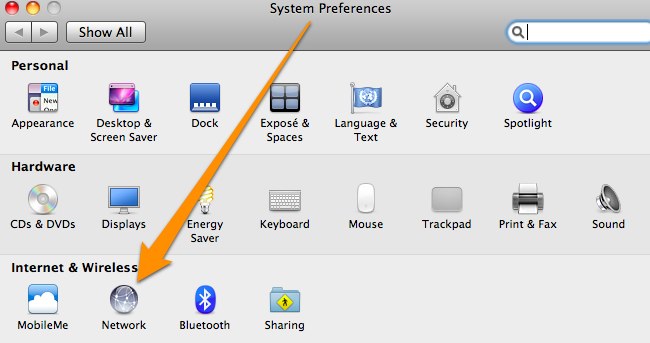
Step 2: Navigate to Network Settings
In System Preferences, click on the Network icon. This opens your network configuration panel.
Step 3: Select Your Network Interface
- On the left side, select your active network connection:
- Wi-Fi (for wireless connections)
- Ethernet (for wired connections)
- USB Ethernet (for adapters)
- The active connection shows a green dot
- Click the Advanced... button in the bottom-right corner
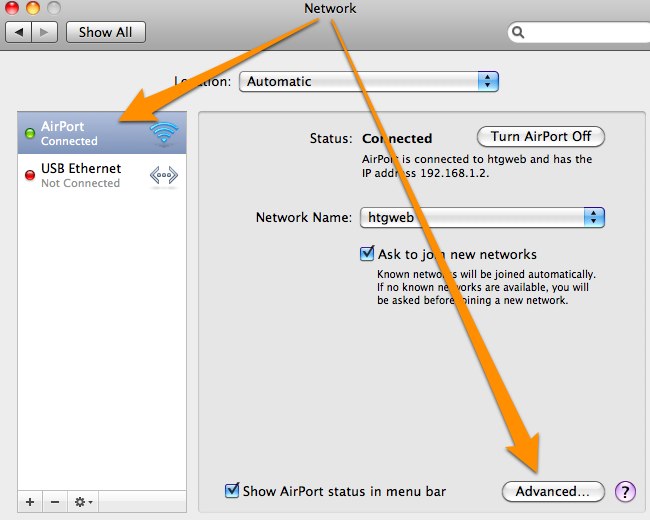
Note: You must configure DNS for each network interface separately. If you use both Wi-Fi and Ethernet, repeat this process for both connections.
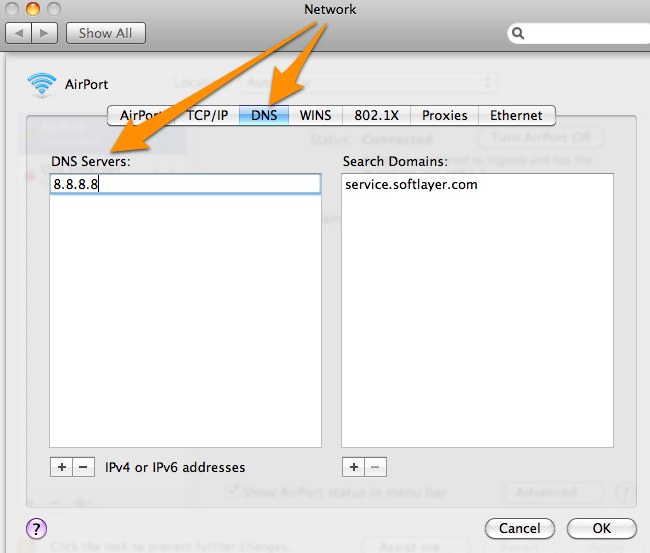
Step 4: Configure DNS Servers
- Click the DNS tab at the top of the Advanced window
- You'll see existing DNS servers (if any):
- Grayed-out entries are from DHCP (automatic)
- Black entries are manually configured
- Click the + button to add new DNS servers
- Type the DNS server IP address (e.g., 1.1.1.1)
- Press Enter and repeat for additional servers
Removing DNS Servers
- Select a DNS server from the list
- Click the - button to remove it
- You cannot remove grayed-out (DHCP) entries
Reordering DNS Servers
- Click and drag servers to change priority
- Top server is tried first
- Lower servers are fallbacks
Step 5: Apply Your Changes
- Click OK to close the Advanced settings
- Click Apply in the Network window
- Your new DNS settings are now active
Settings Applied! Your Mac is now using the custom DNS servers. Test your connection by browsing to any website.
Verifying DNS Configuration
Method 1: Terminal Command
Open Terminal and run:
scutil --dns | grep "nameserver"
Method 2: Network Utility
- Open Network Utility (in /System/Library/CoreServices/Applications/)
- Click the Lookup tab
- Your DNS servers appear at the bottom
Method 3: Online DNS Test
Visit TorGuard DNS Leak Test to verify which DNS servers you're using.
DNS Settings for VPN Users
Preventing DNS Leaks
When using a VPN, ensure DNS queries go through the VPN tunnel:
- Use your VPN provider's DNS servers (e.g., TorGuard: 10.8.0.1)
- Enable DNS leak protection in your VPN client
- Test for leaks after connecting to VPN
Split DNS Configuration
For advanced users who need different DNS for VPN vs. regular traffic:
- Configure VPN DNS in the VPN client
- Set system DNS for non-VPN traffic
- Use network locations for easy switching
macOS Version Differences
macOS Ventura (13.0+) and Sonoma (14.0+)
- System Settings instead of System Preferences
- Navigate: System Settings → Network → [Connection] → Details → DNS
- Interface is redesigned but process remains similar
macOS Big Sur (11.0) through Monterey (12.0)
- Uses System Preferences as shown in this guide
- Interface matches screenshots above
Older macOS Versions
- Process is identical but UI may vary slightly
- DNS tab location remains consistent
Troubleshooting DNS Issues
Websites Not Loading
- Check DNS server status: Ping the DNS IP to verify connectivity
- Try alternate servers: Switch to different DNS providers
- Clear DNS cache: Run
sudo dscacheutil -flushcache - Reset to DHCP: Remove all manual DNS entries
DNS Changes Not Taking Effect
- Ensure you clicked "Apply" after making changes
- Restart your network connection:
- Turn Wi-Fi off and on
- Unplug/replug Ethernet cable
- Reboot your Mac if necessary
VPN DNS Conflicts
- Disconnect VPN before changing system DNS
- Check VPN client DNS settings
- Some VPNs override system DNS (this is normal)
- Configure DNS within VPN client if available
Advanced DNS Configuration
Using Network Locations
Create different DNS profiles for various situations:
- In Network preferences, click "Location" dropdown
- Select "Edit Locations..."
- Create new locations (Home, Work, VPN, etc.)
- Configure different DNS for each location
- Switch locations from Apple menu → Location
Command Line DNS Configuration
For automation or scripts, use networksetup:
# Set DNS for Wi-Fi
sudo networksetup -setdnsservers Wi-Fi 1.1.1.1 1.0.0.1

# Set DNS for Ethernet
sudo networksetup -setdnsservers Ethernet 8.8.8.8 8.8.4.4

# Clear DNS (use DHCP)
sudo networksetup -setdnsservers Wi-Fi Empty
DNS over HTTPS (DoH)
For encrypted DNS queries in macOS 11+:
- Download a configuration profile from your DNS provider
- Install via System Preferences → Profiles
- Enables encrypted DNS system-wide
Best Practices
- Use multiple DNS servers: Add at least two for redundancy
- Test after changes: Verify websites load correctly
- Document your settings: Note which DNS servers you use
- Regular speed tests: Compare DNS provider performance
- Privacy consideration: Choose no-log DNS providers
Pro Tip: Create a "VPN" network location with TorGuard DNS servers pre-configured. Switch to this location before connecting to VPN for optimal compatibility.