Changing your DNS (Domain Name System) servers on macOS can improve your internet speed, enhance privacy, and bypass content restrictions. This comprehensive guide covers all macOS versions and includes TorGuard's secure DNS servers along with other privacy-focused options.
🔒 Why Change DNS?
- Privacy: ISP DNS servers log your browsing activity
- Speed: Faster DNS servers reduce website loading times
- Security: Protection against DNS hijacking and phishing
- Access: Bypass DNS-based content blocking
Recommended DNS Servers
TorGuard DNS (VPN Users)
For optimal privacy when using TorGuard VPN, use our internal DNS servers:
| DNS Type | Primary DNS | Secondary DNS | Features |
|---|---|---|---|
| TorGuard Standard | 10.8.0.1 | 10.10.0.1 | No logs, Ad blocking available |
| TorGuard Secure | 10.9.0.1 | 10.11.0.1 | Enhanced security, Malware blocking |
Public DNS Servers
| Provider | Primary DNS | Secondary DNS | Privacy Features |
|---|---|---|---|
| Cloudflare | 1.1.1.1 | 1.0.0.1 | No logs, DNSSEC, Fast |
| Quad9 | 9.9.9.9 | 149.112.112.112 | Malware blocking, No logs |
| Google Public DNS | 8.8.8.8 | 8.8.4.4 | Fast, Reliable |
| OpenDNS | 208.67.222.222 | 208.67.220.220 | Content filtering options |
For macOS Ventura (13.0) and Sonoma (14.0)
Apple redesigned System Settings in macOS Ventura. Here's the updated process:
- Click the Apple menu → System Settings
- Click Network in the sidebar
- Click your active connection (Wi-Fi or Ethernet)
- Click Details...
- Click DNS in the sidebar
- Click the + button to add DNS servers
- Enter your preferred DNS servers
- Click OK to save
For macOS Big Sur (11.0) to Monterey (12.0)
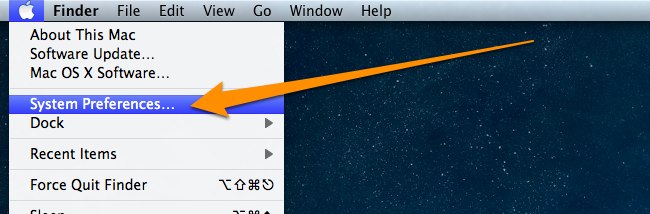
Step 1: Open System Preferences
Click the Apple menu in the top-left corner and select System Preferences.
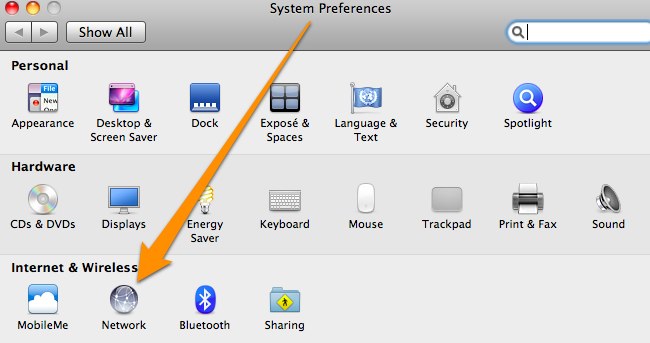
Step 2: Access Network Settings
Click on the Network icon to access your network configuration.
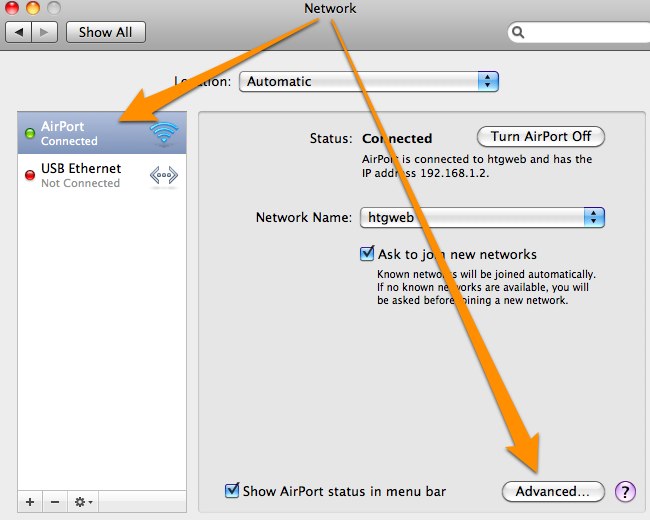
Step 3: Select Your Network Interface
Select your active network connection from the left sidebar:
- Wi-Fi: For wireless connections
- Ethernet: For wired connections
- Thunderbolt Bridge: For Thunderbolt networking
Click the Advanced... button in the bottom-right corner.
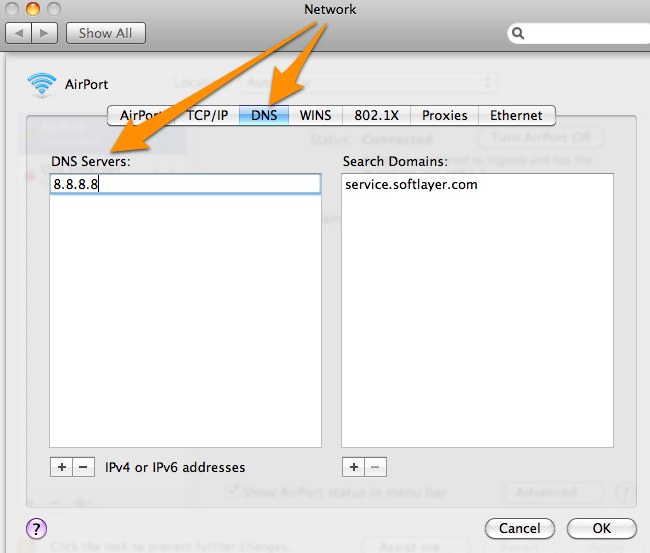
Step 4: Configure DNS Servers
Click the DNS tab to see your current DNS servers. To add new ones:
- Click the + button below the DNS Servers list
- Type the DNS server address (e.g., 1.1.1.1)
- Press Enter and repeat for additional servers
- Remove unwanted servers by selecting them and clicking -
- Drag servers to reorder priority (top = primary)
Step 5: Apply Your Changes
- Click OK to close the Advanced settings
- Click Apply in the Network window
- Your new DNS settings are now active!
Enable DNS over HTTPS (DoH)
For enhanced privacy, enable DNS over HTTPS in macOS Big Sur and later:
- Download a DNS configuration profile from your provider:
- Double-click the downloaded profile
- Follow the installation prompts
- Go to System Preferences → Profiles to verify installation
Change DNS via Terminal
For advanced users, you can change DNS settings using Terminal:
View Current DNS Servers
networksetup -getdnsservers Wi-FiSet New DNS Servers
# For Wi-Fi
sudo networksetup -setdnsservers Wi-Fi 1.1.1.1 1.0.0.1

# For Ethernet
sudo networksetup -setdnsservers Ethernet 1.1.1.1 1.0.0.1
Reset to DHCP-provided DNS
sudo networksetup -setdnsservers Wi-Fi emptyVerify Your DNS Changes
After changing your DNS settings, verify they're working correctly:
Method 1: Using Terminal
# Check which DNS server is being used
nslookup google.com

# Or use dig
dig google.com
Method 2: Online DNS Leak Test
- Visit TorGuard DNS Leak Test
- Click "Standard Test" or "Extended Test"
- Verify the results show your chosen DNS servers
Troubleshooting Common Issues
DNS Changes Not Taking Effect
- Flush DNS cache:
sudo dscacheutil -flushcache - Restart network service:
sudo killall -HUP mDNSResponder - Toggle Wi-Fi: Turn Wi-Fi off and back on
- Reboot: Restart your Mac if changes persist
Slow DNS Resolution
- Try different DNS servers closer to your location
- Remove unnecessary DNS entries (keep only 2-3)
- Ensure DNS servers are ordered by preference
- Check for network interference or firewall rules
Websites Not Loading
- Verify DNS server addresses are typed correctly
- Test with a known working DNS (8.8.8.8)
- Check if the issue is DNS-related:
ping 8.8.8.8  # Should work if internet is connected
nslookup google.com  # Should fail if DNS is broken
Configure DNS for Specific Applications
Some applications allow custom DNS settings:
Firefox
- Type
about:configin the address bar - Search for
network.trr.mode - Set value to
2for DNS over HTTPS - Set
network.trr.urito your DoH provider
Chrome
- Go to Settings → Privacy and security → Security
- Enable "Use secure DNS"
- Select your preferred provider
DNS with VPN Usage
⚠️ Important for VPN Users
When using TorGuard VPN, the app automatically configures secure DNS servers to prevent leaks. Manual DNS changes may interfere with this protection.
Best practices for VPN users:
- Let TorGuard VPN manage DNS automatically
- Enable "DNS Leak Protection" in TorGuard settings
- Test for DNS leaks after connecting to VPN
- Only use manual DNS when not connected to VPN
Advanced DNS Features on macOS
Split DNS Configuration
Configure different DNS servers for specific domains:
# Create a resolver file
sudo mkdir -p /etc/resolver
sudo echo "nameserver 10.8.0.1" > /etc/resolver/work.local
DNS Search Domains
Add search domains in Network → Advanced → DNS:
- Allows typing
serverinstead ofserver.company.com - Useful for internal networks
- Order matters for resolution priority
Security Recommendations
- Use encrypted DNS: Prefer DNS over HTTPS or DNS over TLS
- Avoid ISP DNS: They often log queries and inject ads
- Regular testing: Periodically check for DNS leaks
- Multiple servers: Configure both primary and secondary DNS
- VPN integration: Use VPN for complete privacy protection
Need Additional Help?
If you're experiencing issues with DNS configuration or want to learn more about TorGuard's secure DNS services, our support team is here to help.
Contact Support