Disclaimer: Before we begin make sure there is nothing valuable on the old PC's hard drive that you will use. Any old data will be written over and gone forever.
Prepare the USB Installer
To make this as painless as possible we created a bootable Linux Mint USB image with everything you will need pre-installed.
Fire up your favorite torrent client and download our custom Linux Mint image. This image is only 4GB in size so any USB drive will work however if you have a USB 3.0 drive that works best.
Next, download our favorite application to copy bootable images onto USB drives: balenaEtcher. balenaEtcher is compatible with Windows, MacOS, and Linux.
Start balenaEtcher and click the Flash from file button. Locate the custom Linux Mint image that was downloaded over bittorrent and insert your USB drive into the computer. Click the Select Target button, choose the USB drive and then click the Select button. Double check that you selected the USB drive and not your main hard drive , then click the Flash button.
Wait a few minutes and once the flash is complete remove the USB drive and proceed to the next step.
Boot Your Old PC from USB
Make sure the old PC is powered off then insert the recently flashed USB drive into the computer. In order to boot from the USB drive you must first change the boot order in the bios settings. Most computer's bios settings can be accessed by pressing the ESC key, DEL key, or F12 key right away when the PC is powering on. When in doubt it might take a few tries pressing all of them before you reach the blue bios screen.
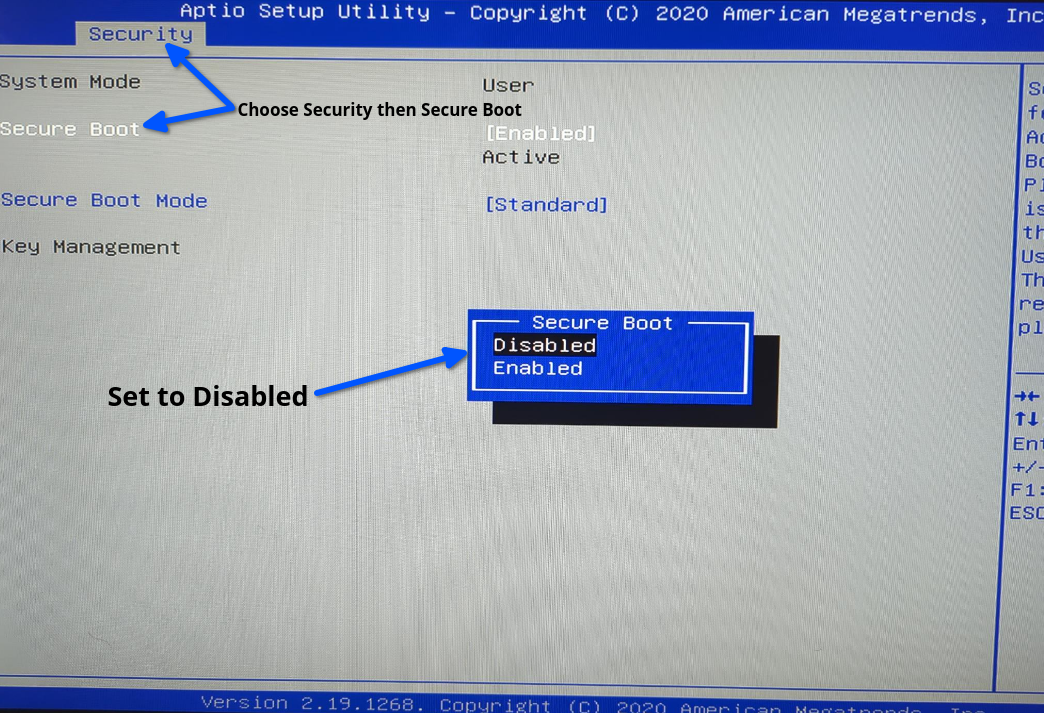
Power on your PC and press ESC, F12, DEL (or all of them) until you see the bios screen below. Depending on your hardware the bios screen might look a little different but the settings should be similar.
Use the right arrow key to access the Security tab and make sure Secure Boot is set to Disabled. If it shows as enabled press the down arrow to highlight Secure Boot and set it as Disabled. Press ESC to go back to the main bios screen.
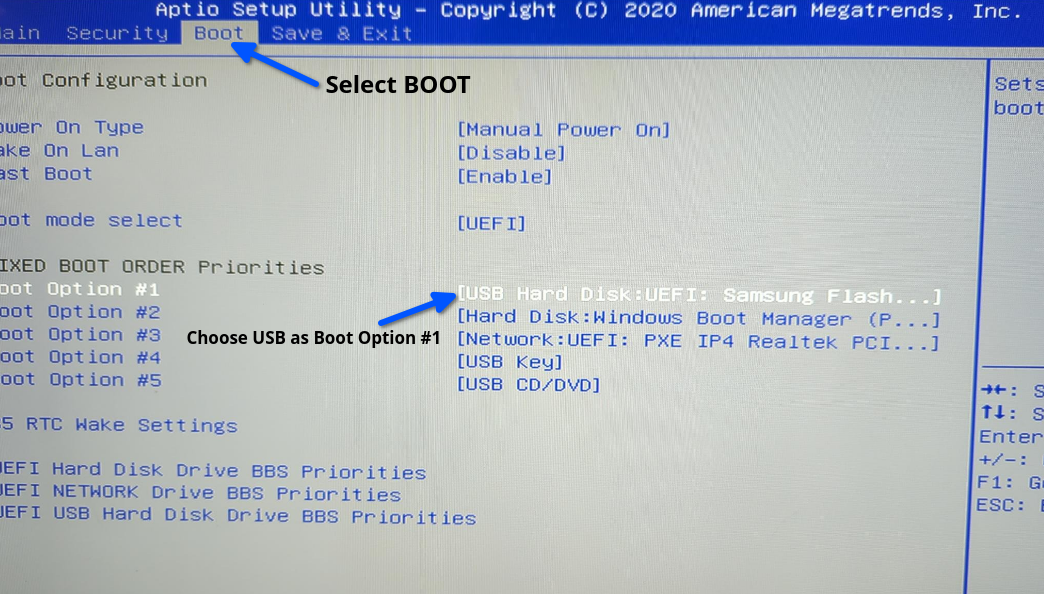
Then select the Boot tab and use the down arrow key to highlight Boot Option #1. This option is likely set to your hard disk. Press ENTER and select the USB drive, then go to Save & Exit and choose Save Changes on Exit.
Your PC should now boot the USB drive first instead of the hard drive and you should see the screen below. Press the ENTER key four times to proceed to the Linux Mint Desktop.

Burn PrivateRouter OpenWRT to your Old PC's Hard Drive
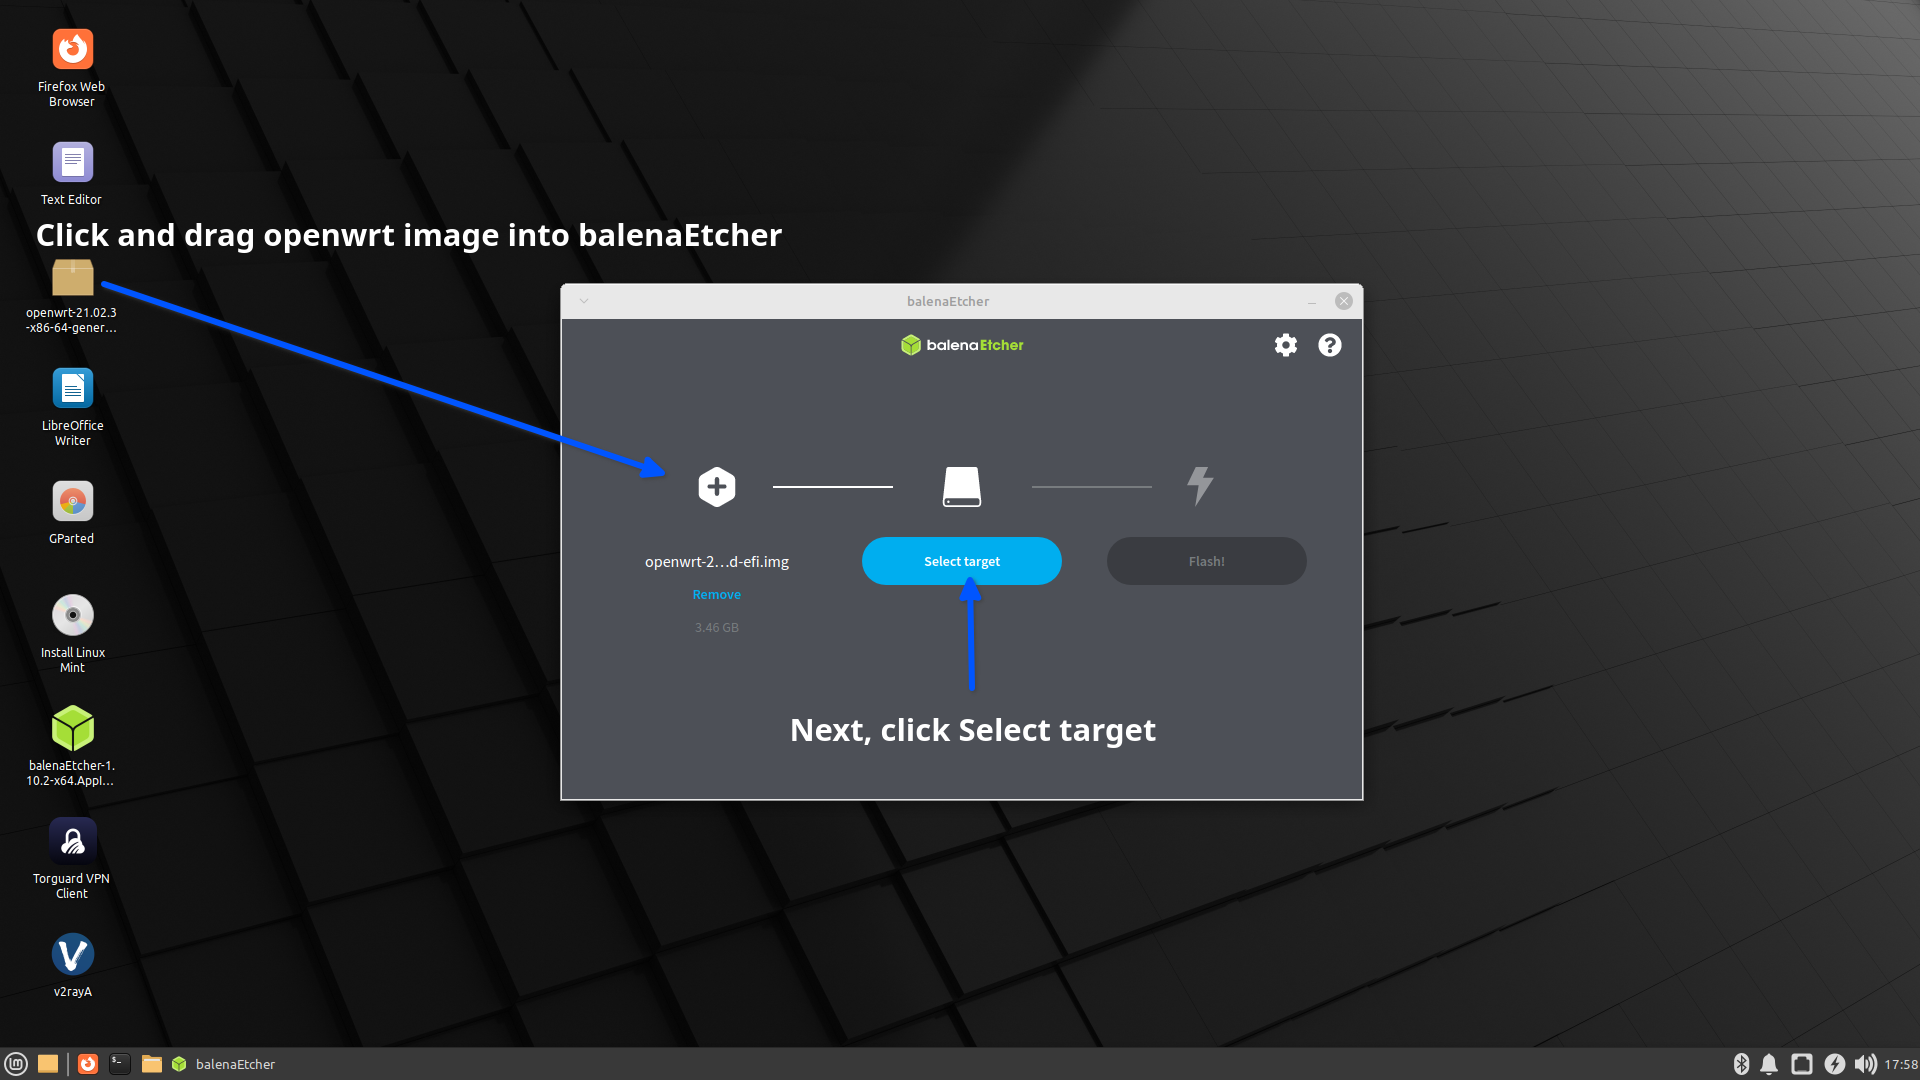
You should now see the Linux Mint Desktop below. Double click balenaEtcher.

Locate the openwrt image on the desktop then click and drag the file into the balenaEtcher window. Next, click Select Target.
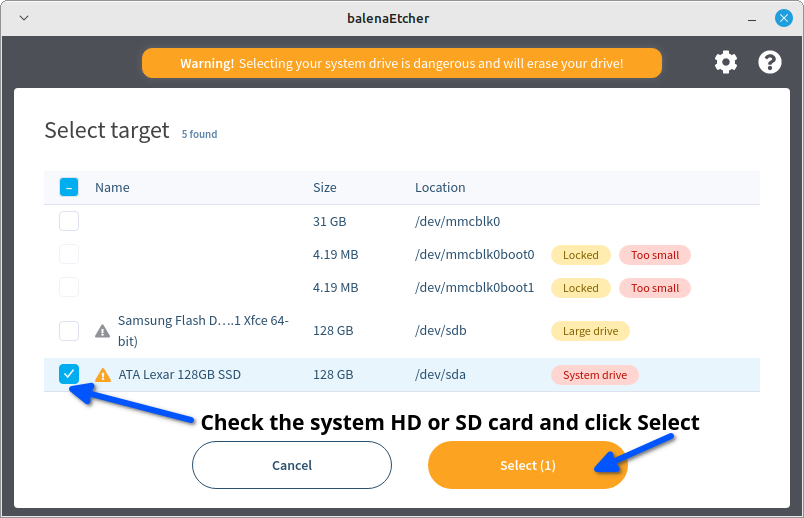
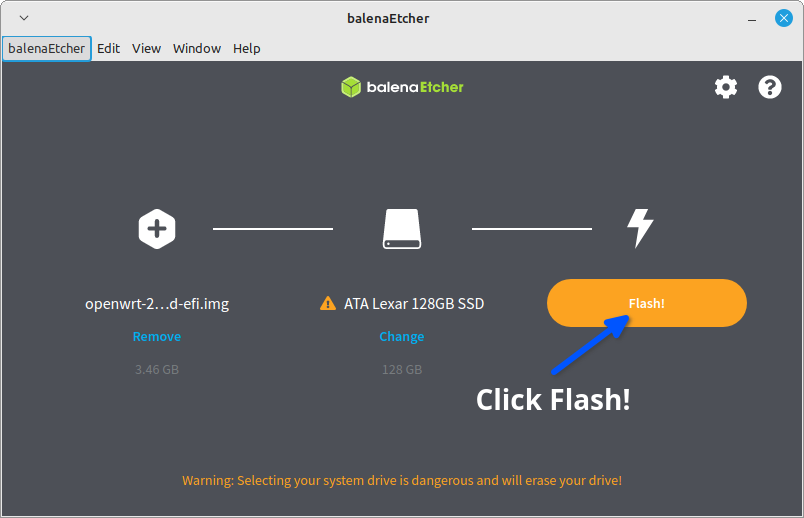
Now we are going to do exactly what the warning says: select the system drive and erase the hard drive by writing over it with the PrivateRouter OpenWRT image. (You may have to click the "hidden" link to see the system drive.) Your system drive is usually labeled /dev/sda
Click the Flash button to copy the image to your hard drive.
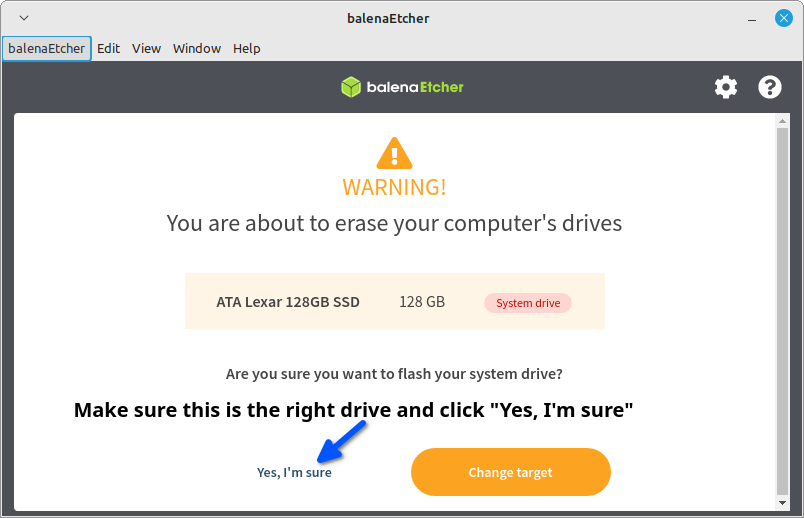
You should see one more warning about erasing your computer's hard drives. Click the Yes, I'm sure link.
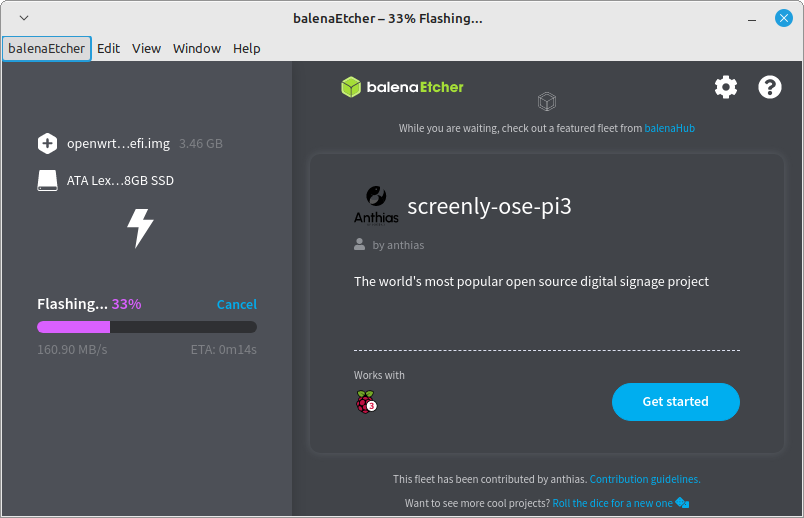
Wait a few moments while the image is being flashed onto your hard drive...
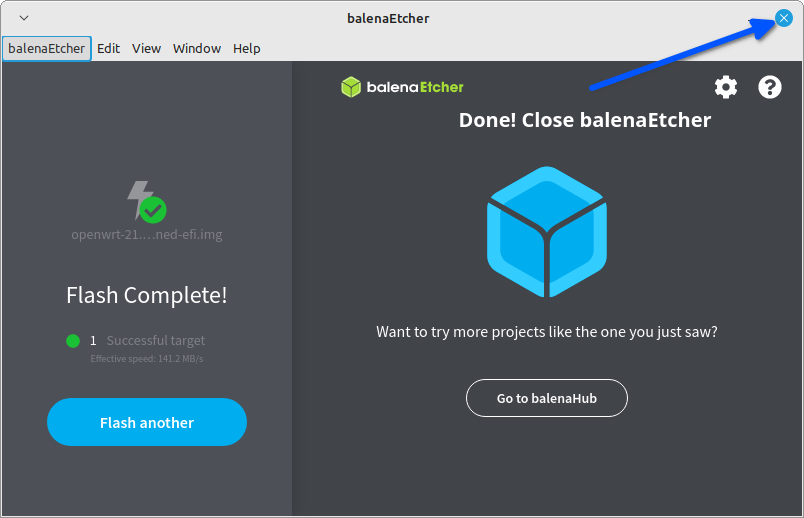
Once the flash is complete, close balenaEtcher.
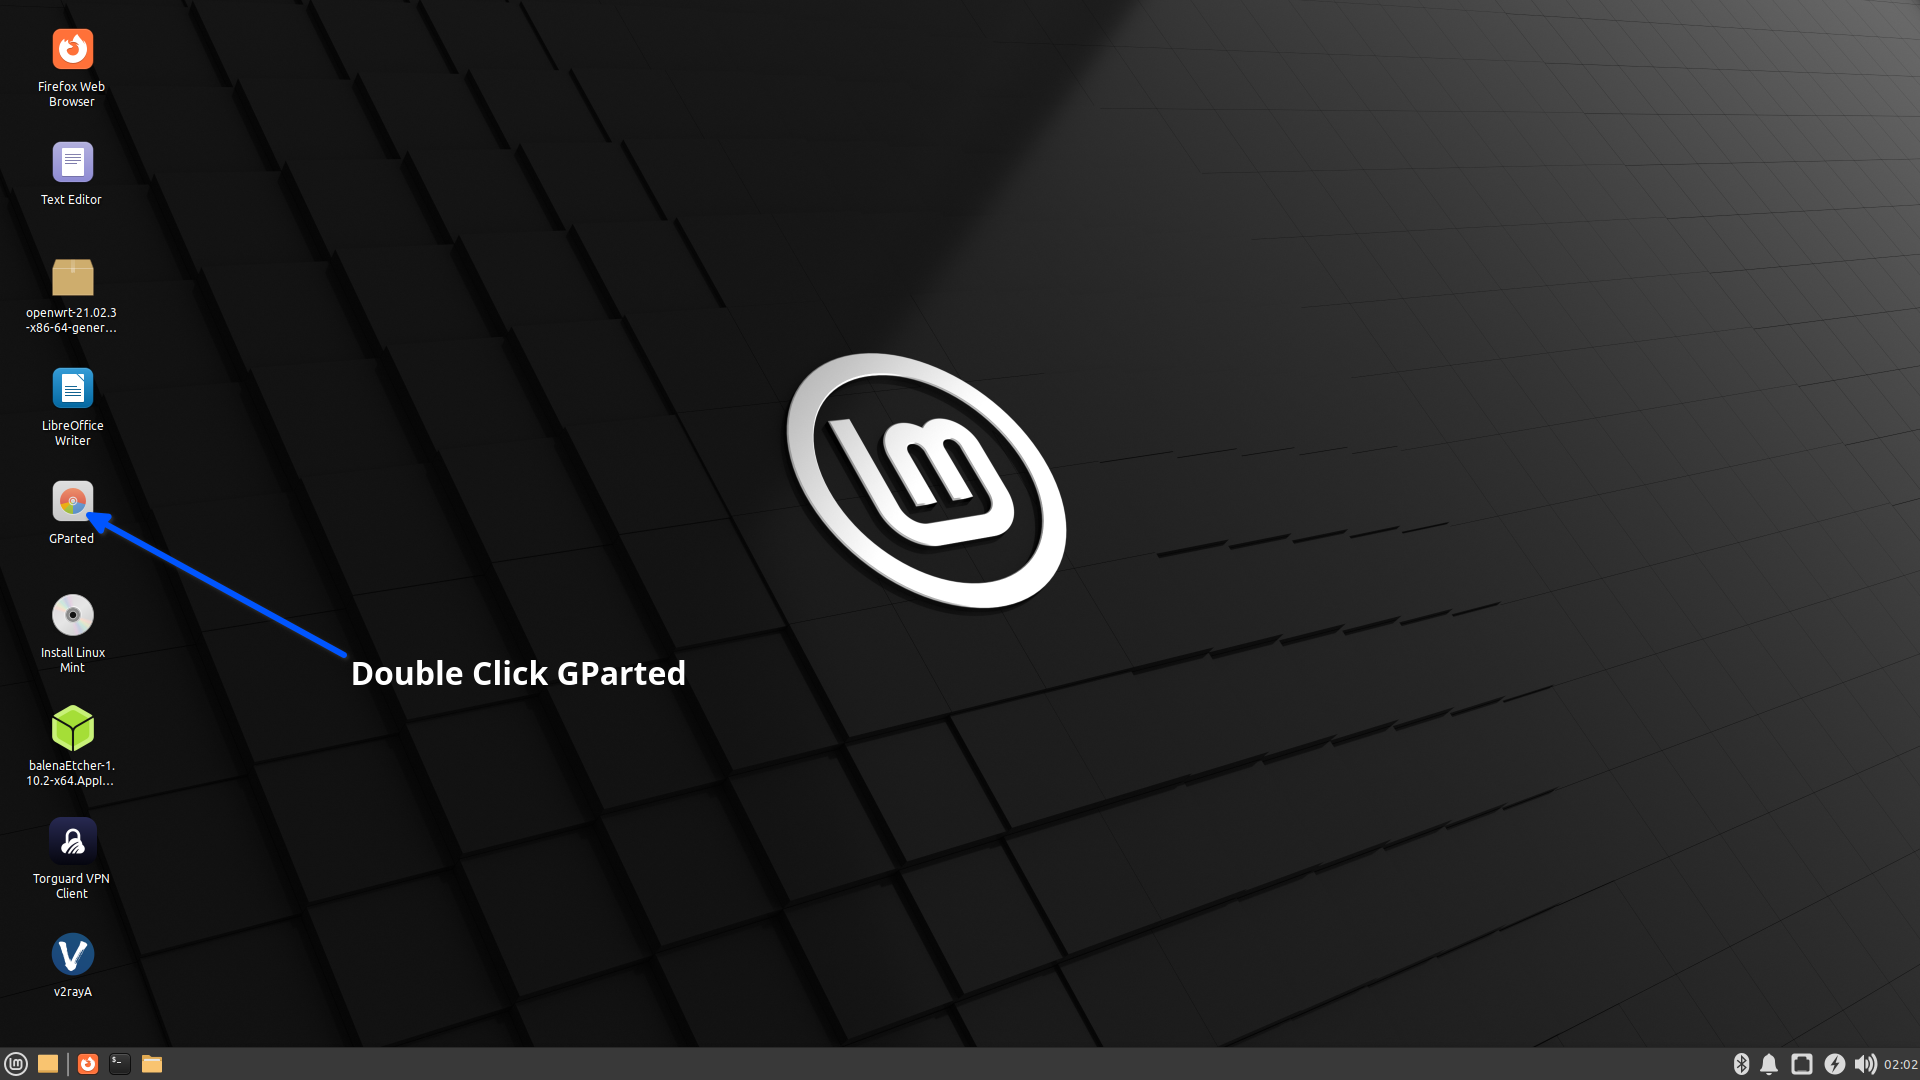
Now that the OpenWRT image is on the hard disk we need to create an ext4 partition with the remaining space for Docker to use. On the desktop double click the Gparted icon. (Docker is the software that can run applications directly on your router.)
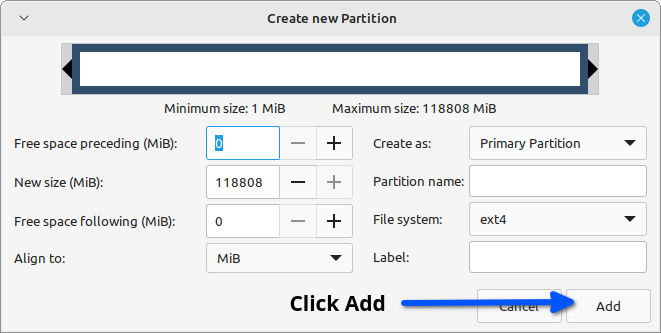
Make sure to choose the system drive that we just flashed from the dropdown menu (/dev/sda). Right click the unallocated space area and click NEW.

Click the add button to create a new ext4 partition with the unallocated space on the hard drive.
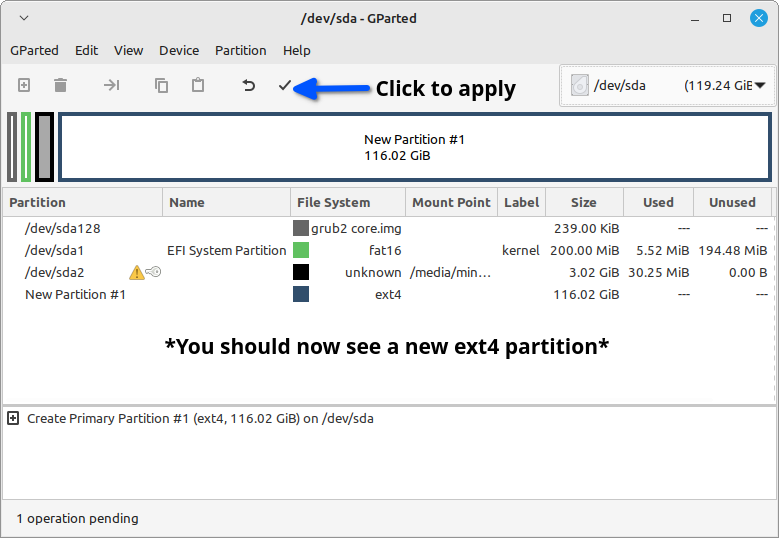
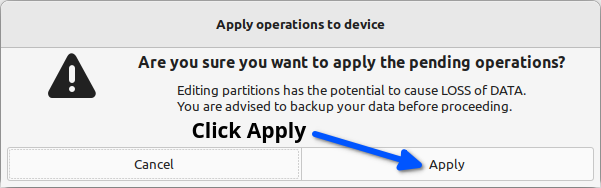
You have now copied the PrivateRouter OpenWRT image to your PC's hard drive. Shutdown the PC and remove the USB drive before moving on to the next step. When prompted click the to save all changes. Apply button
Boot PrivateRouter OpenWRT
Before booting the first time into OpenWRT it's important to plug a LAN cable into your PC that is connected to another internet enabled WiFi router or modem. The first time your PC/Wifi Router boots up it will update itself and install various drivers, VPN clients and Docker. It will need internet access to complete this task.
If your PC does not have two LAN ports we suggest plugging in a USB LAN adapter so you can access it directly from another computer after all drivers are installed. This OpenWRT image is pre-built with drivers for the UGREEN USB 3.0 Gigabit Ethernet Adapter, however other USB LAN adapters will also work.
If you do not have any extra LAN port or USB Ethernet adapter, you can still connect after the first boot to enable WiFi or connect to an existing WiFi network.
By default your OpenWRT router will run on IP address: 192.168.70.1
Power on the PC and monitor the progress on screen. After first boot wait about five minutes for the router to complete the update process, then reboot.
To ensure you have internet access type "ping 1.1.1.1" and press enter. You should see a reply, however if you are not connected you can plug in a LAN cable to another PC and access 192.168.70.1 in a web browser. (If you can't access the IP in a web browser follow the troubleshooting steps at the end of this tutorial.)
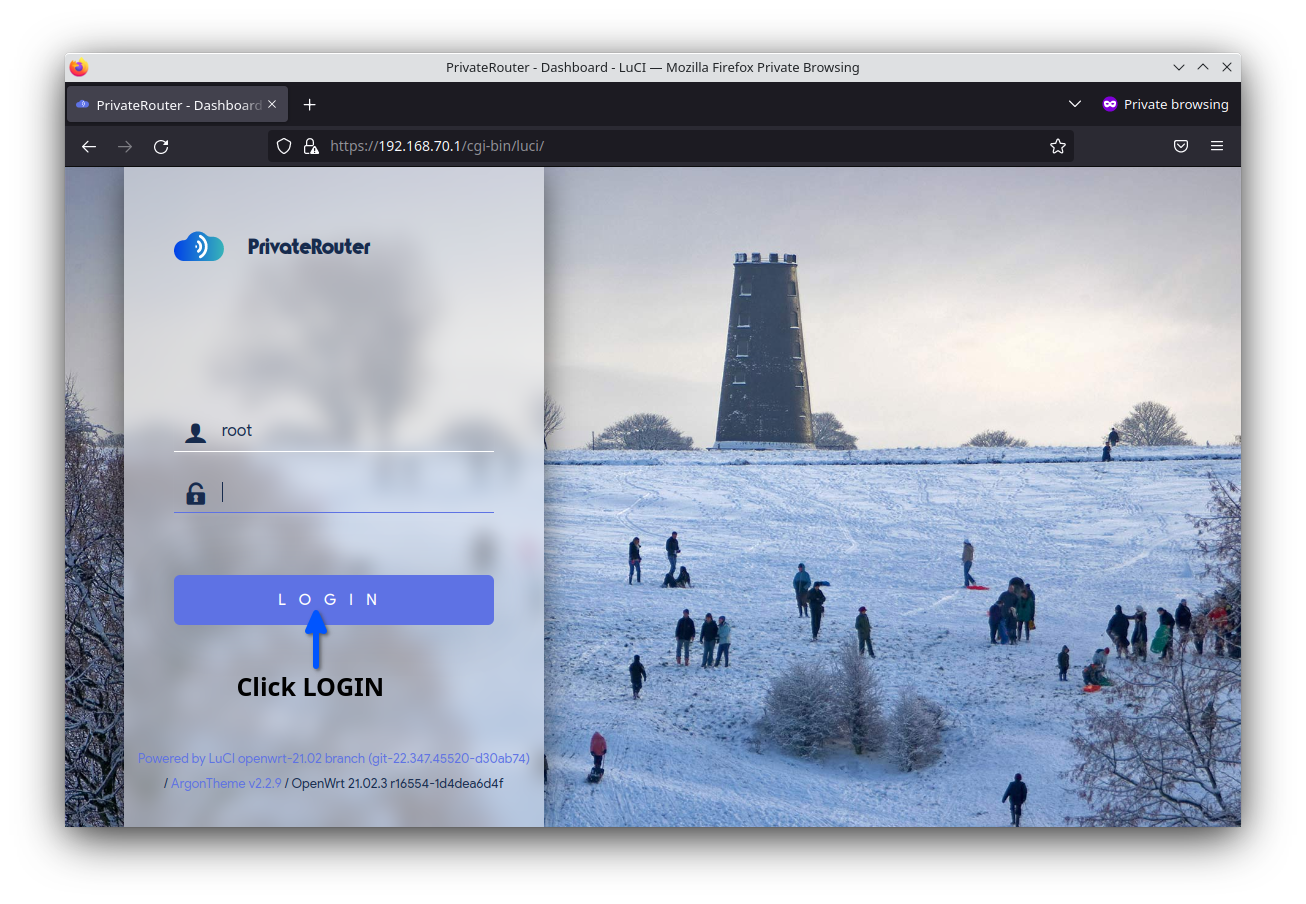
Once the first boot is complete and all drivers are installed, connect a LAN cable to another PC or Laptop and access 192.168.70.1 from any web browser. Click the Login button:
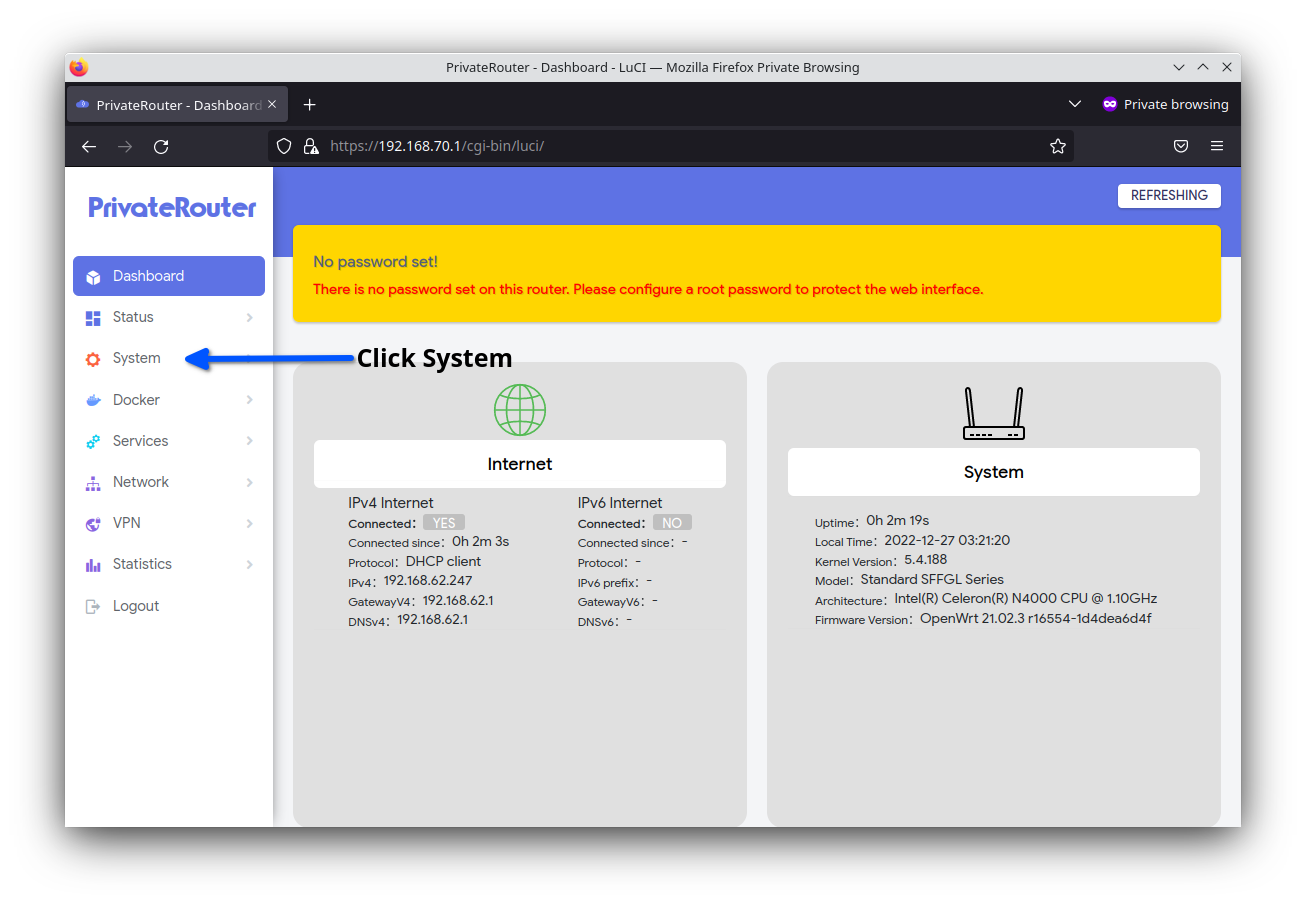
Click the System tab to proceed with mounting the ext4 Docker partition.
Click the Mount Points menu on the left panel then click the GENERATE CONFIG and MOUNT ATTACHED DEVICES buttons.
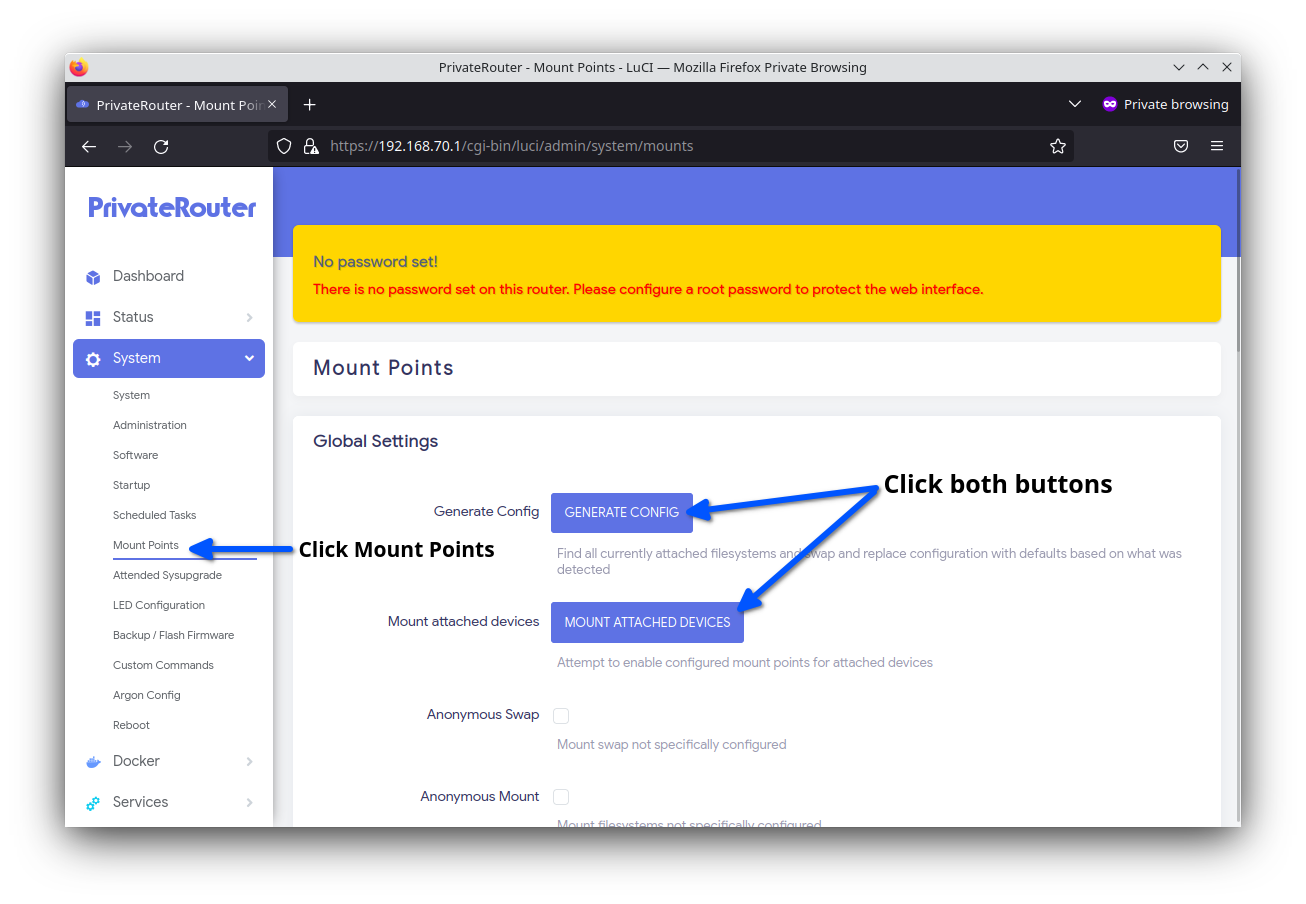
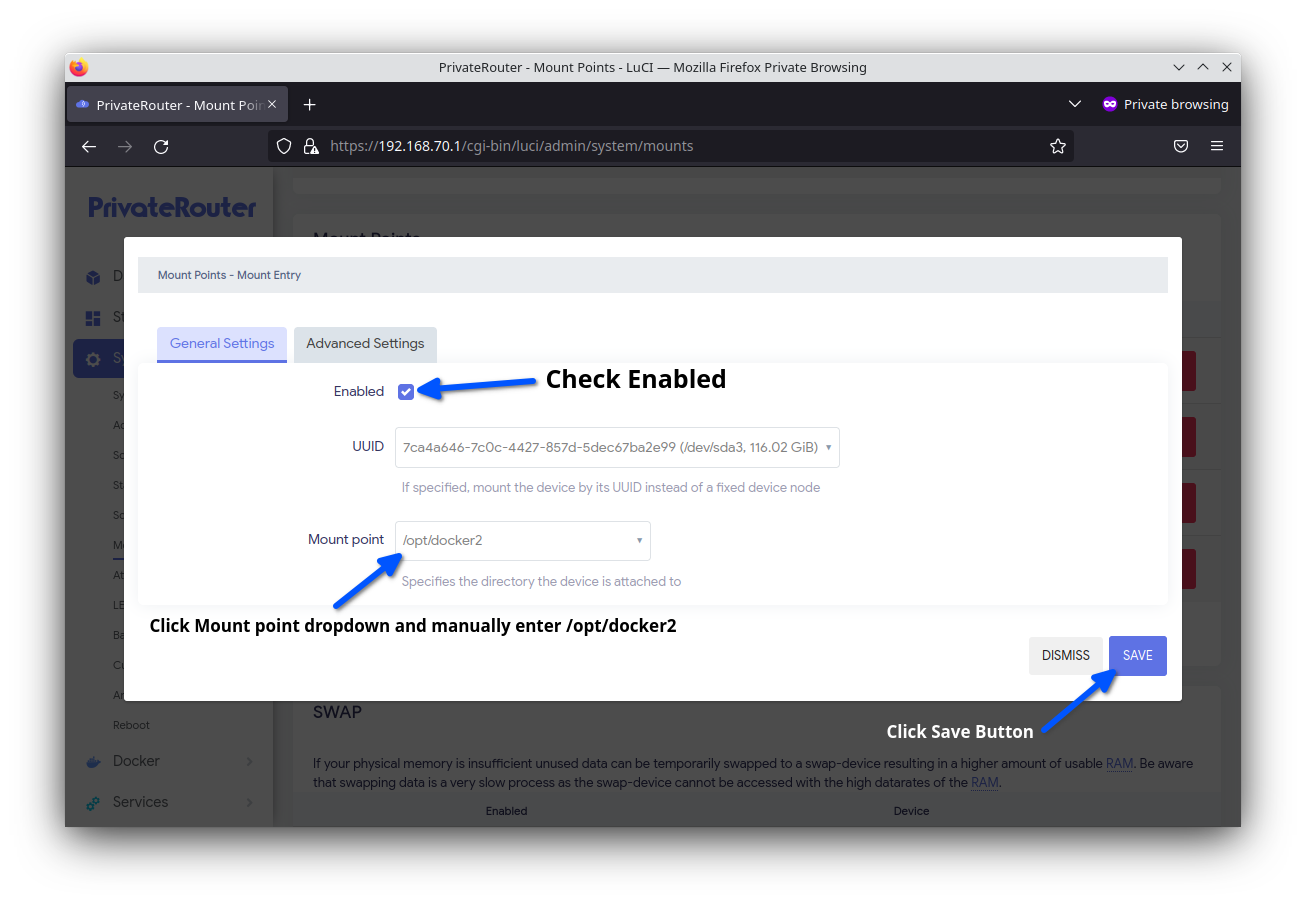
Scroll down to MOUNT POINTS and click the EDIT button for the /dev/sda3 ext4 Filesystem.
Check the Enabled option then click the Mount Point dropdown and manually enter /opt/docker2
Click the save button.
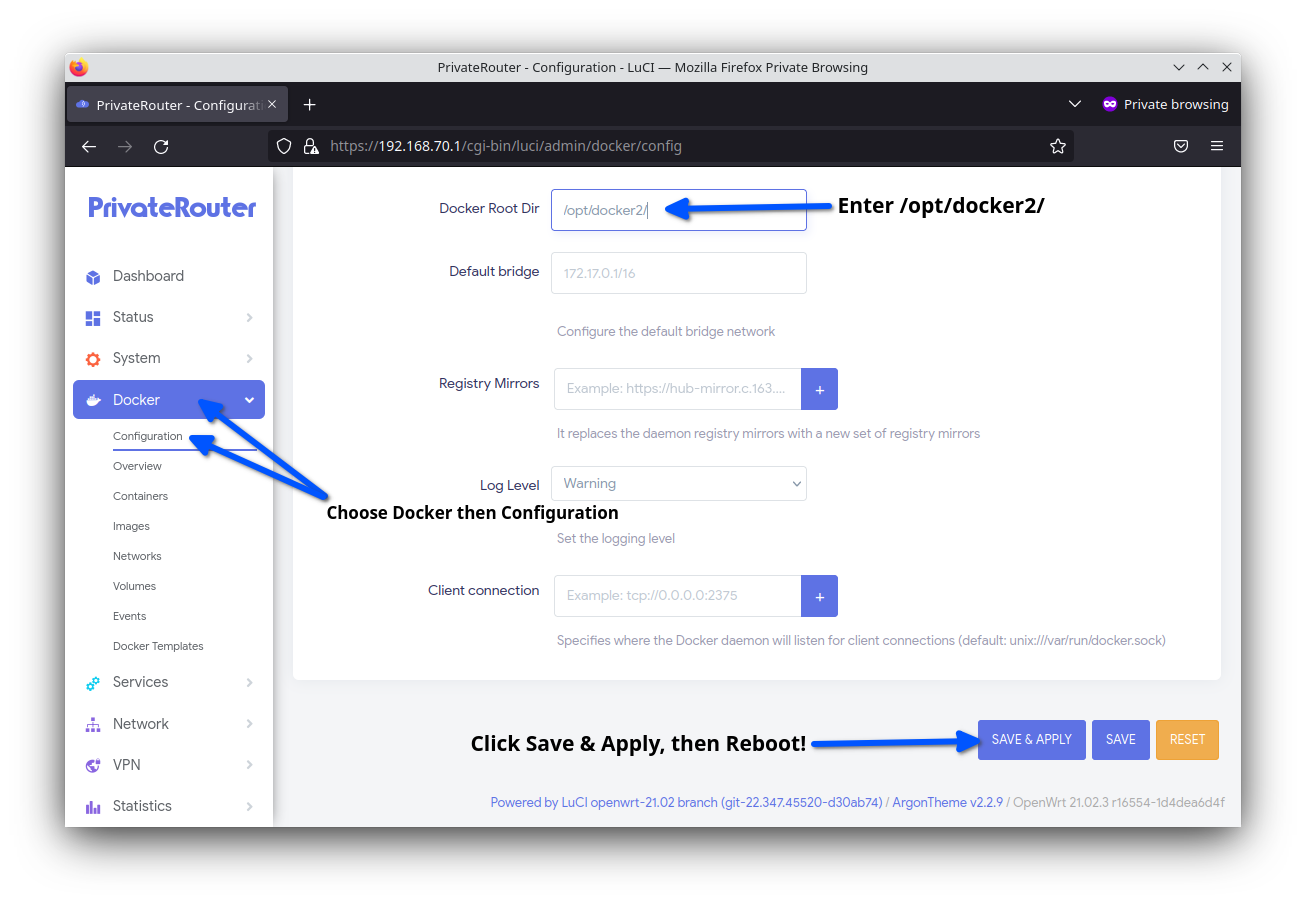
On the left menu click the Docker tab then select Configuration. In the Docker Root Dir textbox enter /opt/docker2/
Click the Save & Apply button then reboot your system to complete the setup.
Click the save button.
On the left menu click the Docker tab then select Configuration. In the Docker Root Dir textbox enter /opt/docker2/
Click the Save & Apply button then reboot your system to complete the setup.