Changing your DNS servers on Windows can improve your internet speed, enhance privacy, and bypass content restrictions. This comprehensive guide covers all modern Windows versions (8, 8.1, 10, and 11) and includes secure DNS options, advanced configurations, and troubleshooting tips.
🔐 Why Change DNS?
- Privacy: ISP DNS servers log all your DNS queries
- Speed: Faster DNS resolution = faster page loads
- Security: Protection from DNS hijacking and malware
- Access: Bypass DNS-based content blocking
- Reliability: Better uptime than ISP DNS servers
Recommended DNS Servers
TorGuard DNS (VPN Users)
For maximum privacy when using TorGuard VPN:
| DNS Type | Primary DNS | Secondary DNS | Features |
|---|---|---|---|
| TorGuard Standard | 10.8.0.1 | 10.10.0.1 | No logs, VPN-only access |
| TorGuard Ad-Block | 10.9.0.1 | 10.11.0.1 | Blocks ads and trackers |
Public DNS Servers
| Provider | Primary DNS | Secondary DNS | IPv6 Primary | Features |
|---|---|---|---|---|
| Cloudflare | 1.1.1.1 | 1.0.0.1 | 2606:4700:4700::1111 | Fastest, privacy-focused |
| Quad9 | 9.9.9.9 | 149.112.112.112 | 2620:fe::fe | Malware blocking |
| 8.8.8.8 | 8.8.4.4 | 2001:4860:4860::8888 | Fast, reliable | |
| OpenDNS | 208.67.222.222 | 208.67.220.220 | 2620:119:35::35 | Content filtering |
Windows 11 (Modern Method)
Via Settings App
- Press
Windows + Ito open Settings - Navigate to Network & internet
- Click on Ethernet or Wi-Fi (your active connection)
- Click Edit next to DNS server assignment
- Change dropdown to Manual
- Toggle IPv4 to On
- Enter your preferred DNS servers:
- Preferred DNS: 1.1.1.1
- Alternate DNS: 1.0.0.1
- DNS over HTTPS: On (automatic)
- Click Save
Windows 10 Method
Via Settings App (Version 2004+)
- Open Settings (
Windows + I) - Go to Network & Internet
- Click Change adapter options
- Right-click your network adapter → Properties
- Select Internet Protocol Version 4 (TCP/IPv4)
- Click Properties
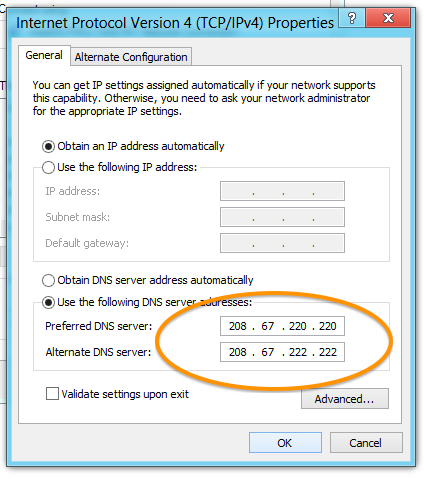
- Select Use the following DNS server addresses
- Enter DNS servers and click OK
Windows 8/8.1 Method
Step 1: Access Desktop
From the Windows 8 Start screen, click or tap the Desktop tile.

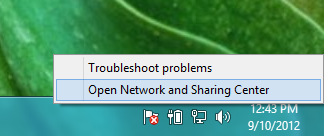
Step 2: Open Network and Sharing Center
Right-click the network icon in the system tray and select Open Network and Sharing Center.
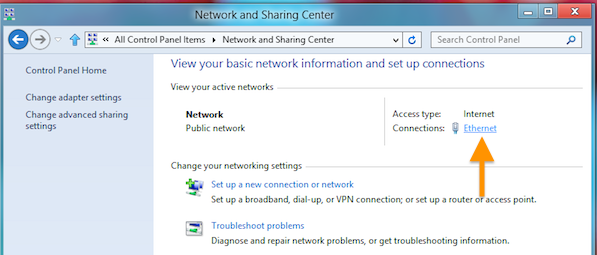
Step 3: Select Your Network Connection
Click on your active connection under "Active Networks" (e.g., Ethernet or Wi-Fi).
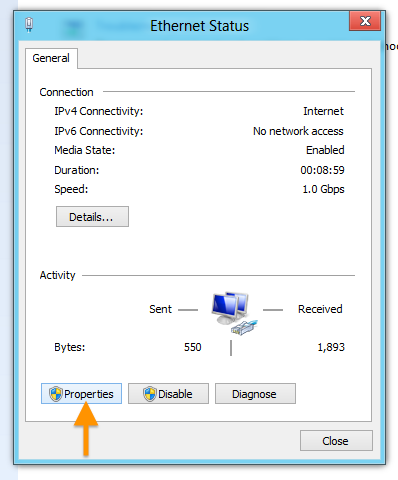
Step 4: Open Connection Properties
In the connection status window, click Properties.
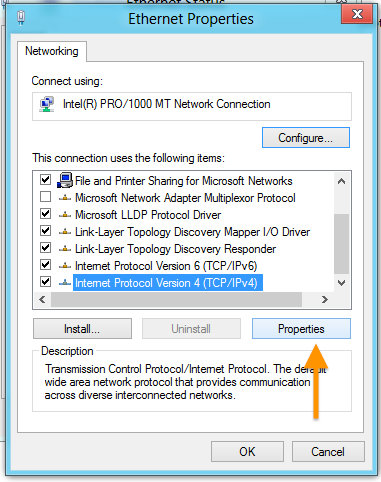
Step 5: Configure IPv4 Settings
Select Internet Protocol Version 4 (TCP/IPv4) and click Properties.
Step 6: Enter DNS Servers
Select "Use the following DNS server addresses" and enter your chosen servers:
- Preferred DNS server: 1.1.1.1
- Alternate DNS server: 1.0.0.1
PowerShell Method (All Windows Versions)
For advanced users and automation:
View Current DNS Settings
# Run PowerShell as Administrator
Get-DnsClientServerAddress
Set DNS for Specific Adapter
# For Ethernet
Set-DnsClientServerAddress -InterfaceAlias "Ethernet" -ServerAddresses 1.1.1.1, 1.0.0.1

# For Wi-Fi
Set-DnsClientServerAddress -InterfaceAlias "Wi-Fi" -ServerAddresses 1.1.1.1, 1.0.0.1
Set DNS for All Adapters
# Apply to all network adapters
Get-NetAdapter | Set-DnsClientServerAddress -ServerAddresses 1.1.1.1, 1.0.0.1
Reset to DHCP DNS
# Reset to automatic (DHCP)
Set-DnsClientServerAddress -InterfaceAlias "Ethernet" -ResetServerAddresses
Configure IPv6 DNS
For networks with IPv6 support:
- Follow steps to adapter properties
- Select Internet Protocol Version 6 (TCP/IPv6)
- Click Properties
- Enter IPv6 DNS servers:
- Preferred: 2606:4700:4700::1111 (Cloudflare)
- Alternate: 2606:4700:4700::1001
Enable DNS over HTTPS (DoH)
Windows 11 Native DoH
- When setting DNS servers, enable "DNS over HTTPS"
- Select encryption preference:
- Automatic: Use DoH when available
- On (manual template): Always use DoH
Windows 10 DoH (Build 19628+)
# Enable DoH via Registry
reg add "HKLM\SYSTEM\CurrentControlSet\Services\Dnscache\Parameters" /v EnableAutoDoh /t REG_DWORD /d 2 /f

# Restart DNS service
net stop dnscache && net start dnscache
Flush DNS Cache
After changing DNS settings, clear the cache:
Command Prompt Method
# Run as Administrator
ipconfig /flushdns

# Verify cache is cleared
ipconfig /displaydns
PowerShell Method
Clear-DnsClientCache
# Verify with
Get-DnsClientCache
Clear Browser DNS Cache
- Chrome: Navigate to
chrome://net-internals/#dns→ Clear host cache - Firefox:
about:networking#dns→ Clear DNS Cache - Edge:
edge://net-internals/#dns→ Clear host cache
Verify DNS Changes
Check Active DNS Servers
# Command Prompt
nslookup google.com

# PowerShell
Resolve-DnsName google.com
Online DNS Leak Test
- Visit TorGuard DNS Leak Test
- Run Standard or Extended test
- Verify results show your chosen DNS servers
Troubleshooting Common Issues
DNS Changes Not Taking Effect
- Restart network adapter:
netsh interface set interface "Ethernet" admin=disable netsh interface set interface "Ethernet" admin=enable - Reset Winsock:
netsh winsock reset - Restart DNS Client service:
net stop dnscache && net start dnscache
No Internet After DNS Change
- Verify DNS server IPs are typed correctly
- Try alternate DNS servers (8.8.8.8)
- Check firewall isn't blocking port 53
- Temporarily disable antivirus/firewall
Slow DNS Resolution
- Use DNS benchmark tool to find fastest servers
- Try servers geographically closer to you
- Disable IPv6 if not using IPv6 DNS
- Check for DNS filtering software conflicts
Advanced DNS Configurations
DNS Suffixes
Configure search domains for short names:
- In adapter properties → Advanced
- DNS tab → Add domain suffixes
- Useful for corporate environments
HOSTS File Editing
Override DNS for specific domains:
# Edit C:\Windows\System32\drivers\etc\hosts
# Add entries like:
127.0.0.1 blocked-site.com
192.168.1.100 myserver.local
Per-App DNS (Windows 11)
Some apps support custom DNS:
- Browsers with DoH settings
- VPN clients with DNS options
- Gaming clients with network settings
Security Best Practices
- Use encrypted DNS: Enable DoH when available
- Avoid untrusted DNS: Stick to reputable providers
- Regular testing: Periodically check for DNS leaks
- VPN integration: Let VPN handle DNS when connected
- Monitor changes: DNS hijacking is a common malware tactic
DNS for Different Network Types
| Network Type | Recommended DNS | Reason |
|---|---|---|
| Home Network | Cloudflare (1.1.1.1) | Fast, private, reliable |
| Public WiFi | Quad9 (9.9.9.9) | Malware protection |
| Work Network | Company DNS | Internal resources |
| Gaming | Google (8.8.8.8) | Low latency |
⚠️ VPN Users Important Note
When using TorGuard VPN, the application automatically configures secure DNS to prevent leaks. Manual DNS changes may interfere with this protection. Only change DNS when not using VPN, or use TorGuard's DNS servers.
Need Help with DNS Configuration?
Our support team can assist with DNS setup, troubleshooting, and optimizing your network settings for privacy and performance.
Get DNS Support