TorGuard's VMess proxy network is one of the fastest encrypted proxy protocols that can also bypass the most strict VPN blocks or firewalls. There are many VMess client apps available, but in this tutorial we'll be using the client software V2RayA.
What is VMess Protocol?
VMess is V2Ray's native protocol, designed specifically to bypass sophisticated censorship and deep packet inspection (DPI). It's particularly effective on Linux systems where you need reliable proxy connectivity.
Advanced Obfuscation
Dynamic encryption and traffic obfuscation
Linux Native
Optimized for Debian/Ubuntu systems
High Performance
Minimal overhead with systemd integration
Easy Management
APT repository and systemd service
🚀 Why Use VMess with V2RayA on Linux?
- Bypass the most sophisticated firewalls and censorship
- Native systemd service integration
- Works on servers, desktops, and Raspberry Pi
- APT repository for easy updates
- Web-based management interface
- Low resource usage
Prerequisites
Before you begin, ensure you have:
- Debian 10+ or Ubuntu 18.04+ (or derivatives)
- sudo/root access
- Active TorGuard Premium Proxy subscription
- Access to TorGuard VMess server list
- Internet connection
- Terminal access
⚠️ Important: VMess is available only with TorGuard Premium Proxy service, not standard VPN subscriptions.
🐧 Distribution Support: This guide works for Debian, Ubuntu, Linux Mint, Pop!_OS, Elementary OS, and other Debian-based distributions.
System Compatibility
| Distribution | Version | Architecture | Support |
|---|---|---|---|
| Debian | 10, 11, 12 | amd64, arm64 | ✅ Full |
| Ubuntu | 20.04, 22.04, 23.10 | amd64, arm64 | ✅ Full |
| Linux Mint | 20.x, 21.x | amd64 | ✅ Full |
| Raspberry Pi OS | Latest | armhf, arm64 | ✅ Full |
Installation and Configuration
Step 1: Open Terminal
To install V2RayA on Debian or Ubuntu, first open the terminal window.
💡 Terminal Access:
- Desktop: Ctrl+Alt+T or search for "Terminal"
- Server: SSH into your system
- GUI Alternative: Use any terminal emulator
Step 2: Add V2RayA Repository
First, add V2RayA's public key:
wget -qO - https://apt.v2raya.org/key/public-key.asc | sudo tee /etc/apt/trusted.gpg.d/v2raya.asc
Next, add V2RayA's software source:
echo "deb https://apt.v2raya.org/ v2raya main" | sudo tee /etc/apt/sources.list.d/v2raya.list
sudo apt update
🔑 Security Note: The public key ensures packages are authentic and haven't been tampered with.
Step 3: Install V2RayA
Now run the following command to install V2RayA:
sudo apt install v2raya
✅ Installation Complete! V2RayA and all dependencies are now installed.
Step 4: Start V2RayA Service
To start V2RayA use the following command:
sudo systemctl start v2raya.service
To set V2RayA to auto-start on boot:
sudo systemctl enable v2raya.service
🔧 Service Management Commands:
sudo systemctl status v2raya- Check service statussudo systemctl restart v2raya- Restart servicesudo systemctl stop v2raya- Stop servicesudo journalctl -u v2raya -f- View logs
Step 5: Configure iptables (Debian 11+)
⚠️ Debian 11+ Note: iptables has been deprecated in favor of nftables. You can use nftables as the backend of iptables for adaptation:
sudo update-alternatives --set iptables /usr/sbin/iptables-nft
sudo update-alternatives --set ip6tables /usr/sbin/ip6tables-nft
sudo update-alternatives --set arptables /usr/sbin/arptables-nft
sudo update-alternatives --set ebtables /usr/sbin/ebtables-nft
To change back to legacy iptables (if needed):
sudo update-alternatives --set iptables /usr/sbin/iptables-legacy
sudo update-alternatives --set ip6tables /usr/sbin/ip6tables-legacy
sudo update-alternatives --set arptables /usr/sbin/arptables-legacy
sudo update-alternatives --set ebtables /usr/sbin/ebtables-legacy
💡 Reboot Required: After switching between nftables and legacy iptables, reboot your system for changes to take effect.
Step 6: Access V2RayA Web Interface
Open a browser and visit http://127.0.0.1:2017 to access the V2RayA admin menu. Create a username and password to access this web UI. This information is stored locally on your computer.
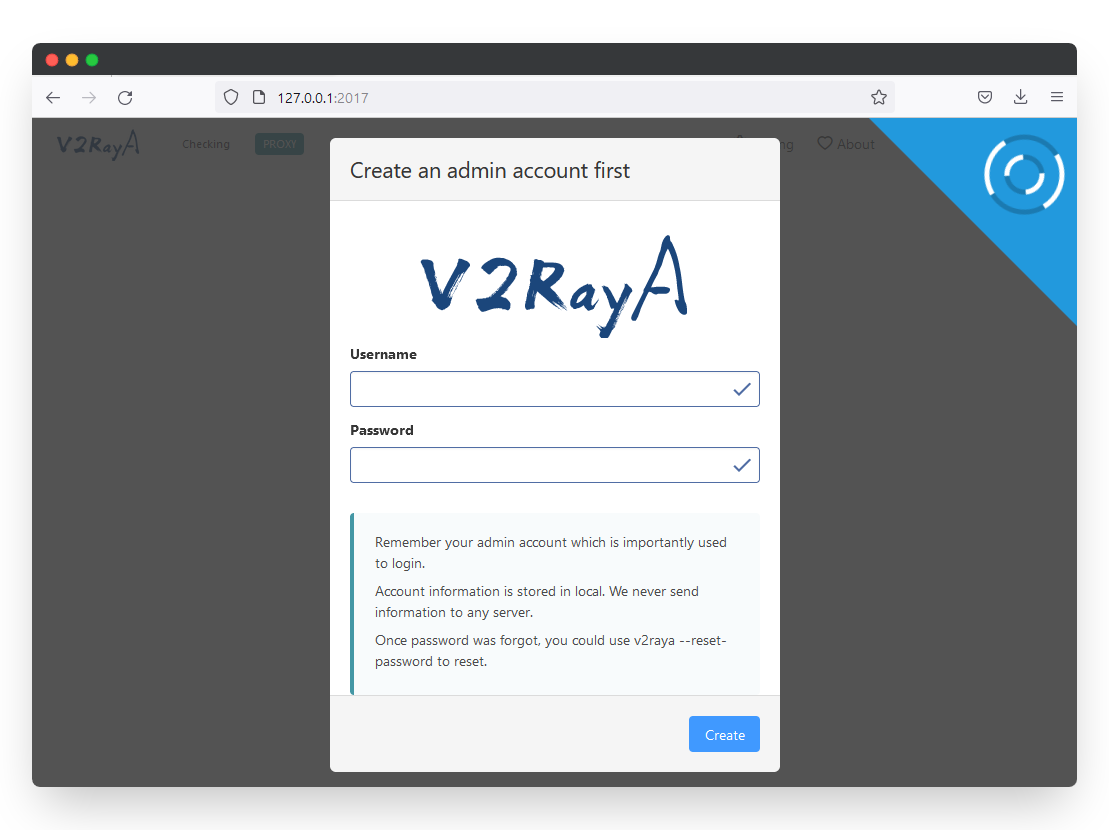
🔒 Security Tip: Use a strong password for the web interface. Consider using SSH tunneling for remote access.
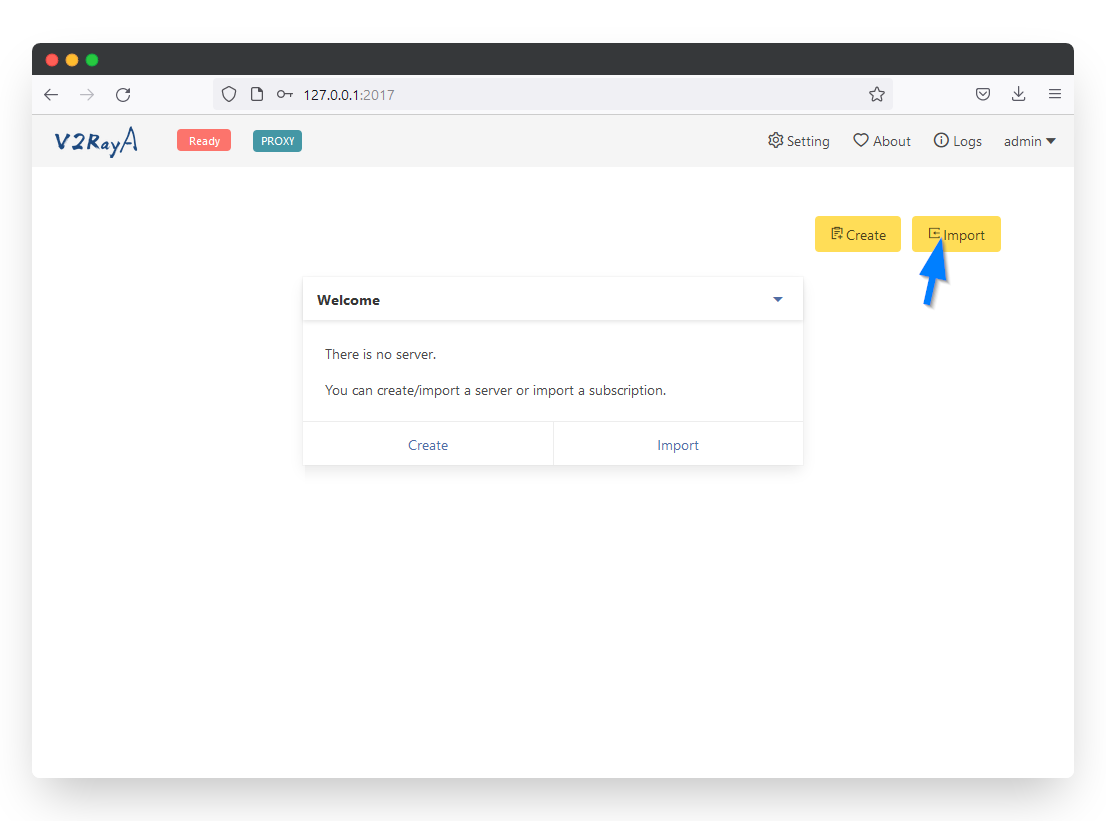
Step 7: Import VMess Server
The fastest way to import a VMess server is to paste the vmess:// link from the TorGuard premium proxy page. (Login to your TorGuard members account to view the page.)
Copy the VMess link of the server you wish to connect to, then click the Import button.
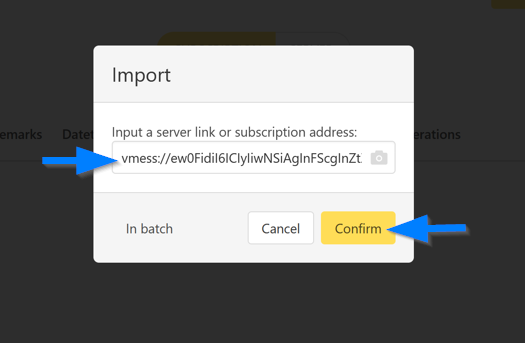
Step 8: Paste VMess Link
Paste the vmess:// link in the server address text box and click the confirm button:
Step 9: Configure Proxy Settings
Click the Settings button in the top right corner and configure:
- Under Transparent proxy select Proxy All Traffic
- In the Transparent proxy implementation select System Proxy
- Under prevent DNS spoofing select Forward DNS Requests
Click the Save and Apply button.
Step 10: Connect to VMess Proxy
Now you're ready to connect. Click the Select button on the newly added VMess proxy server. Then in the top left click the Ready button to connect. When you see the "Running" message, your proxy is connected.

✅ Connected! Your internet traffic is now routed through TorGuard's VMess proxy. Check your IP at torguard.net/whats-my-ip.php
Linux Specific Configuration
🐧 System Proxy Integration
Configure system-wide proxy for GNOME/KDE:
# GNOME
gsettings set org.gnome.system.proxy mode 'manual'
gsettings set org.gnome.system.proxy.http host '127.0.0.1'
gsettings set org.gnome.system.proxy.http port 20171
gsettings set org.gnome.system.proxy.https host '127.0.0.1'
gsettings set org.gnome.system.proxy.https port 20171

# KDE
# Configure via System Settings → Network → Proxy
🔧 Terminal Proxy
Configure proxy for terminal sessions:
# Add to ~/.bashrc or ~/.zshrc
export http_proxy="http://127.0.0.1:20171"
export https_proxy="http://127.0.0.1:20171"
export ALL_PROXY="socks5://127.0.0.1:20170"
export NO_PROXY="localhost,127.0.0.1,::1"

# Apply immediately
source ~/.bashrc
🐳 Docker Integration
Configure Docker to use V2RayA proxy:
# Create/edit ~/.docker/config.json
{
  "proxies": {
    "default": {
      "httpProxy": "http://127.0.0.1:20171",
      "httpsProxy": "http://127.0.0.1:20171",
      "noProxy": "localhost,127.0.0.1"
    }
  }
}
📦 APT Proxy Configuration
Configure APT to use proxy for package downloads:
# Create /etc/apt/apt.conf.d/95proxy
Acquire::http::proxy "http://127.0.0.1:20171/";
Acquire::https::proxy "http://127.0.0.1:20171/";
Server Deployment Tips
🖥️ Headless Server Setup
For servers without GUI:
- Use SSH port forwarding:
ssh -L 2017:localhost:2017 user@server - Access V2RayA at http://localhost:2017 on your local machine
- Or configure nginx reverse proxy for secure remote access
- Use
curlto test connectivity
🔐 Security Hardening
# Bind V2RayA to localhost only
# Edit /etc/default/v2raya
V2RAYA_ADDRESS=127.0.0.1:2017

# Configure firewall
sudo ufw allow from 192.168.1.0/24 to any port 2017
sudo ufw deny 2017
Troubleshooting Common Issues
Service Won't Start
Solution:
- Check logs:
sudo journalctl -u v2raya -n 50 - Verify port 2017 is free:
sudo lsof -i :2017 - Check V2Ray core:
v2ray --version - Reinstall if corrupted:
sudo apt reinstall v2raya - Check disk space:
df -h
iptables/nftables Errors
Solution:
- Verify current backend:
sudo iptables --version - Check kernel modules:
lsmod | grep nf_tables - Try transparent mode: "redirect" instead of "system proxy"
- Disable IPv6 if causing issues
- Check SELinux/AppArmor policies
DNS Resolution Issues
Solution:
- Check DNS settings:
cat /etc/resolv.conf - Try different DNS: 8.8.8.8, 1.1.1.1
- Disable systemd-resolved if conflicting
- Use V2Ray's built-in DNS
- Check for DNS leaks
Proxy Not Working in Apps
Solution:
- Verify environment variables are set
- Check app-specific proxy settings
- Try transparent proxy mode
- Some apps need restart after proxy change
- Use proxychains for stubborn apps
Updates and Maintenance
🔄 Updating V2RayA
# Update package list
sudo apt update

# Upgrade V2RayA
sudo apt upgrade v2raya

# Restart service
sudo systemctl restart v2raya
🗑️ Complete Removal
# Stop service
sudo systemctl stop v2raya
sudo systemctl disable v2raya

# Remove package and config
sudo apt purge v2raya
sudo rm -rf /etc/v2raya

# Remove repository
sudo rm /etc/apt/sources.list.d/v2raya.list
sudo rm /etc/apt/trusted.gpg.d/v2raya.asc
sudo apt update
Security Best Practices
🔐 System Security
- Keep system updated
- Use UFW firewall
- Limit V2RayA access
- Monitor system logs
🛡️ Service Security
- Bind to localhost only
- Use strong web UI password
- Regular security updates
- Audit service permissions
🔑 Access Control
- SSH key authentication
- Fail2ban for brute force
- Limit sudo access
- Monitor auth logs
🌐 Network Security
- Check for DNS leaks
- Verify proxy is active
- Use HTTPS everywhere
- Monitor traffic patterns
Summary
You've successfully configured V2RayA to connect to TorGuard's VMess proxy network on Debian/Ubuntu! This setup provides:
- ✅ Advanced firewall and censorship bypass
- ✅ Native Linux systemd integration
- ✅ APT repository for easy updates
- ✅ System-wide proxy coverage
- ✅ Web-based management interface
- ✅ Support for servers and desktops