PrivateRouter custom VPN routers provide an easy one-click method to deploy popular self-hosted apps directly on your router. When combined with TorGuard's Private VPN Cloud service, users can easily self-host applications securely behind WireGuard.
What is SimpleX Chat?
SimpleX is a revolutionary secure messaging platform that prioritizes privacy above all else. Unlike other messaging apps, SimpleX doesn't require phone numbers, usernames, or any identifiers. It's perfect for:
No User IDs
No phone numbers, emails, or usernames required
Quantum Resistant
Post-quantum end-to-end encryption
Decentralized
Self-host your own messaging infrastructure
Metadata Private
Protects not just content but communication patterns
🔐 Why Host Your Own SMP Server? By running your own SimpleX SMP server, you gain complete control over your messaging infrastructure, ensure data sovereignty, and eliminate dependency on third-party servers.
Prerequisites
Before you begin, ensure you have:
- PrivateRouter with OpenWRT firmware
- Docker support enabled on your router
- TorGuard Private VPN Cloud service active
- Your Private VPN Cloud IP address
- SimpleX Chat app installed on mobile/desktop
- Access to TorGuard member's area
Installation Steps
Step 1: Configure Custom Command with VPN IP
Login to your PrivateRouter and click the System menu. Select Custom Commands then click the configure option at the top so we can add your Private VPN Cloud IP address to the Custom Command.
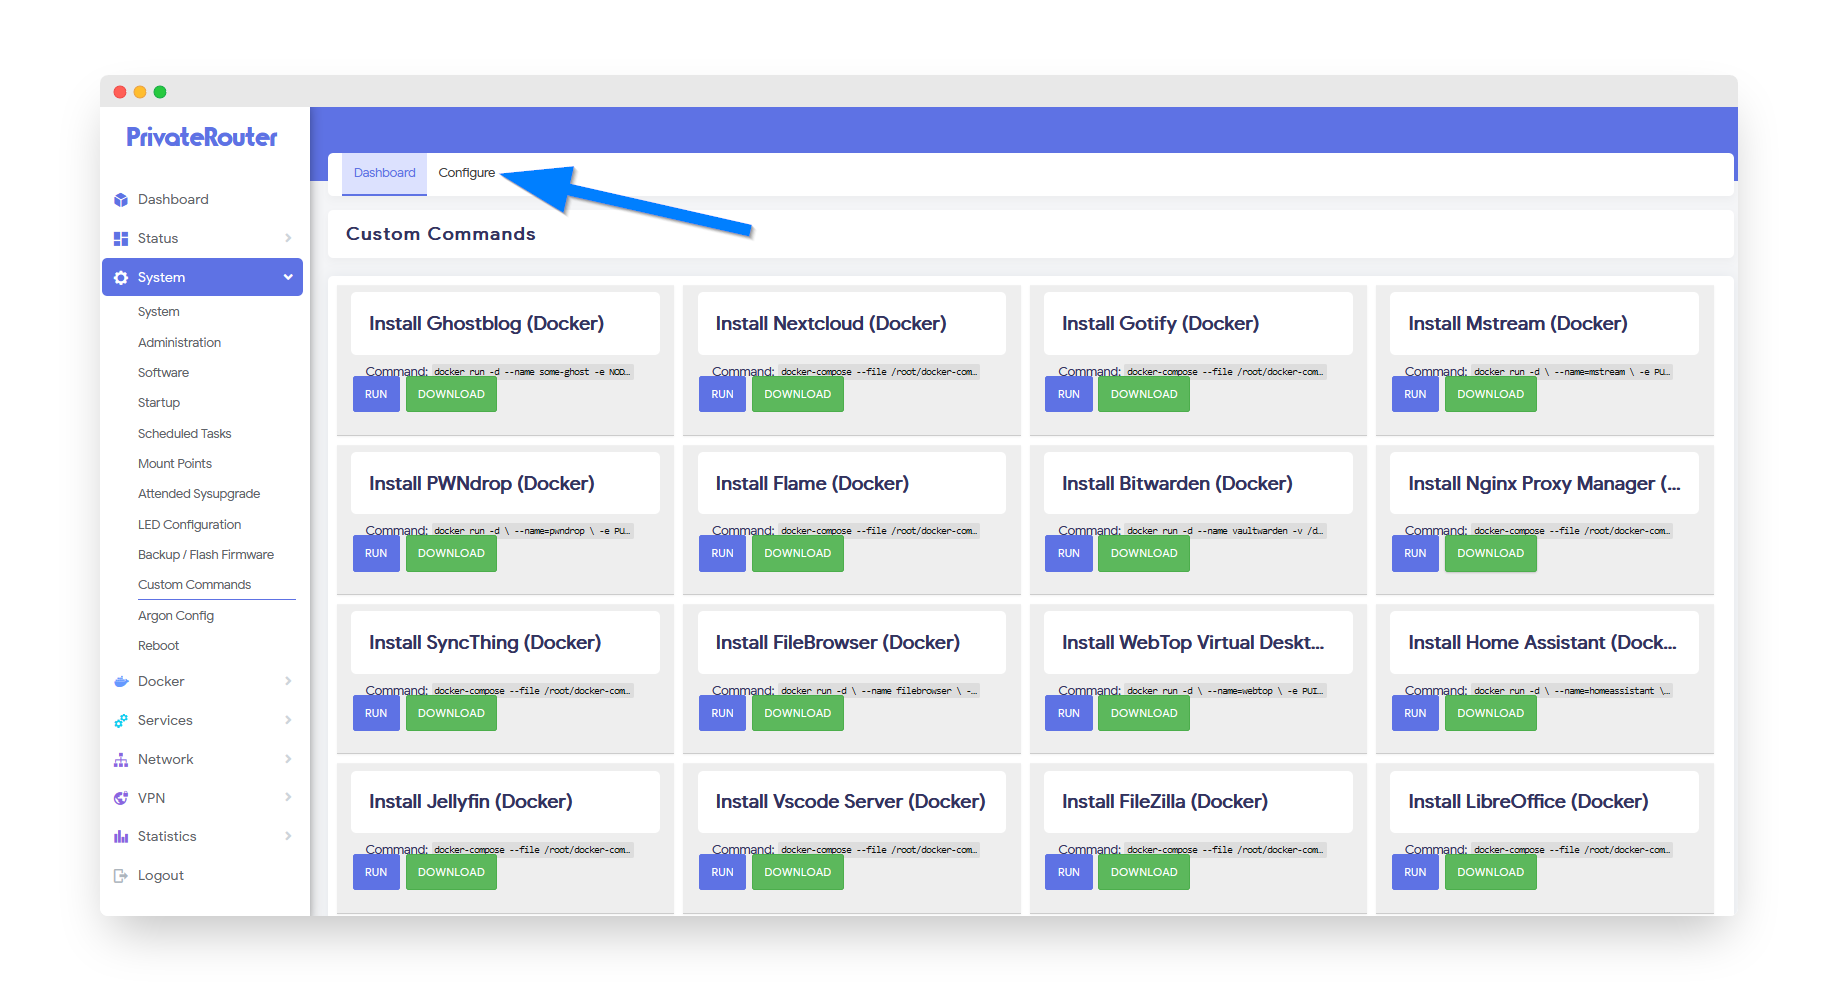
💡 Important: You'll need your Private VPN Cloud IP address for this step. Find it in the TorGuard Members area under My Services.
Step 2: Edit SimpleX Installation Command
Scroll down and locate the Install SimpleX SMP Server option. Copy and paste the docker run command textbox into a text editor.
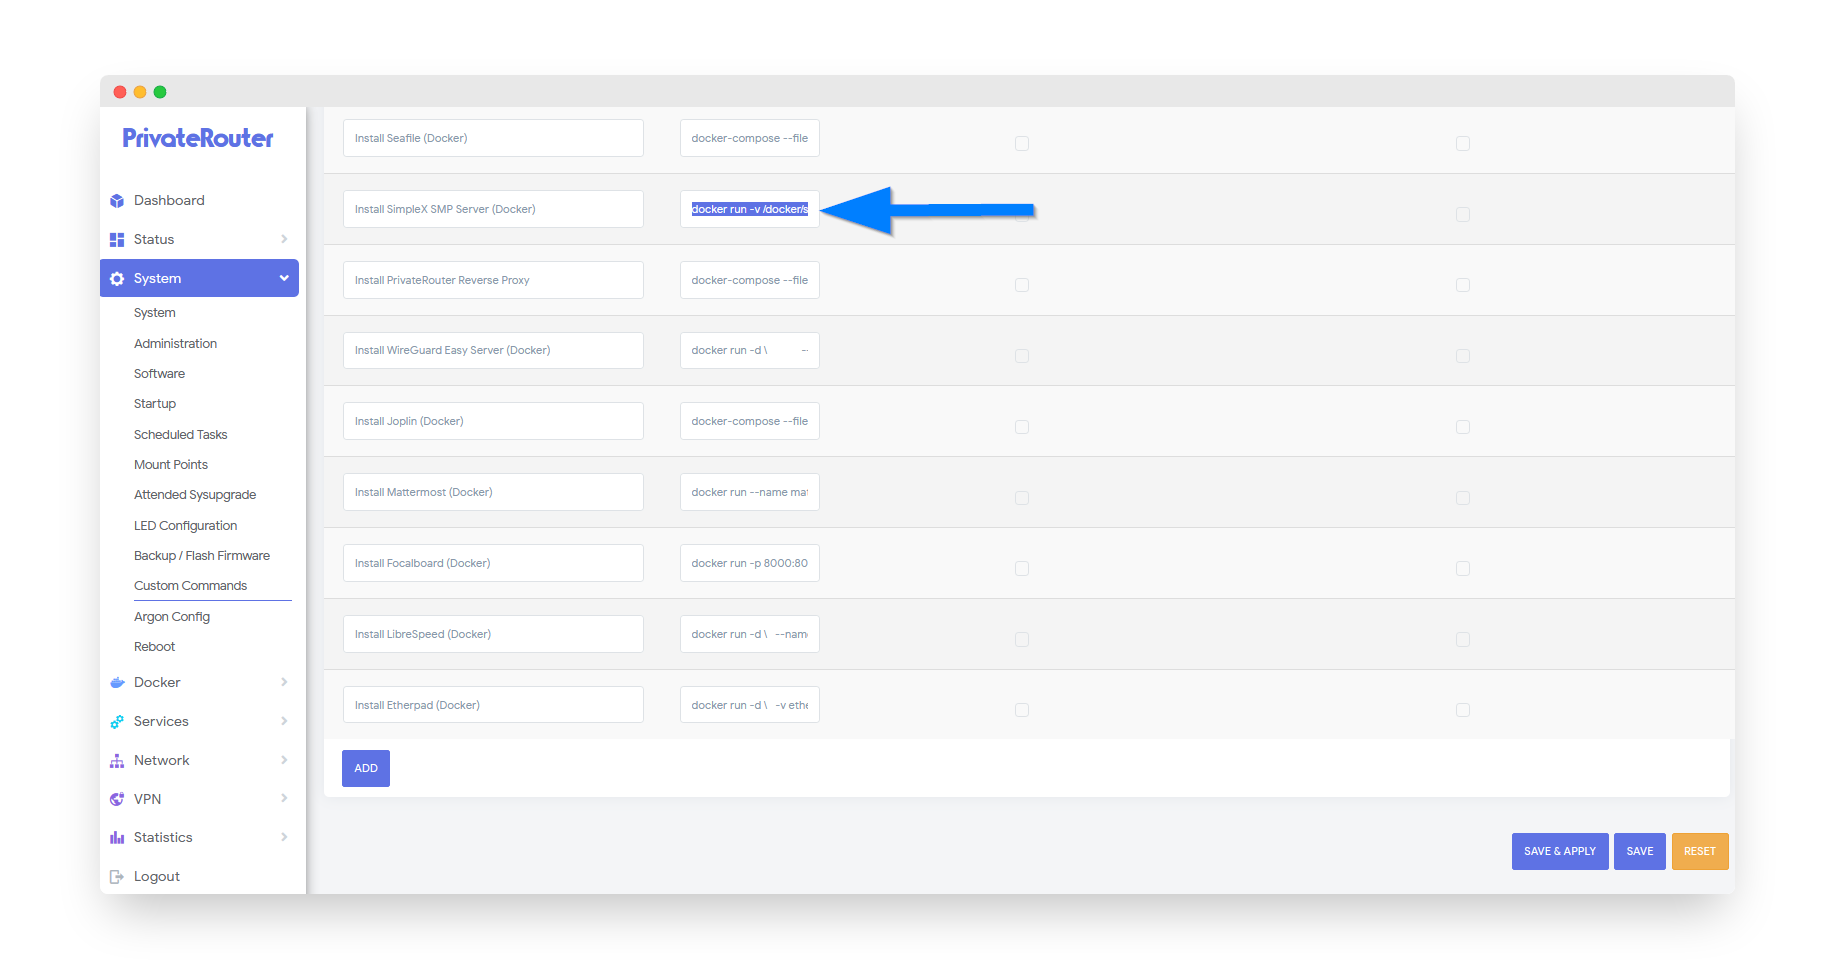
The pasted text content should look similar to the example below. Replace "YOUR_VPN_IP_HERE" with your TorGuard Private VPN Cloud IP Address.

docker run -d \
  --name simplex-smp \
  -p 5223:5223 \
  -v /opt/simplex:/etc/opt/simplex-smp \
  simplexchat/smp:latest \
  -a YOUR_VPN_IP_HERE
Once you have added your Private VPN IP address, copy the entire text area and paste it back into the PrivateRouter Configure text box. Make sure to copy paste all of the text content. Click the Save and Apply button at the bottom.
Step 3: Run SimpleX Installation
Now that you have added your Private VPN IP, go back to the Custom Commands window, scroll down and click the RUN button for Install SimpleX.
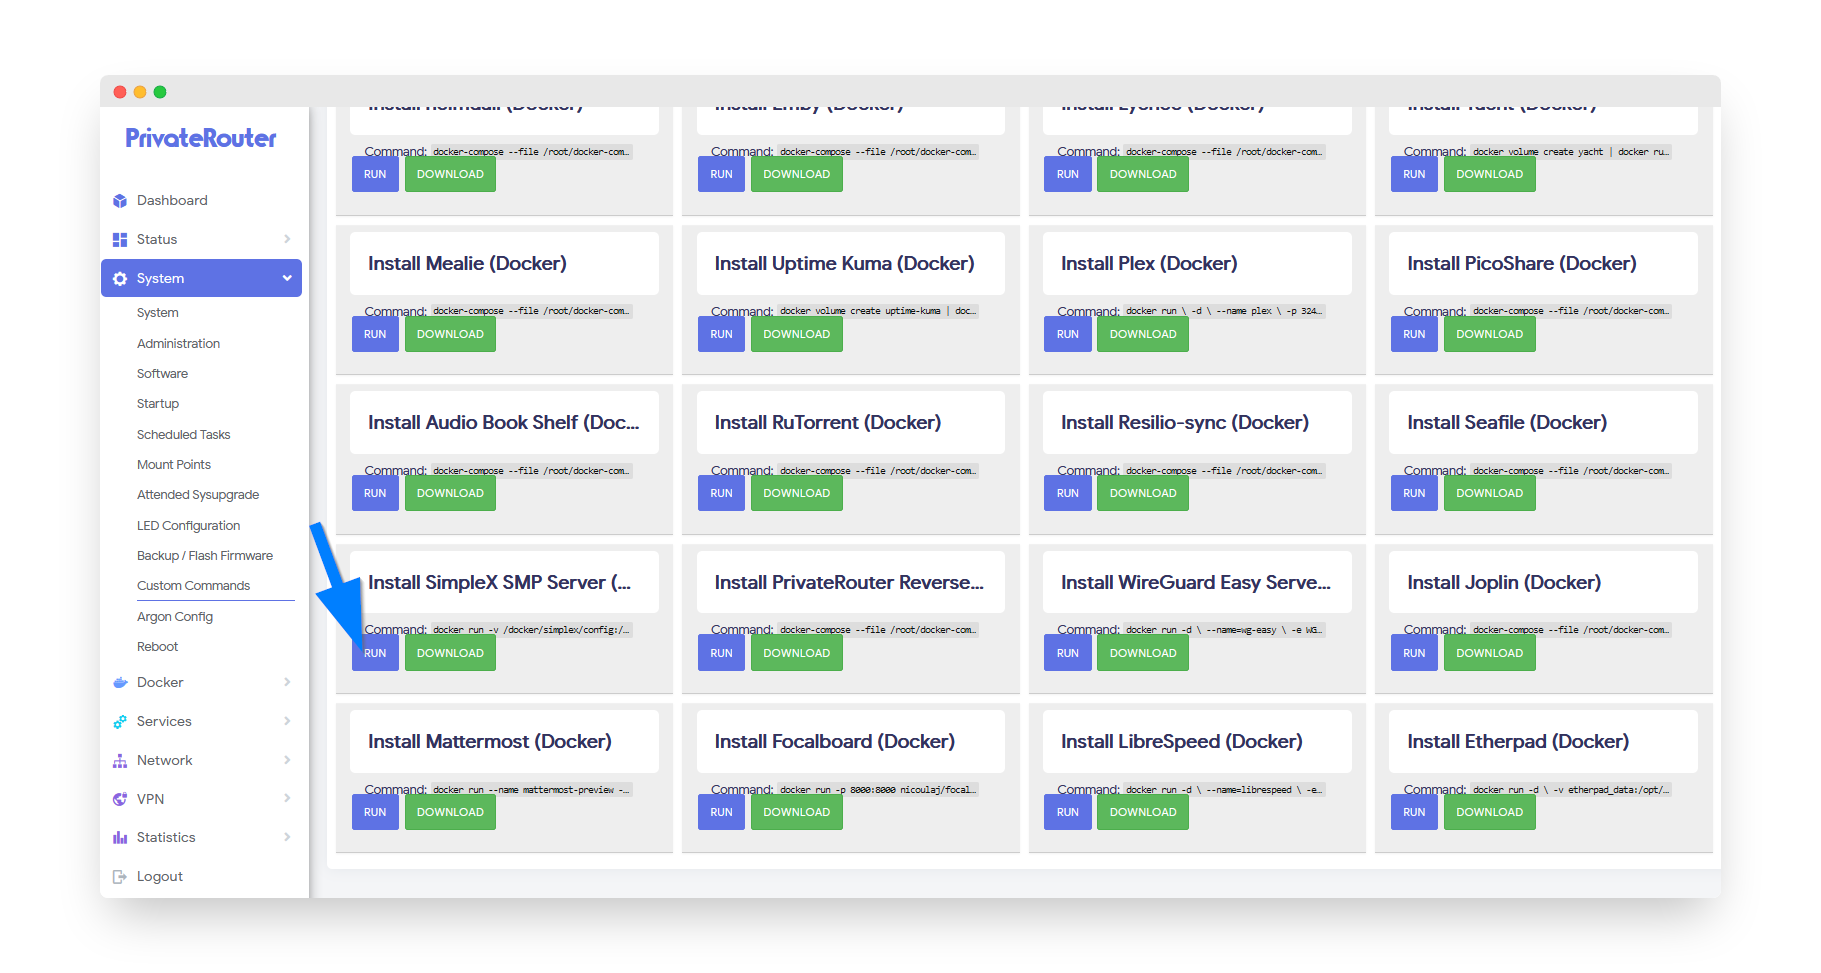
⏱️ Installation Time: The installation typically completes within 1-2 minutes.
Step 4: Retrieve Server Fingerprint
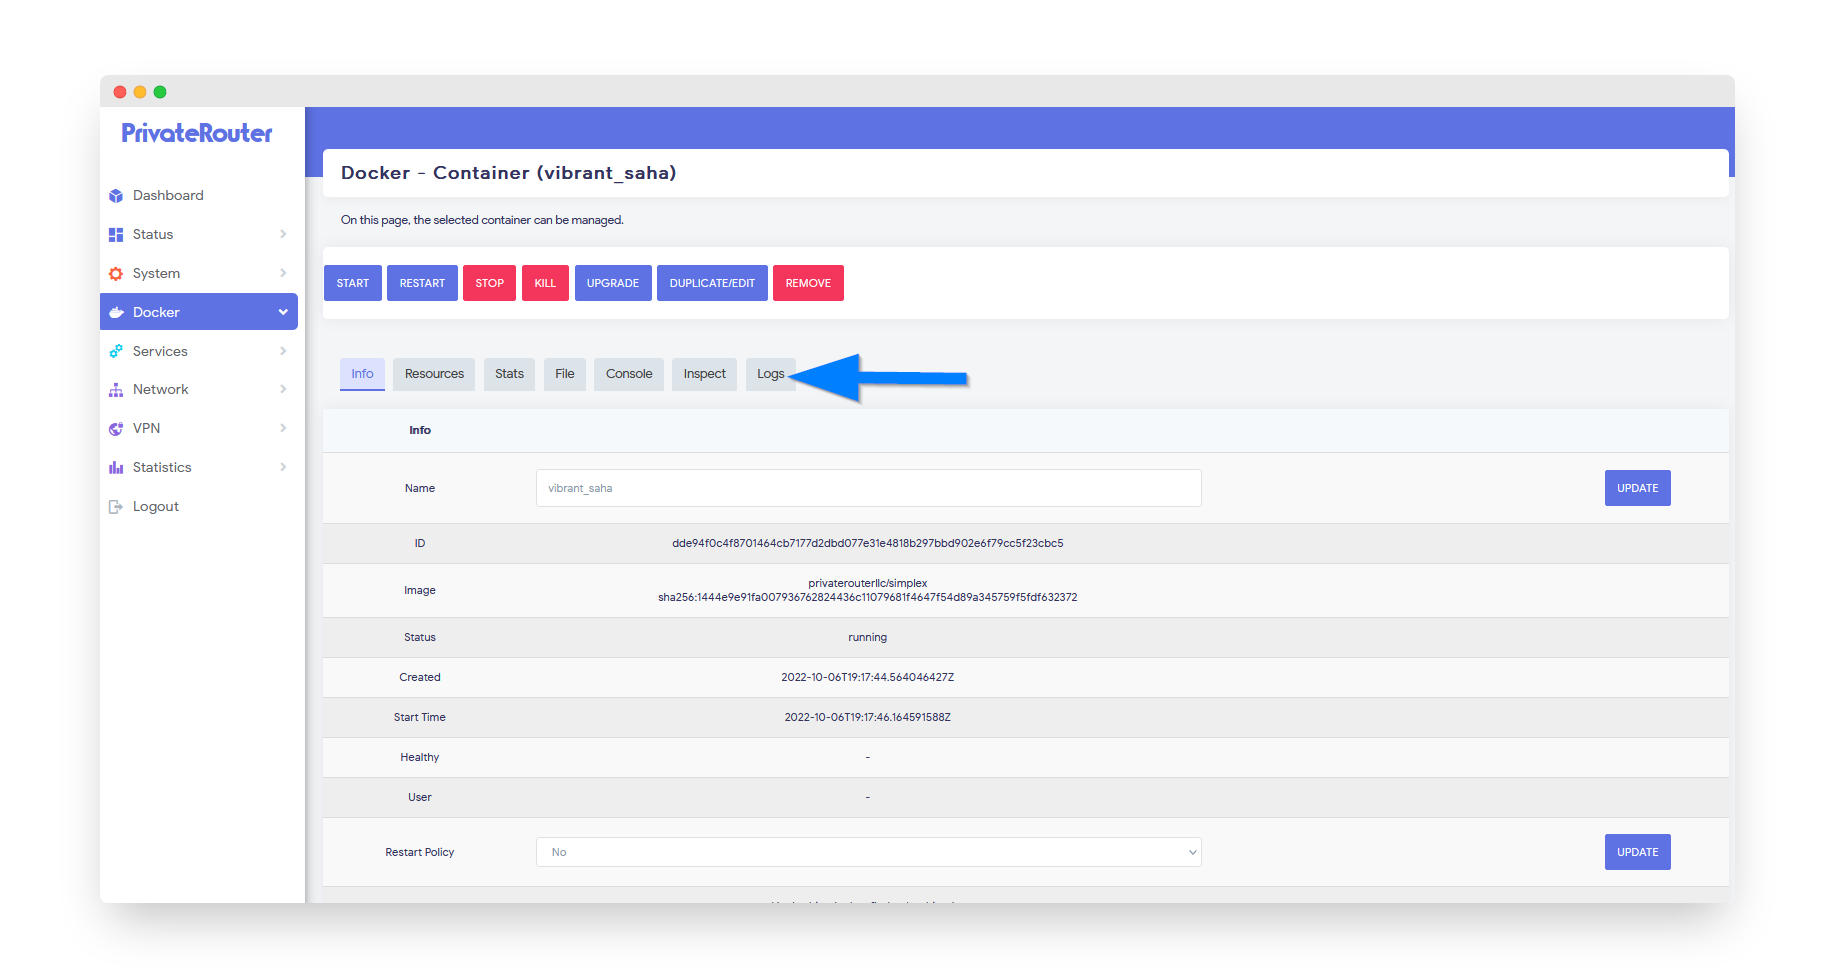
Wait a few moments for the install to finish, then click the Docker menu and select Containers. Click the edit button next to the newly installed SimpleX container.
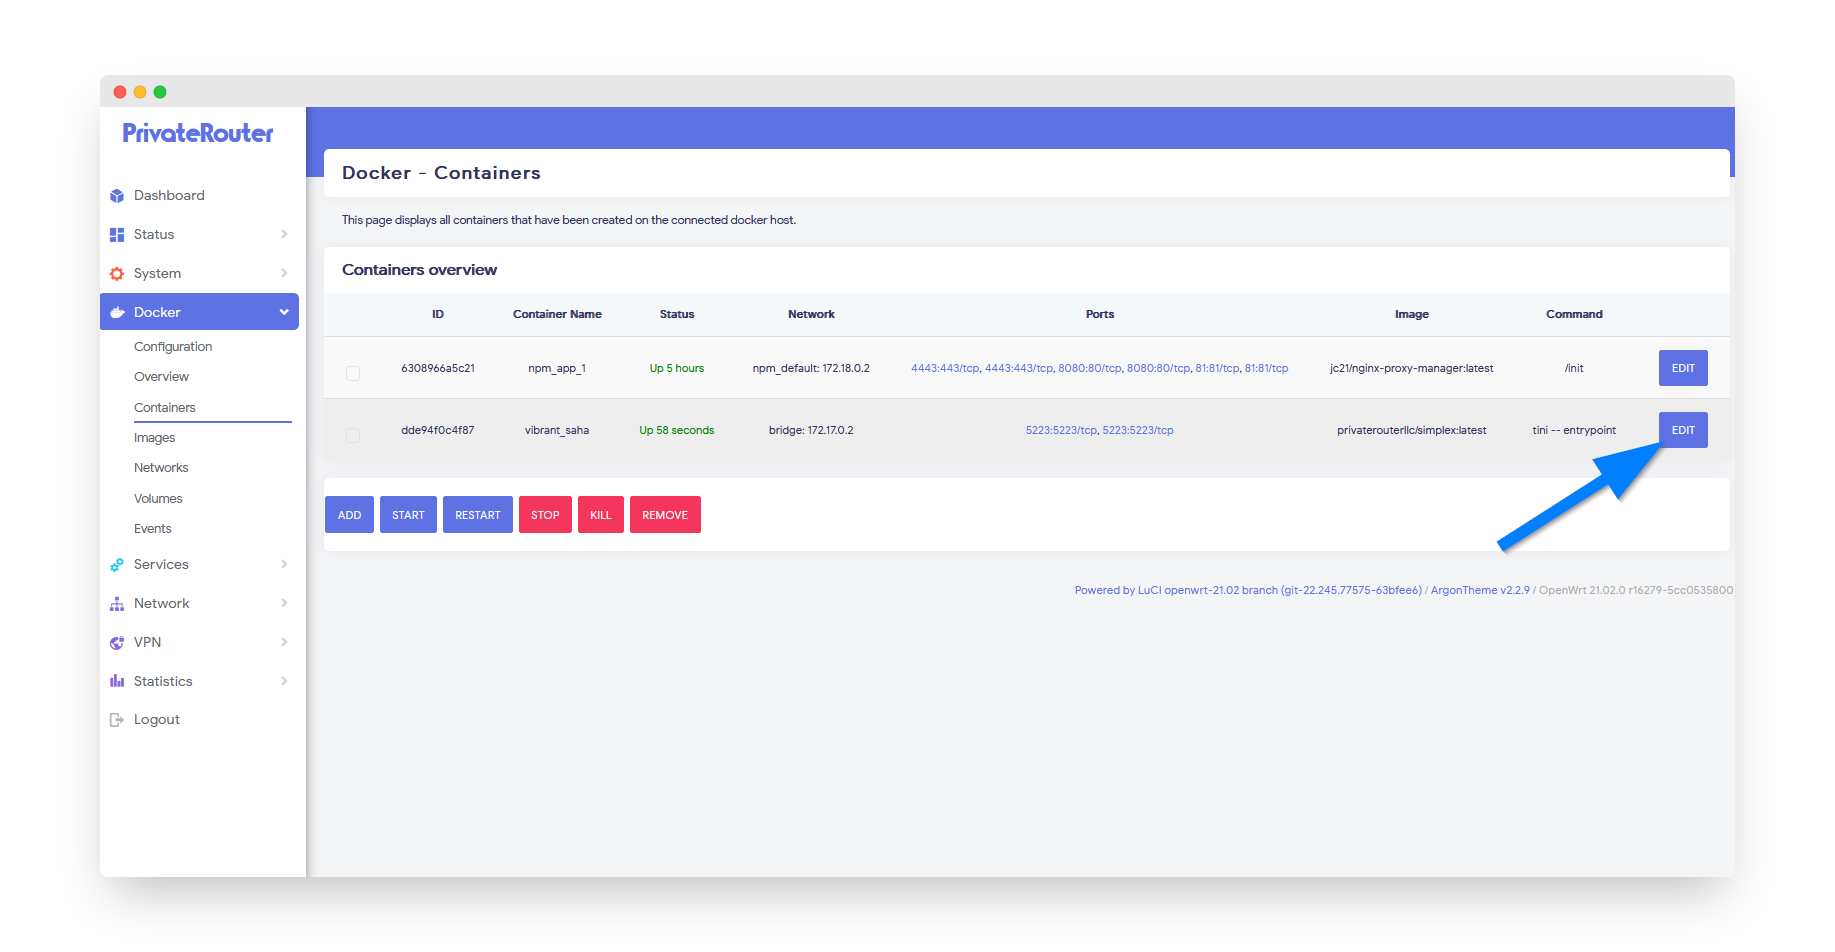
Click the Logs tab so we can obtain your SimpleX SMP server fingerprint:
Locate the Fingerprint value and copy this into a text editor for the next step.
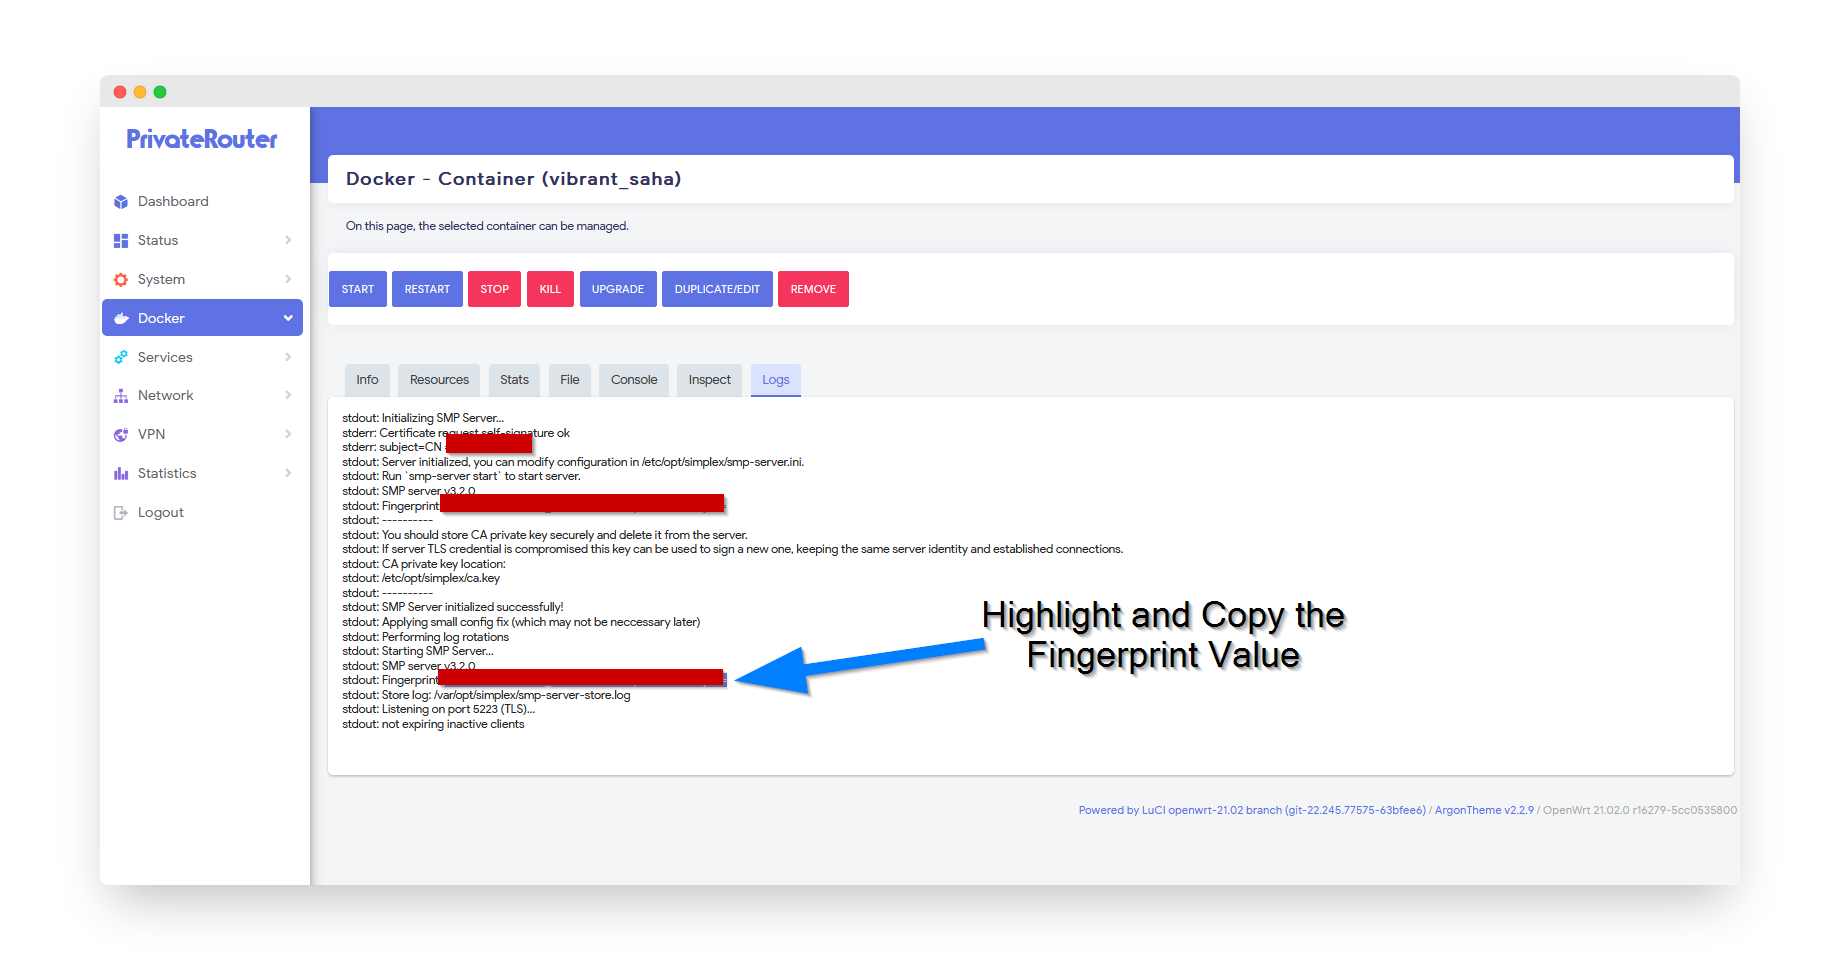
🔒 Security Alert: Keep this fingerprint private! It's the cryptographic identity of your server. Anyone with this fingerprint can connect to your server.
Step 5: Construct Your SMP Server Address
Take the Fingerprint value from the last step and your Private VPN Cloud IP from step 1 to construct your SimpleX SMP Server address. Paste both values in a text editor EXACTLY as shown in the format below:
smp://PASTE_YOUR_ENTIRE_FINGERPRINT_VALUE_HERE@YOUR_PRIVATE_VPN_IP
Example format:
smp://[email protected]
This is your SMP server address that we will add into the SimpleX app in the last step. Make note of it and keep it secure and private.
Step 6: Configure Port Forwarding
Log into the TorGuard.net member's area and go to the services area to access your Private VPN Cloud dashboard. We need to forward the internal/external SMP ports on the WireGuard config that your PrivateRouter is running.
Click the Add New Port Forward option. Configure as follows:
- Rule Name: SimpleX
- Device IP: Select the same device IP for your PrivateRouter WireGuard config
- Internal Port: 5223
- External Port: 5223
- Protocol: TCP
Click the Add button.
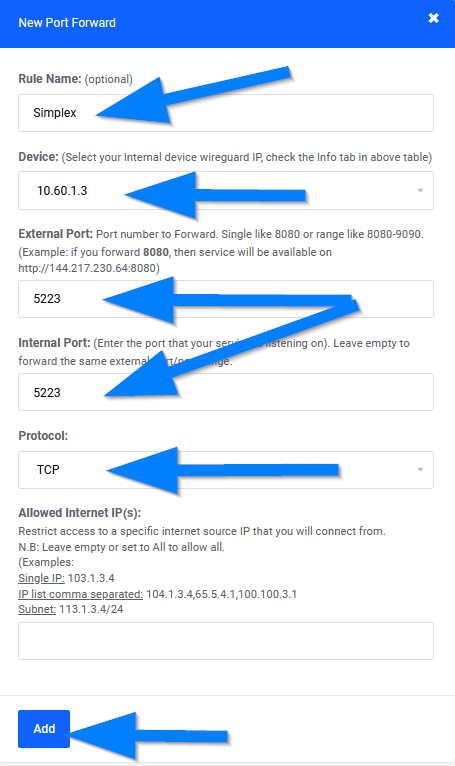
💡 Port Information: SimpleX SMP uses port 5223 for client connections. This port must be accessible from the internet for your server to work.
Step 7: Configure SimpleX Chat App
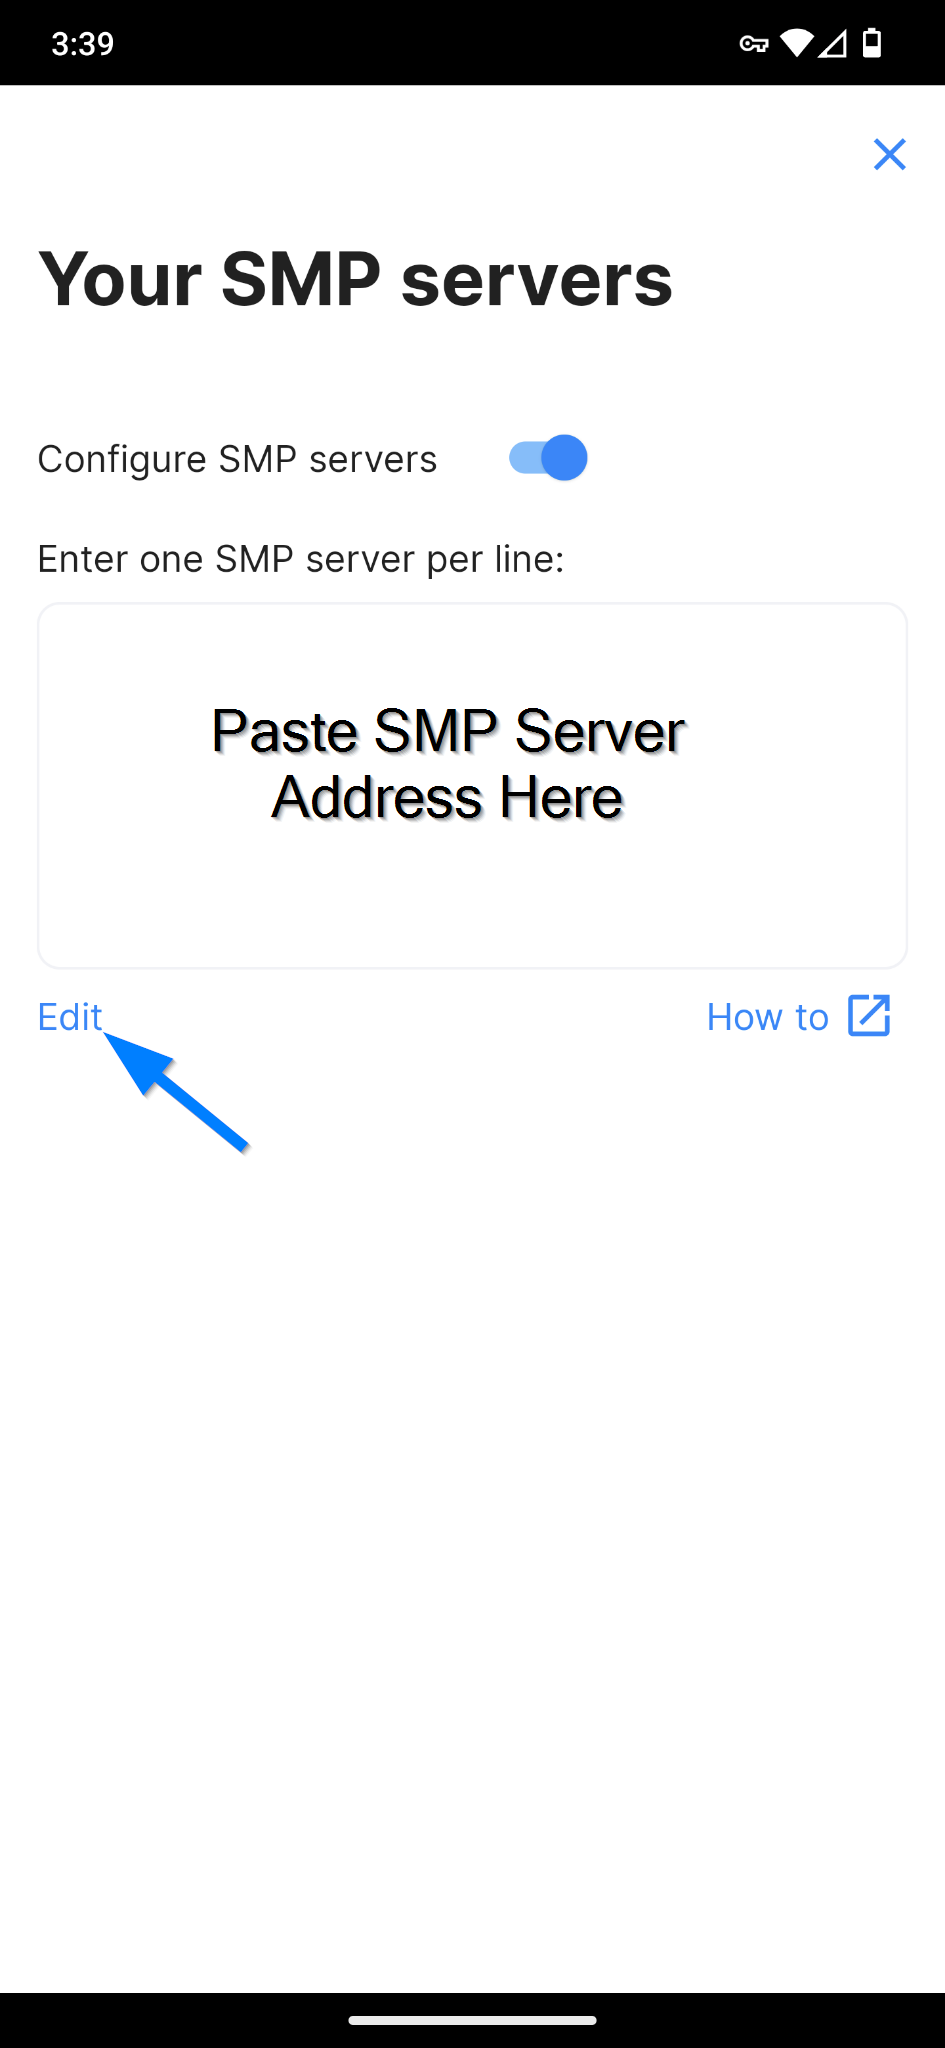
Finally, paste your entire SMP server address from step five into the SMP settings in the SimpleX mobile app:
- Open SimpleX Chat app
- Go to Settings
- Navigate to Network & Servers
- Select SMP Servers
- Switch on Configure SMP servers option
- Tap edit and paste your entire SMP server address
smp://PASTE_YOUR_ENTIRE_FINGERPRINT_VALUE_HERE@YOUR_PRIVATE_VPN_IP
Security Best Practices
🔐 Server Fingerprint
- Never share your server fingerprint publicly
- Only share with trusted contacts
- Store securely offline
- Regenerate if compromised
🛡️ Access Control
- Use firewall rules to limit access
- Consider IP whitelisting
- Monitor connection logs
- Regular security updates
📊 Server Monitoring
- Check Docker logs regularly
- Monitor resource usage
- Set up alerts for failures
- Backup server config
🔄 Maintenance
- Update SimpleX server regularly
- Restart container periodically
- Clean old logs
- Test connectivity frequently
SimpleX SMP Server Features
Why SimpleX is Different
| Feature | SimpleX | Signal | Telegram | |
|---|---|---|---|---|
| No Phone Number | ✅ | ❌ | ❌ | ❌ |
| No User IDs | ✅ | ❌ | ❌ | ❌ |
| Self-Hostable | ✅ | ❌ | ❌ | ❌ |
| Metadata Private | ✅ | ⚠️ | ❌ | ❌ |
| Quantum Resistant | ✅ | ❌ | ❌ | ❌ |
Troubleshooting Common Issues
Cannot Connect to Server
Solution:
- Verify port 5223 is forwarded correctly
- Check Docker container is running:
docker ps | grep simplex - Ensure VPN IP is correct in server config
- Test connectivity:
telnet YOUR_VPN_IP 5223 - Check firewall rules on router
Server Fingerprint Not Showing
Solution:
- Wait 30 seconds after container starts
- Refresh Docker logs page
- Check container logs:
docker logs simplex-smp - Restart container if needed:
docker restart simplex-smp
Messages Not Delivering
Solution:
- Ensure both users are using the same SMP server
- Check server is not overloaded
- Verify network connectivity is stable
- Try reconnecting in SimpleX app
- Check server resource usage
Useful Docker Commands
# View SimpleX SMP logs
docker logs -f simplex-smp

# Restart SimpleX container
docker restart simplex-smp

# Check container status
docker ps | grep simplex

# View resource usage
docker stats simplex-smp

# Access container shell
docker exec -it simplex-smp /bin/bash

# Update SimpleX to latest version
docker pull simplexchat/smp:latest
docker stop simplex-smp
docker rm simplex-smp
# Then re-run installation command

# Backup SimpleX data
docker cp simplex-smp:/etc/opt/simplex-smp ./simplex-backup
Advanced Configuration
Multiple SMP Servers
You can run multiple SMP servers on different ports for redundancy:
- Use different port mappings (5224, 5225, etc.)
- Create separate containers with unique names
- Configure each with different fingerprints
- Load balance between servers in SimpleX app
Custom Server Configuration
Advanced users can customize server behavior:
# Custom storage quota per user
-q 100mb

# Custom message retention
-r 7d

# Enable debug logging
-l debug
Summary
You've successfully deployed your own SimpleX SMP server on PrivateRouter! This provides you with:
- ✅ Complete messaging infrastructure control
- ✅ Enhanced privacy with no user identifiers
- ✅ Quantum-resistant encryption
- ✅ Metadata privacy protection
- ✅ Independent from centralized services