Did you know that your old laptop, PC, or Intel NUC can transform into a VPN WiFi router that just happens to be capable of self-hosting private websites? In this tutorial, we'll show you how easy it is to install PrivateRouter OpenWRT, a powerful WiFi router platform that can run WireGuard, OpenVPN, V2Ray, SSL proxies, SOCKS5, and Docker. All you need is a spare USB drive to get started.
⚠️ Important Disclaimer: Before we begin, make sure there is nothing valuable on the old PC's hard drive that you will use. Any old data will be written over and gone forever.
What is PrivateRouter OpenWRT?
PrivateRouter OpenWRT is a custom router firmware that transforms any x86 computer into a powerful networking appliance with:
VPN Server & Client
Run WireGuard, OpenVPN, V2Ray, and more simultaneously
WiFi Hotspot
Create secure WiFi networks with enterprise features
Docker Support
Self-host web apps, media servers, and services
Enterprise Features
VLANs, QoS, firewall rules, and advanced routing
🚀 Why Transform Your PC into a Router?
- Repurpose old hardware instead of buying expensive routers
- More powerful CPU and RAM than consumer routers
- Run multiple VPN protocols simultaneously
- Self-host private cloud services with Docker
- Enterprise-grade features for free
- Full control over your network
Hardware Requirements
Minimum Requirements
- x86/x64 PC, laptop, or Intel NUC
- 2GB RAM (4GB+ recommended)
- 8GB storage (32GB+ for Docker apps)
- 1 Ethernet port (2+ recommended)
- USB 2.0 port for installation
Recommended Hardware
- Intel i3/i5 or AMD equivalent
- 8GB+ RAM for heavy Docker use
- 128GB+ SSD for app storage
- 2+ Gigabit Ethernet ports
- USB 3.0 Ethernet adapter
💡 Popular Hardware Choices:
- Intel NUC: Compact, low power, perfect for home use
- Old Laptops: Built-in battery UPS, WiFi card included
- Mini PCs: HP/Dell/Lenovo thin clients work great
- Desktop PCs: Most powerful, supports multiple NICs
📶 WiFi Support: If your PC has a compatible WiFi card, it can create access points. Otherwise, use existing WiFi router in AP mode.
PrivateRouter vs Consumer Routers
| Feature | PrivateRouter OpenWRT | Consumer Router | Enterprise Router |
|---|---|---|---|
| Cost | ✅ Free (reuse old PC) | 💰 $50-500 | 💸 $500-5000+ |
| CPU Power | ✅ Full x86 CPU | ⚠️ Limited ARM/MIPS | ✅ Powerful |
| RAM | ✅ 2-32GB+ | ❌ 128MB-1GB | ✅ 2-8GB |
| VPN Performance | ✅ 500+ Mbps | ⚠️ 50-200 Mbps | ✅ 1+ Gbps |
| Docker Support | ✅ Full support | ❌ None | ⚠️ Limited |
| Customization | ✅ Unlimited | ⚠️ Limited | ✅ High |
Installation Guide
Step 1: Prepare the USB Installer
To make this as painless as possible, we created a bootable Linux Mint USB image with everything you need pre-installed.
- Download our custom Linux Mint image (4GB torrent file)
- Download balenaEtcher - compatible with Windows, macOS, and Linux
- Start balenaEtcher and click Flash from file
- Select the Linux Mint image you downloaded
- Insert USB drive and click Select target
- Double-check you selected the USB drive, not your main hard drive!
- Click Flash and wait for completion
💾 USB Requirements: Any USB drive 4GB or larger will work. USB 3.0 recommended for faster installation.
Step 2: Boot Your Old PC from USB
Configure your PC to boot from the USB installer:
- Power off the PC and insert the USB drive
- Power on and immediately press ESC, F12, or DEL to enter BIOS
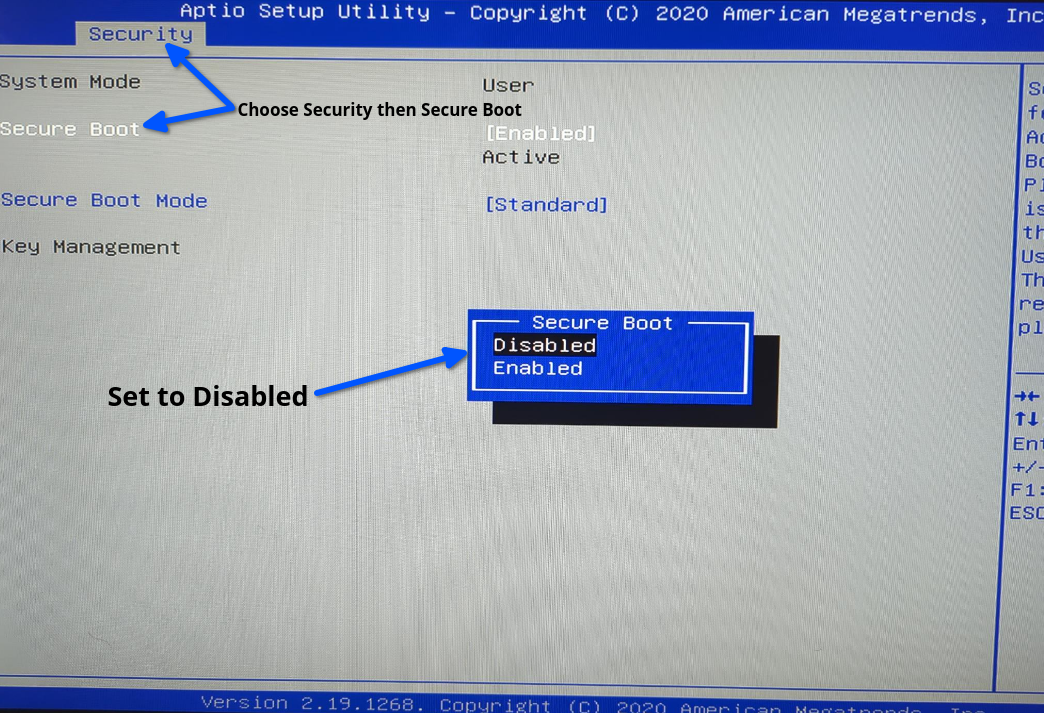
- Navigate to Security tab
- Set Secure Boot to Disabled
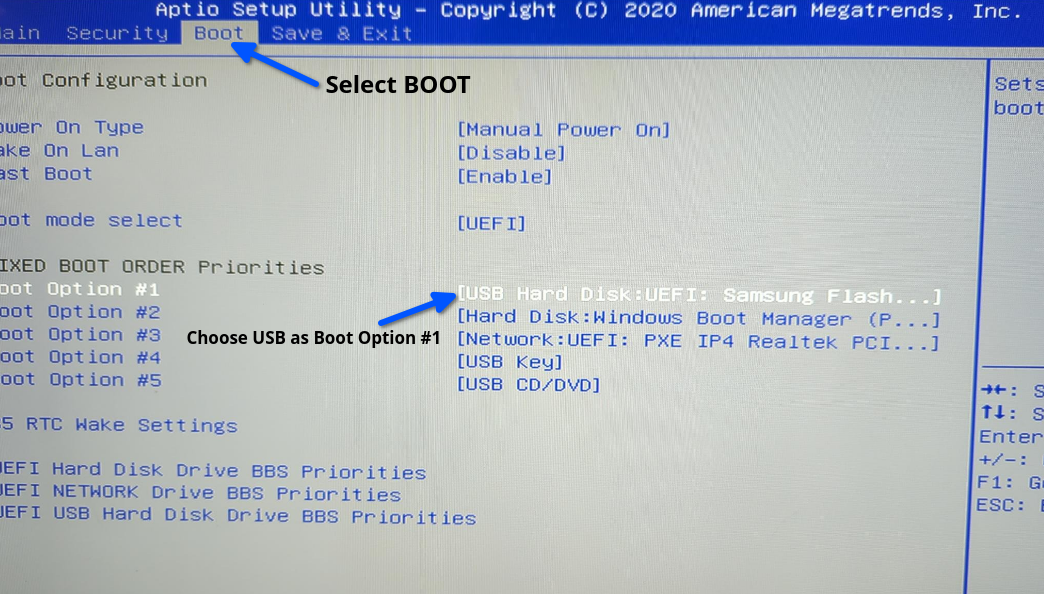
- Go to Boot tab
- Set Boot Option #1 to your USB drive
- Save changes and exit
🔧 BIOS Access Keys: Common keys are ESC, DEL, F2, F10, or F12. Check your PC's manual if unsure.
Step 3: Boot into Linux Mint
Your PC should now boot from USB. When you see the boot menu, press ENTER key four times to proceed to Linux Mint Desktop.
Step 4: Install PrivateRouter OpenWRT to Hard Drive
Now we'll install OpenWRT to your PC's hard drive:
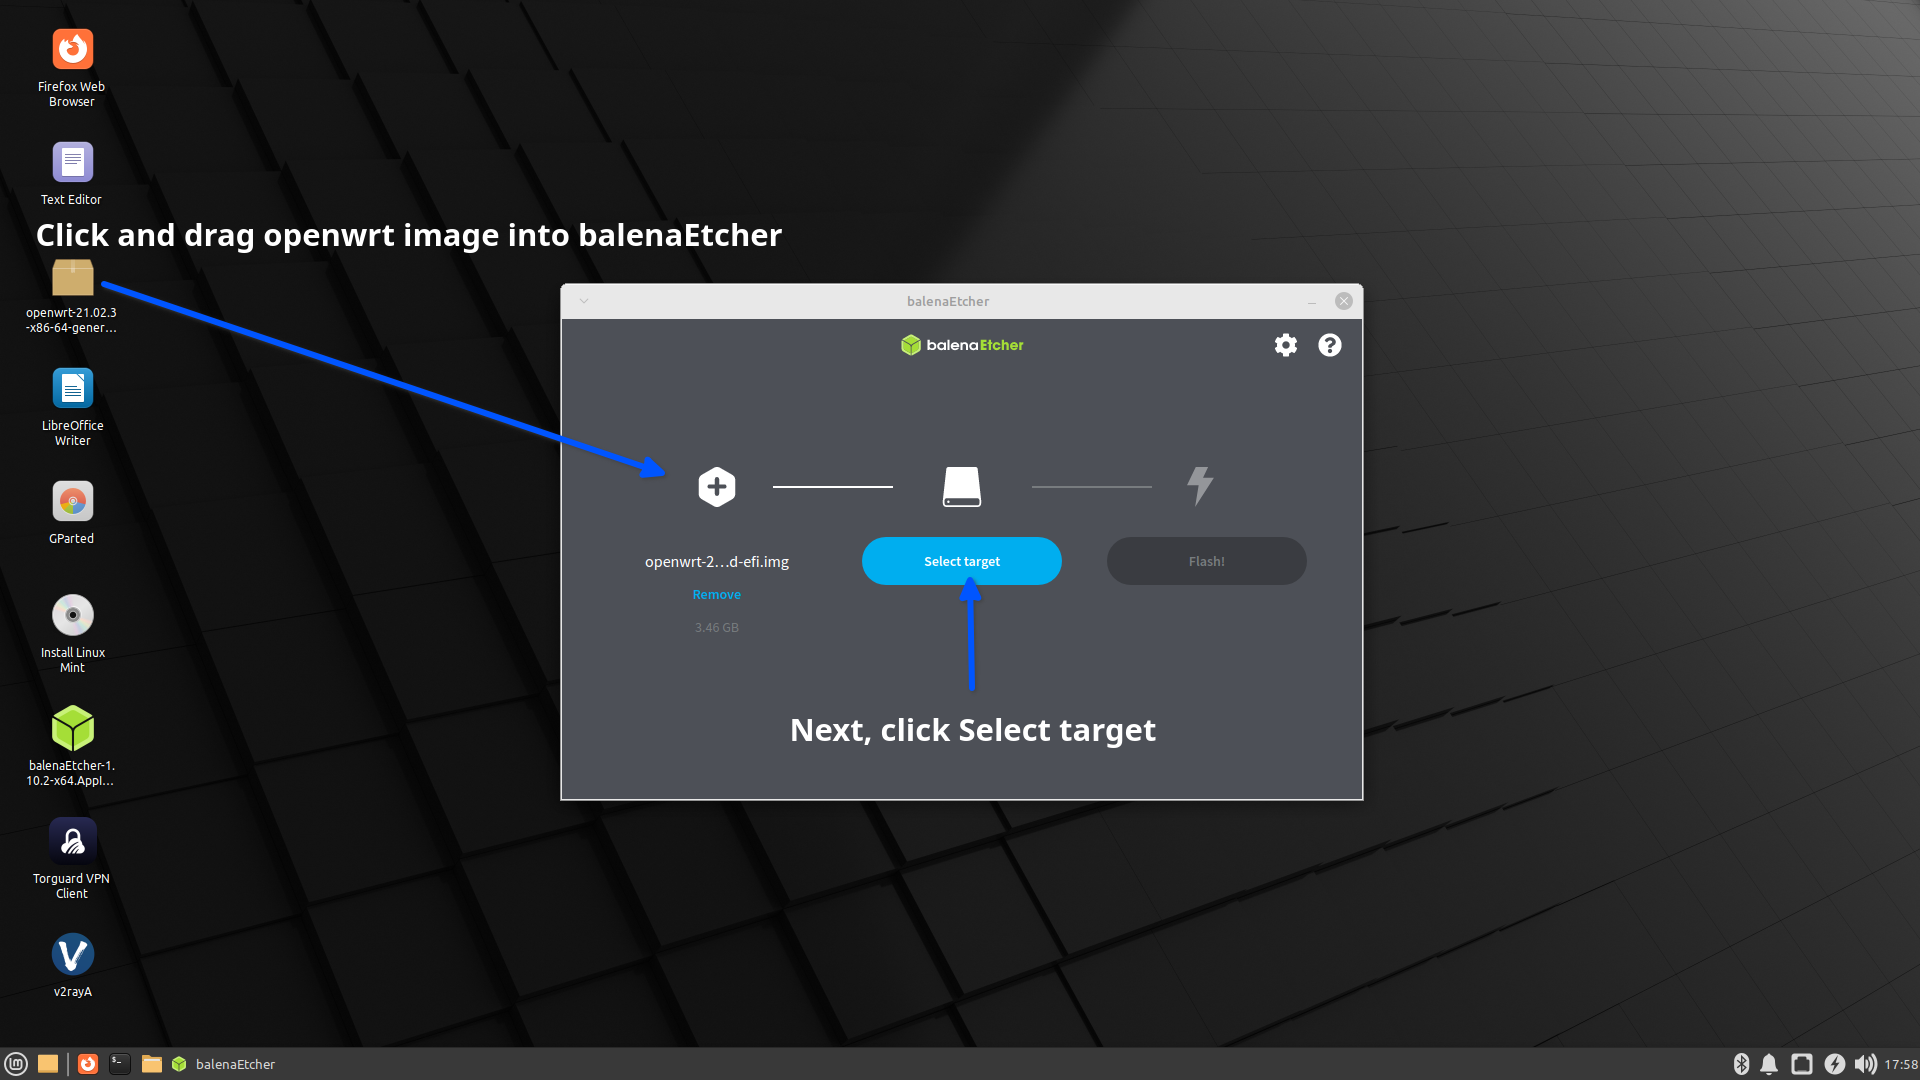
- On the Linux Mint desktop, double-click balenaEtcher
- Drag the OpenWRT image file into balenaEtcher window
- Click Select target
- Click "Show hidden" to see system drives
- Select your system drive (usually /dev/sda)
- Click Flash to begin installation
- Confirm by clicking Yes, I'm sure

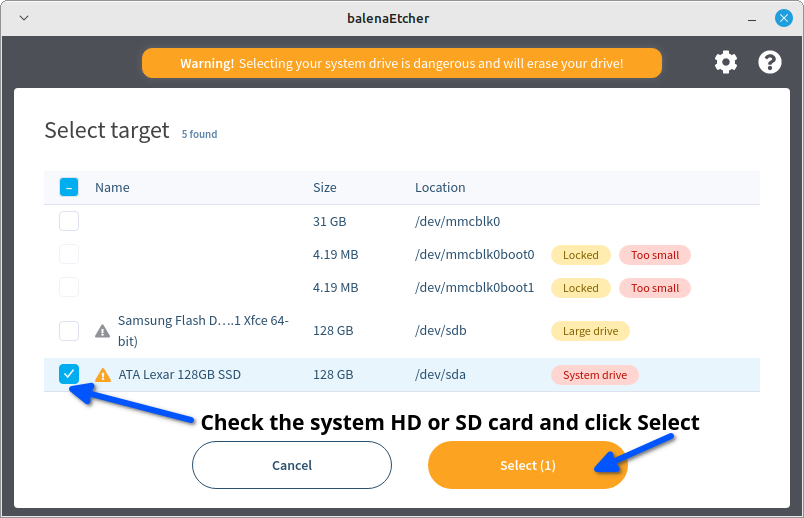
⚠️ Data Loss Warning: This will erase ALL data on the selected drive. Make sure you've backed up anything important!
Step 5: Create Docker Partition
After installing OpenWRT, we need to create a partition for Docker containers:
- Close balenaEtcher after completion
- Double-click GParted icon on desktop
- Select your system drive (/dev/sda) from dropdown
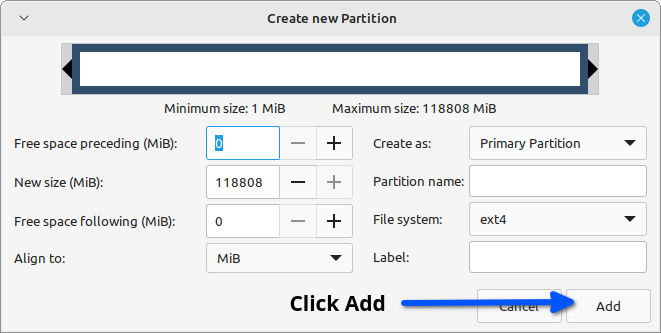
- Right-click the unallocated space
- Click New
- Keep ext4 format and click Add
- Click the checkmark to apply changes
- Shutdown PC and remove USB drive

Step 6: First Boot Configuration
🌐 Internet Required: Connect an Ethernet cable with internet access before first boot. OpenWRT will download drivers and updates.
Boot into PrivateRouter OpenWRT:
- Connect Ethernet cable with internet access
- Power on the PC
- Wait 5 minutes for automatic updates
- Reboot when updates complete
- Connect another PC via Ethernet
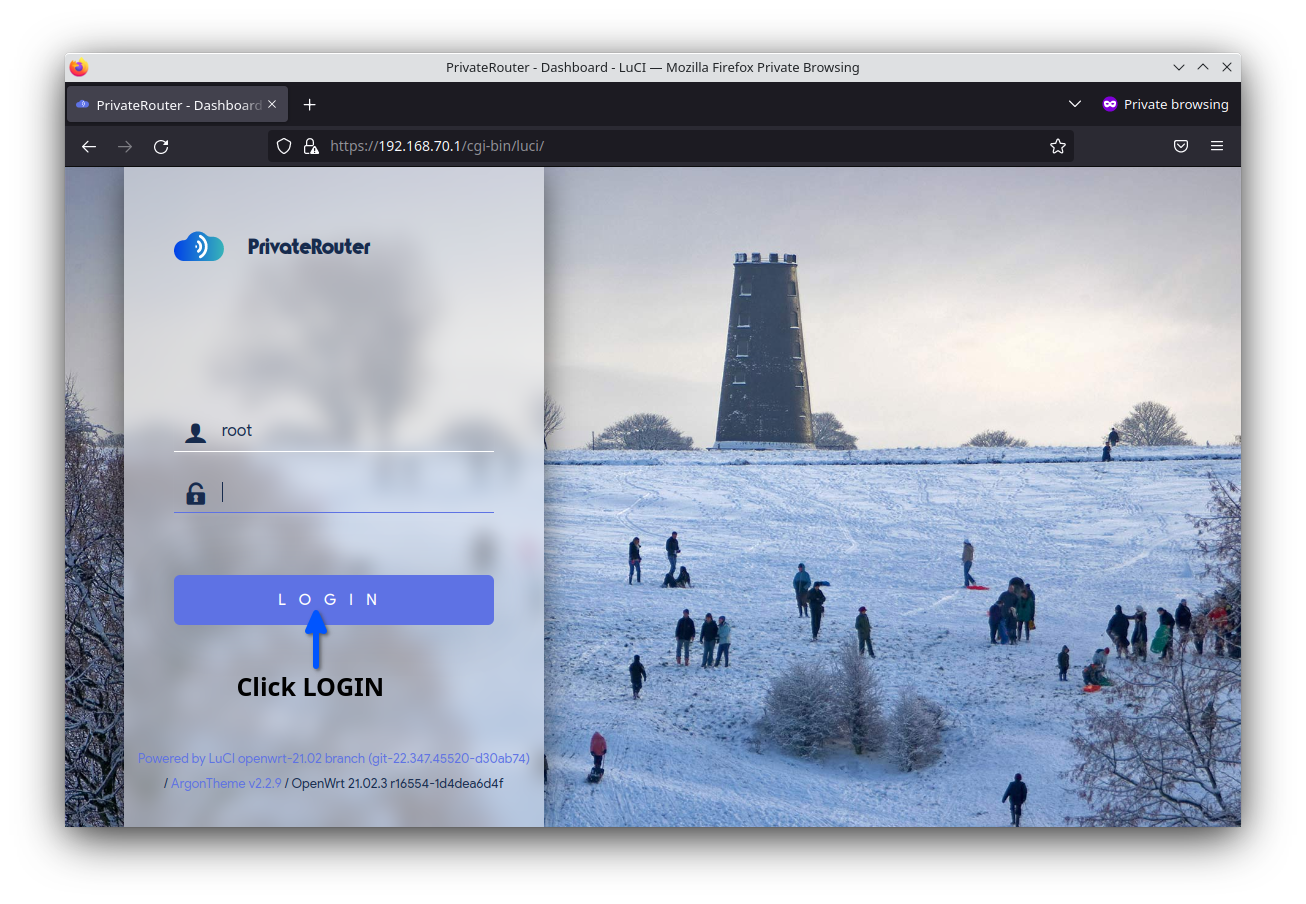
- Access http://192.168.70.1 in browser
- Click Login (no password required initially)
📡 Network Adapters: If your PC has only one Ethernet port, use a USB Ethernet adapter. The UGREEN USB 3.0 adapter has built-in driver support.
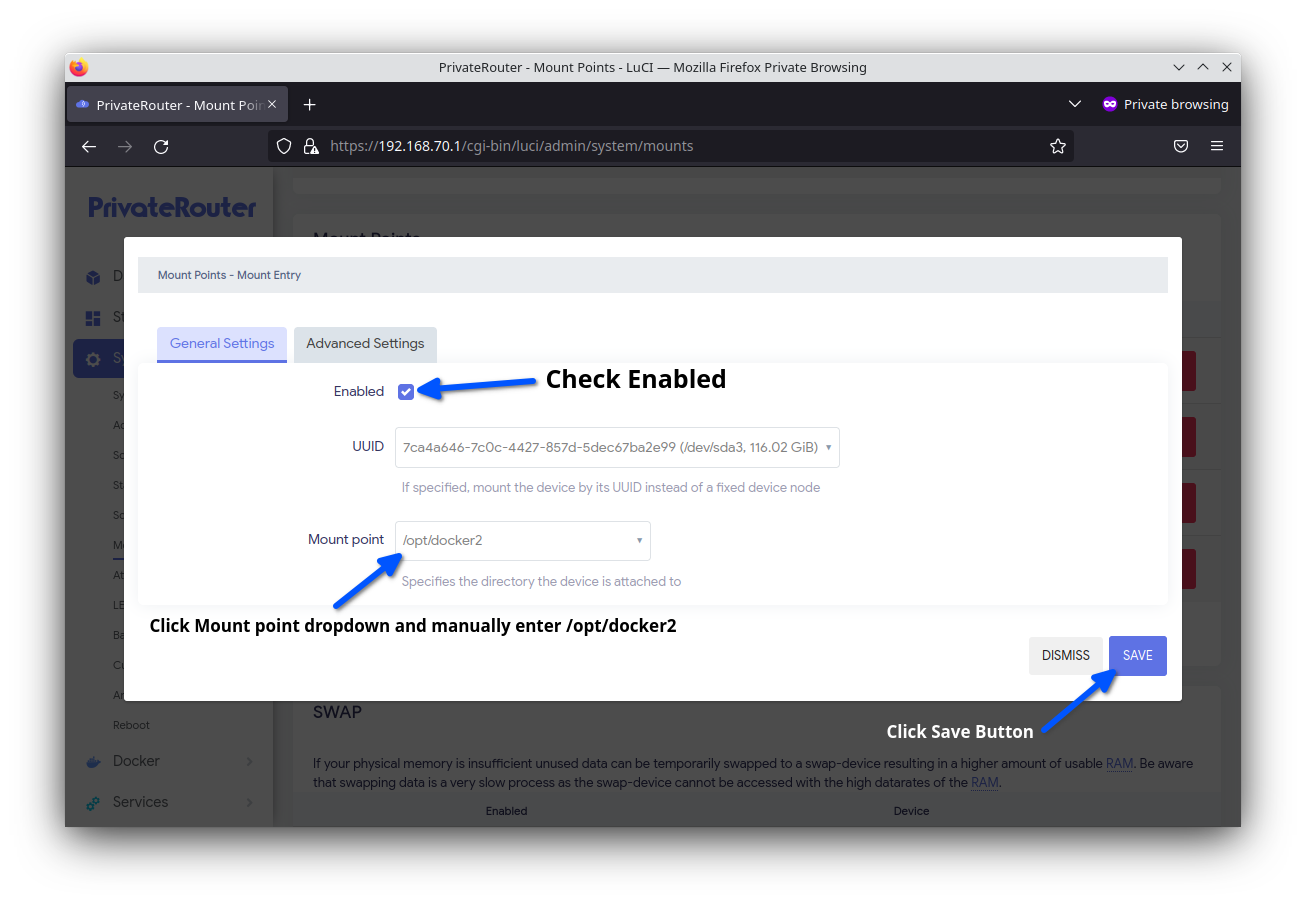
Step 7: Configure Docker Storage
Mount the Docker partition we created earlier:
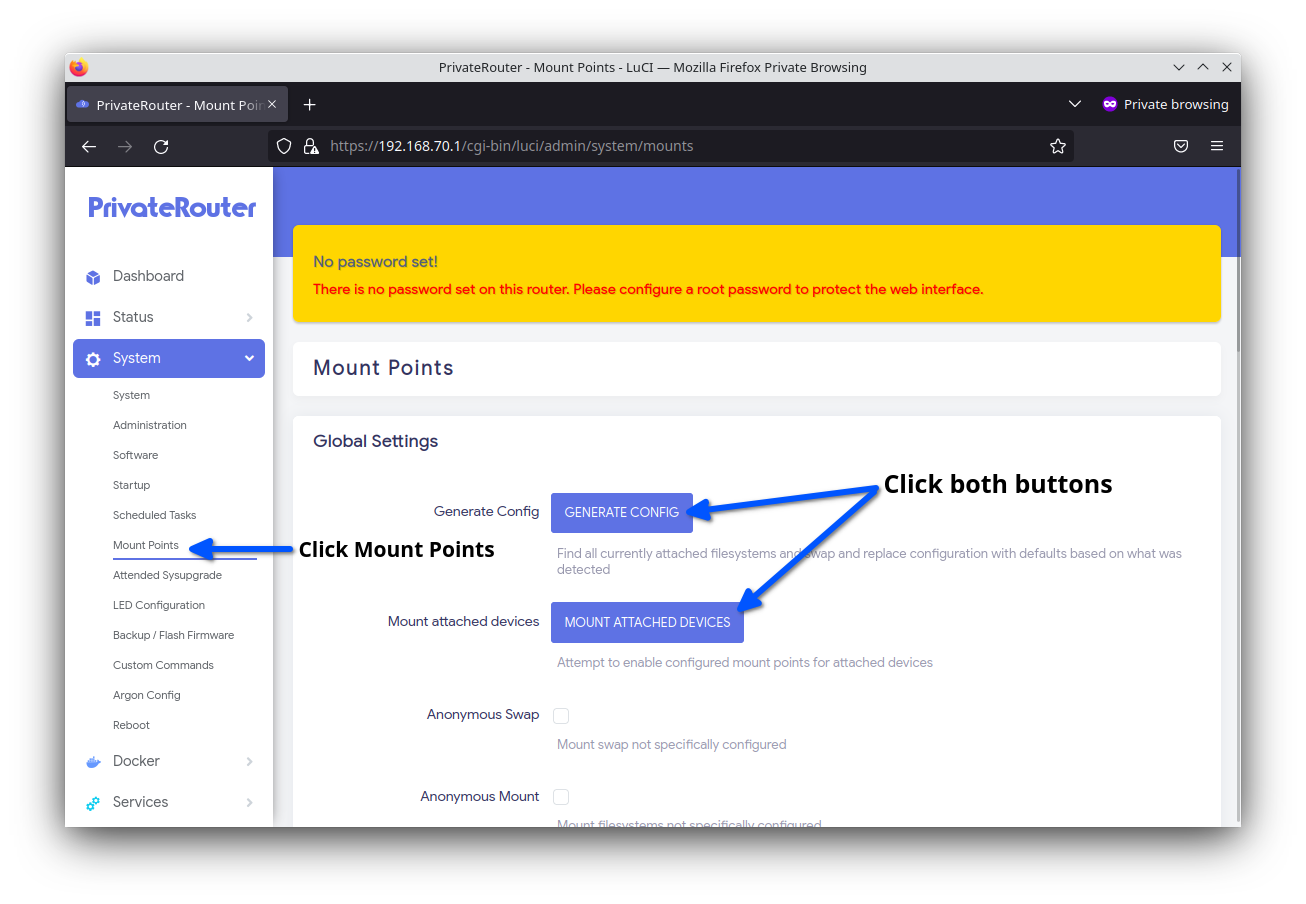
- Click System tab
- Select Mount Points
- Click GENERATE CONFIG
- Click MOUNT ATTACHED DEVICES
- Find /dev/sda3 and click EDIT
- Check Enabled
- Enter mount point: /opt/docker2
- Click Save
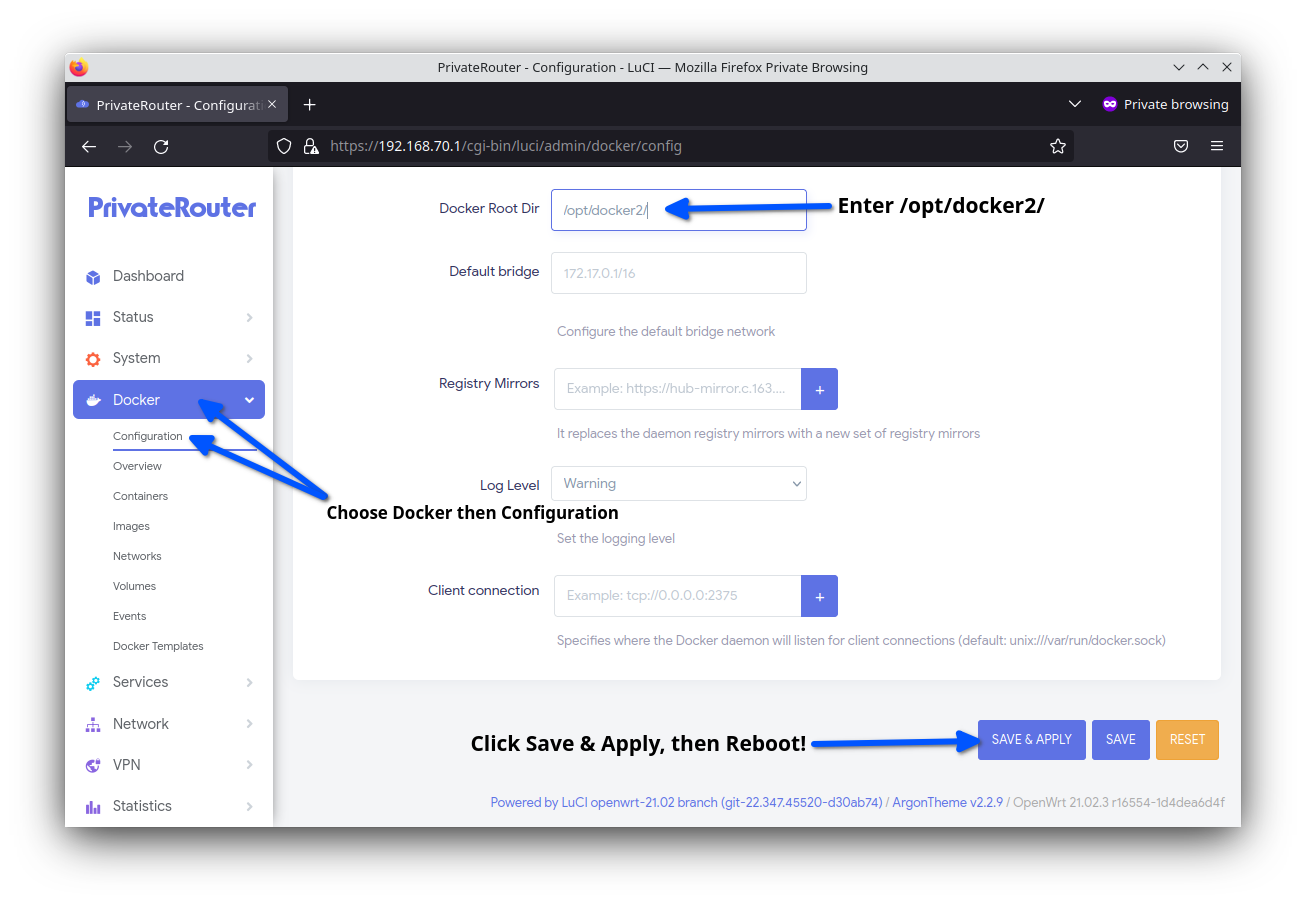
Configure Docker to use the new partition:
- Click Docker tab
- Select Configuration
- Set Docker Root Dir: /opt/docker2/
- Click Save & Apply
- Reboot to complete setup
Self-Hosting with Docker
With Docker configured, you can now self-host various applications:
🌐 Web Services
- Nginx Proxy Manager
- WordPress sites
- Wiki.js documentation
- Ghost blogging
☁️ Cloud Storage
- Nextcloud
- FileBrowser
- Syncthing
- Seafile
🎬 Media Servers
- Jellyfin
- Plex
- Emby
- Airsonic
🔒 Security Apps
- Bitwarden
- AdGuard Home
- WireGuard
- OpenVPN
VPN Configuration
PrivateRouter OpenWRT supports multiple VPN protocols simultaneously:
WireGuard
- Fastest protocol
- Low CPU usage
- Simple configuration
- Mobile-friendly
OpenVPN
- Most compatible
- TCP/UDP support
- Advanced features
- Enterprise standard
V2Ray/Xray
- Stealth protocols
- Bypass censorship
- Multiple transports
- Advanced routing
Shadowsocks
- Lightweight proxy
- Fast performance
- Mobile optimized
- Simple setup
Network Configuration Options
🔧 Basic Setup
- LAN IP: 192.168.70.1
- DHCP server enabled
- DNS forwarding
- Basic firewall rules
📡 WiFi Options
- Create access points
- Guest networks
- WiFi client mode
- WiFi repeater mode
🌐 Advanced Features
- VLANs for segmentation
- QoS traffic shaping
- Dynamic DNS
- Port forwarding
🛡️ Security Features
- Firewall zones
- Intrusion detection
- Ad blocking
- Access control
Troubleshooting Common Issues
Cannot Access 192.168.70.1
Solution:
- Ensure Ethernet cable is connected directly to PC
- Disable WiFi on connecting device
- Set network adapter to DHCP/automatic
- Try incognito/private browser mode
- Flush DNS:
ipconfig /flushdns(Windows) - Check if PC obtained IP in 192.168.70.x range
No Internet After First Boot
Solution:
- Verify WAN cable is connected to internet source
- Check WAN interface status in Network → Interfaces
- Ensure WAN is set to DHCP client
- Try static IP if DHCP fails
- Check DNS settings (use 8.8.8.8, 1.1.1.1)
Docker Not Working
Solution:
- Verify partition is mounted at /opt/docker2
- Check Docker service status
- Restart Docker: System → Startup → Docker → Restart
- Check disk space:
df -h - Review Docker logs for errors
WiFi Not Working
Solution:
- Not all WiFi cards are supported
- Check Network → Wireless for detected radios
- Install additional drivers if needed
- Use USB WiFi adapter with Linux support
- Or use existing router as WiFi access point
Performance Optimization
Hardware Tips
- Use SSD for better performance
- Add more RAM for Docker apps
- Use Intel NICs when possible
- Enable CPU frequency scaling
Network Optimization
- Enable hardware flow offloading
- Tune connection tracking limits
- Optimize firewall rules
- Use QoS for traffic prioritization
Security Best Practices
🔐 Access Security
- Set strong admin password immediately
- Enable HTTPS for web interface
- Restrict management access by IP
- Use SSH keys instead of passwords
🛡️ Network Security
- Keep firmware updated regularly
- Configure firewall zones properly
- Isolate IoT devices on separate VLAN
- Enable intrusion detection
Summary
You've successfully transformed your old PC into a powerful VPN router and self-hosting platform! Your new PrivateRouter provides:
- ✅ Enterprise-grade routing capabilities
- ✅ Multiple VPN protocol support
- ✅ Docker containerization for self-hosting
- ✅ Advanced firewall and security features
- ✅ Cost savings vs commercial routers
- ✅ Full control over your network